skip to main |
skip to sidebar
.
 [Click image above to go to full sized image.]This tutorial was written on June 1, 2009, using Paint Shop Pro, version X.03. It should be okay to do with other versions as well. I just find X.03 more comfortable for me. You may download a free trial of Paint Shop Pro, version X2, from Corel. Any similarities between this tut and any others you may see are purely coincidental.
You will also need:
Animation Shop. This is from CNET, so it's a safe download.
A tube of your choice. I'm using the sexy artwork of Dominic Marco. You must have a license to use his work. You can get that license and his art at C.I.L.M..
Scrap kit is by Tina, of Tina's Magical Scrap World. This is a PTU kit, available through Scraps With Attitude. This is a taggers' size kit and is called Vanilla. I think this is a GORGEOUS kit! It's not on sale alone, but Tina is having a "bundle" sale. This kit and her last kit, "Magical Moments" (with which I wrote another tutorial, found here), can be found on sale together at Exquisite Scraps, 20% off the pair!
Filters: No outside filters used in this tutorial!
Font: I used GoodVibrationsROB.
Supplies: Just the cute sparkly butterfly! Again, I don't know from where I got this. So if you recognize it, or know whose it is, let me know and I'll give proper credit!
Also, please, if you have problems with the download link for supplies, drop me a line via e-mail. Leaving a comment without a way for me to contact you back doesn't help. If you e-mail me, I'll send you the supplies.
Another note: I use a program called WinRAR for my compression of files. It has the capacity to save things as and/or open .rar files OR .zip files. I have been saving the supplies within this program, as .zip files. I'm beginning to use a .rar file for compression. I want to see if you guys have less problems getting supplies with this type of file. Wondering if, because the program is called WinRAR, maybe making .zip files with it is screwing people up? You can find WinRAR free at CNET Downloads. I hope this helps! I think I'll be doing this, and keeping this paragraph in as a boilerplate, while I see if it fixes the problem. *Fingers crossed!*
Okay let's do it! My mojo seems to be working today! Three already! I guess I'm trying to make up for lost time....
Open your butterfly .gif and put where it will be handy for you when you're in Animation Shop.
Open a new image, 700 x 700, white.
Open scallopedcircle1. Copy and paste as a new layer. Drop shadow.
Open ribbonframe2. Copy and paste as a new layer. Resize 90%. Do not drop shadow! lol.
Add your tube. Resize, position and drop shadow to your taste.
Highlight your frame layer. Grab your magic wand and click inside the frame.
Selections > Modify > Expand by 1. Selections > Invert.
Highlight your tube layer. Get your eraser brush and erase any part of your tube that overlaps the bottom of the frame, and that you don't want there. (I left a bit of one of my tube's hands. To do this, Selections > Select none, then grab your lasso tool set at point-to-point and zoom in to draw a careful selection around the part you want to show. Hit delete.) Selections > Select none.
Open satinflower2. Resize 25%. Copy and paste as a new layer. Position on the top right corner of your frame. Duplicate this layer and Image > Mirror. Using your move tool, move the duplicate into place on the top left corner of the frame. Merge these two layers down and duplicate. Image > Flip. Move these flowers into place. Merge those two layers down. Drop shadow your little flower buds.
Open flowerbranch2. Resize 85%. Copy and paste as a new layer. Rotate 77° left. Drag this layer below the satinflower layer. Position your flowerbranch to the right side of the frame, sort of under the satinflowers. See my tag for placement reference. Duplicate this layer. Image > Mirror. Position this where you'd like it on the left side of the frame. Merge these two layers down. Drop shadow.
Drop shadow your frame.
Highlight your scallopedcircle layer.
Open leafbranch4. Resize 75%. Copy and paste as a new layer. Position this to the left side of the frame. Duplicate this layer and Image > Mirror. Merge these two layers down and drop shadow.
Go back to the top layer and add your name. I used color #de96ad for the fill and color #fffce7 for the stroke, stroke set at 1.5.
Drop shadow your name.
Add your copyright, license information if applicable, and taggers'/watermark.
Resize your tag to the size with which you're most comfortable.
If you're NOT going to animate, you can just merge and save. You're done!
A N I M A T I O N
Edit > Copy merged
Open Animation Shop, right-click on the desktop area, and paste as a new animation.
Duplicate this frame until you have 20 frames. Move the slider on the bottom of the animation to the first frame.
Open the pinkbutterflysparkle in Animation Shop. Edit > Select All. Edit > Copy.
Move back to the tag you made and Edit > Select All. Edit > Paste Into Selected Frame.
Position where you'd like the butterfly to be, then release mouse button.
View > Animation. And, we're done! I hope you've enjoyed this tutorial! Thanks for trying my tut!!
.
.
 [Click image above to go to full sized image.]This tutorial was written on June 1, 2009, using Paint Shop Pro, version X.03. It should be okay to do with other versions as well. I just find X.03 more comfortable for me. You may download a free trial of Paint Shop Pro, version X2, from Corel. Any similarities between this tut and any others you may see are purely coincidental.
You will also need:
Animation Shop. This is from CNET, so it's a safe download.
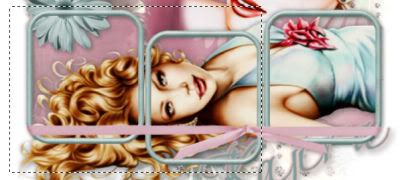
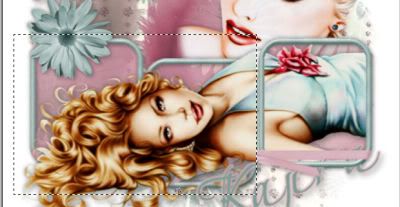
A tube (or two) of your choice. I'm using the beautiful artwork of Jennifer Janesko. You must have a license to use her artwork. You can get that license and her art at C.I.L.M..
Scrap kit is by Teresa, who participates at the Creative Misfits Creations blog. This is a part of another challenge "scrap train" they've done. I'm using the portion that was done by by Teresa. It's the seventh kit down on the page. These are all free, everyone! Leave lots of love for these wonderful things Yvette and Missy are doing for us!!
Filters: dsb Flux > Bright Noise, Eye Candy 4000 > Gradient Glow
Font: I used Beau Rivage Two.
Supplies: The mask, which is by Ali, of Designs by Ali. I couldn't find THIS mask on THIS site (she's switched her site), but the mask is clearly marked that it's by her, so... there you go! And thank you, Ali!!
Also, please, if you have problems with the download link for supplies, drop me a line via e-mail. Leaving a comment without a way for me to contact you back doesn't help. If you e-mail me, I'll send you the supplies.
Okay let's do it! My mojo's seems to be working today! Yay!!
Open a new image, 750 x 700, white.
Open frame1. Copy and paste as a new layer. Resize 90%. Position as you like.
If you're doing a similar look to mine, and using a tube of a person laying down, this is what I did.
Add your tube. Resize, position and drop shadow as you like. This layer should be on top of the frame layer.
Duplicate the frame layer, and drag it in the layer palette until it's on top of the tube layer.
Grab your selection tool, set on rectangle, and draw a rectangle around the area on the top frame that you don't want to show.
Now, making sure you're on the COPY of the frame layer, hit delete.
Selections > Select none.
Now, highlight your white background layer.
Open paper 16. Copy and paste as a new layer. Position as you like it behind your tube and frame.
Highlight the bottom frame layer.
Grab your magic wand and click inside the three portions of the bottom frame. Selections > Modify > Expand by 5. Selections > Invert.
Highlight your paper 16 layer. Hit delete. Selections > Select none.
Drop shadow your bottom frame layer.
Add your second tube. Drag this tube layer below all your other layers. Resize, position and drop shadow to your taste.
Grab your lasso tool, set on "freehand," feather at 17. Draw partial curves around the sharp edges of the second tube if yours has them. Hit delete. Selections > Select none. Do this all around the sharp edges.
Open feather 2. Copy and paste as a new layer. Drag this layer below your second tube layer. Position and drop shadow.
Open feather 1. Mirror this feather. Copy and paste as a new layer. Drag this layer below your other feather layer. Position and drop shadow.
Highlight your white background again.
Open paper 17. Resize to 750 x 750 pixels. Copy and paste as a new layer.
Apply your mask. Delete the mask layer, answer "yes" to the pop-up question, and merge group.
Open the sparkly pink overlay. Resize to 750 x 750 pixels. Copy and paste as a new layer.
Again, apply your mask. Delete the mask layer, answer "yes" to the pop-up question, and merge group.
Your sparkles should be above the paper mask layer, and below the feathers.
Open flower 2. Resize 65%. Copy and paste as a new layer. Drag this layer above all your others, and position where you'd like it on your tag. Drop shadow your flower.
Go back to the top layer and add your name. I used color #809e99 for the fill and stroke, stroke set at 1.5.
I then added Eye Candy 4000 > Gradient Glow set at 5 - 0 - 100, color #e1babe.
Drop shadow your name.
Add your copyright, license information if applicable, and taggers'/watermark.
Resize your tag to the size with which you're most comfortable.
If you're NOT going to animate, you can just merge and save. You're done!
A N I M A T I O N
Highlight your pink sparkle overlay layer. Duplicate this layer twice, for a total of three pink sparkle overlay layers.
Still on the bottom pink sparkle overlay layer...
Effects > Plugins > dsb Flux > Bright Noise, with intensity set at 50. Click on "mix" once.
Hit okay.
Highlight the middle pink sparkle overlay layer. Again, apply Bright Noise, clicking on "mix" twice.
Hit okay.
Highlight the top pink sparkle overly layer. Apply Bright Noise again, and click "mix" three times.
Hit okay.
Close out the top two pink sparkle overlay layers, leaving the bottom pink sparkle overlay layer open.
Edit > Copy merged
Open Animation Shop, right-click on the desktop area, and paste as a new animation.
Return to PSP. Close out the bottom pink sparkle overlay layer, and open the middle pink sparkle overlay layer.
Edit > Copy merged.
Return to Animation Shop and Edit > Paste > After Current Frame.
Back to PSP. Close out the middle pink sparkle overlay layer, and open the top pink sparkle overlay layer.
Edit > Copy merged.
And, back to Animation Shop. Edit > Paste > After Current Frame.
View > Animation. And, we're done! I hope you've enjoyed this tutorial! Thanks for trying my tut!!
.
.
 [Click image above to go to full sized image.]This tutorial was written on June 1, 2009, using Paint Shop Pro, version X.03. It should be okay to do with other versions as well. I just find X.03 more comfortable for me. You may download a free trial of Paint Shop Pro, version X2, from Corel. Any similarities between this tut and any others you may see are purely coincidental.
You will also need:
Animation Shop. This is from CNET, so it's a safe download.
A tube of your choice. I'm using the great work of Elias Chatzoudis. You must have a license to use his artwork. You can get that license and his art at My PSP Tubes.
Scrap kit is by Clarey, of Clarey's Designz. This is a PTU kit, available through Clarey's Designz Digital Scrapbook Shop, and is called Dear Diary.
Filters: Eye Candy 4000 > HSB Noise
Font: I used 2Peas Fancy Free.
Supplies: The mask. I seem to have collected this mask from various places under various names, so I honestly do not know to whom it should be credited. If it is yours, or you recognize whose it is, please let me know so that I can give proper credit! This mask is in .pspimage format. Those using an earlier version of PSP may not be able to use it. If this is your case, let me know and I'll convert it to .jpg for you and send it to you that way!
Also, please, if you have problems with the download link for supplies, drop me a line via e-mail. Leaving a comment without a way for me to contact you back doesn't help. If you e-mail me, I'll send you the supplies.
Okay let's go! My mojo's been on a vacation of late, and I'm trying to get back into the swing of things, so.... onward!
Open a new image, 700 x 750, white.
Open diary1. Copy and paste as a new layer. Rotate 15° left. Position as you like. Drop shadow.
Open notepaper1. Copy and paste as a new layer. Okay, on this one I began by rotating 5° left, so the lines would be straight to write on.
Choose your font and write what you feel like writing as a diary entry. This can get tricky, dependent upon placement of your text, as there is a "cut out" charm added to this notepaper. I needed to use my lasso tool, set on point-to-point, to select the areas where the text overlapped the charm and delete those areas. I then added a small drop shadow to the text. Merge your text layer down to your notepaper1 layer. Now, rotate 20° right and position. Drop shadow your notepaper.
Add your tube. Resize, position and drop shadow to your taste.
Open glittercluster. Copy and paste as a new layer. Rotate 90° right. I used my pick tool to stretch the sides and top of this glittercluster, so it would show up all over the canvas. Drag this layer down below your diary and notepaper layers.
Open scribbledheart. Copy and paste as a new layer. Resize 135%. This layer should be below the glittercluster layer.
Highlight your white background layer.
Open paper11. Resize to 750 x 750 pixels. Copy and paste as a new layer.
Apply your mask. Delete the mask layer, answer "yes" to the pop-up question, and merge group.
Go back to the top layer and add your name. I used color #903853 for the fill, color #cad5d9 for the stroke, stroke set at 2.5.
Drop shadow your name.
Add your copyright, license information if applicable, and taggers'/watermark.
Resize your tag to the size with which you're most comfortable.
If you're NOT going to animate, you can just merge and save. You're done!
A N I M A T I O N
Highlight your glittercluster layer. Duplicate this layer twice, for a total of three glittercluster layers.
[NOTE: When I was done with this tag, I thought perhaps it might look a bit better if I'd used FOUR glittercluster layers instead of just three. You may duplicate that layer once more if you like, and apply the filter that fourth time. Up to you.]
Still on the bottom glittercluster layer...
Effects > Plugins > Eye Candy 4000 > HSB Noise, with the default settings.
Hit okay.
Highlight the middle glittercluster layer. Again, apply HSB Noise, clicking on "Random Seed" once.
Hit okay.
Highlight the top glittercluster layer. Apply HSB Noise again, and again click "Random Seed."
Hit okay.
Close out the top two glittercluster layers, leaving the bottom glittercluster layer open.
Edit > Copy merged
Open Animation Shop, right-click on the desktop area, and paste as a new animation.
Return to PSP. Close out the bottom glittercluster layer, and open the middle glittercluster layer.
Edit > Copy merged.
Return to Animation Shop and Edit > Paste > After Current Frame.
Back to PSP. Close out the middle glittercluster layer, and open the top glittercluster layer.
Edit > Copy merged.
And, back to Animation Shop. Edit > Paste > After Current Frame.
Still in Animation Shop, Edit > Select All
Right-click on the top bar of your animation and choose "Frame Properties." Change this number to 25.
View > Animation. And, we're done! I hope you've enjoyed this tutorial! Thanks for trying my tut!!
.


©kajira hill 2009
http://kajituts.blogspot.com


