skip to main |
skip to sidebar
.
 [Click image above to go to full sized image.]This tutorial was written on March 31, 2009, using Paint Shop Pro, version X.03. It should be okay to do with other versions as well. I just find X.03 more comfortable for me. You may download a free trial of Paint Shop Pro, version X2, from Corel. Any similarities between this tut and any others you may see are purely coincidental.
You will also need:
Animation Shop - I've found it here! This is from CNET, so it's a safe download, too!
A tube your choice. I'm using the wonderful artwork of Zindy S.D. Neilsen. You must have a license to use her work. You may purchase that license at Zindy's web site.
Scrap kit is by Vella, of Wench Designs. It's a FTU kit, available on her site. This particular kit is part of yet another blog train (this one called a blog hop) I've stumbled upon. You can find it here. This blog hop originates at Baby V Design. You can find more portions of it there, too! Thanks girls, for the free stuff! Be a good community member, and thank the ladies who do this for us while you're downloading!!
Filters: Eye Candy 4000 > Gradient Glow, VM Natural > Sparkle
Font: I used Alexandra Script
Supplies: Just the widdle-bitty staple!!!
Let's begin!!
Open a new image, 700 x 750, white.
Open the frame. Copy and paste as a new layer.
Add your tube. Resize if needed, position below the frame and drop shadow.
Highlight the frame layer. Grab your magic wand and click inside the frame. Selections > Modify > Expand by 10. Selections > Invert.
Highlight your tube layer. Hit delete. DO NOT DESELECT!
Open paper4. Resize to 750 x 750 pixels. Copy and paste as a new layer. Drag this layer below your tube layer. Hit delete. Selections > Select none.
Drop shadow your frame.
Open "FlowersNButtons." Resize 20%. Copy and paste as a new layer. I positioned mine to the upper right corner of the canvas. See my tag for reference. Duplicate this layer and Image > Mirror, Image > Flip. Merge these two layers down and drop shadow.
Open Heart Charm. Resize 5%. Copy and paste as a new layer. I positioned mine to the lower right corner of the frame. Again, see my tag for reference.
Open the staple in your supplies. Copy and paste as a new layer. Rotate left 25°. Position above the heart charm layer and the staple that appears on the frame layer. Drop shadow your staple.
Open butterfly1. Resize 17%. Copy and paste as a new layer. I positioned mine on the upper left corner of the frame. See my tag for reference. Drop shadow your butterfly.
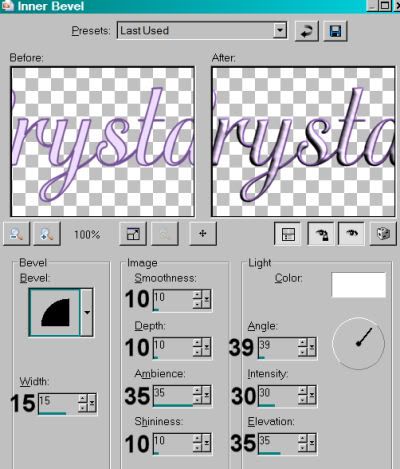
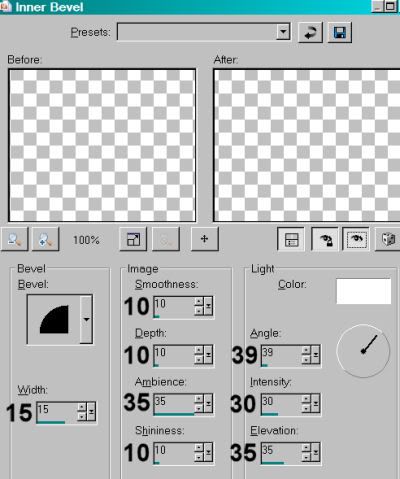
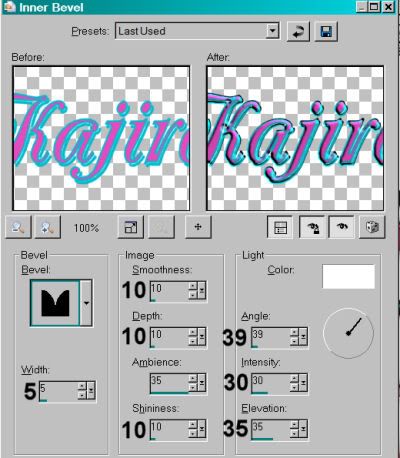
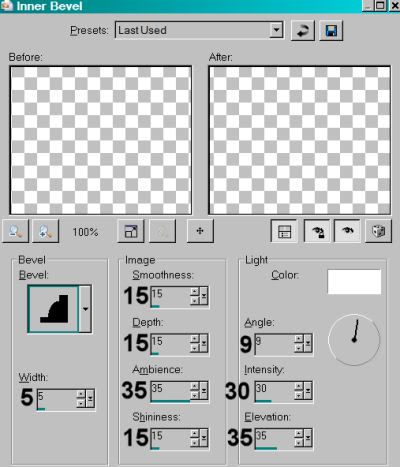
Add your name. I used color#708ba6 for the fill. Stroke size is 2, color is #c0a08b. I added the following inner bevel:
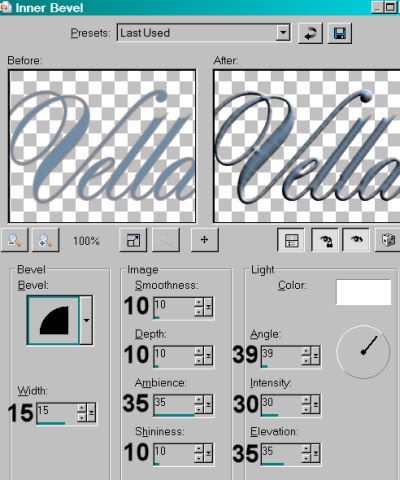
Hit okay.
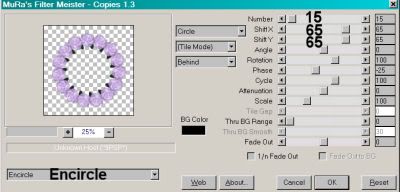
Effects > Plugins > Eye Candy 4000 > Gradient Glow set at 3 - 0 - 100, color white, preset of "medium."
Drop shadow your name.
Add your copyright, license information if applicable and taggers'/watermark.
Resize your tag to the size of your choice. At this point you could stop, if you choose not to animate. Just merge your layers, and save!
A N I M A T I O N
Go to your heart charm layer. Duplicate this layer twice, for a total of three layers.
Highlight the bottom of these layers.
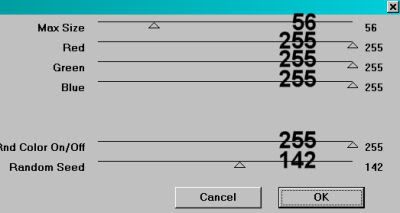
Get your lasso tool, set on point-to-point. Draw a selection carefully around the "fill" area in the heart charm. You may need to zoom in to do this, I sure did!
Effects > Plugins > VM Natural > Sparkle with the following settings:
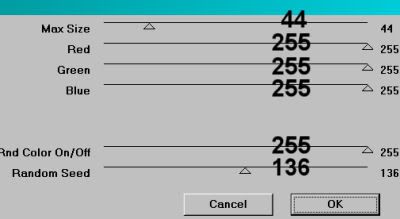
Hit okay.
Highlight the middle heart charm layer and do the same thing, but change the "Random Seed" setting to something... well... random!! You can play with the size slider, too, if you like.
Hit okay.
Highlight the top heart charm layer and add sparkles again, changing the Random Seed and/or Size setting again.
Hit okay.
Now, I'm sorry if this is a repeat for you, but in case you've NOT done any of my tuts with this Sparkle filter, I'll say it anyway: Whenever I use VM Natural > Sparkle, I do it twice. So go through the three layers again the same way.
Selections > Select none.
Close out the top two heart charm layers. Make sure the bottom heart charm layer is open.
Edit > Copy merged
Open Animation Shop, right-click on the desktop area, and paste as a new animation.
Return to PSP. Close out the bottom heart charm layer, and open the middle heart charm layer.
Edit > Copy merged.
Return to Animation Shop and Edit > Paste > After Current Frame.
Once more back to PSP. Close out the middle heart charm layer and open the top heart charm layer.
Edit > Copy merged.
And again, back to Animation Shop. Edit > Paste > After Current Frame.
Edit > Select All.
Right-click on the bar on top of your animation and choose "Frame Properties." Change this number to 35.
View > Animation. And we're done! I hope you've enjoyed this tutorial! Thanks for stopping by!
.
...what's up with my background the past couple of days. I moved it to Fotki yesterday and it worked fine. I re-load my browser today and it's now shrunk!! I've recruited the ever-generous Trixy Doodlebugs to try to come to my rescue. *fingers crossed, again* I must thank her for her amazing patience with me and for helping me with anything to do with coding issues on my layout! Without her, I'd have a basic blogger layout.
Believe me, I've thought about changing my blog a couple times, but I'm totally lost on how to do it! Even with instructions!!
So thanks again, Trixy. I'll never be able to repay you!!!
It looks okay now, after I tried to tweak it, but will it still be here tomorrow?? Strange stuff...
.
 [Click image above to go to full sized image.]This tutorial was written on March 30, 2009, using Paint Shop Pro, version X.03. It should be okay to do with other versions as well. I just find X.03 more comfortable for me. You may download a free trial of Paint Shop Pro, version X2, from Corel. Any similarities between this tut and any others you may see are purely coincidental.
You will also need:
Animation Shop - I've found it here! This is from CNET, so it's a safe download, too!
A tube your choice. I'm using the sexy artwork of Gennadiy Koufay. You must have a license to use his work. You may purchase that license at CILM.
Scrap kit is by Crystal, of Scrappy Inspirations. It's a PTU kit, available at Scrap It Sassy. Crystal is currently (and until April 15) the featured designer at Scrap It Sassy. As a result, all of her designs are now 50% off!! Get 'em while they're hot! This particular kit is called A Little Old Fashioned.
Also, here's a good place to mention that Scrap It Sassy as a whole is having a whopping Spring Cleaning Sale, with prices in effect until the first of May!!!
Filters: Mura's Meister > Copies, VM Natural > Sparkles
Font: I used OttumHmkBold
Supplies: The mask, by the fabulous mask-maker (lol) Essex Girl!! You can get this mask here!
Let's create!!
Open your mask and minimize in PSP. Alternatively, you could file the mask in your PSP masks file for use later. Just be sure to give credit where it's due!
Open a new image, 700 x 700, white.
Open frame4. Copy and paste as a new layer. Give this a very soft drop shadow, so you can see the lace.
Add your tube. Resize, position and drop shadow to your taste.
Highlight your frame layer. Grab your magic wand, click inside the frame and Selections > Modify > Expand by 1. Selections > Invert.
Highlight your tube layer. Grab your eraser brush and erase any part of the tube you don't want overlapping the bottom of the frame. Selections > Select none.
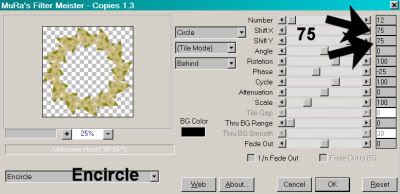
Open rose1. Resize 35%. Copy and paste as a new layer.
Effects > Plugins > Mura's Meister > Copies with the following settings:
Hit okay.
Drag this layer below your frame layer.
Open leaf. Resize 35%. Copy and paste as a new layer. Rotate left 35°. Drop shadow.
Effects > Plugins > Mura's Meister > Copies with the same settings as above.
Drag this layer under the rose layer.
Open paper4. Copy and paste as a new layer. Drag this layer to just above the white background.
Apply your mask. INVERT TRANSPARENCY CHECKED!! Delete the mask layer, answer "yes" to the pop-up question, and merge group.
Take your selection tool, set on rectangle, and draw a square selection on top of the frame. Highlight your leaf layer. Hit delete. Selections > Select none.
Open the doodle. Copy and paste as a new layer. This should be just above the mask layer in the layer palette.
Open butterfly1. Resize 75%. Copy and paste as a new layer. Position where you'd like it. See my tag for reference. Drop shadow your butterfly.
Add your name. I used color #eedcff for the fill. Stroke set on 2, color #77519a. I added the following inner bevel:
Drop shadow your name.
Add your copyright, license information if applicable and taggers'/watermark.
Resize your tag to the size of your choice. At this point you could stop, if you choose not to animate. Just merge your layers, and save!
A N I M A T I O N
Go to your frame layer. Duplicate this layer twice, for a total of three layers.
Highlight the bottom of these layers.
Draw another square selection around *just the outside* of the frame. Selections > Invert.
Effects > Plugins > VM Natural > Sparkle with the following settings:
Hit okay.
Highlight the middle frame layer and do the same thing, but change the "Random Seed" setting to something... well... random!! You can play with the size slider, too, if you like.
Hit okay.
Highlight the top frame layer and add sparkles again, changing the Random Seed and/or Size setting again.
Hit okay.
Now, I'm sorry if this is a repeat for you, but in case you've NOT done any of my tuts with this Sparkle filter, I'll say it anyway: Whenever I use VM Natural > Sparkle, I do it twice. So go through the three layers again the same way.
Selections > Select none.
Close out the top two frame layers. Make sure the bottom frame layer is open.
Edit > Copy merged
Open Animation Shop, right-click on the desktop area, and paste as a new animation.
Return to PSP. Close out the bottom frame layer, and open the middle frame layer.
Edit > Copy merged.
Return to Animation Shop and Edit > Paste > After Current Frame.
Once more back to PSP. Close out the middle frame layer and open the top frame layer.
Edit > Copy merged.
And again, back to Animation Shop. Edit > Paste > After Current Frame.
Edit > Select All.
Right-click on the bar on top of your animation and choose "Frame Properties." Change this number to 35.
View > Animation. And we're done! I hope you've enjoyed this tutorial! Thanks for stopping by!
.
.
 [Click image above to go to full sized image.]This tutorial was written on March 29, 2009, using Paint Shop Pro, version X.03. It should be okay to do with other versions as well. I just find X.03 more comfortable for me. You may download a free trial of Paint Shop Pro, version X2, from Corel. Any similarities between this tut and any others you may see are purely coincidental.
You will also need:
Animation Shop - I've found it here! This is from CNET, so it's a safe download, too!
A tube of your choice. I'm using the elegant artwork of Edward Reed. You must have a license to use his work. You may purchase that license at CILM.
Scrap kit is by Ali, of Designs by Ali. It's a PTU kit, available at Bitchin' Scraps Boutique, and is called Hoppity Easter. This kit is on sale for 69% off!! Get it while it's hot!
Filters: Eye Candy 4000 > Gradient Glow
Font: I used BixAntiqueScriptHmk
Supplies: The teeny diamond and the silver sparkle. You can find these really small files here.
Let's create!!
Open Frame 3. Copy and paste as a new layer. I added a bevel to the frame with the following settings:
Open Paper 23. Resize to 700 x 700. Copy and paste as a new layer. Drag below your frame layer in the layer palette. Position the paper as you'd like it to look inside the frame.
Highlight your frame layer. Grab your magic wand and click inside the frame. Selections > Modify > Expand by 7. Selections > Invert.
Highlight your paper layer. Hit delete. Selections > Select none.
Add your tube. Resize, position and drop shadow to your liking.
Open Tulips 3. Resize 50%. Copy and paste as a new layer. Duplicate this layer and Image > Mirror. Move the two bunches of tulips together to try and make it look like one bunch. LOL. Merge these two layers down. Drop shadow your tulips. Drag the tulips layer below your frame layer and position them on the bottom area of the frame. See my tag for placement reference. If you have some of the greenery sticking out of the frame like I did, grab your selection tool, set on rectangle, mode is Add (Shift), and draw a selection around the greenery on each side. Hit delete. Selections > Select none.
Open Bunnie 6. Resize 45%. Copy and paste as a new layer. Position this layer below the tulips in the layer palette. Have your bunnie looking like it's peeking out of the garden. Drop shadow this bunnie.
Open Bunnie 3. Resize 30%. Copy and paste as a new layer, dragging this layer again down below the tulips. Position as you like. Drop shadow this bunnie.
Open Tag 1. Rotate right 90° ALL LAYERS CHECKED! Add a saying or your name or whatever you'd like to put on the tag. I used "Hoppity Easter." Drop shadow your text.
Edit > Copy merged.
Return to your canvas and paste as a new layer. Resize 75%. Rotate back left 90°. Position so the tag appears to be hanging from the frame. Use your selection tool to remove the parts of the strings that hang over the top. I rotated the tag again, 15° right. Drop shadow your tag.
Open Bow 3. Resize 25%. Copy and paste as a new layer. Position over the strings you have left on the tag. Drop shadow your bow.
Open DiamondTeeny from your supplies. Copy and paste as a new layer. Position over the middle of the bow.
Open Sparkle Silver from your supplies. Copy and paste as a new layer. Position this over the diamond. If your tube has a prominent earring like mine does, duplicate this layer and position it over the earring.
Open Egg in a Basket 2. Resize 35%. Copy and paste as a new layer. Position where you'd like it and drop shadow.
Open Egg in a Basket 3. Resize 35%. Copy and paste as a new layer. Position this next to your first Egg in a Basket. Drop shadow.
Add your name. I used color #ea8297 for the fill. No stroke.
Effects > Plugins > Eye Candy 4000 > Gradient Glow set at 5 - 0 - 100, preset on medium, color #fae1d2.
Drop shadow your name.
Add your copyright, license information if applicable and taggers'/watermark.
Resize your tag to the size of your choice. At this point you could stop. It could be the case that, if you did NOT have the earring to put the sparkle on, you won't be animating your tag. Just merge your layers and save, and you're done.
In the case that you ARE utilizing the second sparkle, we'll go on....
A N I M A T I O N
Close one of your sparkle layers, leaving the other open.
Edit > Copy merged
Open Animation Shop, right-click on the desktop area, and paste as a new animation.
Return to PSP. Close out the first sparkle layer, and open the other sparkle layer.
Edit > Copy merged.
Return to Animation Shop and Edit > Paste > After Current Frame.
Edit > Select All. Right-click on the bar at the top of your animation and choose 'Frame Properties.' Change this number to 30.
View > Animation. And we're done! I hope you've enjoyed this tutorial! Thanks for stopping by!
.
.
 [Click image above to go to full sized image.]This tutorial was written on March 28, 2009, using Paint Shop Pro, version X.03. It should be okay to do with other versions as well. I just find X.03 more comfortable for me. You may download a free trial of Paint Shop Pro, version X2, from Corel. Any similarities between this tut and any others you may see are purely coincidental.
You will also need:
A tube of your choice. I'm using the great artwork of Mario Chavez. You at least USED to have a license to use his work. I got my license at CILM. I notice now, though, after trying links to his art and even on CILM, he's not there. There's nothing about tubes on the link I've given you. He apparently still has a My Space page but says he only checks in every few weeks, and I deleted my My Space page so can't leave him a note. I'm terribly sorry if I've again used a tube that is unavailable!
Scrap kit is by Heza of Heza Scraps. It's a PTU kit, available at Terminally Unique Designs, and is called Bunny Poop!!
Filters: Mura's Meister > Copies
Font: I used OPTIYork Script
Supplies: The mask, which is the art of the always wonderful Kirsty! You can find the mask here.
Let's do it!! This is a quick-n-easy tut!!!
Open your mask and minimize in PSP. Alternatively, you could add your mask to your PSP masks folder, so you'd have it for use later. Always give proper credit where you can, though, as you collect your PSP booty!
Create a new file, 700 x 700, white.
Open Frame4. Copy and paste as a new layer.
Open Paper 12. Copy and paste as a new layer. Drag this layer beneath the frame.
Highlight the frame layer. Take your magic wand and click inside the frame. Selections > Modify > Expand by 10. Selections > Invert.
Highlight your paper layer. Hit delete. Selections > Select none.
Add your tube. Resize, position and drop shadow to your taste. I placed mine to the left of center, to balance out the embellished frame.
Highlight your frame layer again. Click inside the frame with your magic wand. Selections > Modify > Expand by 1. Selections > Invert.
Highlight your tube layer. Grab your eraser brush and erase the parts of your tube that overlap the frame on the bottom. Selections > Select none.
Open Egg. Resize 25%. Copy and paste as a new layer.
Effects > Plugins > Mura's Meister > Copies with the following settings:

Hit okay.
Drag this layer below your frame and paper layers.
Drop shadow your frame.
Drop shadow your eggs layer.
Highlight your white background layer.
Open paper 1. Copy and paste as a new layer.
Apply your mask. Delete the mask layer, answer 'yes' to the pop-up question, and merge group.
Add your name. I used the Metal Brass Gradient for the fill, settings below:
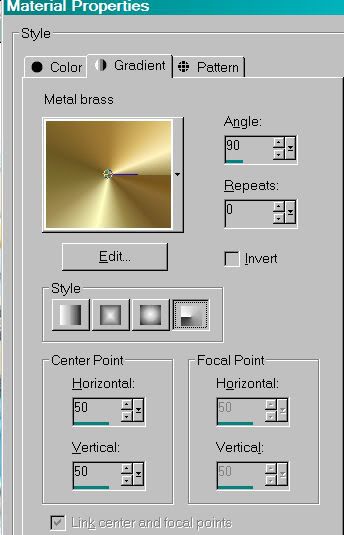
...and black for the stroke. Stroke width is .8.
Rotate your name to the left 25% and move into the bottom right corner (if you wish... that's just what I did).
Drop shadow your name.
Add your copyright, license information if applicable and taggers'/watermark.
Resize your tag to the size of your choice. Merge your layers, and save! We're done! I told you it was quick-n-easy!! I hope you enjoyed!.
.
 [Click image above to go to full sized image.]This tutorial was written on March 28, 2009, using Paint Shop Pro, version X.03. It should be okay to do with other versions as well. I just find X.03 more comfortable for me. You may download a free trial of Paint Shop Pro, version X2, from Corel. Any similarities between this tut and any others you may see are purely coincidental.
You will also need:
Animation Shop - I've found it here! This is from CNET, so it's a safe download, too!
A tube (or tubes, as I have done) of your choice. I'm using the fun artwork of Joe Pekar. You must have a license to use his work. You may purchase that license at CILM.
Scrap kit is by Sarah, half of Pimp My Tags With Scraps. It's a PTU kit, called Her Highschool Years. This kit (plus a couple of others, you may have seen on their blog) is on sale for 20% off March 28 and 29 only!! Get them while they're hot!
Filters: No outside filters used in this tut!
Font: I used Oberon LET Plain 1.0
Supplies: The first is the template, which I got from Beth at Blissfully Beth. I did take about half of the template out (or maybe less), but I did use the template as my "design" for the tag. Leave Beth a little love! You can get the template here.
Next is the book tube. I don't know from where I got this one. I've had it forEVAH. If it is yours, please let me know so that I may credit you properly! And you can find the book tube here!
Let's create!!
Open your mask and minimize in PSP. Alternatively, you could file the mask in your PSP masks file for use later. Just be sure to give credit where it's due!
Open your template. Duplicate this template and close the original. Delete the credit layer, the word art layer and the hearts layers.
Resize the template 110%. Then Image > Canvas Size > 700 x 700, centered.
The first thing I did was to add my tubes, resize them as needed and position, then drop shadow. I didn't want the ones with feet and shoes to have those feet and shoes dangling out into the white space, so I did the following:
Grab your lasso tool, set on freehand, feather 17. Highlight the tube layer with which you will be working. Draw a curve downward and then upward (like a smile) at the feet of your first tube. Hit delete a couple times. Selections > Select none. If you have more than one tube, as I did, do this on each tube you want to remove stuff from on the bottom. lol.
Highlight rec 1 layer. Grab your magic wand, setting feather back at zero and click inside the center of rec 1.
Highlgiht rec 2 layer. Do the same.
Highlight rec 3 layer. Do the same again.
Highlight rec 1 layer.
Open pp1. Copy and paste as a new layer. Selections > Modify > Expand by 1. Selections > Invert.
Still on the paper layer, hit delete. Selections > Select none.
Highlight rec 1 layer again. Grab your magic wand and click on the outside "frame," if you will, of the layer. Do the same for rec 2 and rec 3 layers.
Highlight rec 1 layer.
Open pp3. Copy and paste as a new layer. Selections > Modify > Expand by 1. Selections > Invert.
Still on the paper layer, hit delete. Selections > Select none.
Now, delete rec 1, rec 2, and rec 3 layers. Merge your two paper layers down. Now you should have one layer with three rectangles, colored blue and pink. Drop shadow this layer.
Open "Blah blah blah." Copy and paste as a new layer. Bring it to the top of your canvas. I positioned it in the layer palette under my tubes. See my tag for reference. Drop shadow this layer.
Highlight your gray bars bg layer. Selections > Select all. Selections > Float > Defloat > Modify > Expand by 1.
Open pp14. I rotated mine until I got the colors positioned where I wanted them. Copy and paste as a new layer.
Selections > Invert. Hit delete. Selections > Select none. Delete your gray bars bg layer. Drop shadow the paper layer you just made.
Open notebook. Resize 25%. Copy and paste as a new layer. I positioned mine in the middle at the bottom of the canvas. Drop shadow.
Open the book_tube.psp from your supplies. Copy and paste as a new layer. I positiioned mine on the left side of the canvas, at the bottom. Rotate right 5°. Drop shadow your books.
The backpack and bubbles layer I used was part of one of the Joe Pekar tubes. I'm sorry I can't share that. If you have another school time tube, you can copy and paste it to place on the right bottom area of your canvas and drop shadow that.
Highlight your layer of rectangles in blue and pink that we made. Grab your magic wand and click inside the blue portions of these rectangles. Selections > Modify > Expand by 1.
Open gel pen doodle stars from the kit. Copy and paste as a new layer. Position these stars so that they will cover your desired areas. I moved this up a bit on the canvas. I then copied and pasted another copy of these stars and positioned them where I wanted them. Selections > Invert. Hit delete on both layers of stars. Selections > Select none. Merge down these two stars layers.
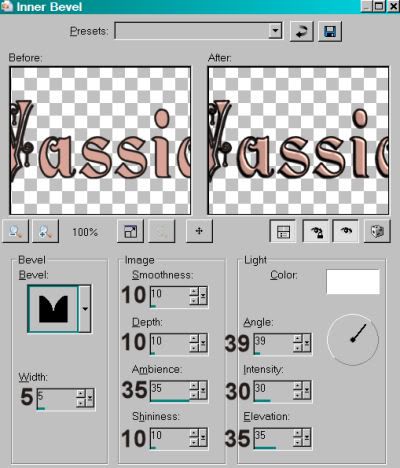
Add your name. I used color #e14dbd for the fill. Stroke set at 2, color #00bdd0. I added the following inner bevel:
Drop shadow your name.
Add your copyright, license information if applicable and taggers'/watermark.
Resize your tag to the size of your choice. At this point you could stop, if you choose not to animate. Just merge your layers, and save!
A N I M A T I O N
Go to your gel pen doodle stars layer. Duplicate this layer twice, for a total of three layers.
Highlight the bottom of these layers.
Adjust > Add/Remove Noise > Add Noise with the following settings:
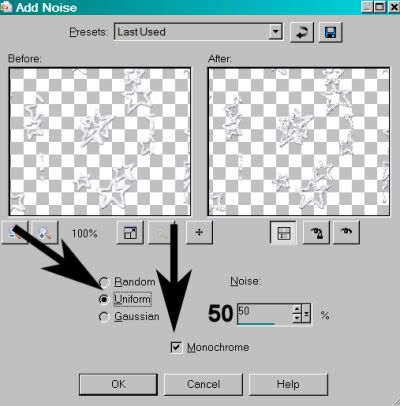
Hit okay.
Highlight the middle stars layer and do the same thing, but change the "Noise" setting to 55.
Hit okay.
Highlight the top stars layer and add Noise again, but change the setting to 60.
Hit okay.
Close out the top two stars layers. Make sure the bottom stars layer is open.
Edit > Copy merged
Open Animation Shop, right-click on the desktop area, and paste as a new animation.
Return to PSP. Close out the bottom stars layer, and open the middle stars layer.
Edit > Copy merged.
Return to Animation Shop and Edit > Paste > After Current Frame.
Once more back to PSP. Close out the middle stars layer and open the top stars layer.
Edit > Copy merged.
And again, back to Animation Shop. Edit > Paste > After Current Frame.
View > Animation. And we're done! I hope you've enjoyed this tutorial! Thanks for stopping by!
.
.
 [Click image above to go to full sized image.]This tutorial was written on March 27, 2009, using Paint Shop Pro, version X.03. It should be okay to do with other versions as well. I just find X.03 more comfortable for me. You may download a free trial of Paint Shop Pro, version X2, from Corel. Any similarities between this tut and any others you may see are purely coincidental.
You will also need:
Animation Shop - I've found it here! This is from CNET, so it's a safe download, too!
A tube of your choice. I'm using the fantastic artwork of Zindy S.D. Nielsen. You must have a license to use her work. You may purchase that license at Zindy's web site.
Scrap kit is by Vassia of Scrap Heaven Boutique. It's a PTU kit, called Stay In Touch. This is a new scrap boutique on the Web, and the grand opening is April 5. But they're open for business now! The kit we're using is available in both taggers' and scrappers' sizes. It's a great size, and I love the colors!
Filters: DSB Flux > Bright Noise
Font: I used Romanesque Normal
Supplies: The mask. This is another mask about which I do not know the origin. If it is yours, please let me know and I'll give you proper credit! It's named caro-mask010, so if anyone knows caro, let him/her know and have him/her get back to me! You can find the mask here.
Let's do it!!
Open your mask and minimize in PSP. Alternatively, you could file the mask in your PSP masks file for use later. Just be sure to give credit where it's due!
Create a new file, 700 x 700, white.
Open paper 11. Copy and paste as a new layer.
Apply your mask. Delete mask layer, answer "yes" to the pop-up question, and merge group.
I noticed that the mask was a bit big for the canvas (in my opinion), so I resized it by 90%. Then I used my lasso tool, set on point-to-point, feather set at 17, and drew around the bottom of the mask, which to me looked like too hard of a line. Hit delete. Selections > Select none. After I was done with the tag and posted it everywhere, I noticed that it looks hard on the right side, too, so if you're as picky as I am, you might want to do the same thing there.
Open frame 2. Copy and paste as a new layer.
Open paper 1. Copy and paste as a new layer. Drag this layer below the frame layer.
Grab your magic wand and click inside the frame. Selections > Modify > Expand by 8. Selections > Invert.
Highlight your paper1 layer and hit delete. Selections > Select none.
Add your tube. Resize, position and drop shadow to your liking. If your tube is emerging from the frame, like mine (almost always) is, do the following:
Grab your magic wand again. Highlight the frame layer. Click inside the frame. Selections > Modify > Expand by 1. Selections > Invert.
Highlight your tube layer. Grab your eraser brush and erase any overlap of the tube over the bottom of the frame. If you have things you'd like to hang down, as the elbow in my frame, go as closely as you can with the eraser brush and then Selections > Select none.
Grab your lasso tool, set at point-to-point, feather 0. Still highlighting your tube layer, carefully draw around the borders of the area you want to show as outside the frame. Hit delete. If all is okay, then Selections > Select none. If it's not as you like it, keep playing with your lasso until you get it right.
Okay? Good!
Open doodle3. Copy and paste as a new layer. Drag this layer between the frame layer and the paper 1 layer. Give it a soft drop shadow.
Now, this may get confusing. Sorry!
Copy and paste doodle3 again, as a new layer. Make this layer your top layer. Move this doodle to the right top corner of the canvas, so it will be showing out behind the head of your tube -- or, if using a different tube, above your frame, some. See my example for placement reference. Duplicate this layer and Image > Mirror. Merge these two layers down and duplicate that layer. Image > Flip.
Now, you need one more copy of doodle3, so copy and paste it again onto your canvas. Position this one up the center so it will show out of the top center of the frame area. Gosh, was that confusing? I'm sorry if it was!! See my tag for the top center placement.
Drop shadow all your doodle3 layers that are on the top of your layer palette. Merge all these doodle layers into one layer and drag that layer down to just above the mask layer.
Add your name. I used color #d8a497 for the fill. Stroke set at 2.5, color #221b1a. I added the following inner bevel:
Drop shadow your name.
Add your copyright, license information if applicable and taggers'/watermark.
Resize your tag to the size of your choice. At this point you could stop, if you choose not to animate. Just merge your layers, and save!
A N I M A T I O N
We're going to be animating two sections of your tag at once. So follow along. I hope it's clear. If not, PLEASE drop me a line, and I will try to help!
Highlight your layer with the copious amounts of doodle3. LOL!! Duplicate twice, for a total of three layers.
Now, highlight the doodle3 layer that is between your frame and your paper1 layer. Duplicate this layer twice, for a total of three layers.
Highlight the bottom layer.
Effects > Plugins > DSB Flux > Bright Noise, setting the intensity to 35, and click on "mix."
Hit okay.
Now, do this same thing on the bottom layer of the other set of three layers we made.
Hit okay.
Highlight the middle layer (we are now still on the copious doodles layers). Apply Bright Noise again, but click on mix twice. Hit okay.
Go up to the other set of three doodle 3 layers and highlight the middle layer. Apply the same Bright Noise and hit okay.
Now highlight the top doodle layer and apply Bright Noise, hitting mix three times.
Down to the "copious" doodles layers and highlight the top one. Bright Noise here, hitting mix three times. Hit okay.
Close out the top two doodle layers in each set. Make sure the bottom doodle layer is open in each set of doodle layers.
Edit > Copy merged
Open Animation Shop, right-click on the desktop area, and paste as a new animation.
Return to PSP. Close out the bottom doodle layer in both sets, and open the middle doodle layer, again in both sets.
Edit > Copy merged.
Return to Animation Shop and Edit > Paste > After Current Frame.
Once more back to PSP. Close out the middle doodle layer and open the top layer. Yes, in both sets of layers.
Edit > Copy merged.
And again, back to Animation Shop. Edit > Paste > After Current Frame.
View > Animation. And we're done! I hope you've enjoyed this tutorial! If I wasn't clear on it or I made your head spin, again, let me know. It's easier to do than it is to explain in words! Thanks for stopping by!
.
.
 [Click image above to go to full sized image.]This tutorial was written on March 26, 2009, using Paint Shop Pro, version X.03. It should be okay to do with other versions as well. I just find X.03 more comfortable for me. You may download a free trial of Paint Shop Pro, version X2, from Corel. Any similarities between this tut and any others you may see are purely coincidental.
You will also need:
A tube of your choice. I'm using the wonderful artwork of Dominic Marco. You must have a license to use his work. You may purchase that license at CILM.
Scrap kit is by Bluey of Bluedream Designs. It's a FTU kit, and it's called Slave. Be sure to leave some lurve for the great freebie kit!
Filters: No filters used in this tut!
Font: I used Inscription LET
Supplies: Two masks, one of which is the art of the great Vix! I have no idea where I got the second one. If it is yours, please let me know so that I might give you proper credit! You can find them both here!
Let's get workin'!!
Open your masks and minimize in PSP. Alternatively, you could add your masks to your PSP masks folder, so you'd have them for use later. Always give proper credit where you can, though, as you collect your PSP booty!
Create a new file, 700 x 750, white.
Add a new raster layer. Selections > Select all.
Open Paper 6. Copy and paste INTO SELECTION. Selections > Select none.
Apply your Vix_Mask05 mask. Delete the mask layer, answer "yes" to the pop-up question, and merge group.
Now, apply your "mask layer" mask. Delete the mask layer, answer "yes" to the pop-up question, and merge group.
Open Frame1. Copy and paste as a new layer.
Open Paper 6 again. Copy and paste as a new layer. Drag this layer below the frame in the layer palette.
Grab your magic wand and click inside the frame. Don't forget the little space between the ribbon and the frame on the bottom! Click in there, too! Selections > Modify > Expand by 10. Selections > Invert.
Highlight your paper layer and hit delete. Selections > Select none.
At this point, I added my tube layer. Resize, position and drop shadow as you like it.
Highlight your frame layer again, and grab the magic wand again. Click inside the frame and in the space between the ribbon and the bottom of the frame. Selections > Modify > Expand by 2.
Highlight your tube layer. Get your eraser brush and erase any part of the tube that overlaps the bottom of the frame. You should be able to peek a portion of your tube in that space between the ribbon and the bottom of the frame. Selections > Select none.
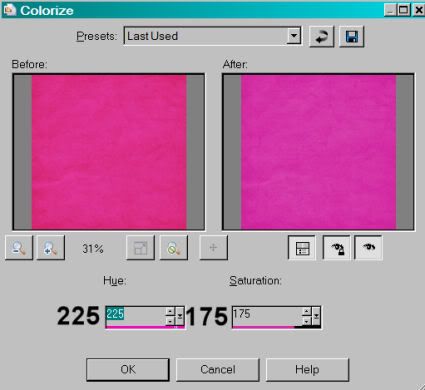
At this point, highlight the frame layer and colorize. Adjust > Hue and Saturation > Colorize with the following settings:
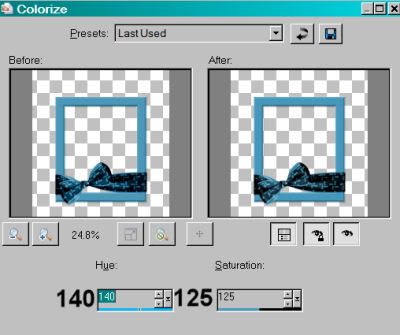
Hit okay.
Now, to make it a bit darker, Adjust > Brightness and Contrast > Brightness/Contrast with the following settings:
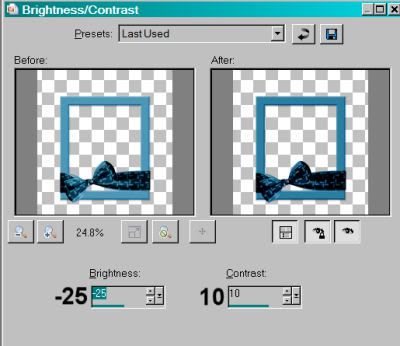
Hit okay.
I did this a couple of times until I got the color I wanted.
Open the Slave Wordcharm. Copy and paste as a new layer. Position it on one side or the other. See my tag for reference purposes. Drop shadow the wordcharm.
Open Label1. Resize 90%. Copy and paste as a new layer. Colorize as we did above. Do not change the brightness and contrast. Rotate left 30°. Position where you'd like it to be in reference to your frame, the ribbon, etc. This label should be just below the frame layer. Duplicate this layer. Drag the duplicate up in the layer palette until it's above your frame, wordcharm and tube.
Grab your lasso tool, set at point-to-point, and draw around each end of the top label, so what shows is the bottom label layer, and it seems to be attached somehow to the frame. See my example for reference purposes. This is hard to explain in words!! Do this on both ends of the label. Selections > Select none.
Change the opacity on your top label layer to about 60. Highlight the top label layer. Still using your lasso tool set at point-to-point, carefully draw around the top of the bow that's poking out into the center of the label. (See my tag for reference purposes.) Hit delete. Selections > Select none. Return the opacity on the label layer to 100.
Add your name. I used color #05628a as the fill color. Stroke size is 1.5, color #eaeaea. Drop shadow your name.
Add your copyright, license information if applicable and taggers'/watermark.
Resize your tag to the size of your choice. Merge your layers, and save! We're done! I hope you enjoyed this tut!.
.

.
.
 [Click image above to go to full sized image.]This tutorial was written on March 26, 2009, using Paint Shop Pro, version X.03. It should be okay to do with other versions as well. I just find X.03 more comfortable for me. You may download a free trial of Paint Shop Pro, version X2, from Corel. Any similarities between this tut and any others you may see are purely coincidental.
You will also need:
A tube of your choice. I'm using the fantastic artwork of Delphine Levesque Demers. You must have a license to use her work. You may purchase that license at CILM. It's impossible to choose one favorite artist, but Delphine Demers is certainly ONE of mine!
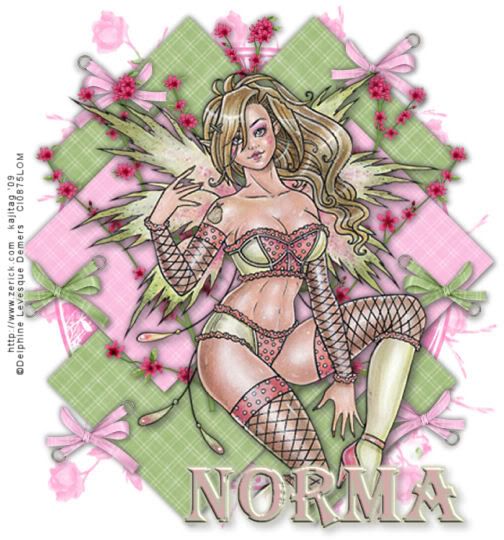
Scrap kit is by Norma of Swheat Creations. It's a PTU kit, and it's called simply Pretty N Pink! As soon as I saw this kit, I thought of the tube I'm using. A perfect match!
Filters: Eye Candy 4000 > Gradient Glow
Font: I used Algerian
Supplies: The mask, which is the art of the always-wonderful Kirsty! You can find the mask here!
Let us create!!
Open your mask and minimize in PSP. Alternatively, you could add your mask to your PSP masks folder, so you'd have it for use later. Always give proper credit where you can, though, as you collect your PSP booty!
Create a new file, 700 x 750, white.
Open Bkg13. Copy and paste as a new layer.
Apply your mask. INVERT TRANSPARENCY CHECKED! Delete the mask layer, answer "yes" to the pop-up question, and merge group.
I added my tube at this point. It was good to have it there, to judge where the rest of the elements and papers were going. So add your tube. Resize, position and drop shadow as is your preference. If your tube seems to go off the page at the bottom, as mine did, then:
Grab your lasso tool, set on freehand, feather set at 23. Highlight your tube layer and draw your selection around the bottom-most portions of your tube. It will be in a downward curve, like a smile. Draw it down and around, back up to the left starting point and finish your selection. Hit delete once or twice, depending upon how much you want to remove. Selections > Select none.
Open Bkg7. Resize 35%. Copy and paste as a new layer. Rotate either way, 45°. Place on the upper left of your canvas. See my tag for placement reference. Duplicate this layer and Image > Mirror. Duplicate the original again and Image > Flip. Then duplicate this layer and Image > Mirror.
Drop shadow each of the smaller paper layers, then merge all four layers down.
Open Bkg5. Resize 35%. Copy and paste as a new layer. Rotate either way, 45°. Place in the middle to the left, and above the four green paper layers. Again, for placement purposes, use my tag as a reference. Duplicate this layer and Image > Mirror. Drop shadow each of the pink paper layers and then merge those two layers down. Position to your liking.
It may seem the mask isn't centered well enough for you. Feel free to move the mask around a bit as you think it may be needed.
Open FlowerBranch. Resize 40%. Copy and paste as a new layer. Rotate left 10°. Place to the left of your tube, below the tube and above the pink papers. See my tag for placement. Duplicate this layer and Image > Mirror. Copy and paste the original again as a new layer. Do not rotate this branch, but position it between the other two branch layers and up a bit, so it's centered and appears above the tube's head. Drop shadow your FlowerBranch layers and merge these layers down.
Open Eyelet Bow 3. Resize 40%. Copy and paste as a new layer. Position where you like. I tended to apply the pink ones to the green paper, and vice-versa. So duplicate this layer and Image > Mirror. If one of your Eyelet Bows ends up above any part of your tube or other elements besides the papers, drag that layer down in the layer palette to below the branches layer. Duplicate one of your pink bow layers and Image > Flip. Position to your liking and duplicate this layer and Image > Mirror. Position all your eyelet bows as you like, dragging them down in the layer palette as needed. Drop shadow your pink eyelet bows.
Open Eyelet Bow 2. Resize 40%. Copy and paste as a new layer, on the pink paper. See my tag for placement. Duplicate this layer and Image > Mirror. Again, if the bows appear above your tube or other elements besides the paper, drag it down in the layer palette to below the branches layer. Drop shadow each of these eyelet bows.
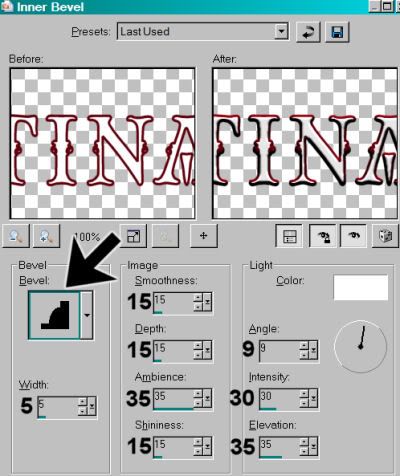
Add your name. I used color #e8bcbb for the fill, and #cccdb5 for the stroke. Stroke size is 2. I added an Inner Bevel, settings shown below. NOTE: This is not the same Inner Bevel I have been using over and over, so take note of the settings:
I then added Effects > Plugins > Eye Candy 4000 > Gradient Glow set at 4 - 0 - 100, color #cccdb5.
Drop shadow your name.
Add your copyright, license information if applicable and taggers'/watermark.
Resize your tag to the size of your choice. Merge your layers, and save! We're done! I hope you enjoyed this tut!.
.
 [Click image above to go to full sized image.]This tutorial was written on March 25, 2009, using Paint Shop Pro, version X.03. It should be okay to do with other versions as well. I just find X.03 more comfortable for me. You may download a free trial of Paint Shop Pro, version X2, from Corel. Any similarities between this tut and any others you may see are purely coincidental.
You will also need:
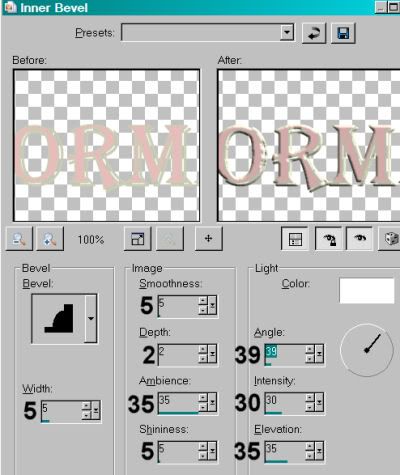
A tube of your choice. A sitting position would work the best for this tutorial. I'm using the fabulous artwork of Dean Yeagle. You must have a license to use his work. You may purchase that license at CILM.
Scrap kit is by [ C I N ] of Juicy Bits. It's a FTU kit and part of the Spring Blog Train I stumbled upon. It's called simply Spring Blog Train Kit! You may be seeing more tuts from me with portions of this blog train. At the moment, my browser is giving me a hard time, so I'll have to devote some attention to my puter. :(
Filters: Eye Candy 4000 > Gradient Glow
Font: I used Antique
Supplies: The mask, by Becky, and both the sunshine and the file called sun_clouds. I used a bit from both of those files. You can find them here!
Let's go, then!!
Open your supplies and minimize in PSP. Alternatively, you could add your mask to your PSP masks folder, so you'd have it for use later. Always give proper credit where you can, though, as you collect your PSP booty!
Create a new file, 750 x 700, white.
Add a new raster layer. Selections > Select all.
Open paper 12. Copy and paste INTO SELECTION.
Apply your mask. Delete the mask layer, answer "yes" to the pop-up question, and merge group.
Open 008. Resize 125%. Copy and paste as a new layer. Add a soft drop shadow.
Open 006. Copy and paste as a new layer. Move it to the right of the mesh heart. Drop shadow.
Open 0031. Copy and paste as a new layer. Mirror, if you like. I did. Move it a bit down on your canvas.
Open Paper 10. Copy and paste as a new layer. Move it around until the area you'd like to show through, well... shows through.
Highlight the 0031 layer. Grab your magic wand and click inside it. Selections > Modify > Expand by 7. Selections > Invert.
Highlight the Paper 10 layer. Hit delete. Selections > Select none.
Add a drop shadow to your frame layer (0031).
Add your tube. Resize, position and drop shadow as you like.
Open the sunshine from your supplies. (The one that's alone in the frame.) Copy and paste as a new layer, above the mask layer but below the mesh heart layer. I wanted to use this particular sun, as it appears to be glowing. (IMO)
Open the sun_clouds from your supplies. Notice each individual cloud and the sun are on different layers. Choose one or more of the clouds and place them where you'd like.
Add your name. I used color #bddb90 for the fill, and #6fd8d4 for the stroke. Stroke size is 1. I added Effects > Plugins > Eye Candy 4000 > Gradient Glow set at 4 - 0 - 100, color white.
Drop shadow your name.
Add your copyright, license information if applicable and taggers'/watermark.
Resize your tag to the size of your choice. Merge your layers, and save! We're done! I hope you enjoyed this tut!.
.
 [Click image above to go to full sized image.]This tutorial was written on March 25, 2009, using Paint Shop Pro, version X.03. It should be okay to do with other versions as well. I just find X.03 more comfortable for me. You may download a free trial of Paint Shop Pro, version X2, from Corel. Any similarities between this tut and any others you may see are purely coincidental.
You will also need:
A tube of your choice. I'm using the great artwork of Brian Rood. You must have a license to use his work. You may purchase that license at CILM.
Scrap kit is by Missy of Scraps With Attitude. It's a FTU kit, called Give Thanks. It's a beautiful kit, done in the autumn, but still beautiful today. Be sure to leave some luv when you download this freebie!
Filters: DSB Flux > Bright Noise
Font: I used Base:Christmas
Supplies: The mask, made by the uber talented Zuzzanna!! You can get this mask here.
Let's get to it!!
Open your mask and minimize in PSP. Alternatively, you could file the mask in your PSP masks file for use later. Just be sure to give credit where it's due!
Create a new file, 700 x 700, white.
Open Frame4. Copy and paste as a new layer. Resize 80%.
I chose to give the frame a bevel. Here are the settings I used:
Open Paper19. Copy and paste as a new layer. Drag this layer below your frame.
Take your magic wand and click inside the frame. Selections > Modify > Expand by 7. Selections > Invert.
On your paper layer, hit delete. Selections > Select none.
Again, Open Paper19. Copy and paste as a new layer, below your last paper layer and above your white background.
Apply your mask. INVERT TRANSPARENCY CHECKED!!! Delete mask layer, answer "yes" to the pop-up question, and merge group. Resize the mask layer by 96%.
Highlight your frame layer and add your tube. Resize, position and drop shadow to your taste.
Grab your magic wand again, and click again inside the frame. Selections > Modify > Expand by 1.
Highlight your tube layer. Take your eraser brush and erase any of the tube that is overlapping the bottom of the frame. Selections > Select none.
Open the Metal Flower Ribbon 1. Copy and paste as a new layer. Line it up with the top or bottom of your frame. Using your lasso tool, select the ends on each side that are hanging out beyond the frame. Hit delete. Selections > Select none.
Duplicate this layer. Image > Flip. Position as you like it on the opposite (top or bottom) end of the frame.
Duplicate one of these layers. Move to the middle of the frame and rotate left 90°. Move it over to the left side of the frame. Again, grab your lasso tool to select the ends hanging over and hit delete. Selections > Select none.
Duplicate this layer and Image > Mirror. Position all to your liking. Merge these layers down. Drop shadow this layer.
Open Flower4. Resize 35%. Copy and paste as a new layer. Rotate left 20°. Position on the bottom left corner of your frame. Refer to my example for positioning. Drop shadow your flower.
Open Flower3. Resize 35%. Copy and paste as a new layer. Do not rotate this flower. Drag the layer below your first flower layer and position as you like. Drop shadow this flower.
Open Flower1. Resize 40%. Copy and paste as a new layer. Do not rotate this flower. Drag this flower below your other two flower layers and position as you like. Drop shadow this flower.
Open Bow4. Resize 27%. Copy and paste as a new layer. Make sure this is your top layer. Rotate left 40°. Position over your bunch of flowers. Again, see my example for positioning. Drop shadow your bow.
Highlight your Flower4 layer. Duplicate this layer. Image > Mirror. Position as you like.
Highlight your Flower3 layer. Duplicate this layer. Image > Mirror. Position as you like. You may notice I dragged this layer up above the Flower4 duplicated layer. It's up to you.
Highlight your Bow4 layer. Duplicate this layer. Image > Mirror. I had to play with resizing this one, but just a tad!! I think I resized this 96%. Position above the mirrored flower layers.
Add your name. I used color #ad412f. Stroke set on 2, color #eedcd5. I added the same Inner Bevel used above.
Hit okay.
Drop shadow your name.
Add your copyright, license information if applicable and taggers'/watermark.
Resize your tag to the size of your choice. At this point you could stop, if you choose not to animate. Just merge your layers, and save!
A N I M A T I O N
Highlight your mask layer. Duplicate twice, for a total of three layers. Make sure you're still highlighting the bottom of the three.
Effects > Plugins > DSB Flux > Bright Noise, using the following settings:
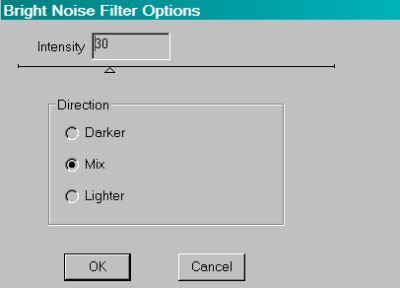
Hit mix once, then hit okay.
Highlight the middle mask layer. Apply Bright Noise again, but click on mix twice. Hit okay.
Now highlight the top mask layer and apply Bright Noise, hitting mix three times.
Close out the top two mask layers. Make sure the bottom mask layer is open
Edit > Copy merged
Open Animation Shop, right-click on the desktop area, and paste as a new animation.
Return to PSP. Close out the bottom mask layer and open the middle mask layer.
Edit > Copy merged.
Return to Animation Shop and Edit > Paste > After Current Frame.
Once more back to PSP. Close out the middle mask layer and open the top layer.
Edit > Copy merged.
And again, back to Animation Shop. Edit > Paste > After Current Frame.
View > Animation. And we're done! I hope you've enjoyed this tutorial! Thanks for stopping by!
.
.
 [Click image above to go to full sized image.]This tutorial was written on March 24, 2009, using Paint Shop Pro, version X.03. It should be okay to do with other versions as well. I just find X.03 more comfortable for me. You may download a free trial of Paint Shop Pro, version X2, from Corel. Any similarities between this tut and any others you may see are purely coincidental.
You will also need:
A tube of your choice. I'm using the fun & sexy artwork of Mark Waysl. You must have a license to use his work. You may purchase that license at CILM.
Unfortunately, the tube I used for this particular tutorial is not available to everyone. It was a bonus tube, given out as a prize during a promotion CILM was having. Ruby asked me about this, so I went on a hunt through my tube files, and found it in with the bonus tubes. I always try to get those tubes, as once I missed a Janesko that I darn well should have had, and learned it was a bonus tube. So I've been getting them ever since. My apologies for those of you who have been looking for this particular tube. And my thanks to Ruby for pointing it out. I'm sorry hon! And to every one else, too!!
Animation Shop - I've found it here! This is from CNET, so it's a safe download, too!
Scrap kit is by Yvette, half of the team at Misfits Scrapz. It's a FTU kit, called Rock Revolution. Be SURE to leave Yvette some thank yous if you download this freebie!!
Filters: No outside filters in this tut!
Font: I used Jokeman
Supplies: The mask, which I got from Chelle at Wee Scots Lass. Thank you so much, Chelle! Also, there are two musical notes files. One static and one animated. I don't know from where I got these two files, so if they're yours, PLEASE let me know (nicely, please) and I'll credit you correctly! You can get these supplies here!
Let's get to it!!
Open your mask and static musical notes file in PSP and minimize. Alternatively, you can load your mask into your PSP masks file, for use again later. Place your animated musical notes wherever they will be handy when we get to Animation Shop.
Create a new file, 700 x 750, white.
Add a new raster layer.
Selections > Select All.
Open Paper4. Copy and paste INTO SELECTION. Selections > Select none.
For my tube, I needed this paper colorized. Just in case you're wondering, my settings were:
Apply your mask. Delete mask layer, answer "yes" to pop-up question, and merge group.
Add your tube. Resize, position and drop shadow to your liking.
Open Drumkit. Copy and paste as a new layer. Drag this layer below the tube layer. Position as you like it.
Because certain parts of this scrap kit have a kind of "dullness" to them, I brought them out a bit with Adjust > Brightness and Contrast > Brightness/Contrast using the following settings:
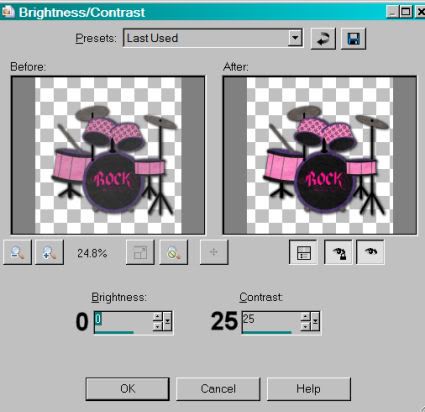
I did this for the drum kit, and the record. Drop shadow your drum kit.
Open Label4. Colorize as I showed, above, if you like. Resize 50%. Copy and paste as a new layer. I put mine on the drum. Drop shadow your label.
Open the Microphone. Copy and paste as a new layer. Position and drop shadow to your liking. I tried to get the microphone to look at least a LITTLE bit like it was being used by the tube....
Open Musicnotesbeingplayed from the supplies I gave you. Resize 175%. Adjust > Sharpness > Sharpen. Copy and paste as a new layer. Rotate left 25°. I tried to position this as though it was coming from the tube, as well. See my example for reference purposes. Duplicate this layer and rotate right 15°. Position these as you would like them. Give them both a soft drop shadow.
Open Record2. Resize 50%. As I said above, I colorized this AND adjusted the brightness and contrast on it. See the settings above. Place your record wherever you like it. Drop shadow your record.
Add your name. I used black as a fill color, and color #d83fab for the stroke, stroke width of 3.
I added my now-standard inner bevel, settings below:
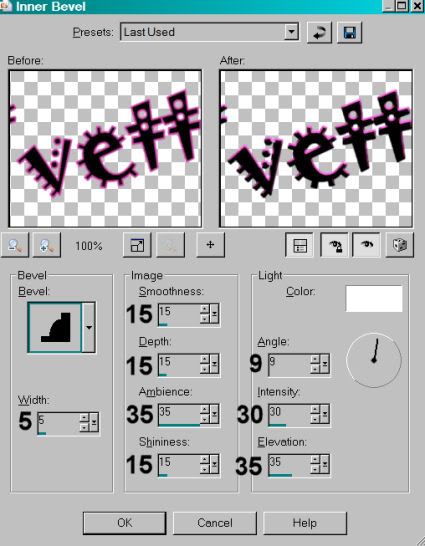
Drop shadow your name. Rotate left 15°. Position at the bottom right of the tag.
Add your copyright, license information if applicable and taggers'/watermark.
Resize your tag to the size of your choice. Merge visible all layers. You can save here and be done, if you choose not to animate.
A N I M A T I O N
Edit > Copy.
Open Animation Shop, right-click on the desktop area and paste as a new animation.
Duplicate this frame until you have a total of 8 frames. Move the slider on the bottom of this animation to frame 1.
Open your music notes animation.
Edit > Select All. Edit > Copy
Go back to the animation you are building and Edit > Select All. Edit > Paste > Into Selected Frame.
Place your notes where you want them (I put them close to the tube again, trying to make it appear as though they're coming from her or the "band"). Release your mouse button.
Repeat this process if you want two instances of this animation, as I did.
Edit > Select All.
Right-click on the top bar of your animation and choose "Frame Properties." Change this number to 35.
View > Animation. If you like what you see, save as a .gif and we're done! Thanks for trying my tut!
.
.
 [Click image above to go to full sized image.]This tutorial was written on March 24, 2009, using Paint Shop Pro, version X.03. It should be okay to do with other versions as well. I just find X.03 more comfortable for me. You may download a free trial of Paint Shop Pro, version X2, from Corel. Any similarities between this tut and any others you may see are purely coincidental.
You will also need:
A tube of your choice. I'm using the glamorus artwork of Jennifer Janesko. You must have a license to use her work. You may purchase that license at CILM.
Scrap kit is by Foxy of Scrap It Sassy. It's a PTU kit, called Embrace the Night. It's a beautiful combination of colors, and comes in scrappers' and taggers' sizes!
Filters: VM Natural > Sparkle
Font: I used Raphael
Supplies: The mask, yet another one made by Essex Girl!! You can get this mask here.
Let's begin!!
Open your mask and minimize in PSP. Alternatively, you could file the mask in your PSP masks file for use later. Just be sure to give credit where it's due!
Create a new file, 700 x 750, white.
Open Frame3. Copy and paste as a new layer. Rotate 90° left.
Open Paper5. Copy and paste as a new layer. Drag this layer below your frame.
Apply your mask. INVERT TRANSPARENCY CHECKED!!! Delete mask layer, answer "yes" to the pop-up question, and merge group.
Highlight your frame layer and add your tube. Resize and position to your taste. As this is another "funky" frame where clicking inside of it doesn't work, I duplicated the tube layer, one being above the frame and one below.
Highlight the top tube layer.
Grab your lasso tool, set on point-to-point, and draw your selection *just* under the head of the top layer of tube, and around the full body of the rest of it. Be sure to allow room for the ribbon which is attached to the frame. See my tag for reference, if you like. Hit delete. Selections > Select none.
Highlight your bottom tube layer. Drop shadow.
Open Branch1. Copy and paste as a new layer. Rotate 65° left. Position on the left side of your tag. See mine for placement. Duplicate this layer. Image > Mirror. Merge these two layers down. Duplicate that layer. Image > Flip. Play around with these two layers until the branches and flowers are sticking out where you'd like them. Again, see my tag for placement. Merge these two layers down and drop shadow. Drag this layer down BELOW the mask layer.
Open Leaf2. Resize 35%. Copy and paste as a new layer. Position on the bottom left of the frame. See my tag for reference. Duplicate this layer and Image > Mirror. Merge these two layers down and drop shadow.
Open Flower6. Resize 35%. Copy and paste as a new layer. Position on the left left as I have in my example. Duplicate this layer and Image > Mirror. Merge these two layers down and drop shadow.
Open Flower5. Resize 35%. Copy and paste as a new layer. Position in the center of the other two flowers. Again, see my example for placement. Drop shadow this flower.
Add your name. I used color #036a67. Stroke set on 3, color #675250. I added the following Inner Bevel:
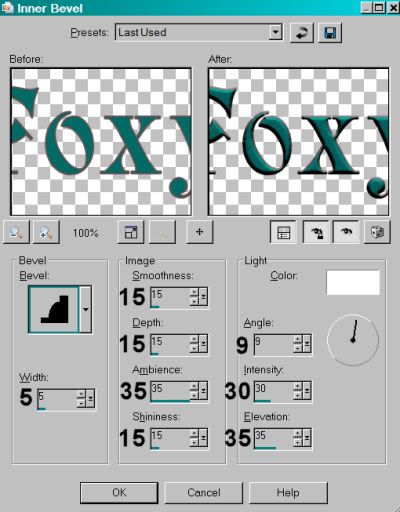
Hit okay.
Drop shadow your name.
Add your copyright, license information if applicable and taggers'/watermark.
Resize your tag to the size of your choice. At this point you could stop, if you choose not to animate. Just merge your layers, and save!
A N I M A T I O N
Highlight your branches layer. Duplicate three times, for a total of four layers. Make sure you're still highlighting the bottom of the four.
Effects > Plugins > VM Natural > Sparkle, using the following settings:
Hit okay.
Highlight the next branches layer up. Apply Sparkle again, but move the slider for Random Seed to another place -- any place. Hit okay.
Highlight the next upper layer. Again, apply Sparkle, with a new Random Seed setting.
Now highlight the top branches layer and apply Sparkle with a new Random Seed setting.
It's all very random. lol.
Now, whenever I use this filter, I go through and do it all again, on every layer, with more differing Random Seed settings. I do this to get more sparkle throughout the tag. So if you'd like to do this, go back to the bottom and add Sparkle, then the next up, then the next up after that, and then the top. Each layer getting a differing Random Seed setting
Okay. Close out the top three branches layers. Make sure the bottom branches layer is open
Edit > Copy merged
Open Animation Shop, right-click on the desktop area, and paste as a new animation.
Return to PSP. Close out the bottom branches layer and open the next branches layer up.
Edit > Copy merged.
Return to Animation Shop and Edit > Paste > After Current Frame.
Once more back to PSP. Close out the second branches layer we just used and open the second from the top.
Edit > Copy merged.
And again, back to Animation Shop. Edit > Paste > After Current Frame.
Return again to PSP. Close out the second branches layer and open the top branches layer.
Edit > Copy merged.
And again, back to Animation Shop. Edit > Paste > After Current Frame.
View > Animation. And we're done! I hope you've enjoyed this tutorial! Thanks for stopping by!
.
.
 [Click image above to go to full sized image.]This tutorial was written on March 22, 2009, using Paint Shop Pro, version X.03. It should be okay to do with other versions as well. I just find X.03 more comfortable for me. You may download a free trial of Paint Shop Pro, version X2, from Corel. Any similarities between this tut and any others you may see are purely coincidental.
You will also need:
A tube of your choice. I'm using the beautiful artwork of Selina Fenech. You must have a license to use her work. You may purchase that license at CILM.
Scrap kit is by Tammygirl0 of Treasured Scraps. It's a PTU kit, called Love, Honor and Cherish. It's a really soft color spectrum , and a HUGE kit!!
Filters: Eye Candy 4000 > Gradient Glow, Alien Skin Xenofex 2 > Constellation
Font: I used Portfolio
Supplies: The frame, made by Jen Ulasiewicz Designs. It's part of the "Shabbier Chic Frames" pack, and you can find that here.
Let's begin!!
Open your frame and minimize in PSP.
Create a new file, 700 x 750, white.
Open your frame of choice. Copy and paste as a new layer.
Okay, you'll notice the parts of this scrap kit are labeled in a way with which you might not be accustomed. I'm using her file numbers throughout, so it's just a bit different.
Open 027. Copy and paste as a new layer, below the frame layer.
Grab your magic wand, click inside the frame, and Selections > Modify > Expand by 7. Selections > Invert. Hit delete. Selections > Select none.
At this point I added my tube. Resize, position and drop shadow to your taste.
Open 158. Resize 220%. Copy and paste as a new layer. Softly drop shadow this layer.
Open 070. Copy and paste as a new layer. Do this on the top of your layer palette. Position the doodle to the upper left side of your tag. See my tag for reference purposes. Duplicate this layer and Image > Mirror. Duplicate the original one more time and rotate right 70°. Position so the swirls will be seen above your frame Merge all three of these layers together and give it a soft drop shadow. Drag this layer down to just above the 158 layer.
Open 212. Copy and paste as a new layer. This will be difficult to see! Resize 110%. Position toward the top of your tag. Duplicate this layer and Image > Flip. There will be an overlap in the center, on each side. Grab your selection tool (set on rectangle would likely be easiest) and draw a selection around the middle of the overlap on each side. Hit delete. Selections > Select none. Merge these two layers down.
Add your name. I used color #c1baca. Stroke set on 3, color #968dbd. Effects > Plugins > Eye Candy 4000 > Gradient Glow, settings 5 - 0 - 100, color white. Drop shadow your name.
Add your copyright, license information if applicable and taggers'/watermark.
Resize your tag to the size of your choice. At this point you could stop, if you choose not to animate. Just merge your layers, and save!
A N I M A T I O N
Highlight your 212 layer. Duplicate twice, for a total of three layers. Make sure you're still highlighting the bottom of the three.
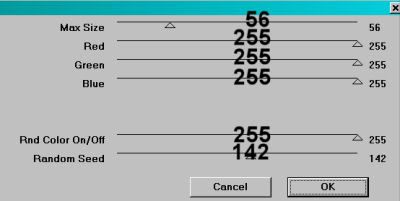
Effects > Plugins > Xenofex 2 > Constellation, using the Small Star Constellation preset.
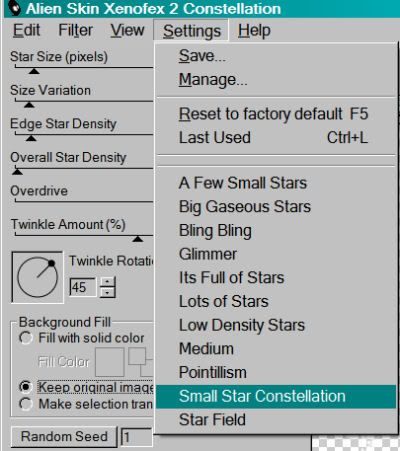
Make sure you click on "Keep original image" when you're doing this. Hit okay.
Highlight the middle 212 layer and apply Constellation again, same settings, but hit the "Random Seed" button. Hit okay.
Highlight the top 212 layer and apply Constellation one more time, same settings, and hit the "Random Seed" button again. Hit okay.
Close out the top and middle 212 layers, leaving the bottom 212 layer open.
Edit > Copy merged
Open Animation Shop, right-click on the desktop area, and paste as a new animation.
Return to PSP. Close out the bottom 212 layer and open the middle layer.
Edit > Copy merged.
Return to Animation Shop and Edit > Paste > After Current Frame.
Once more back to PSP. Close out the middle 212 layer and open the top.
Edit > Copy merged.
And again, back to Animation Shop. Edit > Paste > After Current Frame.
View > Animation. And we're done! I hope you've enjoyed this tutorial! Thanks for stopping by!
.
.
It has just been brought to my attention that there has been a problem with the link to supplies for my Springtime Fun tutorial. I have just fixed this, and the link has been changed at the tut. But in case you just want it now, for some reason, the supplies for Springtime Fun can be found here. Sorry for the inconvenience!!! And thank you for letting me know!!.
.
 [Click image above to go to full sized image.]This tutorial was written on March 22, 2009, using Paint Shop Pro, version X.03. It should be okay to do with other versions as well. I just find X.03 more comfortable for me. You may download a free trial of Paint Shop Pro, version X2, from Corel. Any similarities between this tut and any others you may see are purely coincidental.
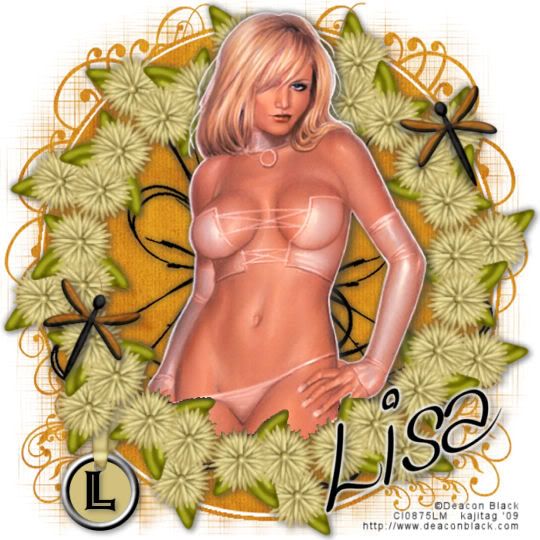
You will also need:
A tube of your choice. I'm using the sexy artwork of Deacon Black. You must have a license to use his work. You may purchase that license at CILM. You may notice, if you've clicked on the link I gave for Deacon Black, that it goes directly to his art at CILM. It turns out his URL isn't working right now. The title bar says it's the right place, but the content is gone. So I decided to link you to his art at CILM. Maybe you'll get some!!
Scrap kit is by Lisa of Scrap It Sassy. It's a PTU kit, called Citrus Blaze. It's a really different color spectrum (IMO), and it's on sale right now for a buck!! ($1 USD)
Filters: Eye Candy 4000 > Gradient Glow, Mura's Meister > Copies
Font: I used Kingthings Wrote for the name, Ashley Inline for the initial on the tag.
Supplies: The doodle, another unknown artist and ambiguous name, so if it turns out to be yours, let me know and I'll credit you correctly! You can find the doodle here. Also, the mask, by Gabee. You can find this mask on Gabee's Fotki page. It is gabeemask13. Thanks for sharing your work with the PSP community, Gabee!!
Let's get to this!!
Open your supplies and minimize in PSP. Alternatively, you could add your mask to your PSP masks folder, so you'd have it for use later. Always give proper credit where you can, though, as you collect your PSP booty!
Create a new file, 700 x 700, white.
Add a new raster layer. Selections > Select all.
Open paper3. Copy and paste INTO SELECTION.
Apply your mask. INVERT TRANSPARENCY! Delete the mask layer, answer "yes" to the pop-up question, and merge group.
Open FlowerCluster4. Copy and paste as a new layer. Resize 80%.
Effects > Plugins > Mura's Meister > Copies with the following settings:
Hit okay.
It may have just been me, but when I just looked at it at this point, it didn't seem to me that the wreath created and the mask layer were centered together. If you see the same thing (don't feel bad if you don't -- I've been weird all my life! lol), fiddle with your mover tool until you see it all nice and centered.
Add your tube. Resize, position and drop shadow to your liking. If you want it to "emerge" from the wreath of flowers we made, then...
Highlight your wreath layer. Grab your magic wand and click inside the wreath. Selections > Modify > Expand by 1. Selections > Invert.
Highlight your tube layer. Get your eraser brush and erase any parts of the tube that overlap the lower portion of the wreath. Selections > Select none.
Open Tag4. Copy and paste as a new layer. I positioned mine in the bottom left corner of the tag. See my example for placement reference. Drag this layer down below the wreath layer. Drop shadow your tag.
Open Dragonfly3. Resize 45%. I added a small inner bevel to my dragonfly. This isn't necessary, I was just experimenting. If you'd like to, here are the settings I used (screen shot from a previous tut):
Hit okay.
Rotate dragonfly 25° right. Duplicate this layer. Image > Mirror. I placed the duplicate on the top right. Again, see my example if you wish. Merge these two layers down and drop shadow your dragonflies.
Open the doodle you got from my supplies. Copy and paste as a new layer. Drag this layer to just above the mask layer. Move it a bit to the right, so there is more doodle showing on the right side of your tube than your left. Duplicate this layer and Image > Mirror. Position as you like. Merge these two layers down and drop shadow your doodle, softly.
If you want to add your initial to the tag, now would be the time to do it. Drop shadow the initial.
Add your name. I just used black for the name. I added Effects > Plugins > Eye Candy 4000 > Gradient Glow set at 5 - 0 - 100, color white.
Drop shadow your name.
Add your copyright, license information if applicable and taggers'/watermark.
Resize your tag to the size of your choice. Merge your layers, and save! We're done! I hope you enjoyed this tut!.
.
 [Click image above to go to full sized image.]This tutorial was written on March 22, 2009, using Paint Shop Pro, version X.03. It should be okay to do with other versions as well. I just find X.03 more comfortable for me. You may download a free trial of Paint Shop Pro, version X2, from Corel. Any similarities between this tut and any others you may see are purely coincidental.
You will also need:
A tube of your choice. I'm using the excellent artwork of Jennifer Janesko. You must have a license to use her work. You may purchase that license at CILM.
Animation Shop - I've found it here! This is from CNET, so it's a safe download, too!
Scrap kit is by Tina of Bitchin Scraps Boutique. It's a PTU kit, called True Red.
Filters: No outside filters in this tut!
Font: I used 2 Matilda DNA
Supplies: The doodle, made by Ziggy Fan. You can find the doodle link here!! Thanks, Ziggy Fan!
Let's get to it!!
Create a new file, 750 x 700, white.
Open rectangleframe2. Rotate either way 90° ALL LAYERS CHECKED! Resize 75%. Copy and paste as a new layer.
Highlight your background layer. Grab your magic wand and click inside the frame. Selections > Modify > Expand by 7.
Add a new raster layer. Flood fill this layer with a color of your choice. I used #c38294. Selections > Select none.
Add your tube. Resize, position and drop shadow to your liking. If you'd like it to appear to be coming out of the frame, then....
Again grab your magic wand. Click inside the frame. Selections > Modify > Expand by 1. Selections > Invert.
Grab your eraser brush. Be sure your tube layer is highlighted. Erase any of the tube area that overlaps the frame at the bottom. Selections > Select none.
Open swirlflower3. Copy and paste as a new layer. Position so the petals of the flower show above and beside the right top portion of the frame. See my tag for reference purposes. Duplicate this layer and Image > Mirror. Image > Flip. Merge these two layers down and drop shadow the flowers. Drag this layer down to just below the flood-filled layer you made earlier.
Open the doodleart2 file that you got from Ziggy Fan's web site. Be sure you're on the doodle layer. Image > Mirror. Copy and paste as a new layer. Resize 115%. Drag this layer down below the flower layer. Add a soft drop shadow.
Open paintedbutterfly4. Copy and paste as a new layer. Resize 35%. Position to your liking. Drop shadow. Duplicate this layer and Image > Mirror. Position again to your liking. See my tag for reference. You may want to drop shadow again.
Open diamonddoodle1. Copy and paste as a new layer. Resize about 105%. Position so the swirl part is on the right side of your frame. (I do this stuff on the top layer so I can see what I'm working with.) Again, see my tag for reference. Duplicate this layer and Image > Mirror. Image > Flip. Merge these two layers down. We're not done with this, I'm just moving on right now. LOL
Add your name. I used the color of white, with a 3 stroke done in color #61030d. Add the following inner bevel:
Hit okay. Drop shadow your name.
Add your copyright, license information if applicable and taggers'/watermark.
You can save here and be done, if you choose not to animate. Resize your tag to your desired size and save.
IF YOU ARE ANIMATING, do not resize yet!
A N I M A T I O N
Highlight your diamonddoodle layer. Duplicate twice, for a total of three doodle layers. Go to the bottom layer. Using your lasso tool, set on point-to-point, draw around one of the circles in the swirl.
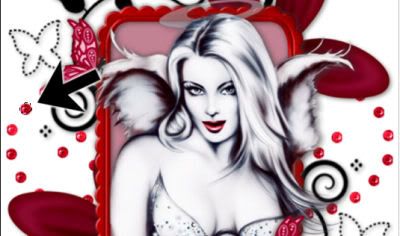
See the "marching ants?" (They're not marching on the above example, as that's a screen shot.)
Now, draw a selection around every third circle. Select, skip, skip. Select, skip skip, etc. No reason to select those in the center, as they will be covered up in the final tag.
Once you have all of the circles selected, Adjust > Brightness and Contrast > Brightness/Contrast:
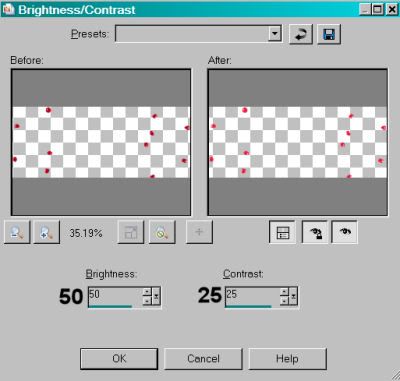
Selections > Select none.
Highlight the middle diamonddoodle1 layer and re-do your selecting again, THIS time selecting the NEXT dot in the swirl and skip, skip, Select, skip, skip again. Once done, apply the same brightness and contrast settings. Selections > Select none.
Highlight the top diamonddoodle1 layer and re-do your selecting again, this time selecting the third dot in the line and Select, skip, skip. Select, skip, skip, etc. Once done there, again you'll apply the same brightness and contrast settings. Selections > Select none.
Close out the top two diamonddoodle1 layers and leave the bottom one open.
Resize your tag to your desired size.
Edit > Copy merged.
Open animation shop, right-click on the desktop area and paste as a new animation.
Return to PSP. Close out the bottom doodle layer and open the middle doodle layer.
Edit > Copy merged
Return to Animation Shop. Edit > Paste > After Current Frame.
Back to PSP. Close out the middle doodle layer and open the top.
Edit > Copy merged.
Return again to Animation Shop and Edit > Paste > After Current Frame.
Edit > Select All
Right-click on the top bar of your animation and choose "Frame Properties." Change this number to 25.
View > Animation. If you like what you see, save as a .gif and we're done! Thanks for trying my tut!
.


©kajira hill 2009
http://kajituts.blogspot.com


