skip to main |
skip to sidebar
.
 [Click image above to go to full sized image.]This tutorial was written on May 22, 2009, using Paint Shop Pro, version X.03. It should be okay to do with other versions as well. I just find X.03 more comfortable for me. You may download a free trial of Paint Shop Pro, version X2, from Corel. Any similarities between this tut and any others you may see are purely coincidental.
You will also need:
Animation Shop. This is from CNET, so it's a safe download.
A tube of your choice. I'm using the wonderful work of Gennadiy Koufay. There is a very short time left that you can get his art at C.I.L.M. I've written to C.I.L.M. for an update. He *IS* leaving them, and I know nothing about his future plans. So, I guess you must have a license to use his work right now, and you can get that license and his tubes at C.I.L.M., link above.
Okay, I've heard from Michelle, and this is what she has to say about Gennadiy Koufay's art being available at C.I.L.M.:
"Once Koufay is off the site then you will no longer be able to purchase his work from CILM. You will only be able to obtain replacements for any orders you may lose, but other than that they will not be available."
I wrote her back for the date, and she said his last day with C.I.L.M. is June 7, 2009.
Scrap kit is by KrazyMary, of The Krazy World of Mary. This is a FTU kit, available through Digital Arts Cafe, and is called I'm Gonna Tell Mommy. This is part of a collaboration from the ladies at Digital Arts Cafe, and it's full scrappers' sized. So it's a heavy download, split into three parts. Also, you must sign up at Digital Arts Cafe to get the free download. But it's BEAUTIFUL!! This is only free until May 31. The collaboration is in celebration of Mothers' Day.
Filters: Eye Candy 3.1 > Glass, Eye Candy 4000 > Gradient Glow -=- and -=- Alien Skin > Xenofex 2 > Constellation
[NOTE: Gradient Glow and Glass settings were used on the name only, so are totally optional!]
Font: I used WaterLily.
Supplies: The mask, from whom I do not know. If you do this tut and find it is yours, please let me know so that I can give you proper credit!
Also, please, if you have problems with the download link for supplies, drop me a line via e-mail. Leaving a comment without a way for me to contact you back doesn't help. If you e-mail me, I'll send you the supplies.
Another note: I use a program called WinRAR for my compression of files. It has the capacity to save things as and/or open .rar files OR .zip files. I have been saving the supplies within this program, as .zip files. I'm beginning to use a .rar file for compression. I want to see if you guys have less problems getting supplies with this type of file. Wondering if, because the program is called WinRAR, maybe making .zip files with it is screwing people up? You can find WinRAR free at CNET Downloads. I hope this helps! I think I'll be doing this, and keeping this paragraph in as a boilerplate, while I see if it fixes the problem. *Fingers crossed!*
Okay let's go!
Open a new image, 700 x 750, white.
Open beige-frame. Resize 35%. Rotate 90° left. Image > Mirror. Now, copy and paste as a new layer on your canvas.
Add your tube. Resize, position and drop shadow to your taste.
Open grey-doodle. Resize 10%. Copy and paste as a new layer. Drag this layer below your tube layer. Position as you would like it. Duplicate this layer and Image > Mirror. Merge these two layers down. Drop shadow.
Open paper18. Copy and paste as a new layer. Drag this layer below the grey-doodle layer.
Highlight your frame layer. Grab your magic wand and click inside the frame. Selections > Modify > Expand by 5. Selections > Invert.
Highlight your paper18 layer. Hit delete. Selections > Select none.
Drop shadow your frame.
Open grey-doodle again. Resize 20%. Copy and paste as a new layer. Rotate 50° right. Drag this layer below your paper18 layer. Duplicate this layer and Image > Mirror, Image > Flip and Image > Mirror again. Merge these layers down and duplicate. Image > Flip. Position these doodles however you'd like them to look. Merge all these layers down and drop shadow.
Highlight your white background layer.
Open paper18 again. Resize to 750 x 750 pixels. Copy and paste as a new layer.
Apply your mask. Delete the mask layer, answer "yes" to the pop-up question, and merge group.
Go back to the top layer and add your name. I used color #eacecb for the fill, color #807575 for the stroke and set the stroke at 1.5.
I then applied Eye Candy 3.1 > Glass with the default settings, but changed the color to light grey:
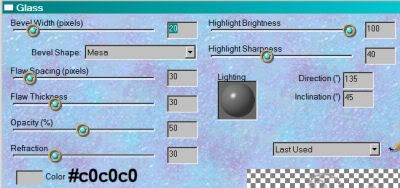
And then I applied Eye Candy 4000 > Gradient Glow with settings of 3 - 0 - 100, color white.
Drop shadow your name.
Add your copyright, license information if applicable, and taggers'/watermark.
Resize your tag to the size with which you're most comfortable.
If you're NOT going to animate, you can just merge and save. You're done!
A N I M A T I O N
Highlight your bottom-most grey-doodle layer. (The background doodles.) Duplicate this layer three times, for a total of four grey-doodle layers.
Still on the bottom grey-doodle layer...
Effects > Plugins > Alien Skin Xenofex 2 > Constellation, with the following settings:
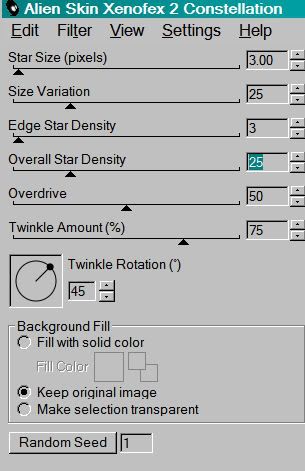
Hit okay.
Highlight the next grey-doodle layer up. Again, apply Constellation, clicking on "Random Seed" once.
Hit okay.
Highlight the next grey-doodle layer. Apply Constellation again, and again click "Random Seed."
Hit okay.
Now, highlight the top grey-doodle layer and apply Constellation, clicking "Random Seed" once more.
Close out the top three grey-doodle layers, leaving the bottom grey-doodle layer open.
Edit > Copy merged
Open Animation Shop, right-click on the desktop area, and paste as a new animation.
Return to PSP. Close out the bottom grey-doodle layer, and open the next grey-doodle layer up.
Edit > Copy merged.
Return to Animation Shop and Edit > Paste > After Current Frame.
Back to PSP. Close out the open grey-doodle layer, and open the next grey-doodle layer up.
Edit > Copy merged.
And, back to Animation Shop. Edit > Paste > After Current Frame.
Return again to PSP and close out the open grey-doodle layer. Open the top grey-doodle layer.
Edit > Copy merged.
Back again to Animation Shop. Edit > Paste > After Current Frame.
View > Animation. And, we're done! I hope you've enjoyed this tutorial! Thanks for trying my tut!!
.
.
 [Click image above to go to full sized image.]This tutorial was written on May 21, 2009, using Paint Shop Pro, version X.03. It should be okay to do with other versions as well. I just find X.03 more comfortable for me. You may download a free trial of Paint Shop Pro, version X2, from Corel. Any similarities between this tut and any others you may see are purely coincidental.
You will also need:
Animation Shop. This is from CNET, so it's a safe download.
A tube of your choice. I'm using the great work of Dirk Richter. You must have a license to use his work. You may purchase that license at My PSP Tubes.
Scrap kit is by Lynne, of Baby Cakes Scraps. This is a FTU kit, available through her blog, and is called After Midnight. Another FTU kit, ladies and gents! Leave some love!!
This is the second tutorial I've done with this kit, and I've used the same "black swirl" for the background on both. But as you can see, Midnight Sparkle, written yesterday, looks much different. I liked them both, so I decided to document them both. If you did or looked at Midnight Sparkle yesterday or today, the verbiage on this tutorial is going to be almost a slam-dunk duplicate of that one. Just to let you know!!
Filters: Eye Candy 4000 > Gradient Glow -=- and -=- dsb Flux
Font: I used Yolanda Princess.
Supplies: NO outside supplies are used in this tut!
Okay let us begin!
Open a new image, 750 x 700, white.
Open the brooch. Resize 250%. Adjust > Sharpness > Sharpen. Copy and paste as a new layer.
Open the gem. Resize 165%. Adjust > Sharpness > Sharpen. Copy and paste as a new layer.
Add your tube. Resize, position and drop shadow to your taste.
Highlight your white background layer.
Open "black swirl." Resize 135%. Copy and paste as a new layer. Duplicate this layer and Image > Flip, then Image > Mirror. Merge these two layers down. Duplicate that layer. Rotate 90° either direction. Merge these two layers down. Resize this layer 90%.
Add your name. I used color #dd1c00 for the fill, black for the stroke, stroke set at 0.5. I then applied Eye Candy 4000 > Gradient Glow with settings of 5 - 0 - 100, color white.
Drop shadow your name.
Add your copyright, license information if applicable, and taggers'/watermark.
Resize your tag to the size with which you're most comfortable.
If you're NOT going to animate, you can just merge and save. You're done!
A N I M A T I O N
Highlight your black swirl layer. Duplicate this layer four times, for a total of five black swirl layers.
Still on the bottom black swirl layer...
Effects > Plugins > dsb Flux > Bright Noise, with settings somewhat like this:
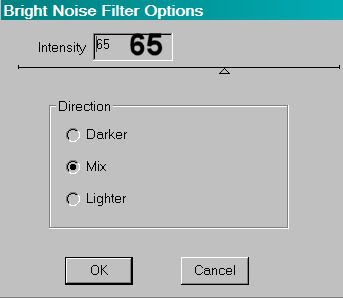
Hit okay.
Highlight the next black swirl layer up. Again, apply Bright Noise, clicking on "mix" a couple times.
Hit okay.
Highlight the middle black swirl layer. Apply Bright Noise again, and again click "mix" a few times.
Hit okay.
Now, highlight the next black swirl layer up and apply Bright Noise, clicking "mix" a few more times.
And finally, highlight the top black swirl layer, and apply Bright Noise again. And again click on "mix" a few times.
Close out the top four black swirl layers, leaving the bottom black swirl layer open.
Edit > Copy merged
Open Animation Shop, right-click on the desktop area, and paste as a new animation.
Return to PSP. Close out the bottom black swirl layer, and open the next black swirl layer up.
Edit > Copy merged.
Return to Animation Shop and Edit > Paste > After Current Frame.
Back to PSP. Close out the open black swirl layer, and open the middle black swirl layer.
Edit > Copy merged.
And, back to Animation Shop. Edit > Paste > After Current Frame.
Return again to PSP and close out the middle black swirl layer. Open the next layer up.
Edit > Copy merged.
Back again to Animation Shop. Edit > Paste > After Current Frame.
Finally, return to PSP and close out the open black swirl layer, opening the top black swirl layer.
Edit > Copy merged.
Return again to Animation Shop. Edit > Paste > After Current Frame.
Still in Animation Shop, Edit > Select All.
Right-click the top bar above the animation and select "Frame Properties." Change this number to 5.
View > Animation. And, we're done! I hope you've enjoyed this tutorial! Thanks for trying my tut!!
.
.
 [Click image above to go to full sized image.]This tutorial was written on May 20, 2009, using Paint Shop Pro, version X.03. It should be okay to do with other versions as well. I just find X.03 more comfortable for me. You may download a free trial of Paint Shop Pro, version X2, from Corel. Any similarities between this tut and any others you may see are purely coincidental.
You will also need:
Animation Shop. This is from CNET, so it's a safe download.
A tube of your choice. I'm using the wonderful artwork of Jennifer Janesko. You must have a license to use her work. You may purchase that license at C.I.L.M..
Scrap kit is by Lynne, of Baby Cakes Scraps. This is a FTU kit, available through her blog, and is called After Midnight. Another FTU kit, ladies and gents! Leave some love!!
Filters: Eye Candy 4000 > Gradient Glow -=- and -=- dsb Flux
Font: I used PhillisOnlShadD.
Supplies: NO outside supplies are used in this tut!
Okay let us begin!
Open a new image, 750 x 700, white.
Open the string frame. Copy and paste as a new layer.
Add your tube. Resize, position and drop shadow to your liking.
Highlight your frame layer. Grab your magic wand and click inside the frame. This is a tricky one, so be sure you remember all the little loops and stuff on the left, AND the outside mini-loops at the bottom! Selections > Modify > Expand by 3. Selections > Invert.
Highlight your white background layer.
Open the Dark Floral Paper. Copy and paste as a new layer. Hit delete.
Selections > Invert. Selections > Modify > Contract by 2. Selections > Invert again.
Grab your eraser brush and erase any of your tube that is overlapping the frame areas. Selections > Select none.
Open the flowers labeled as "cluster." Resize 65%. Copy and paste as a new layer. Position at the bottom of the frame. See my tag for placement reference. Drop shadow your flower cluster.
Open the bfly. Resize 50%. Copy and paste as a new layer. Position over your flower cluster. I also rotated mine 15° to the right. Drop shadow your butterfly.
Highlight your white background layer again.
Open "black swirl." Resize 135%. Copy and paste as a new layer. Duplicate this layer and Image > Flip, then Image > Mirror. Merge these two layers down. Duplicate that layer. Rotate 90° either direction. Merge these two layers down. Resize this layer 90%.
Add your name. I used white for the fill and stroke, stroke set at 1. I then applied Eye Candy 4000 > Gradient Glow with settings of 5 - 0 - 100, color #b31916.
Drop shadow your name.
Add your copyright, license information if applicable, and taggers'/watermark.
Resize your tag to the size with which you're most comfortable.
If you're NOT going to animate, you can just merge and save. You're done!
A N I M A T I O N
Highlight your black swirl layer. Duplicate this layer four times, for a total of five black swirl layers.
Still on the bottom black swirl layer...
Effects > Plugins > dsb Flux > Bright Noise, with settings somewhat like this:
Hit okay.
Highlight the next black swirl layer up. Again, apply Bright Noise, clicking on "mix" a couple times.
Hit okay.
Highlight the middle black swirl layer. Apply Bright Noise again, and again click "mix" a few times.
Hit okay.
Now, highlight the next black swirl layer up and apply Bright Noise, clicking "mix" a few more times.
And finally, highlight the top black swirl layer, and apply Bright Noise again. And again click on "mix" a few times.
Close out the top four black swirl layers, leaving the bottom black swirl layer open.
Edit > Copy merged
Open Animation Shop, right-click on the desktop area, and paste as a new animation.
Return to PSP. Close out the bottom black swirl layer, and open the next black swirl layer up.
Edit > Copy merged.
Return to Animation Shop and Edit > Paste > After Current Frame.
Back to PSP. Close out the open black swirl layer, and open the middle black swirl layer.
Edit > Copy merged.
And, back to Animation Shop. Edit > Paste > After Current Frame.
Return again to PSP and close out the middle black swirl layer. Open the next layer up.
Edit > Copy merged.
Back again to Animation Shop. Edit > Paste > After Current Frame.
Finally, return to PSP and close out the open black swirl layer, opening the top black swirl layer.
Edit > Copy merged.
Return again to Animation Shop. Edit > Paste > After Current Frame.
View > Animation. And, we're done! I hope you've enjoyed this tutorial! Thanks for trying my tut!!
.
.
 [Click image above to go to full sized image.]This tutorial was written on May 20, 2009, using Paint Shop Pro, version X.03. It should be okay to do with other versions as well. I just find X.03 more comfortable for me. You may download a free trial of Paint Shop Pro, version X2, from Corel. Any similarities between this tut and any others you may see are purely coincidental.
You will also need:
A tube of your choice. A sitting or leaning back tube would be best for this tag. I'm using the cute artwork of Pinuptoons. You must have a license to use this work. You may purchase that license at C.I.L.M..
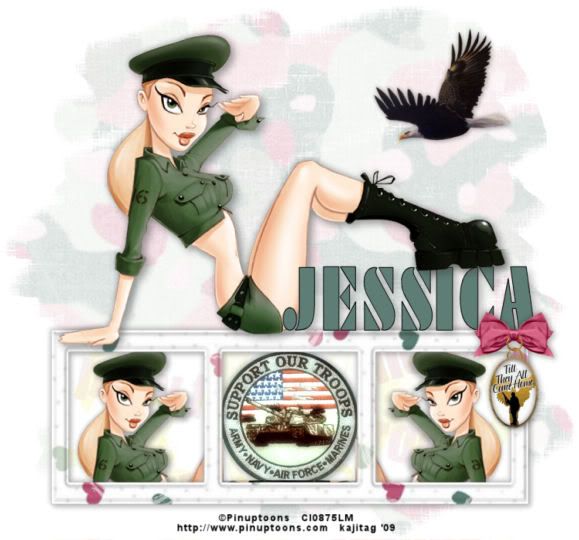
Scrap kit is by Jessica, of Scraps by Jessica. This is a FTU kit, available through her blog, and is called In Memory of Chris. This kit was made to honor the memory of one of Jessica's close friends, who died serving our country in Afghanistan. Please be sure to leave her lots of love when downloading this kit!
Filters: No outside filters used in this tutorial!
Font: I used ArmyBlackCondensed.
Supplies: The mask and the eagle files. I don't know where I got either of them, sorry. So if they are yours, let me know, so I can give you proper credit! You can find these files here!!
Also, please, if you have problems with the download link for supplies, drop me a line via e-mail. Leaving a comment without a way for me to contact you back doesn't help. If you e-mail me, I'll send you the supplies.
Another note: I use a program called WinRAR for my compression of files. It has the capacity to save things as and/or open .rar files OR .zip files. I have been saving the supplies within this program, as .zip files. I'm beginning to use a .rar file for compression. I want to see if you guys have less problems getting supplies with this type of file. Wondering if, because the program is called WinRAR, maybe making .zip files with it is screwing people up? You can find WinRAR free at CNET Downloads. I hope this helps! I think I'll be doing this, and keeping this paragraph in as a boilerplate, while I see if it fixes the problem. *Fingers crossed!*
Okay,let's do this!
Open your supplies in PSP and minimize. Alternatively, you could load the mask into your PSP masks file. This way, you'd have it to use later on....
Open a new image, 750 x 700, white.
Open Frame2. Resize 150%. Copy and paste as a new layer. Rotate 90° either way. Position almost to the bottom of your canvas.
Add your tube. Resize, position and drop shadow to your liking.
Highlight your frame layer. Grab your magic wand and click inside each section of the frame. Selections > Modify > Expand by 7. Selections > Invert.
Open paper 20. Copy and paste as a new layer, dragging this layer below the frame layer. Position the paper where you'd like it, then hit delete. Selections > Select none.
Duplicate your tube layer. Resize as necessary, then position below the frame layer, in the left section of the frame.
Duplicate this layer and Image > Mirror.
Open the patch. Resize 50%. Copy and paste as a new layer. Bring this layer below the frame as well, and position in the middle area of your frame.
Highlight the frame layer. Click inside all sections of the frame and Selections > Modify > Expand by 7. Selections > Invert.
Highlight each of the three layers below the frame and hit delete. Selections > Select none.
You can merge these layers down now, if you like.
Drop shadow your frame.
Open the charm. Resize 65%. Copy and paste as a new layer. Position where you would like it on the frame. I chose the top right corner of the frame. Drop shadow your charm.
Open the eagle image included in the supplies. Resize 50%. Copy and paste as a new layer. Rotate 15° left. Drop shadow the eagle.
Highlight your white background layer.
Add a new raster layer. Selections > Select All.
Open paper1. Copy and paste INTO SELECTION. Selections > Select none.
Apply your mask. Delete mask layer. Answer "yes" to the pop-up question and merge group.
Add your name. I used color #5d7d75 for the fill and black for the stroke, stroke set at 1.
Drop shadow your name.
Add your copyright, license information if applicable, and taggers'/watermark.
Resize your tag to the size with which you're most comfortable.
We are done! I hope you enjoyed this tutorial! Thanks for trying my it!
.
.
 [Click image above to go to full sized image.]This tutorial was written on May 18, 2009, using Paint Shop Pro, version X.03. It should be okay to do with other versions as well. I just find X.03 more comfortable for me. You may download a free trial of Paint Shop Pro, version X2, from Corel. Any similarities between this tut and any others you may see are purely coincidental.
You will also need:
Animation Shop. This is from CNET, so it's a safe download.
A tube of your choice. I'm using the great artwork of Dave Nestler. You must have a license to use his work. You may purchase that license at C.I.L.M..
Scrap kit is by Tina, of Tina's Magical Scrap World. This is a PTU kit, available through Scraps With Attitude, and it's called Magical Moments.
Filters: VM Natural > Sparkle -=- and -=- Eye Candy 4000 > Gradient Glow
Font: I used Boulevard.
Supplies: The mask, which is again from Zuzzanna. She has a lot of beautiful masks there, so look around! Thank you, Zuzzanna!!
Also, please, if you have problems with the download link for supplies, drop me a line via e-mail. Leaving a comment without a way for me to contact you back doesn't help. If you e-mail me, I'll send you the supplies.
Another note: I use a program called WinRAR for my compression of files. It has the capacity to save things as and/or open .rar files OR .zip files. I have been saving the supplies within this program, as .zip files. I'm beginning to use a .rar file for compression. I want to see if you guys have less problems getting supplies with this type of file. Wondering if, because the program is called WinRAR, maybe making .zip files with it is screwing people up? You can find WinRAR free at CNET Downloads. I hope this helps! I think I'll be doing this, and keeping this paragraph in as a boilerplate, while I see if it fixes the problem. *Fingers crossed!*
Okay,let's do this!
Open your mask in PSP and minimize. Alternatively, you could load it into your PSP masks file. This way, you'd have it to use later on....
Open a new image, 700 x 750, white.
Open bradframe4. Resize 85%. Copy and paste as a new layer. Rotate 90° either way.
Add your tube. Resize, position and drop shadow to your liking.
Highlight your frame layer. Grab your magic wand and click inside the frame. Selections > Modify > Expand by 1. Selections > Invert.
Highlight your tube layer. Now, get your eraser brush and erase any of your tube that is overlapping the frame in places you don't want it.
Selections > Invert. Selections > Expand by 7. Selections > Invert again.
Highlight your white background layer.
Open paper21. Resize to 750 x 750 pixels. Copy and paste as a new layer. Hit delete. Selections > Select none.
Highlight your white background layer again.
Open paper6. Resize to 750 x 750 pixels. Copy and paste as a new layer.
Apply your mask. Delete mask layer. Answer "yes" to the pop-up question and merge group.
Now, this mask is too big, right? Grab your pick tool (in PSP X it's in the same drop-down space as the mover tool) and move the edges of the "frame" part of the mask under the actual frame. Gosh, I hope I explained that well enough! In my case, I shrunk it down from all four sides.
Open starchain1. Resize 35%. Copy and paste as a new layer. Drag this layer to just below the frame layer, and position so that it looks like it's hanging from the frame. See my tag for placement reference. Drop shadow your starchain.
Open magicflower1. Resize 65%. Copy and paste as a new layer. Position on the bottom right side of your frame. Drop shadow.
Open magicflower4. Resize 65%. Image > Mirror. Copy and paste as a new layer. Position over the first magicflower layer, to your liking. Drop shadow.
Open tag3. Resize 50%. Copy and paste as a new layer. Rotate 20° left. Position over the stems of both magicflower layers. Drop shadow.
To get rid of the excess stems sticking out under the tag, grab your selection tool, set on rectangle, and select the area around all the stems you want to delete. Highlight one of the magicflower layers. Hit delete. Highlight the second magicflower layer and hit delete again. Selections > Select none.
Add your name. I used color #485762 for the fill and stroke, stroke set at 3. I then applied Eye Candy 4000 > Gradient Glow with settings of 5 - 0 - 100, color #aabec7.
Drop shadow your name.
Add your copyright, license information if applicable, and taggers'/watermark.
Resize your tag to the size with which you're most comfortable.
If you're NOT going to animate, you can just merge and save. You're done!
A N I M A T I O N
Highlight your starchain layer. This part is a bit tricky. I had to do it about 10 times before I got it to where I was satisfied with it.
Grab your selection tool, still set on rectangle. Change THAT setting to "star1."
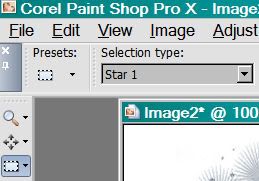
You should have something like the following:
Now, duplicate your starchain layer twice, for a total of three starchain layers.
Still on the bottom starchain layer...
Effects > Plugins > VM Natural > Sparkle, with settings somewhat like this:
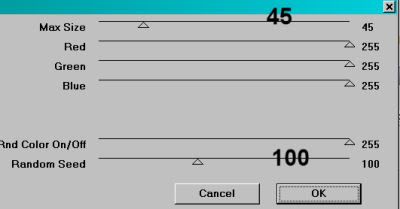
You can change the top and bottom numbers as much as you like. Look in the preview window while moving the sliders to see what changes are happening to the effect.
Hit okay.
Highlight the middle starchain layer. Again, apply Sparkle, changing your top and bottom sliders as you would like.
Hit okay.
Highlight the top starchain layer. Apply Sparkle again, and again change your sliders to your liking.
Hit okay.
Now, whenever I use this filter, I go through that process twice. Going back to the bottom layer and applying, then the middle, then the top. I do this to get more sparkles. It's up to you!
Selections > Select none.
Close out the top two starchain layers, leaving the bottom starchain layer open.
Edit > Copy merged
Open Animation Shop, right-click on the desktop area, and paste as a new animation.
Return to PSP. Close out the bottom starchain layer, and open the middle starchain layer.
Edit > Copy merged.
Return to Animation Shop and Edit > Paste > After Current Frame.
Back to PSP. Close out the middle starchain layer, and open the top starchain layer.
Edit > Copy merged.
And, back to Animation Shop. Edit > Paste > After Current Frame.
Still in Animation Shop, Edit > Select All.
Right-click on the top bar of your animation and change this number to 50.
View > Animation. And, we're done! I hope you've enjoyed this tutorial! Thanks for trying my tut! I hope you enjoyed it!
.
.
 [Click image above to go to full sized image.]This tutorial was written on May 17, 2009, using Paint Shop Pro, version X.03. It should be okay to do with other versions as well. I just find X.03 more comfortable for me. You may download a free trial of Paint Shop Pro, version X2, from Corel. Any similarities between this tut and any others you may see are purely coincidental.
You will also need:
Animation Shop. This is from CNET, so it's a safe download.
A tube of your choice. I'm using the beautiful, mystical artwork of Delphine Levesque Demers. You must have a license to use her work. You may purchase that license at C.I.L.M..
Scrap kit is by Clarey!! Always great when she offers a FTU kit. Be sure to leave lots of love when you download! It's called Delightful. It certainly is! Scroll down past the NSD ad, and there you can download this kit in either taggers' or scrappers' size.
Filters: dsb Flux > Bright Noise
Font: I used Amaze Bold.
Supplies: The mask, which is from Zuzzanna. She has a lot of beautiful masks there, so look around! Thank you, Zuzzanna!!
Also, please, if you have problems with the download link for supplies, drop me a line via e-mail. Leaving a comment without a way for me to contact you back doesn't help. If you e-mail me, I'll send you the supplies.
Another note: I use a program called WinRAR for my compression of files. It has the capacity to save things as and/or open .rar files OR .zip files. I have been saving the supplies within this program, as .zip files. I'm beginning to use a .rar file for compression. I want to see if you guys have less problems getting supplies with this type of file. Wondering if, because the program is called WinRAR, maybe making .zip files with it is screwing people up? You can find WinRAR free at CNET Downloads. I hope this helps! I think I'll be doing this, and keeping this paragraph in as a boilerplate, while I see if it fixes the problem. *Fingers crossed!*
Okay,let's start! This is a "quick-n-dirty" tutorial!
Open your mask in PSP and minimize. Alternatively, you could load it into your PSP masks file. This way, you'd have it to use later on....
Open a new image, 700 x 700, white.
Open paper5. Resize to 700 x 700 pixels. Copy and paste as a new layer.
Apply your mask. Delete the mask layer, answer "yes" to the pop-up question and merge group.
Resize your mask layer 90%.
Add your tube. Resize, position and drop shadow to your liking.
Open stringflowers. Copy and paste as a new layer. Move to the left or the right of your canvas. Duplicate this layer. Image > Mirror. Image > Flip. Merge these two layers down and drop shadow.
Add your name. I used color #9c8c6d for the fill and color #e7dcaa for the stroke, stroke set at 3. Drop shadow your name.
Add your copyright, license information if applicable, and taggers'/watermark.
Resize your tag to the size with which you're most comfortable.
If you're NOT going to animate, you can just merge and save. You're done!
A N I M A T I O N
Highlight your stringflowers layer. Zoom in. I zoomed to 300%. Grab your lasso tool, set on point-to-point, and carefully draw a selection around the middle circle areas of each flower in the stringflowers.
Duplicate this layer two times, for a total of three layers.
Still on the bottom stringflowers layer...
Effects > Plugins > dsb Flux > Bright Noise, set at 41 and click on "mix."
Hit okay.
Highlight the middle stringflowers layer. Again, apply Bright Noise, this time clicking on "mix" a couple times. (That's not really necessary - if you pay attention to the preview in the plugin, you can see the pattern changes if you just hit "mix" once. This is just the way it's always been instructed in tutorials. It's up to you!)
Hit okay.
Highlight the top stringflowers layer. Apply Bright Noise again, and again click on "mix."
Hit okay.
Selections > Select none.
Close out the top two stringflowers layers, leaving the bottom stringflowers layer open.
Edit > Copy merged
Open Animation Shop, right-click on the desktop area, and paste as a new animation.
Return to PSP. Close out the bottom stringflowers layer, and open the middle stringflowers layer.
Edit > Copy merged.
Return to Animation Shop and Edit > Paste > After Current Frame.
Back to PSP. Close out the middle stringflowers layer, and open the top stringflowers layer.
Edit > Copy merged.
And, back to Animation Shop. Edit > Paste > After Current Frame.
View > Animation. And, we're done! I hope you've enjoyed this tutorial! Thanks for trying my tut! I hope you enjoyed it!
.
.
 [Click image above to go to full sized image.]This tutorial was written on May 15, 2009, using Paint Shop Pro, version X.03. It should be okay to do with other versions as well. I just find X.03 more comfortable for me. You may download a free trial of Paint Shop Pro, version X2, from Corel. Any similarities between this tut and any others you may see are purely coincidental. (I know I'm late posting this... Lately, I've been very distracted by a couple of games on Facebook. VERY distracted.)
You will also need:
Animation Shop. This is from CNET, so it's a safe download.
[NOTE: The only animation on this tut is that the pendant on this tube is sparkling. If your tube doesn't have such a thing, animation is not necessary.]
A tube of your choice. I'm using the sexy artwork of Bam Bam. I've just discovered that this URL doesn't seem to be working. I'll contact MPT about it, and see if there is an update to this info. In any case, you must have a license to use his work. You may purchase that license at My PSP Tubes.
Scrap kit is by Dannie of Home of the Urban Fairy. This is a PTU kit, available through Terminally Unique Designs, where it is now (May 15, 2009) on sale, at 55% off!! This great kit is called Clarey. I decided on this kit because it goes perfectly with this particular tube!
Filters: Mura's Meister > Copies
Font: I used 2Ps Blessings.
Supplies: The mask, by Gabbee, which you can find here. And my sparkle of choice, which you can find here.
Also, please, if you have problems with the download link for supplies, drop me a line via e-mail. Leaving a comment without a way for me to contact you back doesn't help. If you e-mail me, I'll send you the supplies.
Another note: I use a program called WinRAR for my compression of files. It has the capacity to save things as and/or open .rar files OR .zip files. I have been saving the supplies within this program, as .zip files. I'm beginning to use a .rar file for compression. I want to see if you guys have less problems getting supplies with this type of file. Wondering if, because the program is called WinRAR, maybe making .zip files with it is screwing people up? You can find WinRAR free at CNET Downloads. I hope this helps! I think I'll be doing this, and keeping this paragraph in as a boilerplate, while I see if it fixes the problem. *Fingers crossed!*
Okay, let's start, shall we?
Open your mask in PSP and minimize. Alternatively, you could load it into your PSP masks file. This way, you'd have it to use later on. Open the sparkle and minimize until needed.
Open a new image, 700 x 750, white.
Open Elements 028. Resize 50%. Copy and paste as a new layer.
Effects > Plugins > Mura's Meister > Copies with the following settings:
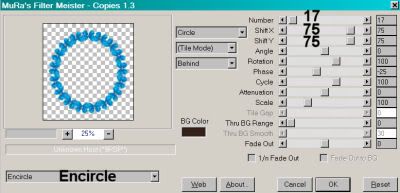
Hit okay.
Highlight your white background layer. Open Papers 007. Copy and paste as a new layer.
Highlight your circle of bows layer. Grab your magic wand and click inside the circle.
Selections > Modify > Expand by 8. Selections > Invert
Highlight your Papers 007 layer and hit delete. Selections > Select none.
Now, to tone down that paper a bit, Adjust > Brightness and Contrast > Brightness/Contrast with the following settings:
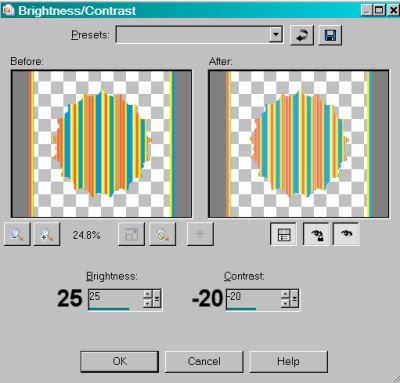
Hit okay.
Add your tube, as the top layer. Resize, position and drop shadow to your liking.
Highlight your circle layer and click inside with the magic wand once again.
Selections > Modify > Expand by 1.
Highlight your tube layer. Grab your eraser brush and erase any of your tube that overlaps the bottom of the circle of bows. Selections > Select none.
Open Elements 011. Resize 50%. Copy and paste as a new layer. Position as your like -- I chose to put it on the right upper area of the circle of bows. Drop shadow.
Duplicate this layer and move the duplicate up or down from the original.
Open Elements 15. Resize 40%. Copy and paste as a new layer. Position between the other two flower layers. See my tag for placement reference. Drop shadow.
Now, here is the tricky part.....
Open Elements 020. Resize 30%. Rotate 90° right.
I used my pick tool to stretch the tag out long enough to compensate for the longer name. Stretch it to the length you think you will need.
Add your name. I used color #13b8ea for the fill, and color #036ca8 for the stroke, stroke set at 1. If the name doesn't fit, highlight the tag layer and use your pick tool to stretch until it does.
Drop shadow your name.
Merge your name layer down to the tag layer. Stretch back to a plausible size with your pick tool.
Now, rotate 45° left. Place on the bottom left area of the circle of bows. Drop shadow your tag.
Highlight your white background layer.
Open Papers 002. Resize to 750 x 750 pixels. Copy and paste as a new layer.
Apply mask gabbeemask13. Delete mask layer. Answer "yes" to the pop-up question and merge group.
Add your copyright, license information if applicable, and taggers'/watermark.
Resize your tag to your desired proportions.
If you're not going to animate, you can just merge and save.
A N I M A T I O N
Open Afbeelding1.pspimage. Resize 50%. Copy and paste as a new layer, placed over the pendant or earring or whatever it is you're sparkling.
Edit > Copy merged
Open Animation Shop, right-click on the desktop area, and paste as a new animation.
Return to PSP. Close out the sparkle layer.
Edit > Copy merged.
Return to Animation Shop and Edit > Paste > After Current Frame.
Still in Animation Shop, highlight your first frame (the one with the sparkle). Click on the top bar of your animation and choose "Frame Properties." Change this number to 50.
Click on the second frame (only -- don't have both frames highlighted). This would be the frame without the sparkle. Click on the top bar of your animation and choose "Frame Properties." Change this number to 75.
View > Animation. Et, voila! We're done! I hope you've enjoyed this tutorial! Thanks for trying my tutorial!.
.
 [Click image above to go to full sized image.]This tutorial was written on May 11, 2009, using Paint Shop Pro, version X.03. It should be okay to do with other versions as well. I just find X.03 more comfortable for me. You may download a free trial of Paint Shop Pro, version X2, from Corel. Any similarities between this tut and any others you may see are purely coincidental. (I know I'm late posting this... Lately, I've been very distracted by a couple of games on Facebook. VERY distracted.)
You will also need:
Animation Shop. This is from CNET, so it's a safe download.
A tube of your choice. I'm using the fun artwork of Rion Vernon aka Pinuptoons. You must have a license to use his work. You may purchase that license at C.I.L.M..
Scrap kit is by Patty of Honored Scraps. This is a PTU kit, available through Treasured Scraps, where it is now (May 12, 2009) on sale, at 50% off!! This great kit is called Denim Daze. I loved working with this kit. When I started out, I really wanted to incorporate the purple, but it just didn't work out that way!
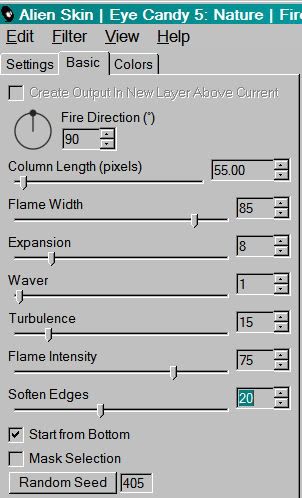
Filters: Alien Skin > Eye Candy 5 > Nature > Fire - and - Eye Candy 4000 > Gradient Glow (for name)
Font: I used Weimar.
Supplies: Just the two masks, about which I know absolutely nothing, save the fact I've collected them along the way. If they are yours, let me know and I'll give you proper credit!!
I got the stock photo used within the frame from StockXpert.com. I entered the search term "blue forest." There is a small fee.
Also, please, if you have problems with the download link for supplies, drop me a line via e-mail. Leaving a comment without a way for me to contact you back doesn't help. If you e-mail me, I'll send you the supplies.
Another note: I use a program called WinRAR for my compression of files. It has the capacity to save things as and/or open .rar files OR .zip files. I have been saving the supplies within this program, as .zip files. I'm beginning to use a .rar file for compression. I want to see if you guys have less problems getting supplies with this type of file. Wondering if, because the program is called WinRAR, maybe making .zip files with it is screwing people up? You can find WinRAR free at CNET Downloads. I hope this helps! I think I'll be doing this, and keeping this paragraph in as a boilerplate, while I see if it fixes the problem. *Fingers crossed!*
Okay,then! Let's begin!
Open your masks in PSP and minimize. Alternatively, you could load them into your PSP masks file. This way, you'd have them to use later on....
Open a new image, 700 x 700, white.
Open Frame6. Resize 85%. Copy and paste as a new layer. Position toward the upper left corner of your canvas. This can be finalized later. And your tube may not work with that placement. Remember, the tutorial is just a guide. Yours might be better positioned on the right, who knows?? ;=)
Open your stock photo or other element that you're going to be using to fill the frame. Copy and paste as a new layer. In the layer palette, drag this layer below the frame layer. Using your mover tool, position this element or stock photo as you'd like it to be.
Highlight your frame layer. Grab your magic wand and click inside the frame. Selections > Modify > Expand by 7.
Highlight your stock photo layer. Hit delete. Selections > Select none.
Open your tube now. Copy and paste as a new layer. Resize, position and drop shadow to your taste. I am, of course, going to be giving the directions to the tag I made. Your tube might make placement, etc., different that I'm saying. Again, this is just a guide.
Okay!
Open Blossom1. Resize 65%. Copy and paste as a new layer. Position behind your tube, around the right side of the frame. Drop shadow.
Open Blosson3. Resize 25%. Copy and paste as a new layer. Rotate 30° right. Position with the first branch, kinda making it so the colors alternate a bit. Drop shadow.
Open Rose6. Resize 50%. Copy and paste as a new layer. Rotate the rose 30° right as well. In your layer palette, position this rose under the Blossom3 layer. Arrange it so the rosebud shows between the stems of Blossom3. Drop shadow.
Duplicate the Rose6 layer. Rotate back, 30° left. I know, I know!! In your layer palette, drag this copy of the rose down below the Blossom1 layer. Position it so it shows between those stems.
Open Rose4. Resize 60%. Copy and paste as a new layer. Rotate 55° right. Position this over the lowest stem of Blossom1. In your layer palette, drag this below Blossom3 and Rose6 (the first copy). Drop shadow.
See my tag for examples of placement. I know, it's mostly behind the tube, but I hope you're getting my drift!!
Open Candle1. Resize 75%. Copy and paste as a new layer. Position where you'd like it. Drop shadow.
Open Bow8. Resize 60%. Copy and paste as a new layer. This should be above the candle in the layer palette. Position so it appears to be wrapped around the candle holder. Drop shadow.
Highlight your white background layer.
Open Paper1. Resize to 700 x 700 pixels. Copy and paste as a new layer.
Apply mask _MA31311112. Delete mask layer. Answer "yes" to the pop-up question and merge group.
Now, apply mask !Mask182. Delete mask layer. As before, answer "yes" to the pop-up question and merge group.
Back up to the top layer in your layer palette.
Add your name. I used color #516390 for the fill and the stroke, stroke set at 2. I then applied Eye Candy 4000 > Gradient Glow with settings of 5 - 0 - 100, preset medium, and color #9eb2d2 Drop shadow your name.
Add your copyright, license information if applicable, and taggers'/watermark. Don't forget the credit for your stock photo!
If you're going to animate the candle burning, do not resize your tag *yet*. If you're NOT going to animate, you can just merge and save.
A N I M A T I O N
Highlight your candle layer. Zoom into the flame area of the candle. Grab your lasso tool, set on point-to-point, and carefully draw a selection around the flame.
Duplicate this layer two times, for a total of three layers.
Still on the bottom candle layer...
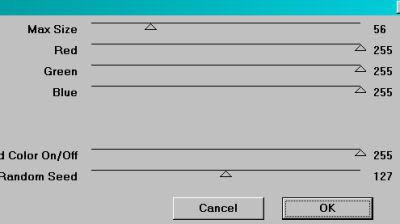
Effects > Plugins > Alien Skin > Eye Candy 5 > Nature > Fire with the following preset:
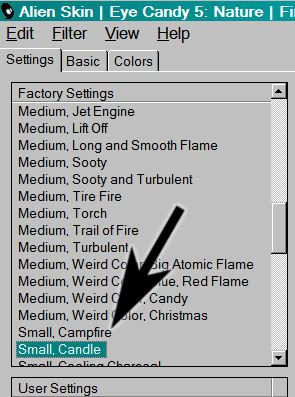
... and the following settings:
Hit okay.
Highlight the middle candle layer. Again, apply Fire, this time clicking on "Random Seed."
Hit okay.
Highlight the top candle layer. Apply Fire again, and again click on "Random Seed."
Hit okay.
Selections > Select none.
Close out the top two candle layers, leaving the bottom candle layer open.
Resize your tag to a size with which you're comfortable.
Edit > Copy merged
Open Animation Shop, right-click on the desktop area, and paste as a new animation.
Return to PSP. Close out the bottom candle layer, and open the middle candle layer.
Edit > Copy merged.
Return to Animation Shop and Edit > Paste > After Current Frame.
Back to PSP. Close out the middle candle layer, and open the top candle layer.
Edit > Copy merged.
And, back to Animation Shop. Edit > Paste > After Current Frame.
In Animation Shop, Edit > Select All.
Right-click on the top bar of your animation and choose "Frame Properties." Change this number to 17.
View > Animation. Et, voila! We're done! I hope you've enjoyed this tutorial! Thanks for trying my tut!
.
.
 [Click image above to go to full sized image.]This tutorial was written on May 7, 2009, using Paint Shop Pro, version X.03. It should be okay to do with other versions as well. I just find X.03 more comfortable for me. You may download a free trial of Paint Shop Pro, version X2, from Corel. Any similarities between this tut and any others you may see are purely coincidental.
You will also need:
Animation Shop. This is from CNET, so it's a safe download.
A tube of your choice. I'm using the sexy artwork of Al Rio. You must have a license to use his work. You may purchase that license at C.I.L.M..
Scrap kit is by Rachel of Captivated Visions. This is a PTU kit, available through Scrap It Sassy, and called Sex in the City. This kit is currently (May 7, 2009) on sale for just $1.29!
Filters: Eye Candy 4000 > Gradient Glow (for name) and Eye Candy 4000 > HSB Noise
Font: I used FansiPensleTwo Plain.
Supplies: Just the two masks, which you can find here. I know where the ivy mask came from, but I cannot find any reference to her work via Google. This Ivy was active and generous in the PSP world about four years ago or so. She found it necessary to close her Yahoo group, from which I got her masks. Where she is now, I don't know. If you see this, Ivy, let me know!! Also, there is the other mask, about which I know nothing. So if it is yours, let me know, and I'll give everyone the correct credit where it's due!
Also, please, if you have problems with the download link for supplies, drop me a line via e-mail. Leaving a comment without a way for me to contact you back doesn't help. If you e-mail me, I'll send you the supplies.
Another note: I use a program called WinRAR for my compression of files. It has the capacity to save things as and/or open .rar files OR .zip files. I have been saving the supplies within this program, as .zip files. I'm beginning to use a .rar file for compression. I want to see if you guys have less problems getting supplies with this type of file. Wondering if, because the program is called WinRAR, maybe making .zip files with it is screwing people up? You can find WinRAR free at CNET Downloads. I hope this helps! I think I'll be doing this, and keeping this paragraph in as a boilerplate, while I see if it fixes the problem. *Fingers crossed!*
Okay,then! Let's begin!
Open your masks in PSP and minimize. Alternatively, you could load them into your PSP masks file. This way, you'd have it to use later on....
Open a new image, 700 x 700, white.
I started with my tube, so add your tube. Resize, position, and drop shadow as you like.
Open Hanging Sign (the first one.. without a number). Image > Mirror. Copy and paste as a new layer on your canvas. Resize 75%. Position as you like. I mean, you don't even have to mirror it if you don't want to. Remember, a tutorial is a guide. It took me a LONG time to break out of doing things exactly by the tutorial, but it can and is often done, so let your imagination flow!
In your layer palette, have the Hanging Sign below your tube layer. Drop shadow the sign.
Open the Dress. Resize 50%. Copy and paste as a new layer. Drag this behind your tube layer, but above the Hanging Sign. Position as though it would be hooked over the top of the Hanging Sign layer. Drop shadow the dress.
Zoom in real close to the area where the hanger overlaps the Hanging Sign. Grab your lasso tool, set on point-to-point, and draw a selection around the inner area of the hanger that overlaps the sign. Hit delete. Selections > Select none. You can zoom back now. This makes it appear as though the hanger actually *is* hanging on the sign.
Open Hatboxes. Resize 65%. Copy and paste as a new layer. Again, drag below the tube layer AND the dress layer, but have it above the Hanging Sign layer. Drop shadow.
Open the Shoe. Resize 35%. Copy and paste as a new layer. Position where you like. Drop shadow.
Highlight your white background layer.
Open Paper 08. Copy and paste as a new layer.
Apply the mask ivy-perspective2. Delete the mask layer, answer "yes" to the pop-up question and merge group.
Now, on the same layer, apply the mask _Mask199_. Again, delete the mask layer, answer "yes" to the pop-up question and merge group.
Open Bling Frame. Resize 115%. Copy and paste as a new layer. Duplicate this layer, and Image > Mirror. Merge these two layers down.
Add your name. I used color #604132 for the fill and the stroke, stroke set at 2. Rotate 20° left and position. I then applied Eye Candy 4000 > Gradient Glow with settings of 5 - 0 - 100, preset medium, and color #e8ecb3. Drop shadow your name.
Add your copyright, license information if applicable, and taggers'/watermark.
Resize your tag to a size with which you're comfortable. At this point, you can just merge and save, if you choose not to animate!!
A N I M A T I O N
Highlight your Bling Frame layer. Duplicate this layer two times, for a total of three layers.
Still on the bottom Bling Frame layer...
Effects > Plugins > Eye Candy 4000 > HSB Noise with the default settings.
Highlight the middle Bling Frame layer. Again, apply HSB Noise, this time clicking on "Random Seed."
Hit okay.
Highlight the top Bling Frame layer. Apply HSB Noise again, and again click on "Random Seed."
Hit okay.
Close out the top two Bling Frame layers, leaving the bottom Bling Frame layer open.
Edit > Copy merged
Open Animation Shop, right-click on the desktop area, and paste as a new animation.
Return to PSP. Close out the bottom Bling Frame layer, and open the middle Bling Frame layer.
Edit > Copy merged.
Return to Animation Shop and Edit > Paste > After Current Frame.
Back to PSP. Close out the middle Bling Frame layer, and open the top Bling Frame layer.
Edit > Copy merged.
And, back to Animation Shop. Edit > Paste > After Current Frame.
In Animation Shop, Edit > Select All.
Right-click on the top bar of your animation and choose "Frame Properties." Change this number to 25.
View > Animation. Et, voila! We're done! I hope you've enjoyed this tutorial! Thanks for stopping by!
.
.
 [Click image above to go to full sized image.]This tutorial was written on May 5, 2009, using Paint Shop Pro, version X.03. It should be okay to do with other versions as well. I just find X.03 more comfortable for me. You may download a free trial of Paint Shop Pro, version X2, from Corel. Any similarities between this tut and any others you may see are purely coincidental.
You will also need:
Animation Shop. This is from CNET, so it's a safe download.
A tube of your choice. I'm using some of the great new artwork of Jennifer Janesko. You must have a license to use her work. You may purchase that license at C.I.L.M..
Scrap kit is by someone named Annu. This is but one portion of a collection of kits made FTU as an idea from Creative Misfits Creations. It's the last kit shown at that page. It has a label that says "Springtime Bonanza," so that's what I've called it!! I hope that's correct. Feel free to download and use any of the other kits there, too. These ladies were extra generous, using one color palette and people who had not ever made kits before participated, too!! Leave them love!!
Filters: VM Natural > Sparkle, and Eye Candy 4000 > Gradient Glow (for name only)
Font: I used Acadian.
Supplies: The mask, again by Essex Girl, and the leafy branch, from where I don't know. If it is yours, let me know, and I will give you proper credit!! The supplies are available here.
Also, please, if you have problems with the download link for supplies, drop me a line via e-mail. Leaving a comment without a way for me to contact you back doesn't help. If you e-mail me, I'll send you the supplies.
And another note: I use a program called WinRAR for my compression of files. It has the capacity to save things as a .rar file OR a .zip file. I have been saving the supplies within this program, as .zip files. On this tutorial, I'm using a .rar file. I want to see if people have less problems getting supplies with this type of file. Wondering if, because the program is called WinRAR, maybe making .zip files with it is screwing people up? You can find WinRAR free at CNET Downloads. I hope this helps! I think I'll be doing this, and keeping this paragraph in as a boilerplate, while I see if it fixes the problem. *Fingers crossed!*
[SPECIAL NOTE: I got a comment on this tut, saying that the leaf image I've provided is not a valid PSP file. As I answered in comments, it most certainly *IS* a proper PSP file. It is in the .pspimage file format. If you are using a version of PSP that is lower than X I think it is, it will not work. Again, if the commenter had e-mailed me, I could have converted the file format and sent it to her. So for anyone else, if a problem, e-mail me. I'll convert. Or, hey. I'll convert anyway and add it to the .rar file. Voila! File converted, both file formats are in the above-referenced .rar file! Enjoy!]
Okay,then! It's been a while, so let's begin!
Open your supplies in PSP and minimize. Alternatively, you could load the mask into your PSP masks file. This way, you'd have it to use later on....
Open a new image, 700 x 700, white.
Open Round Scalloped Frame-02. Copy and paste as a new layer.
Add your tube. Resize, position, and drop shadow as you like.
Highlight the frame layer. Grab your magic wand and click inside the frame. Selections > Modify > Expand by 1. Selections > Invert.
Highlight your tube layer. Take your eraser brush and erase any of your tube that overlaps the bottom/side areas of your frame.
Selections > Select none.
Highlight your white background layer.
Open "papers18." Copy and paste as a new layer.
Apply your mask. Delete mask layer, answer "yes" to the pop-up question and merge group.
Open the leafy branch included with your supplies. Copy and paste as a new layer. I brightened up the color a bit by Adjust > Brightness and Contrast > Brightness/Contrast with settings on 25 and 0.
Position the branch to the left bottom corner area of your frame. See my tag for placement reference. Drop shadow your branch. You can fiddle with this placement later, of course.
Open flower2. Resize 50%. Copy and paste as a new layer. Position over the leafy branch. Duplicate this flower. Rotate the duplicate 30° right. Position with the other flower, grouping them and the branch as you like. Drop shadow both flower layers.
Add your name. I used color #d89a7d for the fill and the stroke, stroke set at 2. I then applied Eye Candy 4000 > Gradient Glow with settings of 5 - 0 - 100, preset medium, and color #f8e0d6. Drop shadow your name.
Add your copyright, license information if applicable, and taggers'/watermark.
Resize your tag to a size with which you're comfortable. At this point, you can just merge and save, if you choose not to animate!!
A N I M A T I O N
Highlight your mask layer. Duplicate this layer three times, for a total of four layers.
Still on the bottom mask layer...
Effects > Plugins > VM Natural > Sparkle with the following settings:
Hit okay.
Highlight the next mask layer up. Again, apply Sparkle, this time moving the slider on "Random Seed" to a different number. There is no secret way to use the slider. Just so it's different.
Hit okay.
Highlight the next higher mask layer. Apply Sparkle again, moving the slider on "Random Seed" to yet a different number.
Hit okay.
Highlight the top mask layer. Apply Sparkle for a fourth time, moving the slider on "Random Seed" one more time.
Hit okay.
I explain this every time, but not everyone sees all the "Sparkle" tuts I do, so I'm sorry if this is a repeat, BUT....
Whenever I use this filter, I go over all the layers twice, so I'll get more sparkle effect. So, go back down to the bottom mask layer and redo all the above steps again until all four have been "sparkled" twice.
Close out the top three mask layers, leaving the bottom mask layer open.
Edit > Copy merged
Open Animation Shop, right-click on the desktop area, and paste as a new animation.
Return to PSP. Close out the bottom mask layer, and open the next mask layer up.
Edit > Copy merged.
Return to Animation Shop and Edit > Paste > After Current Frame.
Back to PSP. Close out that mask layer, and open the NEXT mask layer up.
Edit > Copy merged.
And, back to Animation Shop. Edit > Paste > After Current Frame.
Finally, return to PSP again, closing out the open mask layer and opening the top mask layer.
Edit > Copy merged.
Back to Animation Shop one more time. Edit > Paste > After Current Frame.
In Animation Shop, Edit > Select All.
Right-click on the top bar of your animation and choose "Frame Properties." Change this number to 35.
View > Animation. Et, voila! We're done! I hope you've enjoyed this tutorial! Thanks for stopping by!
.


©kajira hill 2009
http://kajituts.blogspot.com


