skip to main |
skip to sidebar
.
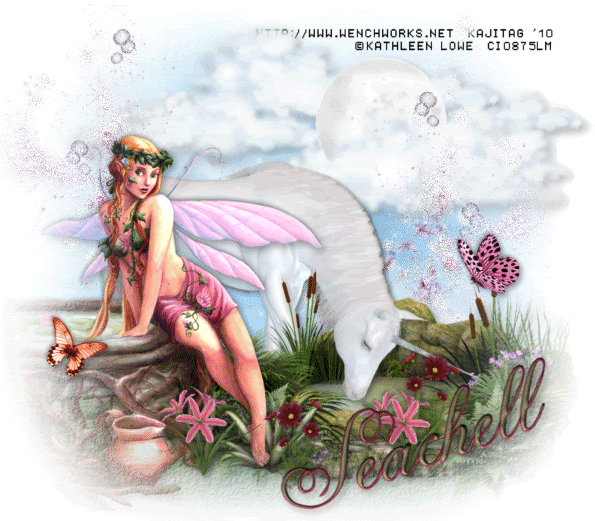 [Click image above to go to full sized image.]This tutorial was written on January 31, 2010 using Paint Shop Pro, version X.03. It should be okay to do with other versions as well. I just find X.03 more comfortable for me. You may download a free trial of Paint Shop Pro, version X2, from Corel.
This is just a guideline, and I know not everyone is going to be using the same tube... so use your imagination as you go! Any similarities between this tut and any others you may see are purely coincidental.
You will also need:
Animation Shop. This is from now a pay-for product, through Corel. That changed a while ago. I don't know why!!
A tube of your choice. I'm using the fantasy artwork of Kathleen Lowe. You must have a license to use her work. You can get that license and art at C.I.L.M.
The scrap kit is by Seachell, at Seachell's Scrapz. This is a FTU kit called "Magical Day." This is a kit she made last year, but it's still a good one! Be sure to leave lots of love for the freebies!
Filters: No outside filters were used in this tutorial!
Font: I used Andrea Cursive SSi.
Supplies: You may find the file here. This file includes the mask, the sky, the grass and the clouds. Wow! The creation! LOL. Just kidding. I honestly don't know where I got these files. They were collected over the years of playing with PSP. If these are yours, or you know who made them, PLEASE let me know so that I may give proper credit. Thank you!
Let's do it to it!!
Open your supplies in PSP and minimize.
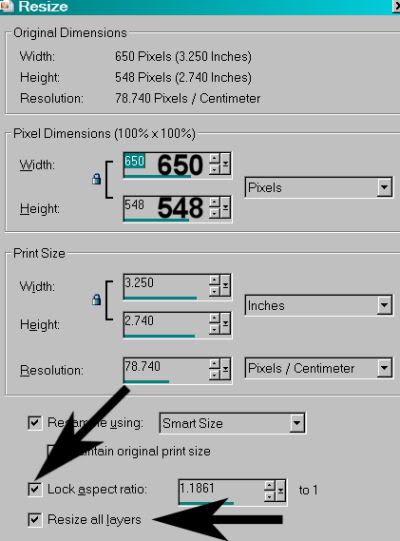
Open a new canvas, 800 x 700, white.
Open element9. Resize 85%. Copy and paste as a new layer. Drop shadow.
Add your tube. Resize, position, and drop shadow to your taste.
Highlight your white background layer.
Open the sky, furnished in the supplies. Resize to 800x700. Copy and paste as a new layer.
Open the grass, furnished in the supplies. Colorize slightly to blend with the greenery already present:
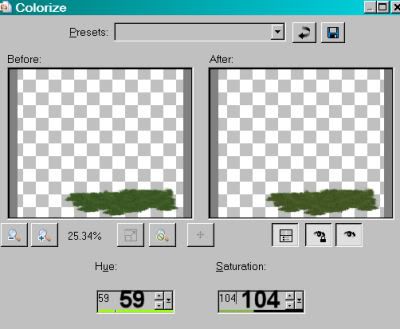
Hit okay.
Position the grass where you'd like it. Duplicate as many times as you like to get the effect that you want. I duplicated and rearranged three times. This is totally up to you. Merge down all your grass layers.
Open the CloudFormation1, furnished in the supplies. Position where you'd like it. Slight drop shadow.
Open element1 (the unicorn). Resize 85%. Copy and paste as a new layer. I mirrored mine. It depends upon where you're putting your pond. :)
Duplicate your unicorn layer. Drag one of these layers to just below the pond layer, the other just above the pond, but below your tube layer. Drop shadow your lowest unicorn.
Highlight your top unicorn layer and draw a rectangular selection around the legs, etc., that overlap the pond. Hit delete. Do this as many times as you need to get the desired effect. Selections > Select None.
Now, we're going to use your mask over and over until you get the shading you desire.
Highlight your sky layer.
Apply your mask. Delete the mask layer, answer "yes" to the pop-up question, and merge group.
Highlight your grass layer.
Apply your mask again, just as above.
If your tube is off to the edge of your canvas like mine was, highlight your tube layer.
Again, apply your mask, delete mask layer, etc.
Highlight your pond layer.
Apply your mask once more, deleting the mask layer and etc.
If this looks good to you, you may quit with the mask. LOL! I actually applied it once more to both the sky and the grass layers. This is totally up to you.
Open element10. Resize 20%. Copy and paste as a new layer. Position where you'd like it. Mine is on the right side of the garden. Drop shadow.
Open element11. Resize 20%. Mirror. Copy and paste as a new layer. Position this one where you'd like it. Drop shadow.
Open element2. Resize 30%. Copy and paste as a new layer. Position to where you'd like it in the garden. Drop shadow. Duplicate this layer and position this one where you'd like it, as well.
Open element3. Resize 30%. Copy and paste as a new layer. Position this one to where you'd like it in the garden. Drop shadow. Duplicate this layer, too, and position in another place in the garden.
Open element5. Copy and paste as a new layer. Position where you think it looks best. Duplicate this layer and Image > Mirror. Position this layer where you think it looks best. Merge these two layers down. In your layer palette, drag this layer to just above the clouds.
Go back to the top and add your name. I used color #80956f as the fill #7c1339 as the stroke, stroke set at 1.5.
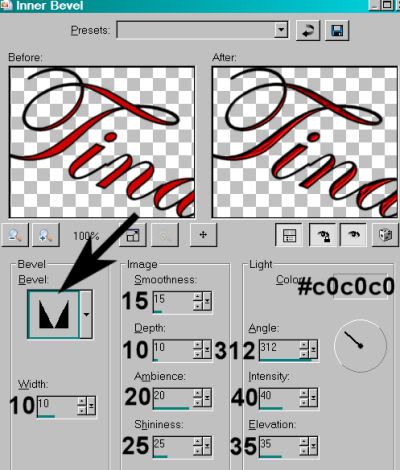
I applied the following bevel:
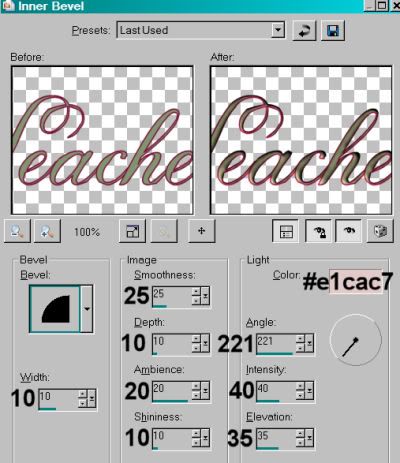
Hit okay.
Drop shadow your name.
Resize your canvas to a size with which you are comfortable.
Add your copyright, license information if applicable, and taggers'/watermark.
If you choose not to animate, you're now done, and you can merge your layers and save!
A N I M A T I O N
Highlight your element5 layer. Duplicate this layer twice, for a total of three element5 layers.
Now highlight your bottom element5 layer.
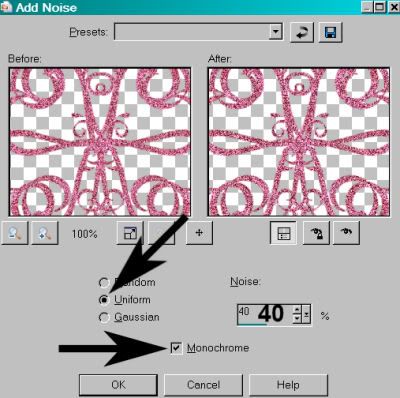
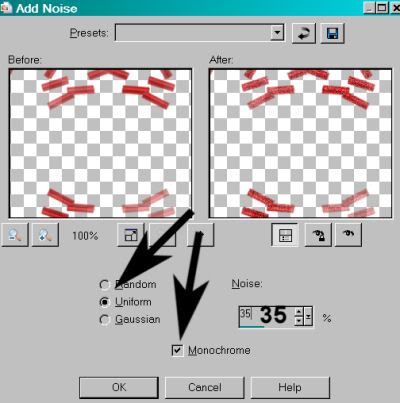
Adjust > Add/Remove Noise > Add Noise with the following settings:
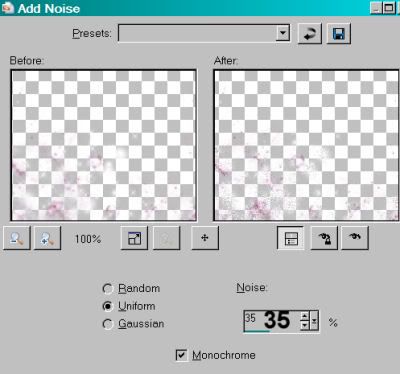
Hit okay.
Highlight your middle element5 layer.
Add Noise again, this time changing the "Noise" setting to 40.
Hit okay.
Highlight your top element5 layer.
Add Noise once more, this time changing the "Noise" setting to 45.
Hi okay.
Close out your top two element5 layers, leaving the bottom element5 layer open.
Edit > Copy Merged.
Open Animation Shop. Right-click on the desktop area and paste as a new animation.
Return to PSP. Close out your bottom element5 layer, and open the middle element5 layer.
Edit > Copy merged.
Back to Animation Shop. Edit > Paste > After Current Frame.
Return again to PSP. Close out your middle element5 layer, and open your top element5 layer.
Edit > Copy merged.
Again, back to Animation Shop. Edit > Paste > After Current Frame.
View > Animation.
Finis!! You're done! Thanks so much for trying one of my tuts! I appreciate you stopping by!
.
.
 [Click image above to go to full sized image.]This tutorial was written on January 30, 2010 using Paint Shop Pro, version X.03. It should be okay to do with other versions as well. I just find X.03 more comfortable for me. You may download a free trial of Paint Shop Pro, version X2, from Corel. Any similarities between this tut and any others you may see are purely coincidental.
This is just a guideline, and I know not everyone is going to be using the same tube... so use your imagination as you go!
You will also need:
Animation Shop. This is from now a pay-for product, through Corel. That changed a while ago. I don't know why!!
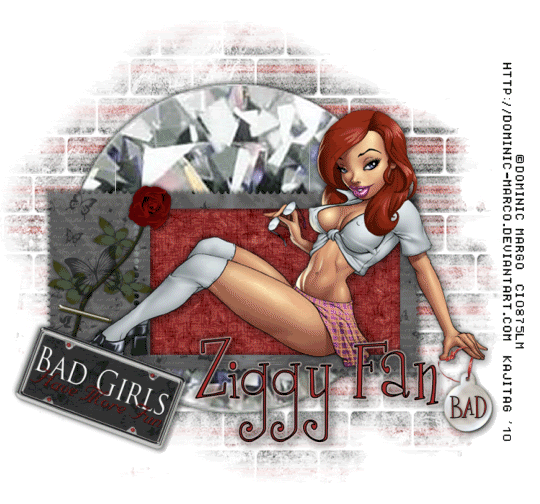
A tube of your choice. A reclining or sitting tube would work best. I'm using the sexy-cute artwork of Dominic Marco. You must have a license to use his work. You can get that license and art at C.I.L.M.
The scrap kit is by Ziggy Fan! This is a FTU kit called "I Love Chrome." Leave lots of love for the freebies!!!
Filters: Eye Candy 4000 > Gradient Glow, VM Natural > Sparkle
Font: I used Curly Cue.
Supplies: Two masks, which can be found here. I don't know where I got the brick mask, but the other is from Boundless Bliss, which seems to have disappeared off the 'Net. Pity. But thanks go to the creator of each of these masks!!
Okay, let's get this done!!
Open your masks and minimize in PSP. Alternatively, you could save them in with those already in your PSP files, for use at a later date!
Open a new canvas, 750 x 700, white.
Open Frame3. Copy and paste as a new layer.
Add your tube. Resize, position, and drop shadow to your taste.
Highlight your white background layer.
Open Paper2. Copy and paste as a new layer.
Highlight your frame layer. Grab your magic wand and click inside the frame. Selections > Modify > Expand by 15. Selections > Invert.
Highlight your Paper2 layer. Hit delete. Selections > Select None.
Highlight you white background layer again.
Open Paper4. Resize to 750x700. Copy and paste as a new layer.
Apply your TileBrick mask. Delete mask layer, answer "yes" to the pop-up question, and merge group.
Now apply your boundlessbliss_grungemask_1, INVERT TRANSPARENCY CHECKED! Delete mask layer, answer "yes" to the pop-up question, and merge group.
Open Plate. Resize 65%. Copy and paste as a new layer. Rotate 20° left. Position in lower left area of the frame. See my example for placement reference. Drop shadow.
[NOTE: At about this time, I realized I wanted everything moved a bit to the left. You may not feel this way, but I did. What I did was to highlight each layer and hit shift+left arrow once.]
Open Tag. I chose to add the word "bad" to the tag prior to adding it to the canvas. Choose your font. Color #ac2c2e as the fill, black for the stroke - stroke set on 2. Type your word of choice. Drop shadow your text. Merge this layer down to the tag layer. Resize 35%. Copy and paste as a new layer. I chose to have this dangle from the tube's hand.
Position where you want the tag. If you're using the same or similar tube, to get the appearance the tag is dangling from one finger, I first reduced the opacity on the tag to 36, so I could see the hand in the background:
I then zoomed in on the hand, and drew point-to-point selections on the hand, to erase those parts of the ribbon. See below:
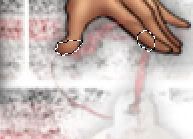
Hit delete. Selections > Select None. Return the opacity to 100.
This next step was done hit-and-miss, so I'll describe exactly how I did it. LOL.
Open Gem2. Resize to 400x400. Adjust > Sharpness > Sharpen. Copy and paste as a new layer. Resize again, by 120%. Drag this layer below the Paper2 layer but above your mask layer. Drop shadow.
Drop shadow your frame layer.
Go back to the top and add your name. Again, I used color #ac2c2e for the fill, black for the stroke, stroke set at 2.
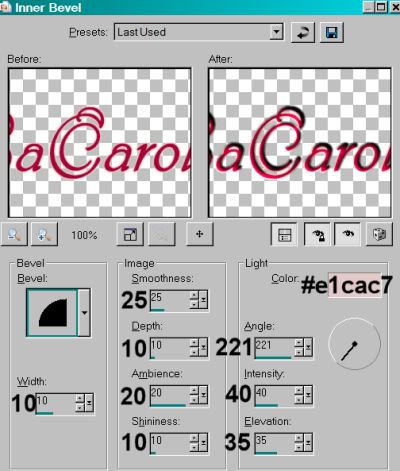
Effects > Eye Candy 4000 > Gradient Glow set at 3-0-100, color #e1cac7.
Hit okay.
Drop shadow your name.
Resize your canvas to a size with which you are comfortable.
Add your copyright, license information if applicable, and taggers'/watermark.
If you choose not to animate, you're now done, and you can merge your layers and save!
A N I M A T I O N
Highlight your Gem2 layer. Duplicate this three times, for a total of four Gem2 layers.
Now highlight the bottom Gem2 layer.
Effects > Plugins > VM Natural > Sparkle
I wanted the sparkles to be larger than normal on this one, so I started like so:
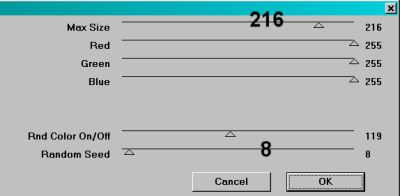
Hit okay.
Highlight the next Gem2 layer up.
Add Sparkle again, this time moving the "random seed" and/or the "max size" to something different. You can watch on the screen provided in the plug-in to see the effect you're getting, so move the sliders 'til you get what you like.
Hit okay.
Highlight the next Gem2 layer up.
Add Sparkle again, and again moving "random seed" and/or "max size."
Hit okay.
Highlight the top Gem2 layer.
Add Sparkle once more, again moving "random seed" and/or "max size."
Now, whenever I use this filter, I give it a double dose, to get more sparkles. So go back, layer by layer, and do the sparkle thing again. You don't HAVE to, of course. Just what I do! When finished, then:
Close out the top three of the Gem2 layers, leaving the bottom layer open.
Edit > Copy Merged.
Open Animation Shop. Right-click on the desktop area and paste as a new animation.
Return to PSP. Close out the bottom Gem2 layer, and open the next mask layer up.
Edit > Copy merged.
Back to Animation Shop. Edit > Paste > After Current Frame.
Return again to PSP. Close out the Gem2 layer you just worked with, and open the next Gem2 layer up.
Edit > Copy merged.
Again, back to Animation Shop. Edit > Paste > After Current Frame.
Finally, return to PSP one last time, and close the current Gem2 layer and open the top Gem2 layer.
Edit > Copy merged.
Return once more to Animation Shop. Edit > Paste > After Current Frame.
Still in Animation Shop, Edit > Select All.
Right-click on the bar above your animation and choose "Frame Properties." Change this number to 27.
View > Animation.
Et, voila! Done with another one! Thank you for using my tutorials! I appreciate you for it! Leave a shout out if you're feeling talky! :)
.
.
 [Click image above to go to full sized image.]This tutorial was written on January 30, 2010 using Paint Shop Pro, version X.03. It should be okay to do with other versions as well. I just find X.03 more comfortable for me. You may download a free trial of Paint Shop Pro, version X2, from Corel. Any similarities between this tut and any others you may see are purely coincidental.
You will also need:
A tube of your choice. I'm using the glamorous artwork of Jennifer Janesko. You must have a license to use her art. You may obtain that license and her art from C.I.L.M.
The scrap kit is by LaCarolita, of LaCarolitas Designz. This is a FTU kit, which is called "Be Mine." Keep on leaving lots of love for the freebies!!
Supplies: You may get the file here. This includes the mask, by whom I do not know, and the doodle. I got the art file from Stock Xpert, and eliminated the white background to create the isolated doodle. You're welcome! LOL!
Filters: No outside filters used in this tutorial!
Font: I used Phyllis Swash.
Let's do it!
Open a new canvas, 700 x 700, white.
Open frame1. Resize 57%. Copy and paste as a new layer.
Add your tube. Resize, position and drop shadow to your taste.
Highlight your frame layer. Grab your magic wand and click inside the frame. Selections > Modify > Expand by 1. Selections > Invert.
Highlight your tube layer. Grab your eraser brush and erase any of your tube that you don't want showing along the sides and/or bottom of your frame.
Selections > Select none.
Highlight your white background layer.
Layers > New Raster Layer.
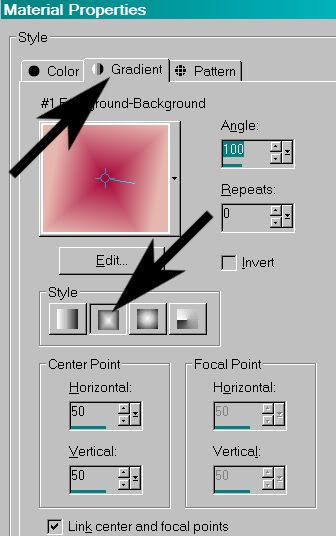
Create a foreground-background gradient to go with your color scheme. I chose color#a60336 as my background, and #e1cac7 as the foreground. Rectangular gradient, angle 100, repeats 0.
Apply your mask. Delete the mask layer, answer "yes" to the pop-up question, and merge group.
I had to move the mask layer a bit to look how I wanted it to look. Go ahead, if you think you should, too!
Open hearts1. Resize 20%. Copy and paste as a new layer. Position in the lower right corner of your frame. Drop shadow your hearts.
Open the ribbonbow2. Resize 40%. Copy and paste as a new layer. Position it towards the bottom of your frame. See my example for placement reference. Drop shadow this layer.
Highlight your frame layer. Grab your magic wand and click inside the frame. Selections > Modify > Expand by 1. Selections > Invert.
Highlight your ribbonbow2 layer. Hit delete. Selections > Select None.
Now, this layer is still overlapping the hearts layer. So...
Highlight the hearts layer. Grab your magic wand and click outside the hearts on the canvas. Selections > Modify > Expand by 1. Selections > Invert.
Highlight the ribbonbow2 layer once more. Grab your eraser brush and erase the part of the ribbonbow2 layer that's overlapping the hearts layer. Selections > Select none.
Open the doodle from StockXpert that was in your supplies. Copy and paste as a new layer. Position this so that it's in the upper left quadrant of your canvas. Duplicate this layer. Image > Mirror. Merge these two layers down. Duplicate that layer. Image > Flip. Merge *these* two layers down. Drop shadow. In your layer palette, drag this layer to just above your mask layer.
Drop shadow your frame layer.
Go to the top layer and add your name. I used color #a60336 as the fill and #e1cac7 as the stroke. Stroke set at 2.
I added the following bevel:
Hit okay.
Drop shadow your name.
Resize your canvas to a size with which you're comfortable.
Add your copyright, license information if applicable, and taggers'/watermark.
Layers > Merge > and save! We are done!
And there you go! Another finished tag! I hope you liked this tutorial, and I thank you SO much for choosing to work with it!!
.
.
 [Click image above to go to full sized image.]This tutorial was written on January 28, 2010 using Paint Shop Pro, version X.03. It should be okay to do with other versions as well. I just find X.03 more comfortable for me. You may download a free trial of Paint Shop Pro, version X2, from Corel. Any similarities between this tut and any others you may see are purely coincidental.
This is just a guideline, and I know not everyone is going to be using the same tube... so use your imagination as you go!
You will also need:
Animation Shop. This is from now a pay-for product, through Corel. That changed a while ago. I don't know why!!
A tube of your choice. I'm using the wonderful artwork of Anna Liwanag. You must have a license to use her work. You can get that license and art at My PSP Tubes.
The scrap kit is by Hezalin, at Heza Scraps. This is a PTU kit, available at Treasured Scraps, and is called "Violet Love." This kit is currently on sale for a mere $0.35!! Get it while you can!
Filters: No outside filters used in this tutorial.
Font: I used 41.
Supplies: Just the current favorite mask, which you may find here. Once again, it's by the wonderful Becky, who has dropped off the Internet so far as I can see. Thank you, Becky, for all you did for the PSP Community while you were around!
Let's start on this one! It's a bit labor-intensive. I hope I explain it well enough!
Open a new canvas, 700 x 700, white.
Open Ellie 6 (white round frame). Copy and paste as a new layer.
Add your tube. Resize, position, and drop shadow to your taste.
Highlight your frame layer. Grab your magic wand and click inside the frame.
Selections > Modify > Expand by 1. Selections > Invert.
Highlight your tube layer. Grab your eraser brush and erase any part of your tube that you don't want showing outside the bottom/sides of the frame.
Selections > Select none.
Highlight your white background layer.
Open Paper 5. Copy and paste as a new layer.
Apply your mask. Delete mask layer, answer "yes" to the pop-up question, and merge group.
I moved my mask layer a teensy bit to the right. You may not like that. It's up to you!
Open Ellie 3. Copy and paste as a new layer.
I chose to write the word "Love" on the heart area. I used color #d1c1d0 for the fill, color #61385d for the stroke, stroke set on 1.
Position your text so it looks best on the heart area. Give this text a small drop shadow.
Merge this text layer down to your Ellie 3 layer.
I applied the following bevel:

Hit okay.
Resize the Ellie 3 layer by 50%. Position on the left side of the frame, so it looks as though it's attached to the frame. Drop shadow.
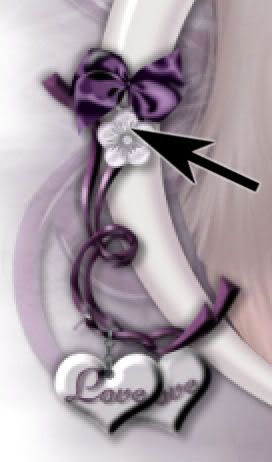
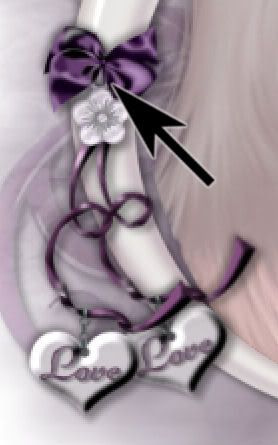
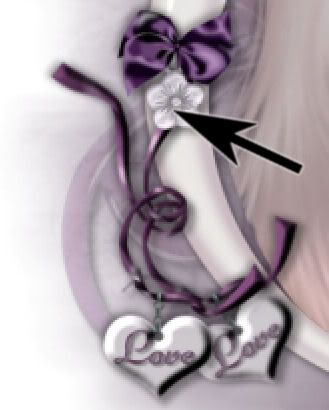
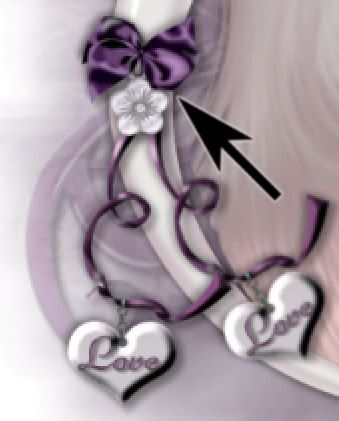
Open Charm. Resize 30%. Copy and paste as a new layer. Position over the top of your Ellie 3 layer. See my example for placement reference. Drop shadow your charm.
Open Bow 4. Resize 20%. Copy and paste as a new layer. Position this over the charm layer. Again, see my example for placement reference. Drop shadow your bow.
Open Flower 1. Resize 30%. Copy and paste as a new layer. Position this flower on the right side of the frame. Duplicate this layer. Image > Mirror. Position these flowers however you like them best. Drop shadow your flowers.
Open Doodle 2. Copy and paste as a new layer. Duplicate this layer. Image > Mirror. Merge these two layers down. Duplicate that layer. Image > Flip. I found I had to fiddle a bit with the placement of these two layers to get them to a place I liked them. Drop shadow both doodle layers.
Drop shadow your frame.
Go back to the top and add your name. I used the same colors as above: #d1c1d0 as the fill, and #61385d for the stroke. Stroke set at 2.
Drop shadow your name.
Open Flower 2. Resize 50%. Copy and paste as a new layer. I put this flower behind the name. This is not a necessary step, but just something that occurred to me while putting this together. Drop shadow the flower.
Resize your canvas to a size with which you are comfortable.
Add your copyright, license information if applicable, and taggers'/watermark.
If you choose not to animate, you're now done, and you can merge your layers and save!
A N I M A T I O N
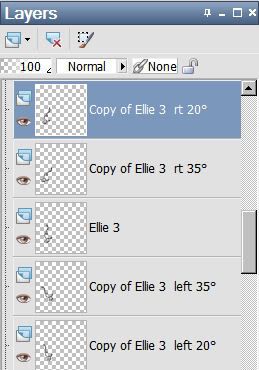
Highlight your Ellie 3 layer. Duplicate this layer four times, for a total of five Ellie 3 layers.
I don't know why, but I find that it's easier for me if I position the original layer in the middle. Like so:
This is just a convenience thing. It's totally up to you how you arrange your layers. Just know that you'll have to keep track of them closely.
Choose one of your copied layers. Rotate 20° left.
You'll notice that this causes the Ellie 3 to go off-center with regard to the point from where it's swinging.
Grab your move tool and move this layer so that the top of the ribbon appears to be coming from the same point of origin as your original Ellie 3 layer.
Highlight another copied Ellie 3 layer. Rotate 35° left.
Again, this throws the "point of origin" off. Move this layer to again, look as though it's coming from the same place.
Highlight a new copied Ellie 3 layer. Rotate 20° right. Repeat your moving of the ribbon until it appears the point of origin is the same.
Highlight your final copied Ellie3 layer. Rotate 35° right. And again, use your move tool to center that point of origin.
I *do* hope I explained that well enough! Let me know if you have trouble. I might be able to help...
Close all but your original Ellie 3 layer.
Edit > Copy merged.
Open Animation Shop, right-click on the desktop area and paste as a new animation.
Return to PSP. Close the original layer and open the 20° left layer.
Edit > Copy merged.
Go back to Animation shop and Edit > Paste > After Current Frame.
Again, return to PSP. Close out the 20° left layer and open the 35° left layer.
Edit > Copy merged.
Go back to Animation shop and Edit > Paste > After Current Frame.
Return again to PSP. Close the 35° left layer and open again the 20° left layer.
Edit > Copy merged.
Go back to Animation shop and Edit > Paste > After Current Frame.
Again, to PSP. Open the original Ellie 3 layer.
Edit > Copy merged.
Go back to Animation shop and Edit > Paste > After Current Frame.
Return to PSP. Close out the original Ellie 3 layer, and open the 20° right layer.
Edit > Copy merged.
Go back to Animation shop and Edit > Paste > After Current Frame.
Once more, go to PSP. Close out the 20° right layer, and open the 35° right layer.
Edit > Copy merged.
Go back to Animation shop and Edit > Paste > After Current Frame.
Finally, return to PSP. Close out the 35° right layer and re-open the 20° right layer.
Edit > Copy merged.
Go back to Animation shop and Edit > Paste > After Current Frame.
You should have 8 frames.
View > Animation to make sure it's all smooth.
Move the slider on the bottom of your animation so that it's set on the first frame.
Edit > Select All.
Right-click on the top bar of your animation and choose "Frame Properties." Change this number to 20.
View > Animation.
Et voila! You are done! Thanks so much for trying my tut! I appreciate you stopping by!
.
.
 [Click image above to go to full sized image.]This tutorial was written on January 27, 2010 using Paint Shop Pro, version X.03. It should be okay to do with other versions as well. I just find X.03 more comfortable for me. You may download a free trial of Paint Shop Pro, version X2, from Corel. Any similarities between this tut and any others you may see are purely coincidental.
This is just a guideline, and I know not everyone is going to be using the same tube... so use your imagination as you go!
You will also need:
Animation Shop. This is from now a pay-for product, through Corel. That changed a while ago. I don't know why!!
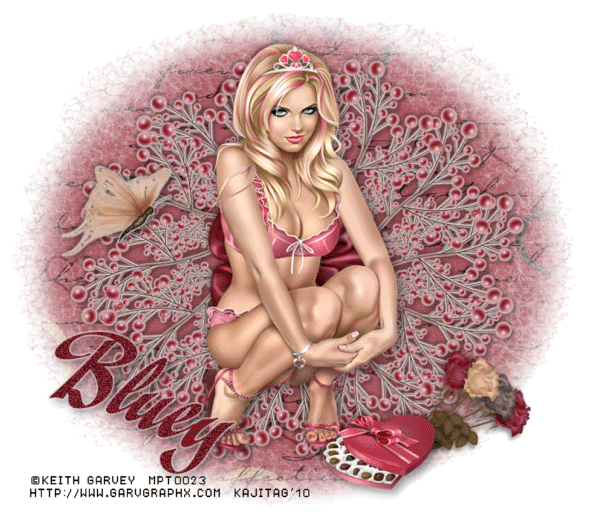
A tube of your choice. I'm using the fantastic artwork of Keith Garvey. You must have a license to use his work. You can get that license and art at My PSP Tubes.
The scrap kit is by Bluey, at Bluedream Designs. This is a FTU kit called simply "Valentine." This is a kit she made last year, but it's still a good one! Continue to leave lots of love for the freebies!
Filters: Mura's Meister > Copies, Eye Candy 4000 > Gradient Glow, dsb Flux > Bright Noise
Font: I used A&S Christmas Script.
Supplies: Just the mask, which you may find here. First time in my recollection that I've used this mask. That doesn't make sense, but I don't remember it! lol. I don't know who shared this mask with me, so if you do, or if it's yours, let me know so that I may give credit where it's due! Thanks!!
Let's get this baby rockin'!!
Open a new canvas, 800 x 700, white.
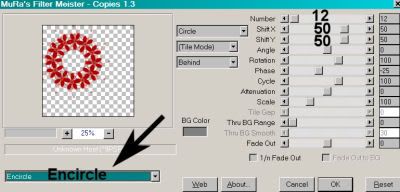
Open FlowerPearls2. Copy and paste as a new layer.
Effects > Plug-ins > Mura's Meister > Copies with the following settings:
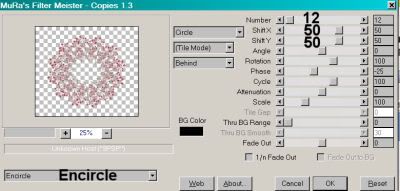
Hit okay.
Effects > Plug-Ins > Eye Candy 4000 > Gradient Glow set at 3-0-100, color #e6dede.
Drop shadow.
Add your tube. Resize, position, and drop shadow to your taste.
Highlight your white background layer.
Open paper8. Resize to 800x700. Copy and paste as a new layer.
Apply your mask. Delete mask layer, answer "yes" to the pop-up question, and merge group.
Back to the top of your layer palette -- This part might be weird, if you're not using the same tube. But again, tutorials are a guide. Hopefully this will help?!?!
Open FlowerRose, FlowerRose1 and FlowerRose2. Resize all three by 50%. Copy all and paste as new layers. Duplicate FlowerRose1.
FlowerRose1: Rotate 75° right. Position toward the bottom right area of your canvas. In your layer palette, drag this layer below your tube layer. If you're using the same (or similar) tube, position it so that it will stick out from under the candy box. Drop shadow.
FlowerRose: Rotate 65° right. Position just above the previous rose. Drop shadow.
FlowerRose2: Rotate 50° right. Position just above the previous rose. Drop shadow.
Second FlowerRose1: Rotate 40° right. Position in your tag so that it is just below the FlowerRose2 layer. In your layer palette, drag this layer below the FlowerRose2 layer. Drop shadow.
Open Flower4. Copy and paste as a new layer. Resize 130%. Position in the center of the FlowerPearls2 circle/frame layer that you created with Copies. Drop shadow.
Open Butterfly4. Resize 65%. Copy and paste as a new layer. Image > Mirror. Position to the side of your canvas. See my example for placement reference. Add the same Gradient Glow as before. Drop shadow.
Go back to the top and add your name. I used color #721927 as the fill. No stroke was used.
No bevel! Surprise! LOL!!
Again, apply the same Gradient Glow as before to your name.
Drop shadow your name.
Resize your canvas to a size with which you are comfortable.
Add your copyright, license information if applicable, and taggers'/watermark.
If you choose not to animate, you're now done, and you can merge your layers and save!
A N I M A T I O N
Highlight your name layer.
Grab your magic wand and click inside each of your letters. Make sure you get all the swirls and swashes that your particular font may include.
Duplicate this layer twice, for a total of three name layers.
Now highlight your bottom name layer.
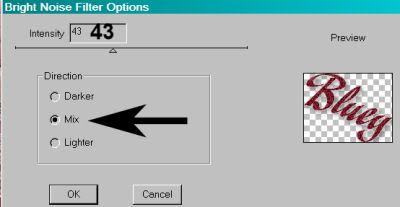
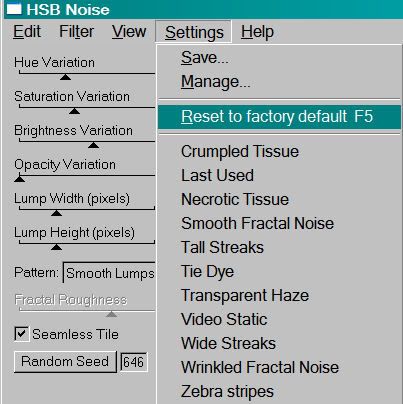
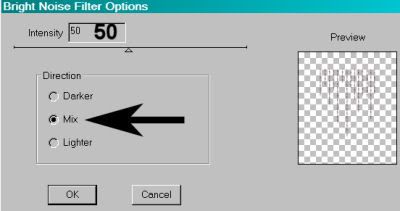
Effects > Plug-ins > dsb Flux > Bright Noise with the following settings:
Hit okay.
Highlight your middle name layer.
Add Bright Noise again, this time changing the "Intensity" setting to 47. Click "Mix" once or twice.
Hit okay.
Highlight your top name layer.
Add Bright Noise once more, this time changing the "Intensity" setting to 52. Click "Mix" again, once or twice.
Selections > Select None.
Close out your top two name layers, leaving the bottom layer open.
Edit > Copy Merged.
Open Animation Shop. Right-click on the desktop area and paste as a new animation.
Return to PSP. Close out your bottom name layer, and open the middle layer.
Edit > Copy merged.
Back to Animation Shop. Edit > Paste > After Current Frame.
Return again to PSP. Close out your middle name layer, and open your top name layer.
Edit > Copy merged.
Again, back to Animation Shop. Edit > Paste > After Current Frame.
View > Animation.
Finis!! You're done! Thanks so much for trying one of my tuts! I appreciate you stopping by!
.
.
 [Click image above to go to full sized image.]This tutorial was written on January 27, 2010 using Paint Shop Pro, version X.03. It should be okay to do with other versions as well. I just find X.03 more comfortable for me. You may download a free trial of Paint Shop Pro, version X2, from Corel. Any similarities between this tut and any others you may see are purely coincidental.
This is just a guideline, and I know not everyone is going to be using the same tube... so use your imagination as you go!
You will also need:
Animation Shop. This is from now a pay-for product, through Corel. That changed a while ago. I don't know why!!
A tube of your choice. I'm using the wonderful artwork of Elias Chatzoudis. You must have a license to use his work. You can get that license and art at My PSP Tubes.
The scrap kit is by Doris, of Scraps Dimensions. This is a FTU kit called "Lovey Dovey." Leave lots of love for the freebies, ladies!
Filters: No outside filters used in this tutorial!
Font: I used Headache Normal.
Supplies: No outside supplies for this tutorial!
Okay, let's begin...
Open a new canvas, 700 x 800, white.
Open Frame 1. Resize 65%. Copy and paste as a new layer.
Add your tube. Resize, position, and drop shadow to your taste.
Highlight your frame layer. Grab your magic wand and click inside the frame.
Selections > Modify > Expand by 1. Selections > Invert
Highlight your tube layer. Grab your eraser brush and erase any portion of the tube you don't want showing at the sides or on the bottom of the frame.
Selections > Select none.
Highlight your white background layer.
Open Paper 4. Copy and paste as a new layer.
Again, highlight the frame layer. Grab the magic wand, click inside the frame. Selections > Modify > Expand by 15. Selections > Invert.
Highlight your paper layer. Hit delete.
Selections > Select None.
Again, highlight your white background layer.
Open Doodle Heart 2. Copy and paste as a new layer. Resize 75%. I moved this layer up a bit on the canvas. Duplicate this layer. Image > Mirror. Merge these two layers down.
Back to the top of your layer palette.
Open Calla Lilly 3. Resize 40%. Copy and paste as a new layer. Rotate 23° left. Place on the bottom left corner of the frame. Duplicate this layer. Image > Mirror. Merge these two layers down. Drop shadow.
Open Cushion. Resize 20%. Copy and paste as a new layer. Position over the Calla Lilly on the bottom right corner of your canvas. Duplicate this layer. Image > Mirror. Merge these two layers down. Drop shadow.
Open Rose 2. Resize 20%. Copy and paste as a new layer. Position in the middle, between the two cushions at the bottom center of the frame. Drop shadow.
Open Heart 8. Resize 20%. Copy and paste as a new layer. Position along one side of the frame. See my example for placement reference. Drop shadow.
Go back to the top and add your name. I used color #f75b9b as the fill and #a6ca3b as the stroke, stroke set on 3.
I added the following bevel:
 0
0
Hit okay.
Drop shadow your name.
Resize your canvas to a size with which you are comfortable.
Add your copyright, license information if applicable, and taggers'/watermark.
If you choose not to animate, you're now done, and you can merge your layers and save!
A N I M A T I O N
Highlight your Doodle Heart 2 layer. Duplicate this twice, for a total of three Doodle Heart 2 layers.
Now highlight the bottom Doodle Heart 2 layer.
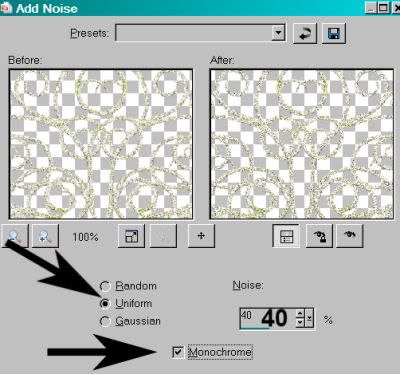
Adjust > Add/Remove Noise > Add Noise with the following settings:
Hit okay.
Highlight the middle Doodle Heart 2 layer.
Add Noise again, this time changing the "Noise" setting to 45.
Hit okay.
Highlight the top Doodle Heart 2 layer.
Add Noise once more, this time changing the "Noise" setting to 50.
Close out the top two Doodle Heart 2 layers, leaving the bottom layer open.
Edit > Copy Merged.
Open Animation Shop. Right-click on the desktop area and paste as a new animation.
Return to PSP. Close out the bottom Doodle Heart 2 layer, and open the middle layer.
Edit > Copy merged.
Back to Animation Shop. Edit > Paste > After Current Frame.
Return again to PSP. Close out the middle Doodle Heart 2 layer, and open the top Doodle Heart 2 layer.
Edit > Copy merged.
Again, back to Animation Shop. Edit > Paste > After Current Frame.
View > Animation.
Once more, we are done! Thanks for using my tutorial! I hope you'll come back soon! Leave me a shout out if you're feeling "talky." LOL!
.
.
 [Click image above to go to full sized image.]This tutorial was written on January 27, 2010 using Paint Shop Pro, version X.03. It should be okay to do with other versions as well. I just find X.03 more comfortable for me. You may download a free trial of Paint Shop Pro, version X2, from Corel. Any similarities between this tut and any others you may see are purely coincidental.
This is just a guideline, and I know not everyone is going to be using the same tube... so use your imagination as you go!
You will also need:
Animation Shop. This is from now a pay-for product, through Corel. That changed a while ago. I don't know why!!
A tube of your choice. I'm using the artwork of Greg Horn. You must have a license to use his work. You can get that license and art at C.I.L.M.
The scrap kit is by Artmama, of Artmama's Studio. This is a FTU kit called "Kisses." Leave lots of love for the freebies, ladies!
Filters: No outside filters used in this tutorial.
Font: I used Karnac Two.
Supplies: Just my current favorite mask, which you may find here. It is again by Becky, who has dropped off the 'net, it seems. At least in PSP form. So thank you once again, Becky, wherever you are!!
Okay, here we go!
Open your mask and minimize in PSP. Alternatively, you could save it in with those already in your masks file, for use at a later date!
Open a new canvas, 700 x 700, white.
Open embellie 08. Rotate it 45° right. Copy and paste as a new layer.
Add your tube. Resize, position, and drop shadow to your taste.
Highlight your emb 08 layer. Grab your magic wand and click inside the frame.
Selections > Modify > Expand by 1. Selections > Invert
Highlight your tube layer. Grab your eraser brush and erase any portion of the tube you don't want showing at the sides or on the bottom of the frame.
Selections > Select none.
Highlight your white background layer.
Open paper 08. Resize to 700x700 pixels. Copy and paste as a new layer.
Apply your mask. Delete mask layer, answer "yes" to the pop-up question, and merge group.
Open emb 17. Copy and paste as a new layer. Duplicate this layer. Image > Mirror. Merge these two layers down.
Open emb 10. Resize 65%. Copy and paste as a new layer. Position this on the left side of your frame. Duplicate this layer. Image > Mirror. Merge these two layers down. Drop shadow.
Drop shadow your frame.
Go back to the top and add your name. I used color #5a1c1e as the fill and #e8bec8 as the stroke, stroke set on 2.
I added the following bevel:

Hit okay.
Drop shadow your name.
Resize your canvas to a size with which you are comfortable.
Add your copyright, license information if applicable, and taggers'/watermark.
If you choose not to animate, you're now done, and you can merge your layers and save!
A N I M A T I O N
Highlight your emb 17 layer. Duplicate this twice, for a total of three emb 17 layers.
Now highlight the bottom emb 17 layer.
Adjust > Add/Remove Noise > Add Noise with the following settings:
Hit okay.
Highlight the middle emb 17 layer.
Add Noise again, this time changing the "Noise" setting to 45.
Hit okay.
Highlight the top emb 17 layer.
Add Noise once more, this time changing the "Noise" setting to 50.
Close out the top two emb 17 layers, leaving the bottom layer open.
Edit > Copy Merged.
Open Animation Shop. Right-click on the desktop area and paste as a new animation.
Return to PSP. Close out the bottom emb 17 layer, and open the middle layer.
Edit > Copy merged.
Back to Animation Shop. Edit > Paste > After Current Frame.
Return again to PSP. Close out the middle emb 17 layer, and open the top emb 17 layer.
Edit > Copy merged.
Again, back to Animation Shop. Edit > Paste > After Current Frame.
View > Animation.
YAY! You're done! Thank you for using my tutorials! I appreciate that you appreciate it!
.
.
 [Click image above to go to full sized image.]This tutorial was written on January 26, 2010 using Paint Shop Pro, version X.03. It should be okay to do with other versions as well. I just find X.03 more comfortable for me. You may download a free trial of Paint Shop Pro, version X2, from Corel. Any similarities between this tut and any others you may see are purely coincidental.
This is just a guideline, and I know not everyone is going to be using the same tube... so use your imagination as you go!
You will also need:
Animation Shop. This is from now a pay-for product, through Corel. That changed a while ago. I don't know why!!
[Please Note: The animation in this tutorial is minimal: The sparkle in the eye. You can very easily go without the animation if you choose not to do it.]
A tube of your choice. I'm using the great artwork of Elias Chatzoudis. You must have a license to use his work. You can get that license *and* his art at My PSP Tubes.
The scrap kit is by Sylvie, of Fantasy Moments. This is a FTU kit called "For Your Love."
This kit is available through Rapid Share, a site with which I have numerous problems. It took me about 15 tries to get this kit. So if this happens to you, too, please know that you can use ANY kit with this tutorial, or even just use your flood fill tool with your chosen colors.
The template, which I got from Trish at Dreamland Designs. This particular template was offered a year ago, and you may find it here.
Filters: Eye Candy 4000 > Gradient Glow
Font: I used Arial.
Supplies: The mask and the sparkle, both available here. The sparkle is obviously from someone named Laura, but I don't know exactly WHICH Laura, so... basically it's another "unknown" file. And the mask is by the wonderful-yet-MIA Becky! Thanks so much to both these lovely ladies for their contributions to the PSP community!
Okay... I have a feeling this is going to be difficult to put into words, so please bear with me!
Open your supplies and minimize in PSP. Alternatively, you could save them in with those already in your masks file, for use at a later date!
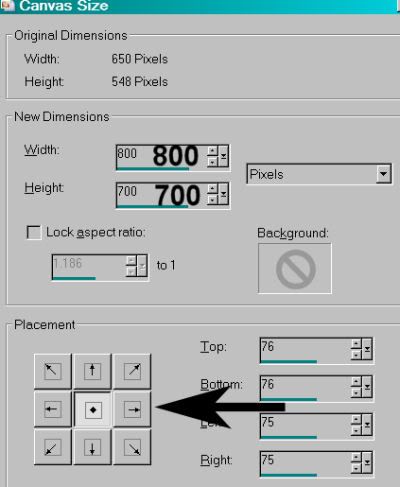
Open the template. Window > Duplicate. Close the original template. Resize to a width of 650 pixels, a height of 548 pixels.
Hit okay.
Change your canvas size to 800x700.
Hit okay.
Highlight your white background layer. Grab your flood fill tool and fill the background with white.
Delete your copyright layer (on top), and the Frame2 and BLACK SHAPE 1 layers (just above your white background layer).
Highlight your Large Hearts layer.
Open Paper-12. Copy and paste as a new layer.
[Please Note: If you're using just your colors of choice, be sure to add a new raster layer, then flood fill this area with your color as a substitute for the paper. This holds true with all the paper layers in this tutorial. And face it, most of this tutorial is reliant upon paper layers....]
Again, highlight the Large Hearts layer. Grab your magic wand and click on the canvas outside the hearts. Selections > Invert.
Highlight your Paper-12 layer. Hit delete. Selections > Select None.
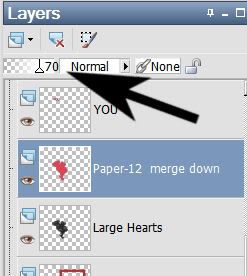
Reduce the opacity on this paper layer to 70.
Merge your paper layer down with your Large Hearts layer. Drop shadow.
Highlight your Little Hearts layer.
Again, open paper-12. Copy and paste as a new layer. Highlight your Little Hearts layer again. Grab your magic wand and click on each of the little hearts. Selections > Invert.
Highlight your new Paper-12 layer. Hit delete. Selections > Select None.
Reduce the opacity on this paper layer to 70.
Merge this paper layer down with your Little Hearts layer. Drop shadow.
Highlight your Frame 1 layer.
Add your tube. Resize, position, and drop shadow to your taste.
Highlight your frame layer. Grab your magic wand and click inside the frame.
Selections > Modify > Expand by 1. Selections > Invert
Highlight your tube layer. Grab your eraser brush and erase any portion of the tube you don't want showing at the sides or on the bottom of the frame.
Selections > Select none.
Highlight your TOP SHAPE 1 layer.
Open Paper-30. Copy and paste as a new layer.
Back to the shape layer. Grab your magic wand and click outside the shape.
Highlight your Paper-30 layer. Hit delete. Selections > Select None.
Merge these two layers down.
Highlight the RECTANGLE SHAPES layer.
Again, open Paper-30, copy and paste as a new layer.
Back to the RECTANGLE SHAPES layer. Grab your magic wand, click outside all the rectangles.
Highlight your new Paper-30 layer and hit delete. Selections > Select none.
Merge these two layers down.
Highlight your Rectangle Frames layer.
Open Paper-4. Copy and paste as a new layer.
Back to the Rectangle Frames layer. Grab your magic wand and click inside AND outside the four rectangle frames.
Highlight again Paper-4 layer and hit delete. Selections > Select None.
Merge your Paper-4 layer with your Rectangle Frames layer. Drop shadow.
Highlight your Frame 1 layer again.
Open Paper-4 again. Copy and paste as a new layer.
Back to the Frame 1 layer. Grab your magic wand and click inside and outside the frame.
Return to your new Paper-4 layer and hit delete. Selections > Select None.
Merge this Paper-4 layer down with your Frame 1 layer. Drop shadow your frame.
Highlight the white background layer.
Open Paper-15. Resize to 800x700. Copy and paste as a new layer.
Apply your mask. Delete mask layer, answer "yes" to the pop-up question, and merge group.
I found I wanted to move the mask layer a bit to the right at this point. You may, or may not. Up to you!
At this point I went to the top and started adding my text. I used Arial and just typed out something simple. You may use "You Me Us Love" or anything you like. I used color #ab2927. Drop shadow your text.
Go back to the top again and add your name. I used color #ab2927 again as the fill, no stroke.
Effects > Plugins > Eye Candy 4000 > Gradient Glow set at 4-25-100 with color #e8a3b6.
Hit okay.
I added the following bevel:
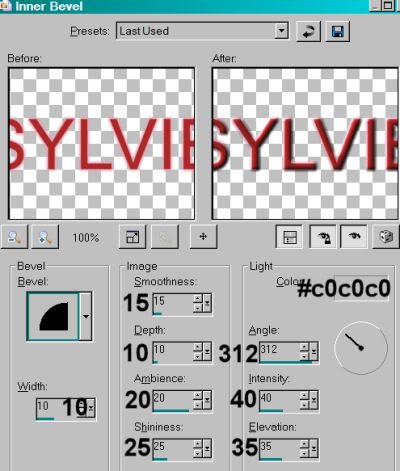
Hit okay.
Drop shadow your name.
I rotated mine 25° left. Position as you like.
It was at this point, with the drop shadow already in place on all of my text, that I decided to add the above bevel also to the "You Me Us Love" text. That, again, is up to you.
Resize your canvas to a size with which you are comfortable.
Add your copyright, license information if applicable, and taggers'/watermark.
If you choose not to animate, you're now done, and you can merge your layers and save!
A N I M A T I O N
Go again to the top layer of your tag.
Open the SparkleLauras I included with the supplies. Resize 50%. Copy and paste as a new layer.
Position over the eye area of your tube. (Actually, it doesn't need to be positioned correctly at this point... but I just did it. lol.)
Making sure you're on that sparkle layer, Edit > Copy.
Open Animation Shop. Right-click on the desktop area, and paste as a new animation.
Effects > Insert Image Transition with settings like so:
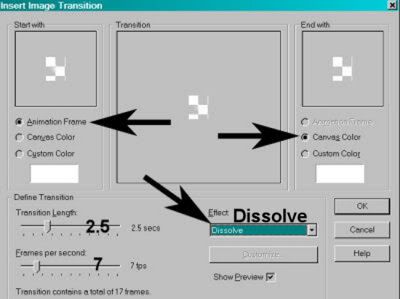
Hit okay. You should now have 18 frames.
Go back to PSP and close out the sparkle layer. Edit > Copy Merged.
Return to Animation Shop and once more, right-click on the desktop area and paste as a new animation.
Duplicate this frame until you have a total of 18 frames. Make sure your bottom slider is positioned at the first frame.
Go to the sparkle animation you created and Edit > Select All. Edit > Copy.
Return to the main tag you just duplicated and Edit > Select All. Edit > Paste > Into Selected Frame.
NOW!! lol. Position your sparkle in the area of the eye on your tube. Release your mouse button.
View > Animation.
Lookie there! You're done! I sincerely hope I was able to put this into words well enough for you to follow and understand! Thank you for giving this one a try!!
.
.
 [Click image above to go to full sized image.]This tutorial was written on January 25, 2010 using Paint Shop Pro, version X.03. It should be okay to do with other versions as well. I just find X.03 more comfortable for me. You may download a free trial of Paint Shop Pro, version X2, from Corel. Any similarities between this tut and any others you may see are purely coincidental.
This is just a guideline, and I know not everyone is going to be using the same tube... so use your imagination as you go!
You will also need:
Animation Shop. This is from now a pay-for product, through Corel. That changed a while ago. I don't know why!!
A tube of your choice. I'm using the great Twilight artwork of Irene Shpak. You must have a license to use her work. You can get that license and art at My PSP Tubes.
The scrap kit is by Stina, of Designed by Stina. This is a FTU kit called "New Moon." Leave lots of love for the freebies!!!
Filters: VM Natural > Sparkle
Font: I used Penhurst.
Supplies: Just this mask. I've been using this one quite a bit of late!
Okay, let's begin!! It's been 10 days since my last tut post! BAD!!
Open your mask and minimize in PSP. Alternatively, you could save it in with those already in your PSP files, for use at a later date!
Open a new canvas, 800 x 700, white.
Open Glitterheart02. Resize 75%. Copy and paste as a new layer.
Add your tube. Resize, position, and drop shadow to your taste.
Highlight your Glitterheart02 layer. Grab your magic wand and click on the inside.
Selections > Modify > Expand by 1.
Selections > Invert
Highlight your tube layer. Grab your eraser brush and erase any portion of the tube you don't want showing at the sides or on the bottom of the frame.
Selections > Select none.
Highlight your white background layer.
Open paper01. Copy and paste as a new layer.
Apply your mask. Delete mask layer, answer "yes" to the pop-up question, and merge group.
You may want to keep this layer from coming to an abrupt stop at the edges. To accomplish this, I used my lasso tool set on freehand, feather set at 17. Draw freehand curves around the outside edges of your mask layer. Hit delete. Selections > Select none.
Open Moon. Resize 35%. Copy and paste as a new layer. Position in the top right area of your Glitterheart02. See my example for placement reference. It's up to you and your choice of tube as to where to put it. Drop shadow.
Open Hearts. Resize 50%. Copy and paste as a new layer. Rotate 35° left. Position on the upper left portion of your canvas. See my example for placement reference. Drop shadow.
Drop shadow your Glitterheart02 layer.
Open Tree02. Resize 50%. Copy and paste as a new layer. In your layer palette, drag this layer below your tube layer. Position this tree as you'd like it. Mine is in the lower left area of the canvas. Duplicate this layer and position to the right a bit, and up or down a little from the first. Drop shadow both these trees.
Open Tree01. Resize 50%. Copy and paste as a new layer. Position this tree as you'd like them all to look together in that same area. Duplicate this layer and move it to a place you like for your tag. Drop shadow both these trees.
You can merge down all your tree layers if you like.
Open Wolf. Resize 50%. Copy and paste as a new layer. Image > Mirror. In your layer palette, this layer should be above the rest. Position this to the lower left area of your canvas. See my example for placement reference. Drop shadow.
Open the "Team _______" heart. (Choose your team! lol) Resize 50%. In your layer palette, this should be below your tube layer but above your Glitterheart02 layer. Position this sort-of in the upper center area of your canvas. See my example for placement reference. Drop shadow.
Go back to the top and add your name. I used color #eaca92 for the fill, color #cea870 for the stroke, stroke set at 4.
I added the following bevel:
Hit okay.
Drop shadow your name.
Resize your canvas to a size with which you are comfortable.
Add your copyright, license information if applicable, and taggers'/watermark.
If you choose not to animate, you're now done, and you can merge your layers and save!
A N I M A T I O N
Highlight your mask layer. Duplicate this three times, for a total of four mask layers.
Now highlight the bottom mask layer.
Effects > Plugins > VM Natural > Sparkle
Use the default settings. Mine started like so:
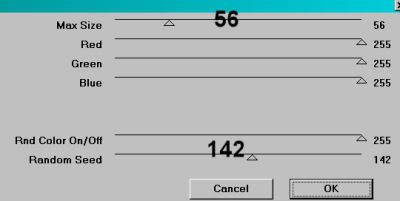
Hit okay.
Highlight the next mask layer up.
Add Sparkle again, this time moving the "random seed" and/or the "max size" to something different. You can watch on the screen provided in the plug-in to see the effect you're getting, so move the sliders 'til you get what you like.
Hit okay.
Highlight the next mask layer up.
Add Sparkle again, and again moving "random seed" and/or "max size."
Hit okay.
Highlight the top mask layer.
Add Sparkle once more, again moving "random seed" and/or "max size."
Now, whenever I use this filter, I give it a double dose, to get more sparkles. So go back, layer by layer, and do the sparkle thing again. You don't HAVE to, of course. Just what I do! When finished, then:
Close out the top three of the mask layers, leaving the bottom layer open.
Edit > Copy Merged.
Open Animation Shop. Right-click on the desktop area and paste as a new animation.
Return to PSP. Close out the bottom mask layer, and open the next mask layer up.
Edit > Copy merged.
Back to Animation Shop. Edit > Paste > After Current Frame.
Return again to PSP. Close out the mask layer you just worked with, and open the next mask layer up.
Edit > Copy merged.
Again, back to Animation Shop. Edit > Paste > After Current Frame.
Finally, return to PSP one last time, and close the current mask layer and open the top mask layer.
Edit > Copy merged.
Return once more to Animation Shop. Edit > Paste > After Current Frame.
Still in Animation Shop, Edit > Select All.
Right-click on the bar above your animation and choose "Frame Properties." Change this number to 27.
View > Animation.
Et, voila! We're done! Thank you for using my tutorials! I appreciate you for it! Leave a shout out if you're feeling talky! :)
.
.
 [Click image above to go to full sized image.]This tutorial was written on January 15, 2010 using Paint Shop Pro, version X.03. It should be okay to do with other versions as well. I just find X.03 more comfortable for me. You may download a free trial of Paint Shop Pro, version X2, from Corel. Any similarities between this tut and any others you may see are purely coincidental.
This is just a guideline, and I know not everyone is going to be using the same tube... so use your imagination as you go!
You will also need:
Animation Shop. This is from now a pay-for product, through Corel. That changed a while ago. I don't know why!!
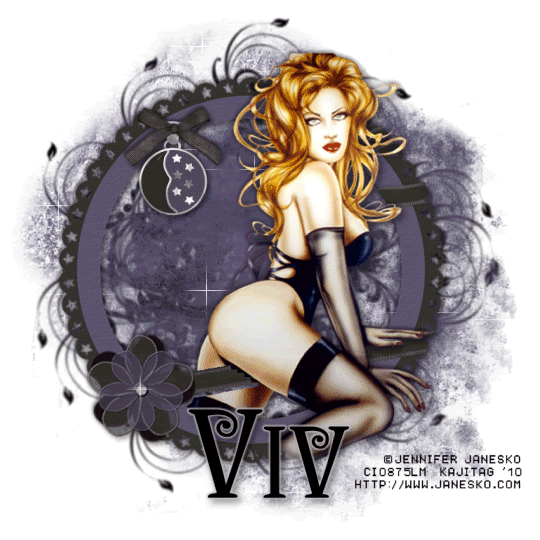
A tube of your choice. I'm using the glamorous artwork of Jennifer Janesko. You must have a license to use her work. You can get that license and art at C.I.L.M.
The scrap kit is by Vivian, of Sinfully Blissful Scraps. This is a FTU kit called "Into The Night." This is was previously a PTU kit, which Viv put on FTU status. It's the third one down in that post. Click the image to download.
Filters: Eye Candy 4000 > Gradient Glow, VM Natural > Sparkle
Font: I used SecejaPL.
Supplies: The mask and the sparkle, which you may find here. The mask is from Boundless Bliss, which has recently dropped off the face of the blogosphere. I don't know where she went, but I thank her for her mask!! The sparkle? I don't know the origin. I have many sparkles, all the same basic look, just differing colors and sizes. I don't know where most of them came from. If anyone knows (somehow), let me know so that I may give proper credit and thanks!!
Okay, let's do this!
Open your supplies and minimize in PSP. Alternatively, you could save them in with those already in your PSP files, for use at a later date!
Open a new canvas, 700 x 700, white.
Open frame. Copy and paste as a new layer.
Add your tube. Resize, position, and drop shadow to your taste.
Highlight your frame layer. Grab your magic wand and click inside the frame. Be sure to click in both the empty areas: the top and the bottom!
Selections > Invert
Highlight your tube layer. Grab your eraser brush and erase any portion of the tube you don't want showing at the sides or on the bottom of the frame.
Selections > Select none.
Highlight your white background layer.
Open paper4. Resize to 700x700 pixels. Copy and paste as a new layer.
Apply your mask. Delete mask layer, answer "yes" to the pop-up question, and merge group.
Open nightcharm. Resize 40%. Copy and paste as a new layer. Position in the top right area of your frame. See my example for placement reference. It's up to you and your choice of tube as to where to put it. Drop shadow.
Open bow2. Resize 40%. Copy and paste as a new layer. Position as though the bow is holding the nightcharm onto the frame. See my example for placement reference. Drop shadow.
Drop shadow your frame.
Open the sparkle provided in your supplies. Copy and paste as a new layer. Position this sparkle as close to the center of the flower in the frame as you can. This is just meant as an accent.
Duplicate your sparkle layer and Image > Free Rotate 90° either direction. Merge these two layers down.
Okay, here's a long and drawn out process. You have been warned! I find it easier to do these things on the top layer. Your process may be different. These layers are going to eventually be merged down and dragged below your mask layer.
Open doodle. Resize 150%. Copy and paste as a new layer.
Duplicate this layer. Rotate 35° right. Duplicate *this* layer (Copy of Copy). Rotate 35° right.
Duplicate *this layer* (Copy 2 of Copy). Rotate 35° right. Duplicate *this* layer (Copy 3 of Copy). Rotate 35° right.
Finally, duplicate *this* layer (Copy 4 of Copy). Rotate 15° right.
Merge all these doodle layers down. Drag this layer below your mask layer.
You may notice it's not exactly centered. It pokes up toward the top more than it shows on the bottom. Move your doodle layer to your taste.
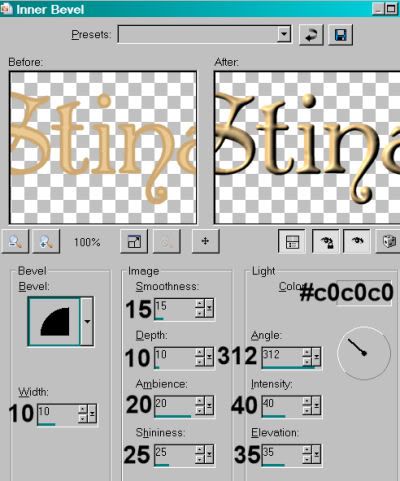
Go back to the top and add your name. I used black, as you can see.
Effects > Plugins > Eye Candy 4000 > Gradient Glow set at 4-0-100 with color #c0c0c0.
Drop shadow your name.
Resize your canvas to a size with which you are comfortable.
Add your copyright, license information if applicable, and taggers'/watermark.
If you choose not to animate, you're now done, and you can merge your layers and save!
A N I M A T I O N
Highlight your mask layer. Duplicate this three times, for a total of four mask layers.
Now highlight the bottom mask layer.
Effects > Plugins > VM Natural > Sparkle
Use the default settings. Mine started like so:
Hit okay.
Highlight the next mask layer up.
Add Sparkle again, this time moving the "random seed" and/or the "max size" to something different. You can watch on the screen provided in the plug-in to see the effect you're getting, so move the sliders 'til you get what you like.
Hit okay.
Highlight the next mask layer up.
Add Sparkle again, and again moving "random seed" and/or "max size."
Hit okay.
Highlight the top mask layer.
Add Sparkle once more, again moving "random seed" and/or "max size."
Now, whenever I use this filter, I give it a double dose, to get more sparkles. So go back, layer by layer, and do the sparkle thing again. You don't HAVE to, of course. Just what I do! When finished, then:
Close out the top three of the mask layers, leaving the bottom layer open.
Edit > Copy Merged.
Open Animation Shop. Right-click on the desktop area and paste as a new animation.
Return to PSP. Close out the bottom mask layer, and open the next mask layer up.
Edit > Copy merged.
Back to Animation Shop. Edit > Paste > After Current Frame.
Return again to PSP. Close out the mask layer you just worked with, and open the next mask layer up.
Edit > Copy merged.
Again, back to Animation Shop. Edit > Paste > After Current Frame.
Finally, return to PSP one last time, and close the current mask layer and open the top mask layer.
Edit > Copy merged.
Return once more to Animation Shop. Edit > Paste > After Current Frame.
Still in Animation Shop, Edit > Select All.
Right-click on the bar above your animation and choose "Frame Properties." Change this number to 27.
View > Animation.
Et, voila! We're done! Thank you for using my tutorials! I appreciate you for it! Leave a shout out if you're feeling talky! :)
.
.
 [Click image above to go to full sized image.]This tutorial was written on January 12, 2010 using Paint Shop Pro, version X.03. It should be okay to do with other versions as well. I just find X.03 more comfortable for me. You may download a free trial of Paint Shop Pro, version X2, from Corel. Any similarities between this tut and any others you may see are purely coincidental.
This is just a guideline, and I know not everyone is going to be using the same tube... so use your imagination as you go!
You will also need:
Animation Shop. This is from now a pay-for product, through Corel. That changed a while ago. I don't know why!!
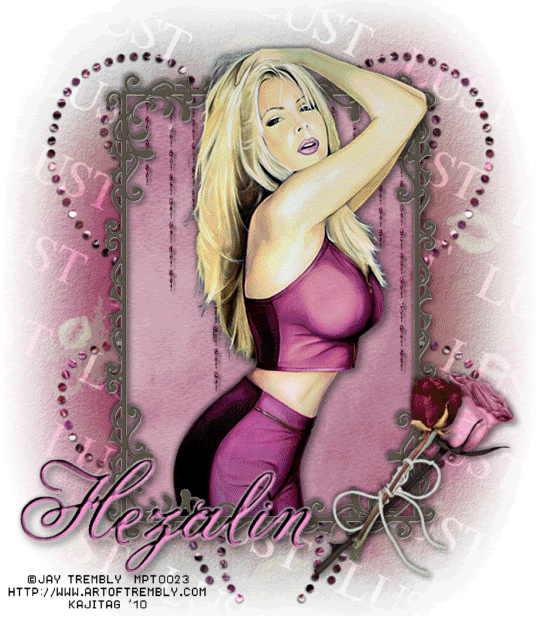
A tube of your choice. I'm using the great artwork of Jay Trembly. You must have a license to use his work. You can get that license and art at C.I.L.M. If you notice I put an MPT license on mine. I bought this tube from MPT when Jay was with them. He has since moved to C.I.L.M.
The scrap kit is by Hezalin, of Heza Scraps. This is a PTU kit, available at Treasured Scraps. This kit is called "Craving a Dark Heart." This kit is currently on sale for $1.00!! Get it while you can!!
Filters: Eye Candy 4000 > Gradient Glow, Eye Candy 4000 > HSB Noise, dsb Flux > Bright Noise
Font: I used Anglia Script Enhancements.
Supplies: The mask is all for this one, found here. I do not know from whence I got this mask. If anyone knows this info, PLEASE let me know so that I can give proper credit! Thanks a bunch!
Okay, get going!
Open your mask and minimize in PSP. Alternatively, you could save it in with those already in your masks file, for use at a later date!
Open a new canvas, 700 x 800, white.
Open Frame5. Rotate it 90° either way. Resize 80%. Copy and paste as a new layer.
Add your tube. Resize, position, and drop shadow to your taste.
Highlight your frame layer. Grab your magic wand and click inside the frame. This is a very tricky frame! Be sure to click in all the little nooks and crannies that the swirls cause in the frame!
Selections > Modify > Expand by 2. Selections > Invert
Highlight your tube layer. Grab your eraser brush and erase any portion of the tube you don't want showing at the sides or on the bottom of the frame.
Selections > Select none.
Highlight your white background layer.
Open Paper19. Resize to 800x800 pixels. Copy and paste as a new layer.
Apply your mask. Delete mask layer, answer "yes" to the pop-up question, and merge group.
Open Rose. Resize 50%. Copy and paste as a new layer. Rotate 45° right. Position in the bottom left corner of your frame. See my example for placement reference. It's up to you where to put it. Drop shadow.
Open Flower3. Resize 50%. Copy and paste as a new layer. Rotate 45° right. Drag this layer below your first rose layer. Drop shadow
Drop shadow your frame.
Open PearlCurtain1. Copy and paste as a new layer. In your layer palette, drag this below your frame layer. Position it so that it looks as though it may be attached to the inside top of the frame.
Adjust > Brightness and Contrast > Brightness/Contrast with the following settings:
Grab your pick tool...

...and squish together the sides, then pull the curtain downward until you get it to fit in the frame's area, and you feel you like the length.
Highlight you white background layer.
Open GlitterDoodle1. Copy and paste as a new layer. Rotate 20° left. Duplicate this layer. Image > Mirror. Merge down these two layers.
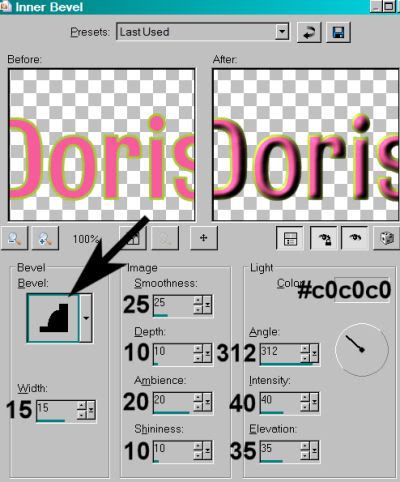
Go back to the top and add your name. I used color #b65e92 as the fill and the stroke, stroke set on 2.
I added the following bevel:
Hit okay.
Effects > Plugins > Eye Candy 4000 > Gradient Glow set at 3-25-100 with color #c0c0c0.
Drop shadow your name.
Resize your canvas to a size with which you are comfortable.
Add your copyright, license information if applicable, and taggers'/watermark.
If you choose not to animate, you're now done, and you can merge your layers and save!
A N I M A T I O N
I've animated two layers in this one. The GlitterDoodle1 layer and the PearlCurtain1 layers. The PearlCurtain1 layer doesn't really show up well. I'm including the instruction for both, but you don't have to do the PearlCurtain1 if you don't want to.
Highlight your PearlCurtain1 layer. Duplicate this three times, for a total of four PearlCurtain1 layers.
Do the same with your GlitterDoodle1 layer.
Now highlight the bottom GlitterDoodle1 layer.
Effects > Plugins > Eye Candy 4000 > HSB Noise
Use the default settings. If you're not sure what they are, they are listed under "Settings."
Hit okay.
Highlight the next GlitterDoodle1 layer up.
Add HSB Noise again, this time clicking on "random seed."
Hit okay.
Highlight the next layer up of the GlitterDoodle1 layers.
Add HSB Noise again, clicking again on "random seed."
Hit okay.
Highlight the top GlitterDoodle1 layer.
Add HSB Noise once more, again clicking on "random seed."
Go to the bottom layer of the PearlCurtain1 layers.
Effects > Plugins > dsb Flux > Bright Noise with the following setting:
Hit okay.
Highlight the next PearlCurtain1 layer up.
Add Bright Noise again, this time clicking on "mix" a couple times.
Hit okay.
Highlight the *next* PearlCurtain1 layer up.
Add Bright Noise again, again clicking on "mix" a couple times.
Highlight the top PearlCurtain1 layer.
Add Bright Noise a last time, clicking on "mix" a couple times.
Close out the top three layers of the GlitterDoodle1 and the PearlCurtain1 layers, leaving the bottom layers open.
Edit > Copy Merged.
Open Animation Shop. Right-click on the desktop area and paste as a new animation.
Return to PSP. Close out the bottom Glitter Doodle1 and PearlCurtain1 layers, and open the next layers up.
Edit > Copy merged.
Back to Animation Shop. Edit > Paste > After Current Frame.
Return again to PSP. Close out the layers you just worked with, and open the next Glitter Doodle1 and PearlCurtain1 layers up.
Edit > Copy merged.
Again, back to Animation Shop. Edit > Paste > After Current Frame.
Finally, return to PSP one last time, and close those two Glitter Doodle1 and PearlCurtain1 layers, and open the top layers.
Edit > Copy merged.
Return once more to Animation Shop. Edit > Paste > After Current Frame.
View > Animation.
Phew! You're done! Thank you for using my tutorials! I appreciate that you appreciate it!
.
.
 [Click image above to go to full sized image.]This tutorial was written on January 11, 2010 using Paint Shop Pro, version X.03. It should be okay to do with other versions as well. I just find X.03 more comfortable for me. You may download a free trial of Paint Shop Pro, version X2, from Corel. Any similarities between this tut and any others you may see are purely coincidental.
This is just a guideline, and I know not everyone is going to be using the same tube... so use your imagination as you go!
You will also need:
Animation Shop. This is from now a pay-for product, through Corel. That changed a while ago. I don't know why!!
A tube of your choice. I'm using the great artwork of Elias Chatzoudis. You must have a license to use his work. You can get that license and art at My PSP Tubes.
The scrap kit is by Tina, of Tina's Magical Scrap World. This is a PTU kit, available exclusively at Sophisti-Scraps. This kit is called "Sophistication." This kit was used in my previous tutorial, "Seduction," as well. It's also on sale right now (January 11, 2010). The store sale was scheduled to end, but I connected with Tina and I think it's been extended!! Hurry while the gettin's good!! :)
Filters: Eye Candy 4000 > Gradient Glow, Mura's Meister > Copies
Font: I used Brock Script.
Supplies: Just the same Becky mask that I've been using a lot of late! You may find this here. Again, if any of y'all know where Becky's gone, let me know please!! Thank you very much!
Okay, let's do it again!
Open your mask and minimize in PSP. Alternatively, you could save it in with those already in your masks file, for use at a later date!
Open a new canvas, 700 x 700, white.
Open SpecialFlower1. Resize 50%. Copy and paste as a new layer.
Effects > Plugins > Mura's Meister > Copies with the following settings:
Hit okay.
Open SpecialFlower2. Resize 50%. Copy and paste as a new layer.
Apply Copies to this one as well, same settings.
This should be below the red SpecialFlower1 layer. Position this layer just slightly to one side or the other so that it looks like it's "shadowing" the red one. See my example for placement reference.
Add your tube. Resize, position, and drop shadow to your taste.
Duplicate your tube. Mirror and resize to your liking. Position so the face is in the middle of the circle of RED SpecialFlower1 layer.
Highlight your red SpecialFlower1 layer. Grab your magic wand, click inside the center of the circle.
Selections > Modify > Expand by 15. Selections > Invert.
Highlight your enlarged tube layer, the one that you mirrored. Hit delete.
Selections > Select None.
Drag this layer to below both SpecialFlower layers. Lower the opacity to 70.
Drop shadow both SpecialFlower layers.
Highlight your white background layer.
Open Paper4. Copy and paste as a new layer.
Apply your mask. Delete mask layer, answer "yes" to the pop-up question, and merge group.
Open WomansBag1. Resize 40%. Copy and paste as a new layer. Arrange to your liking. Drop shadow.
Open Boots2. Resize 35%. Copy and paste as a new layer. Arrange to your liking. Drop shadow.
Open Bottle2. Resize 40%. Copy and paste as a new layer. Arrange to your liking. I rotated mine 15° left. Drop shadow.
Open Lipstick2. Resize 30%. Copy and paste as a new layer. Arrange to your liking. Drop shadow.
Open Perfume1. Resize 30%. Copy and paste as a new layer. Arrange to your liking. Drop shadow.
Go back to the top and add your name. I used color #d00000 as the fill, black as the stroke, stroke set on 2.
I added the following bevel:
Hit okay.
Effects > Plugins > Eye Candy 4000 > Gradient Glow set at 3-25-100 with color #c0c0c0.
Drop shadow your name.
I rotated mine 20° left. Position as you like.
Resize your canvas to a size with which you are comfortable.
Add your copyright, license information if applicable, and taggers'/watermark.
If you choose not to animate, you're now done, and you can merge your layers and save!
A N I M A T I O N
Highlight your SpecialFlower1 layer. Duplicate this four times, for a total of five SpecialFlower1 layers.
Now highlight the bottom SpecialFlower1 layer.
Adjust > Add/Remove Noise > Add Noise with the following settings:
Hit okay.
Highlight the next SpecialFlower1 layer up.
Add Noise again, this time changing the intensity to 40.
Hit okay.
Highlight the next layer up of the SpecialFlower1 layers.
Add Noise again, this time changing the intensity to 45.
Hit okay.
Highlight the next SpecialFlower1 layer. Add Noise once more, this time changing the intensity to 50.
Hit okay.
Highlight the top SpecialFlower1 layer. Add Noise one more time, this time changing the intensity back to 45.
Close out the top four layers of the SpecialFlower1 layers, leaving the bottom layer open.
Edit > Copy Merged.
Open Animation Shop. Right-click on the desktop area and paste as a new animation.
Return to PSP. Close out the bottom SpecialFlower1 layer, and open the next layer up.
Edit > Copy merged.
Back to Animation Shop. Edit > Paste > After Current Frame.
Return again to PSP. Close out the layer you just worked with, and open the next SpecialFlower1 layer up.
Edit > Copy merged.
Again, back to Animation Shop. Edit > Paste > After Current Frame.
Return again to PSP. Now close that SpecialFlower1 layer, and open the next SpecialFlower1 layer up.
Edit > Copy merged.
Return once more to Animation Shop. Edit > Paste > After Current Frame.
Finally, return to PSP, closing the layer you've just worked with and opening the top SpecialFlower1 layer.
Edit > Copy merged.
Last time to Animation Shop. Edit > Paste > After Current Frame.
View > Animation.
You're done! I hope you're happy with your results! And thanks for trying my tutorials!
.
.
 [Click image above to go to full sized image.]This tutorial was written on January 11, 2010 using Paint Shop Pro, version X.03. It should be okay to do with other versions as well. I just find X.03 more comfortable for me. You may download a free trial of Paint Shop Pro, version X2, from Corel. Any similarities between this tut and any others you may see are purely coincidental.
This is just a guideline, and I know not everyone is going to be using the same tube... so use your imagination as you go!
You will also need:
Animation Shop. This is from now a pay-for product, through Corel. That changed a while ago. I don't know why!!
A tube of your choice. I'm using the gorgeous artwork of Jennifer Janesko. You must have a license to use her work. You can get that license and art at C.I.L.M.
The scrap kit is by Tina, of Tina's Magical Scrap World. This is a PTU kit, available exclusively at Sophisti-Scraps. This kit is called "Sophistication." This kit is going to be used in this tutorial, as well as the next tutorial, "Painting the Town Red," that I'm going to post. It's also on sale right now (January 11, 2010). The store sale was scheduled to end, but I connected with Tina and I think it's been extended!! Hurry while the gettin's good!! :)
Filters: Eye Candy 4000 > Gradient Glow
Font: I used Edwardian Script.
Supplies: Two masks used in this one, both found here. One is the Becky mask I've used a lot of late, and the other the 20-20 mask. I don't know where Becky's gone, and have no idea who came up with the 20-20 mask. If anyone knows this info, PLEASE let me know so that I can give proper credit! Thanks a bunch!
Okay, let's do it!
Open your masks and minimize in PSP. Alternatively, you could save them in with those already in your masks file, for use at a later date!
Open a new canvas, 700 x 700, white.
Open CircleFrame3. Copy and paste as a new layer.
Add your tube. Resize, position, and drop shadow to your taste.
Highlight your frame layer. Grab your magic wand and click inside the frame.
Selections > Modify > Expand by 1. Selections > Invert
Highlight your tube layer. Grab your eraser brush and erase any portion of the tube you don't want showing at the sides or on the bottom of the frame.
Selections > Select none.
Highlight your white background layer.
Open Paper1. Copy and paste as a new layer.
Again, highlight your frame layer and again, grab your magic wand and click inside.
Selections > Modify > Expand by 15. Selections > Invert.
Highlight your Paper1 layer and hit delete.
Selections > Select None.
Highlight the white background layer.
Open Paper2. Copy and paste as a new layer.
Apply your 20-20 mask. Delete mask layer, answer "yes" to the pop-up question, and merge group.
After I applied the mask, I did some "refining" (for lack of a better term) to the effect, so the color didn't slam right up to the edge of the canvas.
I grabbed my lasso tool, set on freehand, feather set at 20. Then did my best to draw a circle around the outside edges of the canvas (this is all on the mask layer). Selections > Invert. Hit delete. Then Selections > Select None. This took me a couple swipes, because I can't draw a perfect (nor near perfect) circle for the life of me! :)
Open CornerFlower1. Rotate 90° left, ALL LAYERS CHECKED! Resize 60%. Copy and paste as a new layer. Position in the bottom left corner of your frame. See my example for placement reference. It's up to you where to put it. Drop shadow.
Drop shadow your frame.
This next part is easier (at least for me) if you go to the top layer and start there.
Open SeedBeads1. Copy and paste as a new layer. Position to the left top, so the outer edges are kinda in that corner.
Duplicate this layer. Image > Mirror. Position this to the right top, if it's not where you like it already. Merge these two layers down.
Duplicate *this* layer. Image > Flip. Merge these two layers down.
Apply your BeckyMask_023. Delete the mask layer, answer "yes" to the pop-up question, and merge group.
In your layer palette, drag this layer down to just above your black paper mask layer.
Duplicate this layer and merge down as much as needed (I think I did this about four times) to make the seed beads stand out more than they are now. Make sure all these layers are merged!
Go back to the top and add your name. I used color #d00000 as the fill, black as the stroke, stroke set on 2.
I added the following bevel:
Hit okay.
Effects > Plugins > Eye Candy 4000 > Gradient Glow set at 3-25-100 with color #c0c0c0.
Drop shadow your name.
I rotated mine 20° right. Position as you like.
Resize your canvas to a size with which you are comfortable.
Add your copyright, license information if applicable, and taggers'/watermark.
If you choose not to animate, you're now done, and you can merge your layers and save!
A N I M A T I O N
Highlight your SeedBeads1 layer. Duplicate this three times, for a total of four SeedBeads1 layers.
Now highlight the bottom SeedBeads1 layer.
Adjust > Add/Remove Noise > Add Noise with the following settings:
Hit okay.
Highlight the next SeedBeads1 layer up.
Add Noise again, this time changing the intensity to 40.
Hit okay.
Highlight the next layer up of the SeedBeads1 layers.
Add Noise again, this time changing the intensity to 45.
Hit okay.
Highlight the top SeedBeads1 layer. Add Noise once more, this time changing the intensity to 50.
Hit okay.
Close out the top three layers of the SeedBeads1 layers, leaving the bottom layer open.
Edit > Copy Merged.
Open Animation Shop. Right-click on the desktop area and paste as a new animation.
Return to PSP. Close out the bottom SeedBeads1 layer, and open the next layer up.
Edit > Copy merged.
Back to Animation Shop. Edit > Paste > After Current Frame.
Return again to PSP. Close out the layer you just worked with, and open the next SeedBeads1 layer up.
Edit > Copy merged.
Again, back to Animation Shop. Edit > Paste > After Current Frame.
Finally, return to PSP one last time, and close that SeedBeads1 layer, and open the top layer.
Edit > Copy merged.
Return once more to Animation Shop. Edit > Paste > After Current Frame.
View > Animation.
You're done! I *do* hope you're happy with your results! And thanks for trying my tutorials!
.


©kajira hill 2009
http://kajituts.blogspot.com


