skip to main |
skip to sidebar
.
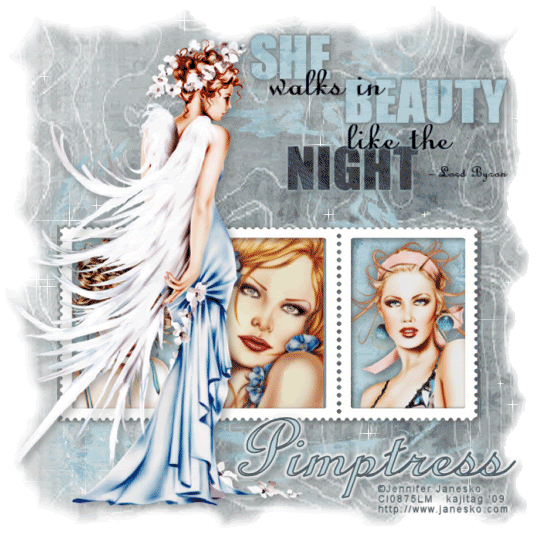
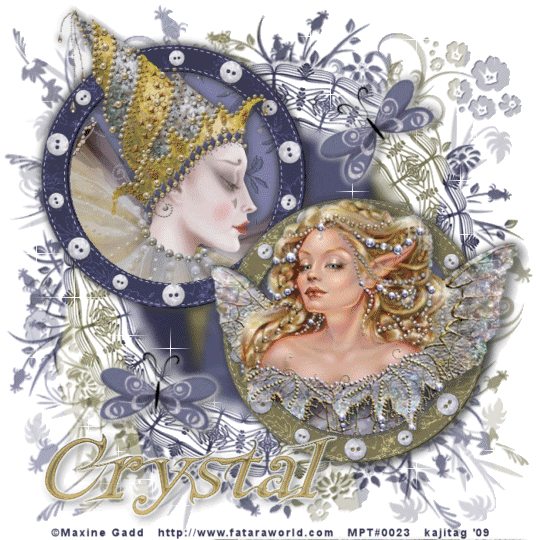 [Click image above to go to full sized image.]This tutorial was written on February 28, 2009, using Paint Shop Pro, version X.03. It should be okay to do with other versions as well. I just find X.03 more comfortable for me. You may download a free trial of Paint Shop Pro, version X2, from Corel. Any similarities between this tut and any others you may see are purely coincidental.
You will also need:
Two tubes of your choice by the same artist. I'm using the intricate artwork of Maxine Gadd. You must have a license to use her work. You may purchase that license at My PSP Tubes.
Animation Shop - at this time, I'm not sure where you can get this program, if you don't already have it. You may, however, save the tut as a static (non-animated) image if you like.
Scrap kit by Crystal of Scrap It Sassy. It is a PTU kit, called Inspired. It's on sale, but I think the sale may end today (Saturday, February 28, 2009).
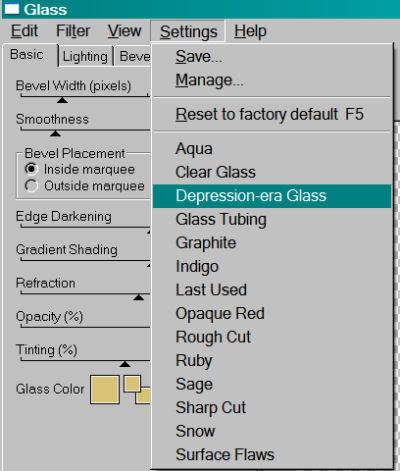
Filters: Eye Candy 4000 > Gradient Glow, Eye Candy 4000 > Glass, VM Natural > Sparkle
Font: I used Fairydust
Supplies: The mask, once again by Essex Girl. I just love her masks!
Let's go!
Open your mask and minimize in PSP. Alternatively, you can save it to your PSP masks file for future use!
Open a new image, 700 x 700, white.
Open frame1 and frame2. Resize both 70%. Copy and paste as new layers. Position as you like. You can use my example, above, for reference purposes.
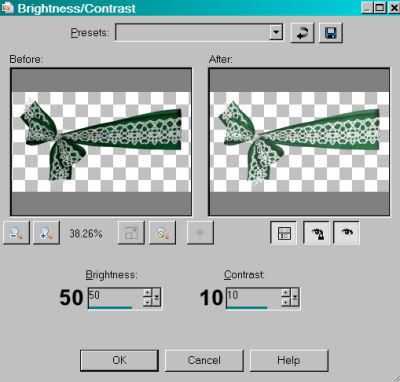
Open paper15. Copy and paste as a new layer, below the two frame layers. I lightened it a bit by going Adjust > Brightness and Contrast > Brightness/Contrast with the settings below:
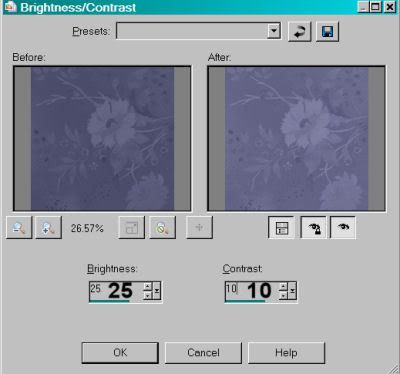
Hit okay.
Highlight one of the frame layers. Grab your magic wand and click inside the frame. Now, highlight the other frame layer and click inside that frame.
Selections > Modify > Expand by 10.
Highlight your paper layer. Selections > Invert and then hit delete. Selections > Select none.
Add your tubes of choice. Resize, position and drop shadow as you like.
To make your tube "emerge" from the frame, once again highlight your frame layer. And once again, click inside the frame with your magic wand. Selections > Invert.
Grab your eraser brush and erase any part of the tube that is hanging over the bottom part of your frame.
Repeat for the second frame.
Now, this is different: Open the paper preview. Resize it to 700 x 700 pixels. Edit > Copy. Highlight your white background layer and paste as new layer.
Apply your mask. Delete the mask layer, answer "yes" to the pop-up question and merge group.
Now, this is also different: Choose your font tool. Pick a font, any font.
Highlight the top layer of your canvas. Type an X in the center of the tag, as a new vector layer. Objects > Align > Center in Canvas. Convert to raster layer.
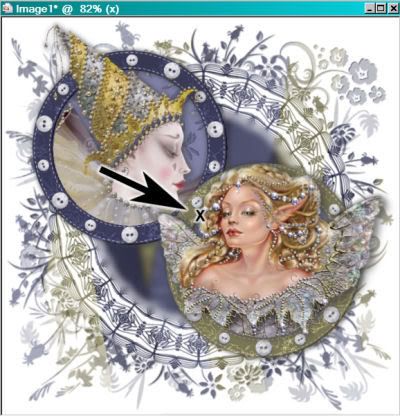
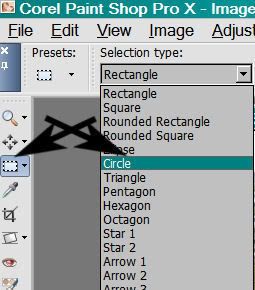
Grab your selection tool, set on circle.
Position your cursor directly over the center of the X that you've just made, and draw out a circle, about the same size as the circle of the mask layer.
Highlight the mask layer. Adjust > Blur > Gaussian Blur set on 5.
Selections > Select none.
Delete your X layer.
Open butterfly. Resize 60%. Place as desired onto your canvas. Rotate to your liking. See my example for reference. Drop shadow.
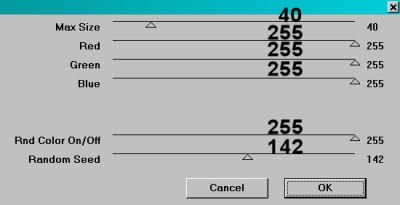
Add your name. I used color #d8c275. I then applied Eye Candy 4000 Glass with the following settings:
I then added a white Gradient Glow, settings of 3 - 0 - 100. Drop shadow your name.
Add your copyright, license information if applicable, and taggers'/watermark.
Resize your tag to your taste. You can save now if you choose not to animate.
A N I M A T I O N
This is just like most of my other animations!
Highlight your mask layer. Duplicate twice, for a total of three layers.
On your bottom mask layer, Effects > Plugins > VM Natural > Sparkle with the following settings:
Hit okay.
Highlight your middle mask layer and apply Sparkle again, this time moving your "Random Seed" slider to any number you like.
Highlight your top mask layer and repeat.
Whenever I do a tag using VM Natural > Sparkle, I apply the effect twice on each layer. So, go back to the bottom mask layer and repeat Sparkle, making sure to move the "Random Seed" slider to a setting you have not yet used.
Do the same on the middle and top mask layers.
Close out the middle and top mask layers, leaving the bottom mask layer open.
Edit > Copy merged
Open Animation Shop. Right-click on the desktop area and paste as a new animation.
Return to PSP. Close out the bottom mask layer and open the middle mask layer.
Edit > Copy merged
Back to Animation Shop. Edit > Paste > After Current Frame
Once more, back to PSP. Close out the middle mask layer and open the top.
Edit > Copy merged
Return to Animation Shop. Edit > Paste > After Current Frame.
Edit > Select All
Right-click on the top bar of your animation and choose "Frame Properties." Change this number to 35.
Save as a .gif and you're done! Thank you for taking on one of my tutorials! Have a great day!
.
.
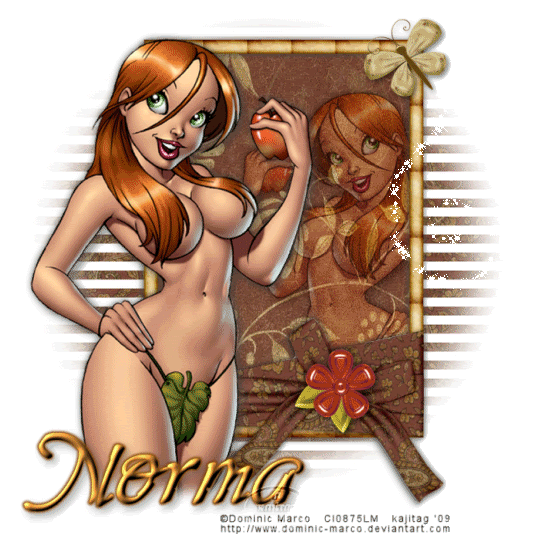
 [Click image above to go to full sized image.]This tutorial was written on February 27, 2009, using Paint Shop Pro, version X.03. It should be okay to do with other versions as well. I just find X.03 more comfortable for me. You may download a free trial of Paint Shop Pro, version X2, from Corel. Any similarities between this tut and any others you may see are purely coincidental.
You will also need:
A tube of your choice. A sitting tube would work best for this tutorial. I'm using the artwork of Rachel Anderson. You must have a license to use her work. You may purchase that license at CILM.
Animation Shop - at this time, I'm not sure where you can get this program, if you don't already have it. You may, however, save the tut as a static (non-animated) image if you like.
Scrap kit by Pimptress of Paradise 4 Scrappers. It is a PTU kit, called Emerald Sky. I have written another tut, posted right below this one, with the same kit.
Filters: Eye Candy 4000 > Gradient Glow
Font: I used Quilline Script Thin
Supplies: The fence, the mask, the grasses and the bling butterfly, available here. The bling comes from Nicky, whose site is no longer functioning. If you are Nicky, let me know so I can put up a working link! The mask is by Essex Girl again. I just love her masks!
This is kind of a fiddly one. It all started out VERY differently than it ended up. There's a lot of "put it where you think it looks best" stuff in here. Also, using your pick tool to reshape things. I hope I can keep it straight for you!
Let's begin!
Open your supplies and minimize in PSP. You can load your mask into your PSP masks file if you wish. File your bling in a place that is easily accessible when you're in Animation Shop.
Open a new image, 700 x 700, white.
Add a new raster layer. Selections > Select all.
Open pp07. Copy and paste INTO SELECTION. Selections > Select none.
Apply your mask, INVERT TRANSPARENCY CHECKED! Delete mask layer, answer "yes" to the pop-up question and merge group.
Here is where I used my pick tool, but I don't think it will work well if you do it right now. You'll notice my mask layer is much smaller than what you've ended up with. I first rotated 90° -- either direction is fine. I used the pick tool to make it skinnier vertically, and a bit thinner side-to-side. I also positioned it higher on the tag, but that will all be better figured out once more of your elements are in place.
So, open fence-nk6. Copy and paste as new layer. Position to the right or left, either is fine. Duplicate this layer. Image > Mirror. Line it up so there are equal spaces between all the slats of the fence. Merge these two layers down. Drop shadow your fence.
Add your tube. Resize, position and drop shadow as you like.
Open vintage-flower. Resize 85%. Copy and paste as a new layer. Position to the opposing side from your tube, above the fence layer. Rotate 10° right. Drop shadow.
Open flora-01. Resize 85%. Copy and paste as a new layer, above the vintage-flower. Rotate 15° left. Drop shadow.
Open grass_2. Copy and paste as a new layer. Position to one side of the fence, above your flower layers. Duplicate this layer. Image - Mirror. Merge these two layers down. Drop shadow.
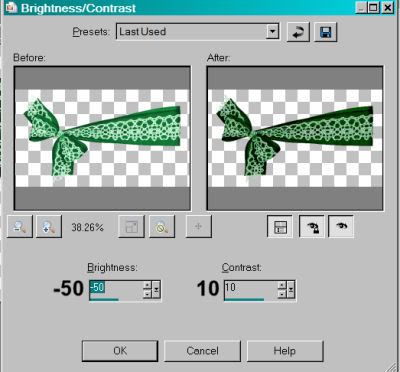
Open grass1a. Resize 50%. Adust > Brightness and Contrast > Brightness/Contrast with settings below:
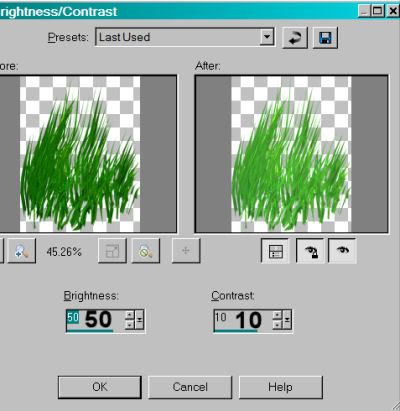
Hit okay.
Adjust > Hue and Saturation > Colorize with the settings below:
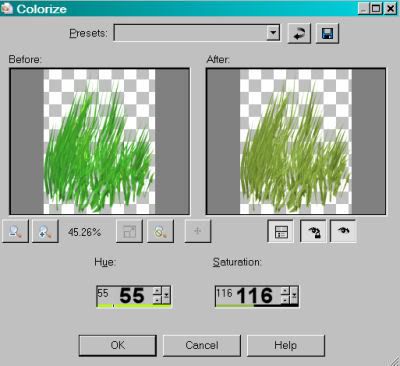
Hit okay. Copy and paste this grass as a new layer. Drag this layer below your first grass layer. Duplicate this layer and Image > Mirror. Move these grasses close to each other, so it's one big clump. Merge these layers down. Move that to the edge of the first grass layer. Duplicate again and Image > Mirror. Duplicate yet again, and continue, until your second grass layer is filled in. Merge these layers together. Drop shadow.
I hope you understood all that!
What I did now was to grab my lasso tool, set at freehand, feather 17. Draw a selection in the form of a big, wide smile so that the bottom of your tag will have a softer feel to it. See my tag for reference purposes. See how the hard edge has been taken off the grassy areas? Hit delete. Selections > Select none.
And I hope you understood that! :)
At this point you can see how you'd want your mask shaped and sized. Your pick tool is your friend! Use it to do the squishing and stretching. :) And place it toward the top of your tag.
Add your name. I used color #95af4e. I added Eye Candy 4000 > Gradient Glow with settings at 5 - 0 - 100, color #f0ebd8. Drop shadow your name.
Add your copyright, license information if applicable, and your taggers'/watermark.
Resize your tag to taste.
Layers > View > None
Open the bottom two layers, the white background and your mask layer.
Edit > Copy merged
Open Animation Shop. Right-click on the desktop area and paste as a new animation. Duplicate this layer until you have 38 frames. That's right! 38! Move your slider at the bottom of your animation to the first frame.
Open your bling animation. Delete the first frame, which is black.
Edit > Select All. Edit > Copy
Go to your mask and white background animation that you just made. Edit > Select All. Edit > Paste > Into Selected Frame. Position the little trail that you see to the left of center. Release your mouse button.
Return to PSP. Layers > View > All. Close the bottom two layers.
Edit > Copy merged
Return to Animation Shop. Right-click on the desktop area and paste as a new animation. Duplicate this layer until you have 38 frames. Move your slider at the bottom of your animation to the first frame.
Edit > Select All. Edit > Copy
Return again to the animation that you're building. Edit > Select All. Edit > Paste > Into Selected Frame
Position as you like and release your mouse button.
Save as .gif and we're done! Whew! Thanks for tackling this one!!.
.
 [Click image above to go to full sized image.]This tutorial was written on February 27, 2009, using Paint Shop Pro, version X.03. It should be okay to do with other versions as well. I just find X.03 more comfortable for me. You may download a free trial of Paint Shop Pro, version X2, from Corel. Any similarities between this tut and any others you may see are purely coincidental.
You will also need:
Four tubes of your choice by the same artist. I'm again using the fantastic artwork of Jennifer Janesko. You must have a license to use her work. You may purchase that license at CILM.
Animation Shop - at this time, I'm not sure where you can get this program, if you don't already have it. You may, however, save the tut as a static (non-animated) image if you like.
Scrap kit by Pimptress of Paradise 4 Scrappers. It is a PTU kit, called Emerald Sky. I have written another tut, to be posted right above this one, with the same kit.
Filters: Eye Candy 4000 > Gradient Glow, VM Natural > Sparkle
Font: I used QTLinostroke Regular
Supplies: Two masks and my word art, available
here. These masks are by Kels, and I have picked them up along the way. I don't know Kels, and would love to give her a link, if she'll let me know where she is!
Let's begin!
Open a new image, 700 x 700, white.
Add a new raster layer. Selections > Select All
Open pp10. Copy and paste INTO SELECTION. Selections > Select None
Apply your mask: 58MaskkelsWWA. Delete your mask layer, answer "yes" to the pop-up question, and merge group.
Add a new raster layer. Selections > Select All
Open pp02. Copy and paste INTO SELECTION. Selections > Select None
Apply your mask: 27MaskkelsWWA. Delete your mask layer, answer "yes" to the pop-up question, and merge group.
Open stamp-frame-01. Copy and paste as a new layer. Move toward the bottom of your tag a bit. See my example for reference purposes.
Choose one of your tubes. Copy and paste as a new layer, beneath the frame layer. Position as you like it, resizing if necessary.
Highlight your frame layer.
Grab your magic wand and click inside the frame you're working with. Selections > Modify > Expand by 5. Selections > Invert.
Highlight your tube layer. Hit delete. Selections > Select None. Drop shadow your tube.
Repeat this procedure for the other two tubes you're using for your frame.
Drop shadow your frame.
Add your "main" tube. Resize, positon and drop shadow as necessary.
Now, the word art!
Highlight "SHE." Selections > Select All > Float > Defloat
Open pp02. Copy and paste as new layer. Selections > Invert. Hit delete. Merge this layer down with the original SHE layer.
Do the same thing with "BEAUTY."
Highlight "NIGHT." Selections > Select All > Float > Defloat
Open pp01. Copy and paste as new layer. Selections > Invert. Hit delete. Merge this layer down with the original "NIGHT" layer.
I put a gradient glow on all the main words. Settings of 5 - 0 - 100. For the two words in light blue, the color was #535e62. I also used this gradient glow with #535e62 for the words "like the." For "NIGHT," color #bfd7de.
Edit > Copy merged.
Edit > Paste as new layer. Resize, position and drop shadow the word art.
Add your name. I used color #535e62 for the fill, #bfd7de for the stroke, stroke width 2. I then added the gradient glow, same settings as above, color white. Drop shadow your name.
Add your copyright, license information if applicable, and taggers'/watermark.
Resize your tag as desired. You may save now if you choose to not animate.
A N I M A T I O N
Copy your first mask layer. The darker one, right above your white background. Copy it twice for a total of three layers.
Highlight the original layer and go Effects > Plugins > VM Natural > Sparkle with the settings below:
Hit okay.
Highlight the middle mask layer and apply Sparkle again, this time sliding the Random Seed slider to a different number. Hit okay.
Highlight the top mask layer and apply Sparkle yet again, and again slide the Random Seed slider to a different number.
Now, as I say in all the tuts I do with this filter, I always go back over the three layers and repeat the Sparkle with different settings. I do this for more sparkles. You may choose not to, it's up to you.
Close out the top two layers of sparkle. Leave the bottom layer open.
Edit > Copy merged
Open Animation Shop. Right-click on the desktop area and paste as a new animation.
Return to PSP. Close out the bottom layer of sparkle and open the middle layer.
Edit > Copy merged
Returning to Animation Shop, Edit > Paste > After Current Frame
Back to PSP again! Close out of the middle sparkle layer and open the top layer.
Edit > Copy merged
Back to Animation Shop. Edit > Paste > After Current Frame
Edit > Select All
Right-click on the top bar of your animation and choose "Frame Properties." Change this number to 35.
Save as .gif and you're done! I hope you enjoyed this tut! I'll be doing another with this same kit soon! Stay tuned.....
.
Many thanks to Gabby at Heavenly Creations for these two new awards! There is a story behind both, and requirements to meet in order to qualify. So here I go!

First, The Lemonade Award. This award is for showing great attitude and/or gratitude.
The "rules" of this award are:
1. Put the logo on your blog or post.
2. Nominate at least 10 blogs which show great attitude and/or gratitude!
3. Link to your nominees within your post.
4. Let them know that they have received this award by commenting on their blog.
5. Share the love and link to this post with the person from whom you received your
award.
Okay. So 10 blogs to receive this award from me ARE.... (drumroll please!)
1a. Norma at Swheat Creations!!
2a. Patty at Honored Scraps!!
3a. Pimptress at Pimp'd Tag Scraps!!
4a. Clarey at Clarey's Designz Tutorials!!
5a. Hezalin at Heza Scraps!!
6a. Vella at Wench Designs!!
7a. Stacey at Stacey's Designs!!
8a. Jade at Sinful Jade Creations!!
9a. Marianne at Marianne's Creations!!
10a. Tootsie at Tootsie's Creations!!
Off to tell all the lucky winners about their new award, and then THEY have to find 10 blogs! LOL! Thank you Gabby, again, for the great award!
Next, The "Premio Dardos" award.

The Premio Dardos award acknowledges the values that every blogger shows in their effort to transmit cultural, ethical, literary, and personal values every day. The rules are:
1. Accept the award, post it on your blog together with the name of the person that has granted the award and his or her blog link.
2. Pass the award to other 15 blogs that are worthy of this acknowledgment. Remember to contact each of them to let them know they have been chosen for this award.
Okay. Now, 15 blogs to receive this award from me ARE.... (more drumrolls please!)
1a. Norma at Swheat Creations!!
2a. Patty at Honored Scraps!!
3a. Pimptress at Pimp'd Tag Scraps!!
4a. Clarey at Clarey's Designz Tutorials!!
5a. Hezalin at Heza Scraps!!
6a. Vella at Wench Designs!!
7a. Stacey at Stacey's Designs!!
8a. Jade at Sinful Jade Creations!!
9a. Marianne at Marianne's Creations!!
10a. Tootsie at Tootsie's Creations!!
11a. Crystal at Crystal's Designs!!
12a. Denise at Designs by Scrappy Redhead!!
13a. Foxy of Foxy's Designz!!
14a. Essy of Scrap Stuff by Essy!!
15a. Tammy Jo of Tammy Jo's Creations!!
Congratulations to all the winners, and like I said: Now I'm off to notify everyone!! What a neat couple of awards to get, eh? Thanks again to Gabby of Heavenly Creations!!
.
.
 [Click image above to go to full sized image.]This tutorial was written on February 25, 2009, using Paint Shop Pro, version X.03. It should be okay to do with other versions as well. I just find X.03 more comfortable for me. You may download a free trial of Paint Shop Pro, version X2, from Corel. Any similarities between this tut and any others you may see are purely coincidental.
You will also need:
Tube of your choice. I'm using the fantastic pin-up artwork of Dominic Marco. You must have a license to use his work. You may purchase that license at CILM.
Animation Shop - at this time, I'm not sure where you can get this program, if you don't already have it. You may, however, save the tut as a static (non-animated) image if you like.
Scrap kit by Norma of Paradise 4 Scrappers. It is a PTU kit, called Affection.
Filters: Eye Candy 4000 > Gradient Glow
Font: I used Saliere
Supplies: You can find the bling here. There are "identifiers" in the name of this bling file, but I have no idea where I got it. If it is yours, please let me know so that I can give you the proper credit! The mask is by Monti of Monti's Pixel Playground. Click "Masks" in the left column and grab "Monti's Blinds Mask 1."
Okay, let's do it!
Open your mask in PSP and minimize. Or, you could load it into your PSP masks file. Put the bling somewhere that you can find it easily when in Animation Shop.
Open a new image, 700 x 700, white.
Open Frame4. Copy and paste as new layer. Rotate right 90°.
Open Brown Floral paper. Copy and paste as a new layer, under your frame layer.
Highlight the frame layer. Grab your magic wand and click inside the frame. Selections > Modify > Expand by 5. Selections > Invert
Highlight your Brown Floral paper layer. Hit delete. Selections > Select none
Add your tube. Position and drop shadow.
Duplicate and mirror your tube. Resize as necessary, positioning to the right side of the frame. Drag this layer below the frame layer and above the Brown Floral paper layer.
Highlight your frame layer again. Grab the magic wand and click inside the frame. Selections > Modify > Expand by 5. Selections > Invert
Highlight your second tube layer. Hit delete. Selections > Select none.
Drop shadow the second tube layer. Set the blend mode to "Soft Light."
Open Candyflower. Resize 30%. Copy and paste as a new layer. Position over the center of the bow on the frame. Drop shadow.
Drop shadow your frame.
Open Dragonfly. Resize 25%. Copy and paste as a new layer. Position in the upper right corner of the frame. Drop shadow your dragonfly.
Add your name. I used color# d6ad72. I also used an inner bevel, settings below:
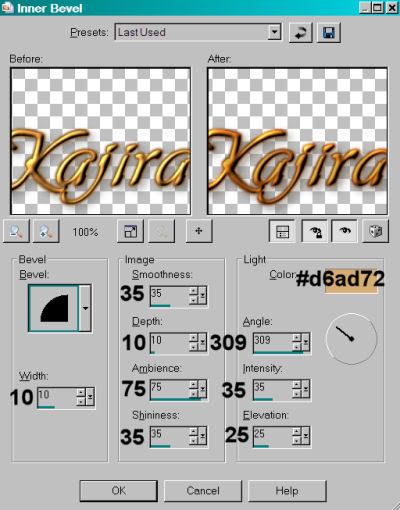
Hit okay.
Effect > Plugins > Eye Candy 4000 > Gradient Glow, settings of 3 - 25 - 100, color #834603. Drop shadow your name.
Add your copyright, license information if applicable, and taggers'/watermark.
Resize your tag to your taste. If you choose not to include the bling, you can save it now and be done! If you want the bling, here we go!
A N I M A T I O N
Close out your dragonfly layer.
Edit > Copy merged
Open Animation Shop, right-click on the desktop area and paste as new animation.
Duplicate this frame until you have a total of 10 frames. Move the slider at the bottom of the animation to the first frame.
Open the bling file. Edit > Select All
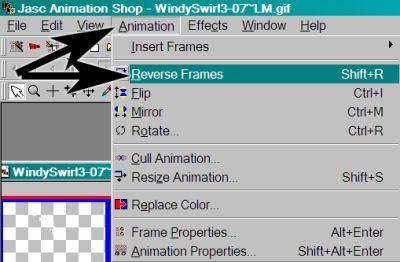
Rotate the bling right 90°

Reverse the frames.
Making sure all frames are still selected, Edit > Copy
Return to your tag. Edit > Select All. Edit > Paste > Into Selected Frame
Position your bling up toward the top right hand corner of the frame. Remember, you're going to be putting the dragonfly on the very top of it. Release your mouse button.
Return to PSP. Close out all layers. Open the dragonfly layer. Edit > Copy merged
Back to Animation Shop. Right-click on the desktop area and paste as a new animation.
Duplicate this frame until you have a total of 10 frames. Move the slider on the bottom of these frames to the first frame.
Edit > Select All. Edit > Copy
Return to the original animation that we're building, and Edit > Select All. Edit > Paste > Into Selected Frame.
Move your dragonfly into place over the top of the bling. Release your mouse button.
Click on your second frame to highlight it. Right-click on the top bar of the animation and choose "Frame Properties." Change this number to 13.
Click on your third frame to highlight it. Keeping this frame highlighted, move your slider at the bottom to the ninth frame. Holding your shift key down, click on the ninth frame so that frames 3 - 9 are highlighted. Right-click on the top bar of the animation and choose "Frame Properties" again. Change this number to 17.
Finally, click on your 10th frame to highlight it. Right-click on the top bar of the animation and choose "Frame Properties" again. Change this number to 100.
View > Animation. We are done! I hope you enjoyed designing your tag from this tut! Have a great day!.
.
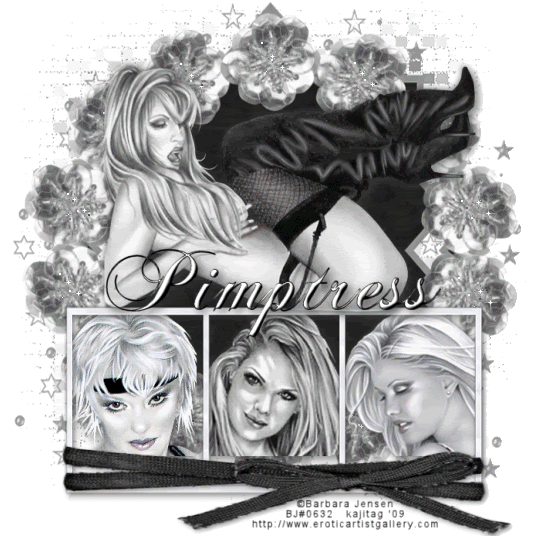 [Click image above to go to full sized image.]This tutorial was written on February 25, 2009, using Paint Shop Pro, version X.03. It should be okay to do with other versions as well. I just find X.03 more comfortable for me. You may download a free trial of Paint Shop Pro, version X2, from Corel. Any similarities between this tut and any others you may see are purely coincidental.
You will also need:
Four tubes of choice, from the same artist. It'd be best, IMHO, to have three face shots and one laying down, or resembling the "main" tube I used. I'm using the erotic artwork of Barbara Jensen. You must have a license to use her work. You may purchase that license at Barbara's Web site.
Animation Shop - at this time, I'm not sure where you can get this program, if you don't already have it. You may, however, save the tut as a static (non-animated) image if you like.
Scrap kit by Pimptress of Pimp'd Tag Scraps. This one is a FTU kit, simply called B&W Freebie. I *LOVE LOVE LOVE* black and white tags, so when I saw she'd offered this freebie, I jumped on it! Leave her some love for the freebie kit!!!
Filters: Mura's Meister > Copies
Font: I used ChaseCallasSH
Three files in my supplies. This includes the mask and two sparklies that I used on the wreath of flowers on the tag. The mask is once again a product of Essex Girl! Thanks once again, for the use of your wicked masks!
Let's begin!!
Open your mask in PSP and minimize, or load it into your PSP masks folder. Open the two sparklies and put them wherever you put things in anticipation of using them in an animation.
Open a new image, 700 x 650, white.
Open Frame. Copy and paste as a new layer. Bring this down toward the bottom of your tag. See my tag for reference purposes.
Choose a tube to be in the left-hand frame. Copy and paste it as a new layer, below the frame layer, and position it as you'd like it to be.
Highlight your frame layer. Grab the magic wand and click inside the left-hand frame. Selections > Modify > Expand by 5. Selections > Invert
Highlight your tube layer. Hit delete. Selection > Select none. Drop shadow your tube as you like.
Do this same process for the middle and right-hand frames.
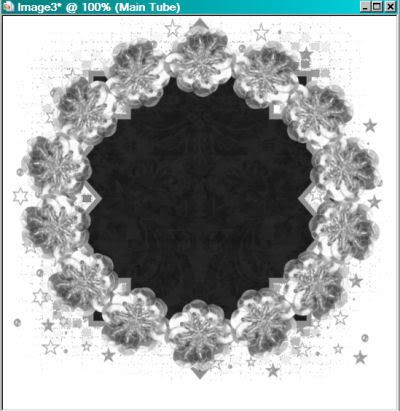
Open sequin-flower. Resize 68%.
Effects > Plugins > Mura's Meister > Copies. Use the settings below. I apologize for the size of the screen shot. Basically, it's the Encircle preset with the top number at 14, the following two numbers at 75, and everything else as is.
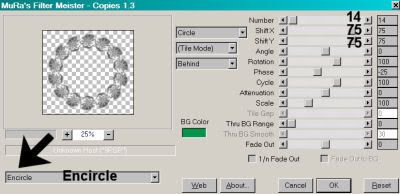
Hit okay.
Highlight your background layer. Add a new raster layer. Selections > Select all.
Open pp04. Copy and paste INTO SELECTION. Selections > Select none.
Apply your mask. Delete your mask layer, answer "yes" to the pop-up question, and merge group.
Add your main tube. Position and drop shadow.
Okay, here is where it got tricky for me. LOL.
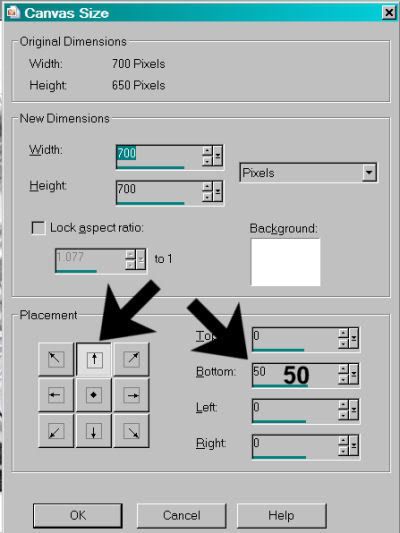
Open ribbon-wrap. Resize 65%. Apply to the frame. See my tag for reference. I wanted to do this, but I didn't have enough room at the bottom of my tag. So I highlighted my background layer once more and Image > Canvas Size:
Flood fill your background with white.
Use your pick tool to squeeze this ribbon-wrap vertically and stretch it horizontally so it will fit the frame.
But it doesn't fit the frame, does it? I highlighted the frame layer and used the pick tool to drag the bottom of the frame down enough so that the ribbon-wrap would fit the frame and not blot out the images in the frame.
I hope that was clear!! Any problems, drop me a line!!
Add your name. I used a white fill with a black stroke, stroke set at 1. I then applied the following inner bevel:
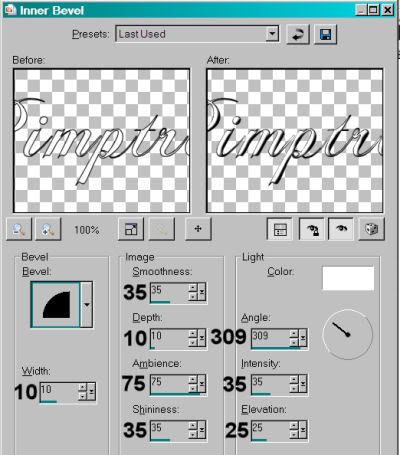
Hit okay. Drop shadow your name.
Add your copyright, license information if applicable, and taggers'/watermark.
Resize your tag to taste. You may quit and save now as is, if you choose not to animate. Those of you animating, keep on going!
A N I M A T I O N
Layers > View None
Open your bottom three layers. It should look something like this:
For a result like this:
Copy > Merged
Open Animation Shop, right-click on the desktop area and paste as a new animation.
Duplicate this frame for a total of 16 frames. Move your slider at the bottom of your animation to the first frame.
Open up the sparkly named "subtle."
Edit > Select All, Edit > Copy
Go back to your canvas and Edit > Select All, Edit > Paste > Into Selected Frame
Position this in the center of one of the flowers in the circle, and release your mouse button. You're going to do this 14 times, to get the centers of all the flowers to sparkle subtly. Just Edit > Paste > Into Selected Frame over and over 'til you get them all.
Now open the sparkly named "silver." You'll note this only has eight frames.
Edit > Select All, Edit > Copy.
Highlight the 8th frame.
Edit > Paste > After Current Frame. You should now have 16 frames. Move the slider over to the first frame.
Edit > Select All, Edit > Copy
Return to your main canvas and again, Edit > Select All, Edit > Paste Into Selected Frame.
And again, do this 14 times so all the flowers are covered.
All done? Great! Go back to PSP and Layers > View > All. Close out the bottom three layers and Edit > Copy merged
Return to Animation Shop. Right-click on the desktop area and paste as a new animation. Like before, duplicate this frame so you have a total of 16 frames. Move the slider over to the first frame.
Edit > Select All, Edit > Copy
Return to your main canvas and Edit > Paste > Into Selected Frame
Position this to your liking, then release the mouse button.
View > Animation. Et, voila! We're done! I hope you enjoyed this tut! If you have any questions, please don't hesitate to drop me a line!! Have a great day!
.
.
 [Click image above to go to full sized image.]This tutorial was written on February 25, 2009, using Paint Shop Pro, version X.03. It should be okay to do with other versions as well. I just find X.03 more comfortable for me. You may download a free trial of Paint Shop Pro, version X2, from Corel. Any similarities between this tut and any others you may see are purely coincidental.
You will also need:
Tube of your choice. I'm using the cute artwork of Suzanne Richards. You must have a license to use her work. You may purchase that license at CILM.
Scrap kit by Vella of Treasured Scraps. It is a PTU kit, called A Little Bit O Irish. There is a taggers' size and a scrappers' size.
Filters: Eye Candy 4000 > Gradient Glow
Font: I used Celticmd and Chalice
Supplies: A template by Missy, of Divine Intensionz. We're using missy-tagtemplate128, which you can find in her download, here. Leave a shout out on her blog if you download her template! She is a template-making queen! Thanks, Missy!
Let's begin!!
Open your template in PSP. Window > Duplicate. Close the original. Delete the credit layer.
Resize all layers 125%.
Highlight your background layer. Image > Canvas Size > 700 x 650. Flood fill the background with white.
Move each layer like so: Grab your mover tool. Click on the layer you're going to move. Hit SHIFT and the up arrow, simultaneously, once. Do that on each layer, until they're all arranged right, just a bit of a jump higher than they were. Ready? Okay!
Highlight your circle layer. Open Button1. Resize 175%. Copy and paste as new layer, and position where the circle layer is. Merge this layer down with the circle layer. Drop shadow.
Highlight the rectangle layer. Selections > Select All > Float > Defloat > Modify > Expand by 1
Open paper12. Resize to 700 x 700. Copy and paste as new layer. Selections > Invert. Hit delete. Selections > Select none. Merge this layer down to your rectangle layer. Drop shadow.
Highlight thin rectangle 1 layer. Selections > Select All > Float > Defloat > Modify > Expand by 1
Open paper18. Resize to 700 x 700. Copy and paste as new layer. Selections > Invert. Hit delete. Selections > Select none. Merge this layer down to your thin rectangle 1 layer. Drop shadow.
Highlight thin rectangle 2 layer. Selections > Select All > Float > Defloat > Modify > Expand by 1
Open paper15. Resize to 700 x 700. Copy and paste as new layer. Selections > Invert. Hit delete. Selections > Select none. Merge this layer down to your thin rectangle 2 layer. Drop shadow.
Highlight the Kiss Me word art layer. Selections > Select All > Float > Defloat > Modify > Expand by 1
Grab your flood fill tool, and flood fill the letters with white. Selections > Select none. Drop shadow.
Highlight the lips layer. Selections > Select All > Float > Defloat > Modify > Expand by 1
Open paper12. Resize to 700 x 700. Copy and paste as new layer. Selections > Invert. Hit delete. Selections > Select none. Merge this layer down to your lips layer. Drop shadow.
Highlight the word art template layer. Selections > Select All > Float > Defloat > Modify > Expand by 1
Open paper9. Resize to 700 x 700. Copy and paste as new layer. Selections > Invert. Hit delete. Selections > Select none. Merge this layer down to your word art template layer. Drop shadow.
Add your tube. Position and drop shadow as you like.
Open your CloverBunch7 from the scrap kit. Copy and paste as a new layer. Rotate left 20°. Position and drop shadow.
Add your name. I used color #115935 for the stroke and #009547 for the fill. Add your Eye Candy 4000 Gradient Glow, set at 4 - 25 - 100, color white. Drop shadow your name.
Add your copyright, license information if applicable, and your taggers'/watermark.
Choose another font. I used Chalice. Type in "I'm Irish!" under your "Kiss me" word art template layer. I used color #fad201. Drop shadow.
Resize your tag to your taste. Merge all, save, and we're done! I hope you liked this tut! It's relatively easy, yes?? :).
.
 [Click image above to go to full sized image.]This tutorial was written on February 24, 2009, using Paint Shop Pro, version X.03. It should be okay to do with other versions as well. I just find X.03 more comfortable for me. You may download a free trial of Paint Shop Pro, version X2, from Corel. Any similarities between this tut and any others you may see are purely coincidental.
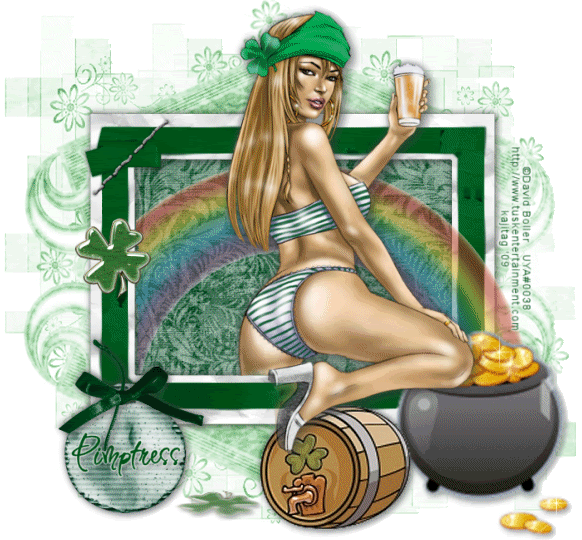
You will also need:
Tube of your choice. I'm using the artwork of David Boller. You must have a license to use his work. You may purchase that license at Up Your Art.
Animation Shop - at this time, I'm not sure where you can get this program, if you don't already have it. You may, however, save the tut as a static (non-animated) image if you like.
Scrap kit by Pimptress of Paradise 4 Scrappers. It is a PTU kit, called Just My Luck. It's on sale today for only $1, and will be on sale tomorrow at 25% off -- today and tomorrow only! (February 24 & 25, respectively.)
Filters: Eye Candy 5 > Impact > Perspective Shadow, Eye Candy 4000 > Gradient Glow
Font: I used Inspiration
Supplies can be found here. This includes the mask and the two sparkles I used for the coins. The mask is once again a product of Essex Girl! Thanks once again, for the use of your wicked masks!
Let's begin, shall we?
Open a new image, 700 x 650, white.
Add a new raster layer. Selections > Select All.
Open pp05. Copy and paste INTO SELECTION. Selections > Select none.
Apply your mask, INVERT TRANSPARENCY CHECKED! Delete mask layer, answer "yes" to the pop-up question and merge group.
Open Frame-01. Copy and paste as a new layer.
Highlight your mask layer. Open pp09. Copy and paste as new layer.
Highlight your frame layer. Grab your magic wand, click inside the frame and Selections > Modify > Expand by 7.
Highlight your pp09 layer. Hit delete. Selections > Select none.
Open the rainbow. Copy and paste as new layer, above your frame layer.
Take your selection tool, set on rectangle, and crop out the portion of the rainbow that sticks out beyond the frame on the left side. Leave the right side as is.
Open your pot-o-gold. Resize 200%. Adjust > Sharpness > Sharpen. Then Adjust > Softness > Soften. Copy and paste as new layer, at the end of the rainbow on the right. Drop shadow your pot-o-gold.
Open the irish-ale. Resize by 150%. Adjust > Sharpness > Sharpen. Position and drop shadow the irish-ale layer.
Open the trash-tag. Apply your name. I used color #005138. Effects > Plugins > Eye Candy 4000 > Gradient Glow set at 3 - 25 - 100, color white. Drop shadow your name.
Edit > Copy merged. Paste as new layer on your canvas. Resize 65%. Position over the lower left corner of the frame. Drop shadow.
Open the green-ribbon-bows element. Take your selection tool, set on rectangle, and select the farthest left bow. It should look something like this:
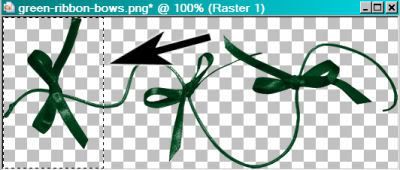
Edit > Copy. then paste as new layer. This should look something like this:
Rotate the bow 90° right. Move the bow over your tag with your name on it. Position and drop shadow your bow.
Open shamrock-01. Resize by 40%. Copy and paste as a new layer. Position on the left side of the frame. See my tag for reference. Drop shadow your shamrock. Duplicate this layer, and position the copy down between the irish-ale and the tag.
Effects > Plugins > Alien Skin Eye Candy 5 > Impact > Perspective shadow. Settings as follows:

Hit okay.
Now, with your selection tool set on point-to-point, draw your selection carefully around the original shamrock (the one on the bottom of the tag), making sure to not nick the shadow you just created. Hit delete. Move the shadow into position as you like. That area of the tag was blank white space, and I wanted to fill it, but subtly. So this is what I did.
Now, open your sparkles. You may pick and choose which one you want where, and at what size. Sprinkle them over your coins, in and out of the pot-o-gold. I ended up with seven layers of sparkles.
Add your copyright, license information if applicable, and your taggers'/watermark.
Resize your tag to suit your taste.
Now, go through your sparkle layers, opening and closing them to get a random look you like.
Edit > Copy merged
Open Animation Shop, right-click on the desktop area and paste as a new animation.
Return to PSP. Open and close your sparkles again, to get the look you want.
Edit > Copy merged
Back to Animation Shop. Edit > Paste > After Current Frame
And return again to PSP and play with your sparkles again.
Edit > Copy merged
Return to Animation Shop and Edit > Paste > After Current Frame.
Right-click the top bar of your animation and choose "Frame Properties." Change this number to 35.
Now View > Animation. When I first did this, I didn't care for the way my sparkles, well, sparkled. So I played back and forth with them until I got the combination I liked. (Deleting a frame, going back to PSP and opening and/or closing layers you think will work better, then Edit > Copy merged and highlight a frame of your animation after which (or before which) you want the new frame and paste accordingly. Whew! LONG sentence! LOL)
When you get to a sequence you like, then save it as a .gif and we're done! I hope you enjoyed playing with this tut! And I also hope you're having a GREAT day!.
.
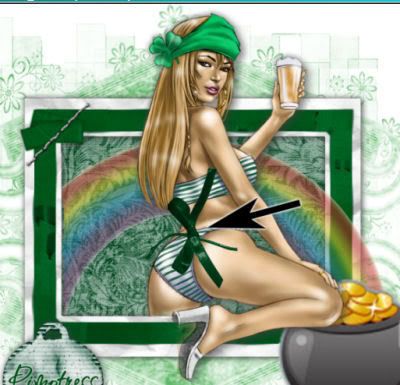
 [Click image above to go to full sized image.]This tutorial was written on February 23, 2009, using Paint Shop Pro, version X.03. It should be okay to do with other versions as well. I just find X.03 more comfortable for me. You may download a free trial of Paint Shop Pro, version X2, from Corel. Any similarities between this tut and any others you may see are purely coincidental.
You will also need:
Tube of your choice. I'm using the great artwork of Deacon Black. You must have a license to use his work. You may purchase that license at CILM. (The link to his web site is not working. I have an inquiry in to CILM to see what's up with that, as they still have the old link up, too.) UPDATE!! I just got a return e-mail from Kelly at CILM. Here's what she said:
To:
Subject: Re: Deacon Black Web Site?
From: "CILM Customer Help"
Date: Mon, 23 Feb 2009 16:34:29 -0700
Hi Kajira :)
Just use www.cilm.com for Deacons web addy :))
Have a wonderful day!!!
Kelly :o)
So, there ya' go. An official word that Deacon Black's URL has changed!! You heard it here first!
Animation Shop - at this time, I'm not sure where you can get this program, if you don't already have it. You may, however, save the tut as a static (non-animated) image if you like.
Scrap kit by Patty of Honored Scraps. It is a PTU kit, available at Treasured Scraps and called Twilight. And it's on sale!!
Filters: Eye Candy 4000 > Gradient Glow
Font: I used JackieO
Supplies: The mask, sg_macrame-hexagon, which you can find here.
Let's go for it!
Open a new image, 700 x 650, white.
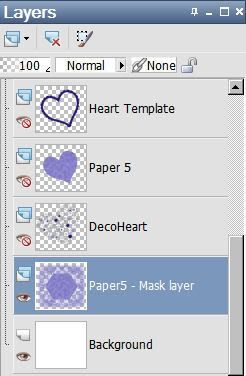
Open Paper5. Resize to 700 x 700. Copy and paste as new layer.
Apply your mask. Delete the mask layer, answer "yes" to the pop-up question and merge group.
Open the DecoHeart. Copy and paste as a new layer. Rotate left 25°. Resize by 110%.
Open Heart Template. Copy and paste as a new layer. Resize by 75%. Position so that the DecoHeart and the Heart Template are well-balanced. See my tag for reference.
Grab your magic wand and click inside the Heart Template. Selections > Modify > Expand by 7. Selections > Invert.
Open Paper5 again. Copy and paste as new layer, under the Heart Template layer. Hit delete. Selections > Select none.
Lower the opacity on the new Paper5 layer to 75.
Drop shadow the Heart Template.
Add your tube. Position and drop shadow to your liking.
Open FlowerSwag. Copy and paste as a new layer. Resize 75%. Drop shadow.
Add your name. I used color #a8a4da. I added an inner bevel, settings below:
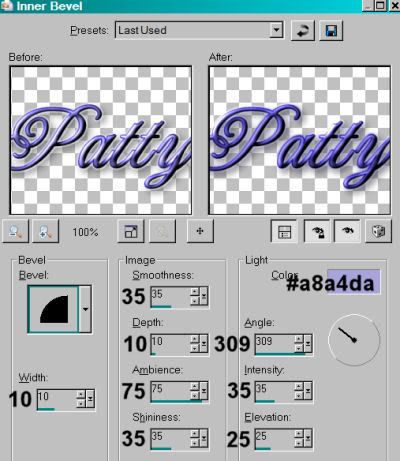
Hit okay.
Effects > Plugins > Eye Candy 4000 > Gradient Glow with the settings 3 - 25 - 100 with a color of #221974. Apply a second Gradient Glow, this time in white. Drop shadow.
Add your copyright, license information if applicable and taggers'/watermark.
Resize your tag to suit your taste. You can save here if you choose not to animate. Otherwise, here we go!
A N I M A T I O N
Highlight your DecoHeart layer. Edit > Copy
Open Animation Shop. Right-click on the desktop area and paste as new animation.
Effects > Insert Image Effect
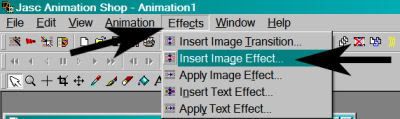
Choose "Noise" with the settings below:
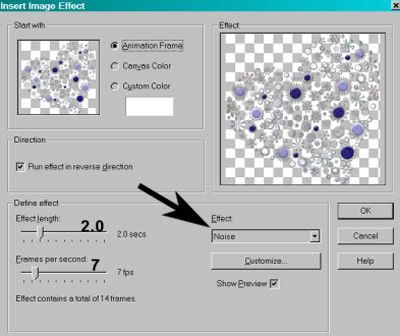
Hit okay. You should now have 15 frames. Move the slider at the bottom of your animation to the first frame.
Return to PSP. Layers > View > None
Open the bottom two layers. It should look like this:
Edit > Copy merged
Return to Animation Shop, right-click the desktop area and paste as a new animation.
Duplicate this until you have 15 frames. Move the slider on this back to frame 1.
Go back to your DecoHeart animation. Edit > Select All. Edit > Copy
Return to your background and mask layer animation. Edit > Select All. Edit > Paste > Into Selected Frame. Position as you want it, and release your mouse button.
Return again to PSP. Close out the bottom two layers and open all the layers above it. Probably easiest to go Layers > View > All, then close out the bottom two layers.
Edit > Copy merged
Back again to Animation Shop. Right-click on the desktop area and paste as a new animation.
Duplicate this until you have 15 frames. Move the slider on this animation to the first frame.
Edit > Select All, Edit > Copy
Move back to your DecoHeart animation. Edit > Select All, Edit > Paste Into Selected Frame
Again, position as you want it, then release your mouse button.
And look at that, you're done! View > Animation Save as .gif and I hope you had fun!
This creates a rather big file, but I wanted to experiment with the effects today, so there you have it!.
.
 [Click image above to go to full sized image.]This tutorial was written on February 23, 2009, using Paint Shop Pro, version X.03. It should be okay to do with other versions as well. I just find X.03 more comfortable for me. You may download a free trial of Paint Shop Pro, version X2, from Corel. Any similarities between this tut and any others you may see are purely coincidental.
You will also need:
Tube of your choice. I'm using the great artwork of Ismael Rac. You must have a license to use his work. You may purchase that license at My PSP Tubes.
Scrap kit by Pimptress of Paradise 4 Scrappers. It is a PTU kit, called Springtime In Paris.
Filters: Eye Candy 4000 > Gradient Glow *and* Glass
Font: I used Good Vibrations
Supplies: The mask, sg_stenciled-circle1. You can find this here. The mask was made by Essex Girl. She has a LOT of wonderful masks there to choose from, so take a look! Thank you, Essex Girl, for sharing your talent with the PSP community!
Let's begin, shall we?
Open a new image, 700 x 700, white.
Add a new raster layer. Selections > Select all.
Open pp01. Copy and paste INTO SELECTION. Selections > Select none.
Apply your mask, INVERT TRANSPARENCY CHECKED! Delete mask layer. Answer "yes" to pop-up question and merge group.
Open pp07. Copy and paste as new layer.
Open circle-wooden-frame. Copy and paste as new layer.
Grab your magic wand. Click inside the frame. Selections > Modify > Expand by 7. Selections > Invert.
Highlight your pp07 layer. Hit delete. Selections > Select none.
Add your tube. Positon and drop shadow.
Highlight your frame layer again. And, again grab your magic wand and click inside the frame. Selections > Invert
Get your eraser brush and erase any of your tube that is overlapping the bottom of the frame. Selections > Select none.
Open the Eiffel Tower in the scrap kit. Resize 45%. Copy and paste as a new layer, above your pp07 layer and below your tube layer. Position the Eiffel Tower so it shows as kind-of a background object in the frame. Drop shadow your Eiffel Tower. Change the blend mode to Overlay.
Open spring-blossom-01. Resize 50%. Highlight your top layer. Copy and paste your spring blossom as new layer. Arrange as desired. Drop shadow. Duplicate this layer and rotate right 30°. Arrange again, to your liking. Use your lasso tool, point-to-point, to crop out any stem that may be sticking out or things like that.
Open wisteria. Image > Mirror. Copy and paste as new layer on the right hand side of the frame, so that it's hanging down the side of your tube. See my tag as a reference. Drop shadow the wisteria.
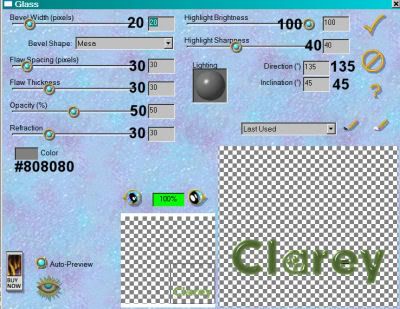
Add your name. I used color #e8a9cf. Effects > Plugins > Eye Candy 4000 > Glass with the following settings:
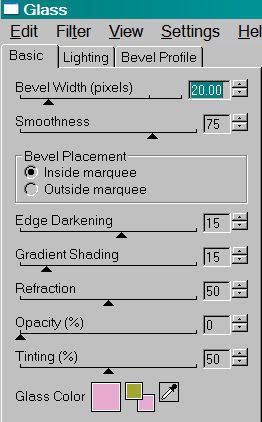
Hit okay.
I added Eye Candy 4000 > Gradient Glow with settings at 3 - 25 - 100, color #as237d. I then added the same gradient glow, but using the color white. Drop shadow your name.
Add your copyright, license information if applicable, and taggers'/watermark.
Save and we're done! Easy-peasy! :) I hope you enjoyed this tut!.
.
 [Click image above to go to full sized image.]This tutorial was written on February 22, 2009, using Paint Shop Pro, version X.03. It should be okay to do with other versions as well. I just find X.03 more comfortable for me. You may download a free trial of Paint Shop Pro, version X2, from Corel. Any similarities between this tut and any others you may see are purely coincidental.
You will also need:
Tube of your choice. I'm using the fantastic pin-up artwork of Dominic Marco. You must have a license to use his work. You may purchase that license at CILM. For this tut, a laying down or similarly posed tube as I've used is best.
Animation Shop - at this time, I'm not sure where you can get this program, if you don't already have it. You may, however, save the tut as a static (non-animated) image if you like.
Scrap kit by Clarey of Clareys Designz. It is a PTU kit, called Lucky Charm.
Filters: Eye Candy 3.1 > Glass
Font: I used Irish Participants
Supplies: You can find here. This includes the mask, the rainbow, the font and the pile of coins. The rainbow was made by Kelly Gates. I don't know Kelly, so if you are she, or if you know her, please let her know I'd like her permission to use it! I tried Google, but there are a lot of Kelly Gates' listed!
Let's begin, shall we?
Open a new image, 700 x 650, white.
Open your mask and pile of coins. Minimize in PSP. You could also load your mask into your PSP masks file. Load your font, or if you wish, open it and minimize on your task bar. File your rainbow animation where it is most convenient for you to access when we get to that portion of the tutorial.
Add a new raster layer. Selections > Select all
Open paper5. Copy and paste INTO SELECTION. Selections > Select none.
Apply your mask. Delete mask layer, answer "yes" to the pop-up question and merge group. Resize mask layer 85%. I added a small drop shadow to the mask.
Open rectangle frame. Image > Free Rotate > Right 90° Copy and paste as new layer.
Open paper11. Copy and paste as new layer below the frame.
Highlight your frame layer. Grab your magic wand. Click inside the frame. Selections > Modify > Expand by 7. Selections > Invert.
Highlight your paper11 layer. Hit delete. Selections > Select none.
Add your tube. Position and drop shadow.
Open the pot of gold. Resize 50%. Copy and paste at one end of the frame. See my tag for reference purposes. Drop shadow the pot of gold.
Open the pile of coins from the supplies. Copy and paste as new layer. Position and drop shadow.
Open the coin from the scrap kit. Resize 40%. Copy and paste as new layer. I positioned mine as best I could to imply the tube was dropping the coins into the pile. Drop shadow. Duplicate this layer and position the copy as you like. Merge these two layers down. I added motion blur to the two coins. Adjust > Blur > Motion Blur, settings as follows:
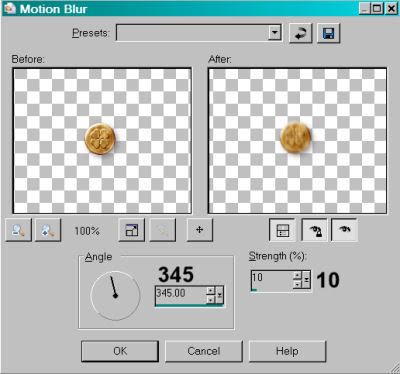
Hit okay.
Open the pipe from the scrap kit. Resize 40%. Positon as you like. I have mine "leaning" on the pot of gold. Drop shadow your pipe.
Add your name. I used color#86ad5a. Apply your Eye Candy Glass with settings as follows:
Hit the checkmark (or "okay" if you're using a newer version of Eye Candy).
Drop shadow your name.
Add your copyright, license information if applicable and your taggers'/watermark.
Resize your tag to your taste.
Layers > View > None.
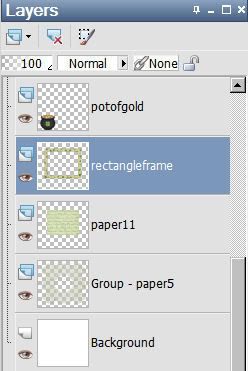
Open up the bottom five layers. For me, it looks like this:
Edit > Copy merged
Open Animation Shop. Right-click and paste as new animation. Duplicate this frame until you have a total of 16 frames. Move your slider at the bottom of this animation to the first frame.
Open your rainbow animation. Edit > Select All. Animation > Mirror. Edit > Copy
Go to your new animation that you just created and Edit > Select All
Edit > Paste > Into Selected Frame
Position as you like, then release your mouse button. I found that just about ½ inch in from the right inside edge of the frame worked for me. If your rainbow isn't ending in the right place, then Edit > Undo Paste and try, try again!
Go back to PSP. Close out the five layers you'd opened before, and open all the rest of the layers above.
Edit > Copy merged
Return to Animation Shop, right-click on the desktop area and paste as new animation. Again, duplicate this frame until you have 16 frames. Move your slider to the first frame.
Edit > Select All. Edit > Copy
Go back to the animation you created with the rainbow in it and make sure you have all layers selected. Edit > Paste > Into Selected Frame.
Position appropriately and release your mouse button.
View > Animation. Et, voila again! We are done! I hope you enjoyed this tutorial, and are pleased with your results!.
.
 [Click image above to go to full sized image.]This tutorial was written on February 20, 2009, using Paint Shop Pro, version X.03. It should be okay to do with other versions as well. I just find X.03 more comfortable for me. You may download a free trial of Paint Shop Pro, version X2, from Corel. Any similarities between this tut and any others you may see are purely coincidental.
You will also need:
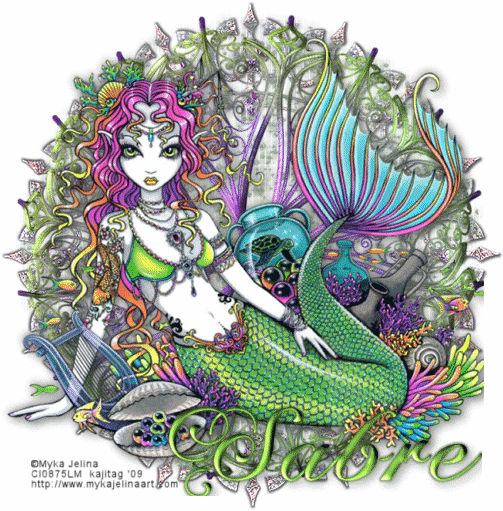
Tube of your choice. I'm using the artwork of the talented Myka Jelina. You must have a license to use her work. You may purchase that license at CILM.
Animation Shop - at this time, I'm not sure where you can get this program, if you don't already have it. You may, however, save the tut as a static (non-animated) image if you like.
Scrap kit by Sabre of The Quill and Parchment. It's a FTU kit, called Morning Glory. It's got some beautiful elements in it. I couldn't find use for many of them in this tut, however. It's an easy basic tut, until you get to the animation!
Filters: Eye Candy 4000 > Gradient Glow
Font: I used Chateau
Supplies: Mask WSL_Mask74, by Chelle at Wee Scots Lass. Click on "Navigate," then "Downloads." Choose the second group of masks in the list to get #74. Thank you Chelle, for sharing your talent with the PSP Community!
Okay, let's start. The names of the contents of this kit are not really in any kind of sequence, so this will be difficult to read, but it'll come out alright at the end!
Open a new image, 700 x 700, white.
Open SL-MGFrame1. Copy and paste as new layer. Resize 115%.
Open SL-MorningGloryPaper2sabre. Copy and paste as new layer.
Apply your mask. Delete the mask layer, answer "yes" to the pop-up question, and merge group.
Open SL-MorningGloryElementSabre. Copy and paste as new layer. Resize by 95%.
Add your tube. Position and drop shadow.
Add your name. I used color #86c54e. I used the following inner bevel:
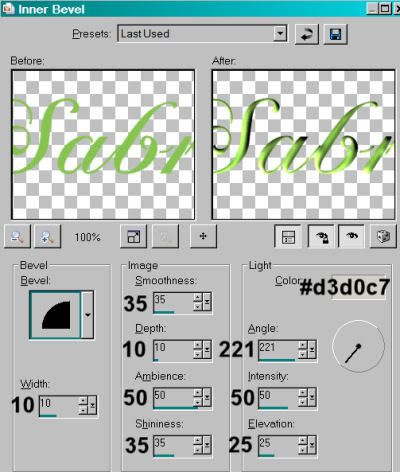
Hit okay.
Apply Eye Candy 4000 > Gradient Glow, settings on 4 - 0 - 100, color #2b4e1a.
Drop shadow your name.
Add your copyright, license information if applicable, and taggers'/watermark.
Resize your tag to your desired size.
Highlight your bottom element layer (SL-MorningGloryElementSabre).
Edit > Copy
Open Animation Shop, right-click on the desktop layer and paste as new animation.
Go to Effects > Insert Image Effects
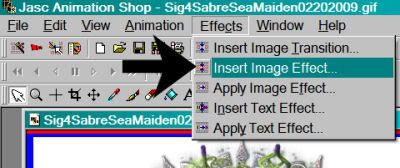
Choose "Underwater," with the settings shown below:
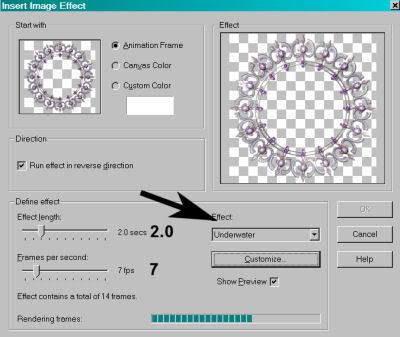
Hit okay.
This gives you 15 frames. Delete the last frame. Bring the slider at the bottom of this animation to the first frame.
Return to PSP. Close out the bottom white background layer and the SC-MorningGlowerElementSabre layer. Reveal all the rest of your layers.
Edit > Copy merged
Return to Animation Shop, right-click on the desktop area and paste as new animation.
Duplicate this frame until you have a total of 14 frames. Again, bring the slider at the bottom of this animation to the first frame.
Edit > Select All
Edit > Copy
Go to your animation with the underwater effects.
Edit > Select All
[NOTE: On the next step, do not release your mouse button until you have positioned your frames where you want them to be on the finished product!]
Edit > Paste > Into Selected Frame
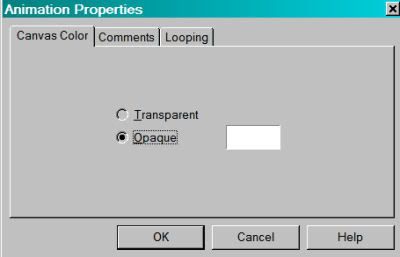
Animation > Animation Properties with the following settings:
View > Animation! Save as .gif and we're done!! Thanks for trying my tut, I hope it was clear for you.
.
.
 [Click image above to go to full sized image.]This tutorial was written on February 20, 2009, using Paint Shop Pro, version X.03. It should be okay to do with other versions as well. I just find X.03 more comfortable for me. You may download a free trial of Paint Shop Pro, version X2, from Corel. Any similarities between this tut and any others you may see are purely coincidental.
You will also need:
Tube of your choice. I'm using the artwork of the talented Carrie Hall. You must have a license to use her work. You may purchase that license at Up Your Art.
Animation Shop - at this time, I'm not sure where you can get this program, if you don't already have it. You may, however, save the tut as a static (non-animated) image if you like.
Scrap kit by Bluey of Bluedream Designs. It's a FTU kit, called Irish Charm.
Filters: Eye Candy 4000 > Gradient Glow, Alien Skin Xenofex 2 > Constellation
Font: I used Celticmd
Supplies: Mask WSL_Mask95, by Chelle at Wee Scots Lass. Click on "Navigate," then "Downloads." Choose the second group of masks in the list to get #95. Thank you Chelle, for sharing your talent with the PSP Community!
Okay, let's go!
Open a new image, 700 x 700, white.
Add new raster layer. Selections > Select All
Open Paper6. Copy and paste INTO SELECTION. Selections > Select none.
Apply your mask. Delete mask layer, answer "yes" to pop-up question, and merge group.
Open Frame 4. Copy and paste as new layer. Drop shadow your frame.
Open Bling Shamrock. Copy and paste as new layer. Drop shadow your bling shamrock.
Add your tube of choice. Position and drop shadow.
Open Pendant2. Copy and paste as new layer. I positioned mine on the left side of the frame. Drop shadow your pendant.
Open your Label. Copy and paste as new layer. Position as desired and drop shadow. See my tag for reference.
Add your name. I used color #e1e8d7 with a .5 stroke in color #2b4e1a. I also added an inner bevel with the following settings:
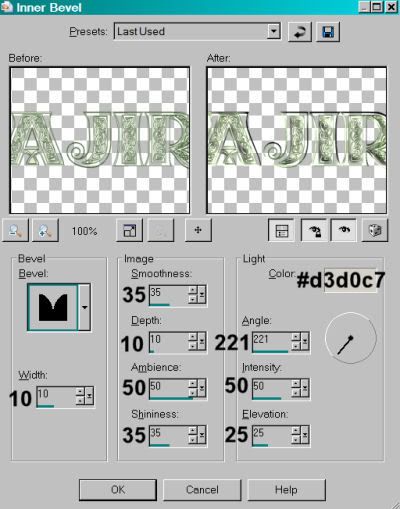
Hit okay. I then used Eye Candy 4000 > Gradient Glow with settings at 4 - 0 - 100, color #e1e8d7. Hit okay. Drop shadow your name.
Add your copyright, license information if applicable, and taggers'/watermark.
Resize your tag to the size you're comfortable with. You may save now if you don't wish to animate. If not, here we go!
A N I M A T I O N
Highlight your Bling Shamrock layer and duplicate twice, for a total of three layers.
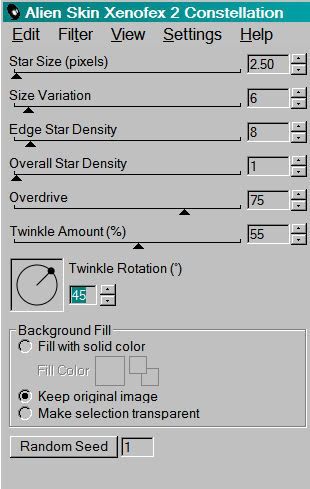
Still highlighting the bottom layer, Effects > Plugins > Alien Skin Xenofex2 > Constellation with the following settings;
Hit okay.
Now, highlight the middle Bling Shamrock layer and re-apply Constellation, but hit the "Random Seed" button to change the sparklies. Hit okay.
Highlight the top Bling Shamrock layer. Re-apply Constellatioin and hit the "Random Seed" button again. Hit okay.
Now, close out the top two Bling Shamrock layers and leave the bottom one open.
Edit > Copy merged
Open Animation Shop, right-click on the desktop area and paste as a new animation.
Return to PSP. Close the bottom Bling Shamrock layer and open the middle one.
Edit > Copy merged
Return to Animation Shop. Edit > Paste > After current frame
Once again, back to PSP. Close out the middle Bling Shamrock layer and open the top one.
Edit > Copy merged
And, back to Animation Shop. Edit > Paste > After current frame.
View > Animation! Save as .gif and we're done! I hope you've enjoyed this tut!.
.
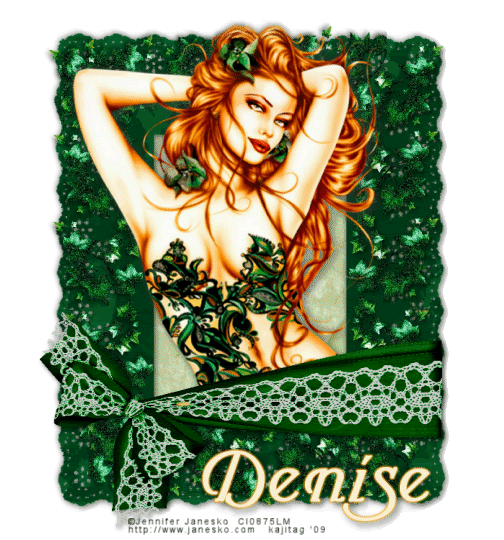 [Click image above to go to full sized image.]This tutorial was written on February 19, 2009, using Paint Shop Pro, version X.03. It should be okay to do with other versions as well. I just find X.03 more comfortable for me. You may download a free trial of Paint Shop Pro, version X2, from Corel. Any similarities between this tut and any others you may see are purely coincidental.
You will also need:
Tube of your choice. I've chosen to use the sumptuous artwork of Jennifer Janesko. You must have a license to use her work. You may purchase that license at CILM.
Animation Shop - at this time, I'm not sure where you can get this program, if you don't already have it. You may, however, save the tut as a static (non-animated) image if you like.
Scrap kit by Denise of Scrappy Redhead Designs. It's a PTU kit, called Forces of Nature.
I thought I'd be doing something St. Patrick's Day related, but it didn't turn out that way! I decided to use the tube that Jennifer called "Forces of Nature" to go with the kit called "Forces of Nature."
Filters: Eye Candy 4000 Gradient Glow, DSB Flux > Bright Noise
Font: I used Turbayne Running Hand
Supplies: No outside supplies for this tut!
Okay, let's go!
Open a new image, 700 x 700, white.
Open Paper12. Copy and paste as a new layer.
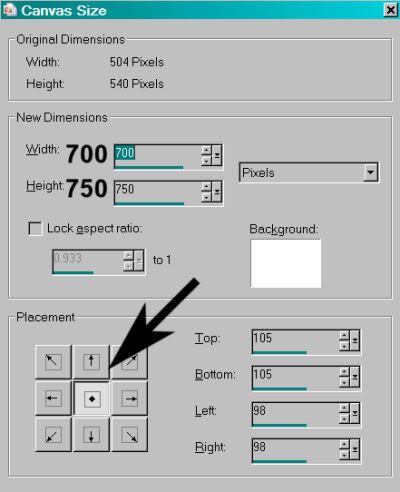
Open lace frame. Copy and paste as a new layer. I did some tweaking to this frame as I was building the tag. I used the pick tool and stretched it so it would be taller and skinnier than it was originally. This caused me to have to change the canvas size, with the settings below:
Highlight your frame layer. Grab your magic wand and click inside the frame.
Highlight your paper layer and Selections > Invert. Hit delete. Selections > Select None.
Add your tube. Position and drop shadow.
Highlight the frame layer. Grab your magic wand tool again, and click inside the frame. Selections > Invert.
Highlight your tube layer. Grab your eraser brush and erase the portion of your tube that overlaps the bottom of the frame. Selections > Select none.
Open the lace bow. Copy and paste as new layer over your tube. For *me* I thought the original color was too dark for the tag. I changed the color on the lace bow by using the Adjust > Brightness and Contrast > Brightness/Contrast and using the settings below:
Hit okay. Then, Adjust > Hue and Saturation > Colorize with the settings below:

Hit okay. And again with the Brightness and Contrast:
Hit okay. I know that was circuitous, but that's how it worked out.
Position your lace bow where you'd like it. Drop shadow.
Open poison ivy. Copy and paste as a new layer. I put mine on the right side of the frame, at the top.
Duplicate this layer four times, for a total of five layers. Position them in a line up and down the right side of the frame. Merge all these layers down. Drop shadow.
Now, duplicate this layer and Image > Mirror. Duplicate again, and rotate 90° right. Line this up at the top of your frame. Use your selection tool to crop out the right and left sides that are hanging over.
Duplicate this layer and Image > Flip. Whew!
Now, merge these poison ivy layers down as one. Drag this layer down below the tube and above the frame.
Add your name. I used color #f8f0d2. Add Eye Candy 4000 Gradient Glow, settings of 3 - 0 - 100, preset of "Fat" and color #f6a720. Drop shadow your name.
Add your copyright, license information if applicable, and taggers'/watermark.
Resize your tag to taste. You may save now if you don't wish to animate. If you DO wish to animate, keep going.
A N I M A T I O N
You know what's coming!!
Duplicate your poison ivy layer two times, for a total of three layers.
Highlight the bottom poison ivy layer. Effects > Plugins > DSB Flux > Bright Noise with the intensity set at 45, "mix" checked. Hit okay.
Highlight the middle poison ivy layer. Effects > Plugins > DSB Flux > Bright Noise. Intensity is still at 45, but hit mix twice. Hit okay.
Highlight the top poison ivy layer. Effects > Plugins > DSB Flux > Bright Noise. Intensity is still at 45, but hit mix three times. Hit okay.
Close out the top two layers of poison ivy, leaving the bottom layer open.
Edit > Copy merged
Open Animation Shop and right-click on the desktop area, pasting as a new animation.
Return to PSP. Close out the bottom poison ivy layer and open the middle layer.
Edit > Copy merged
Back to Animation Shop. Edit > Paste > After current frame.
Once more to PSP. Close out the middle poison ivy layer and open the top layer.
Edit > Copy merged
And back to Animation Shop once more, Edit > Paste > After current frame.
Still in Animation Shop, Edit > Select All.
Right click on the bar on top of your canvas and choose "Frame Properties." Change this number to 15.
View > Animation. There you go! Save as .gif and we're done!
Thanks for trying my tut! I hope you're having a wonderful day!.


©kajira hill 2009
http://kajituts.blogspot.com


