
You will also need:
Tube of your choice. I've chosen to use the glamorous artwork of Jennifer Janesko. You must have a license to use her work. You may purchase that license at CILM.
Animation Shop - at this time, I'm not sure where you can get this program, if you don't already have it. You may, however, save the tut as a static (non-animated) image if you like.
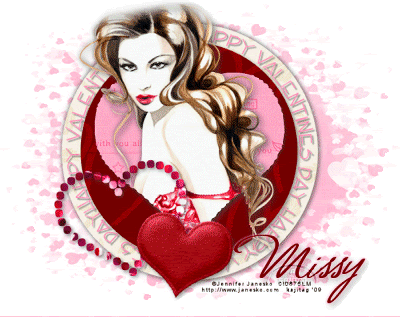
Scrap kit is by Missy at Misfits Scrapz. The kit I'm using is FTU, taggers' sized and called Sweet Valentine. Now, you be SURE to leave Missy some love for sharing her kits and all the rest that she does with the PSP Community! They're fewer and farther between these days, so this is a particular treat! Thanks, Missy!
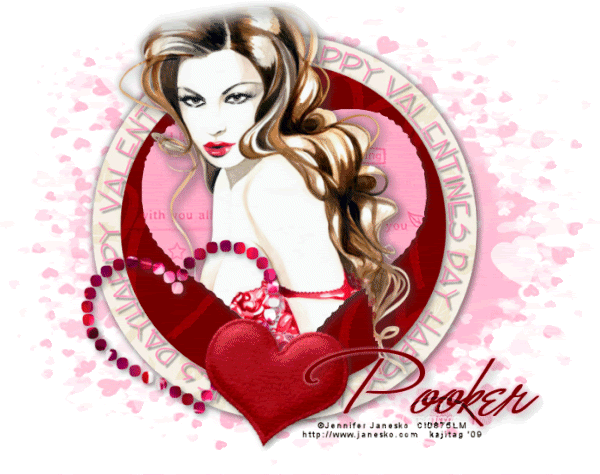
I also used a template by Pooker, of Pooker's Creations. I used Template #40. Be sure to leave Pooker some love, too! All these designers allowing us to use their work for free should be given medals!!
Filters: Eye Candy 4000 HSB Noise and Gradient Glow (for the name -- optional)
Font: I used Monika
I also used a mask called heart-burst. This has been attributed to many people. I don't really know from whom it came, but if it's yours, please let me know so I can give you credit!!
Now, let's begin!!
Either open your mask in PSP and minimize, or load mask into your mask file.
Open your template. Windows > Duplicate, then delete the original. Delete the copyright layer. Resize the template to size 700 x 554, all layers checked.
Working from the bottom up in the template, highlight the Circle1 layer. Selections > Select All > Float > Defloat > Modify > Expand by 1.
Open paper7. Copy and paste as new layer. Selections > Invert > Delete. Selections > Select none. Merge down your paper layer to the original circle layer. Drop shadow.
Highlight the Word Art layer. Selections > Select All > Float > Defloat > Invert
Open paper2. Copy and paste as new layer. Hit delete. Selections > Select none. Delete the original word art layer. Drop shadow your word art as desired.
Highlight the Circle2 layer. Selections > Select All > Float > Defloat > Modify > Expand by 1
Open paper3. Copy and paste as new layer. Selections > Invert > Delete. Selections > Select none. Merge down your paper layer to the original circle2 layer. Drop shadow.
Highlight the heart1 layer. Selections > Select All > Float > Defloat > Modify > Expand 1
Open paper1. Copy and paste as new layer. Selections > Invert > Delete. Do not de-select!! Merge down your paper layer to your original heart layer.
Add your tube of choice. I had to resize mine down. Do whatever works best for you. Position your tube and, if it's a "half-body" or in this case a "bust," like mine, then take your eraser brush and erase the portions hanging over the bottom of the heart that you want to be gone. In my case, I wanted the tube's hair to hang outside the heart, so I left that part there. Again, do whatever works best for you. Selections > Select none. Drop shadow your tube.
Go to your heart3 layer and highlight it. Now, for this layer, I chose to open puffyheart2 from the scrap kit, resize it down by 50% and free rotate right by 10°. I then deleted the heart3 layer from the template. Drop shadow your heart, whichever way you choose to do it!
Highlight the heart2 layer. Selections > Select all > Float > Defloat > Modify > Expand by 1. On *this* layer, I chose to use diamond1 from the kit and resize by 125%. Copy and paste as new layer and position over your selections. Selection > Invert > Delete. Selections > Select none. Merge this layer down to the original heart2 template layer. I chose to not drop shadow.
Duplicate this heart2 layer twice, for a total of three layers. X out the top two layers. Leave it for now.
Open paper6. Copy and paste as new layer, just above your white background layer. Apply your mask. Delete mask layer, answer "yes" to the pop-up question, and merge group.
Add your name. I used Monika, color #7b0002. Position as desired. If you like, add the Gradient Glow, set at 4 - 0 - 100. Color #fea5c2. Use the "diffuse" setting. Okay.
Add your copyright, license number if applicable, and your tagger's/water mark.
Resize your tag as desired.
You can save now if you're not animating. (If you're not animating, delete the two duplicate layers of the heart2 layer I told you to do earlier. Sorry about that.)
A N I M A T I O N
Go back to your set of three heart2 layers. Highlight the bottom layer, make sure it's open, and apply Eye Candy 4000 > HSB Noise, settings as below:
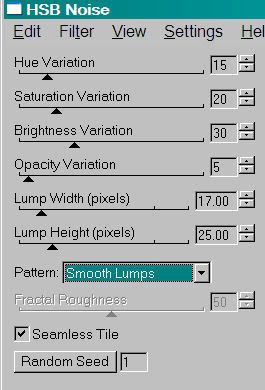
Hit okay. X out of the bottom heart2 layer and open the middle one. HSB Noise again, but hit the "random seed" button.
Hit okay. X out of the middle heart2 layer and open the top. HSB Noise a third time, and again, hit the "random seed" button. Hit okay.
X out the top two of these layers, leaving the bottom one open.
Edit > Copy merged.
Open Animation Shop. Right click on the desktop area in A.S. and paste as new animation.
Go back to PSP. X out of the bottom heart2 layer, and open the middle one.
Edit > Copy merged.
Return to Animation Shop and Edit > Paste > After current frame.
Go back once again to PSP. X out of the middle heart2 layer and open the top.
Edit > Copy merged.
Finally, back to Animation Shop and Edit > Paste > After current frame.
View > Animation. Voila! We've done it!
I hope you enjoyed this tutorial. Thank you so much for trying it! And have a super weekend!
.


No comments:
Post a Comment