
You will also need:
Tube of your choice. A sitting tube would work best. I've chosen to use the sexy artwork of Tom Hoover. You must have a license to use his work. You may purchase that license at My PSP Tubes.
Animation Shop - at this time, I'm not sure where you can get this program, if you don't already have it. You may, however, save the tut as a static (non-animated) image if you like.
Scrap kit by Hezalin of Terminally Unique Designs. It's a FTU add-on kit, and is called Off to Tipperary. It also has a GREAT PTU counterpart, which you can find at the aforementioned Terminally Unique Designs.
Filters: Eye Candy 4000 > Gradient Glow, DSB Flux > Bright Noise
Font: I used JeffrianaJF
The mask, from Boundless Bliss, which you can find here.
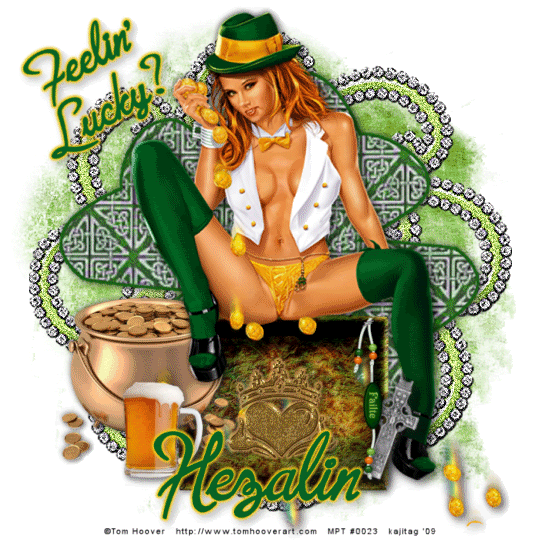
I hope you're ready for St. Patty's Day already! Suprises me every year, coming just a month after Valentine's Day. I'll try to do a few of these to add to our mutual collections.
I have to confess, that I just threw this tag together, THEN went back to guesstimate resize percentages, etc. I am going to put down the percentages I have a *general* idea that are right. You may need to fiddle with yours as you go along. I apologize now for this. I really didn't think I had much to work with, with this freebie add-on kit. But, you can see, with the right tube, anything's possible!
Let's begin! :)
Open your mask and minimize in PSP, or load it into your PSP masks folder for use from now into eternity. LOL.
Open a new image, 700 x 700, white.
Open Paper 11. Copy and paste as new layer.
Apply your mask, WITH INVERT TRANSPARENCY CHECKED!
Delete mask layer, answer "yes" to the pop-up question, and merge group.
Open Diamond Flower 2. Resize 175%, then 120%. Copy and paste onto your canvas.
Open Shamrock 4. Resize 120%. Copy and paste as new layer. Drop shadow your shamrock.
Open Box 2. NOTE: I used this box simply because my tube required something to sit on. You can choose to use it, or not. Anyway, resize Box 2 40%. Copy and paste, position where you like it. Drop shadow box.
Open the pot of gold. Resize 45%. Copy and paste as new layer. Position as you like it, and drop shadow.
At this point, I added my tube. Resize if necessary, position and drop shadow.
Open the Claddagh gold. Resize 50% Place in the middle of your box, a bit toward the bottom. Now, you can't see the Claddagh very well, so I used Eye Candy 4000 Gradient Glow, set at 4 - 0 - 100, and color #f7cb1e. I applied this Gradient Glow twice. Then drop shadow your Claddagh.
Open the bear-mug. Resize 35%. Copy and paste as new layer. Position as you like. Drop shadow.
Open Bead String. Resize 35%. Copy and paste as new layer. Position so it looks as though it's hanging from the top right corner of the box. Drop shadow.
Open Cross. Resize 25%. Smaller, if needed. Rotate right 20°. I positioned mine so it would look like it's leaning out of the box, resting on the tube's leg. Drop shadow.
Position everything now, the way you want it to look best on your finished product.
If you elect to, add your word art now. I chose "Feelin' Lucky?" because it seemed to capture the scene with my tube's expression and all her gold coins. I used color #066325. Use the same gradient glow as last time, with the Claddagh. Rotate, position, and drop shadow your word art.
Add your name. I used the same colors and gradient glow on the name. Drop shadow your name.
Add your copyright, license information if applicable, and tagger's/watermark.
Resize your tag now, to your desired finished size. You can save now, if you'd like to forego the animation. Otherwise, onward!
A N I M A T I O N
Highlight your Diamond Flower 2 layer. Selections > Select All > Float > Defloat
Duplicate this layer twice, for a total of three layers. You know what's coming!
Highlight the bottom Diamond Flower layer. Effects > Plugins > DSB Flux > Bright Noise. Set your noise on 40 and click on "mix" and hit okay.
Highlight the middle Diamond Flower layer. Repeat your DSB Flux > Bright Noise, but click on "mix" a couple of times.
Now highlight the top Diamond Flower layer. Again, repeat the DSB Flux > Bright Noise and click "mix" three or four times.
Interestingly, on this tut, I experimented and went over the three layers again to see what would result. Mega noise! You may choose not to do this. I totally understand!
Selections > Select none
Now, X out the top two Diamond Flower layers and make sure the bottom one is open.
Edit > Copy merged
Open Animation Shop. Right click on the desktop area and paste as new animation.
Return to PSP. X out the bottom Diamond Flower layer and open the middle one.
Edit > Copy merged
Return to Animation Shop and Edit > Paste > After current frame.
And again, back to PSP. X out the middle Diamond Flower layer and open the top.
Edit > Copy merged
Finally, back to Animation Shop and Edit > Paste > After current frame.
View > Animation. If you like it, save as .gif and you're done! Et, Voila!
I hope you're having a great weekend. In the U.S., if you have tomorrow off, more's the better! Thanks for stopping by and choosing to try my tut! Aye and begorrah! LOL!
.


No comments:
Post a Comment