
You will also need:
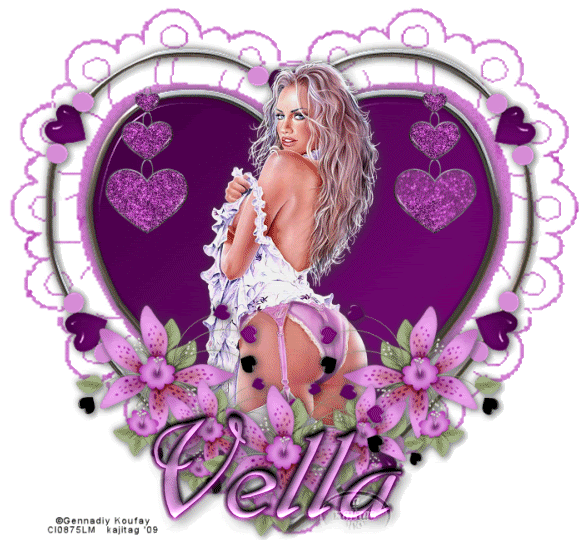
Tube of your choice. I've chosen to use the fabulous artwork of Gennadiy Koufay. You must have a license to use his work. You may purchase that license at CILM.
Animation Shop - at this time, I'm not sure where you can get this program, if you don't already have it. You may, however, save the tut as a static (non-animated) image if you like.
Scrap kit by Vella of Wench Designs. It's a FTU kit, called Purple Love, and part of yet *another* Valentine blog train!! Gotta love these blog trains all about the blogosphere! Be sure to give Vella LOTS of love if you download this kit! I'm partial to purple, so it's all good!
No outside filters in this tut! (I used Eye Candy 4000 Gradient Glow on the name, that's it.)
Font: I used 38.
Supplies: Just the mask, here!
I don't know where I got this mask. It was picked up along the way. If it is yours, please let me know so I can give you credit!
Ready? Let's do it!!
Open your mask in PSP and minimize, or else load it into your masks file.
Open a new image, 700 x 650, white.
Open Paper8. Copy and paste as new image.
Apply your mask. Delete mask layer, answer "yes" to the pop-up question, and merge group.
Open BeadedHeart. Copy and paste as new layer. Resize if you like. I enlarged mine a bit. I found the BeadedHeart didn't exactly center on the mask layer, so I moved it around until it did.
Add your tube. Position and drop shadow.
Open DecoFlower1. Copy and paste as new layer. Resize by 65%. Position on the left side of the bottom of the heart. See my tag for reference purposes. Duplicate this layer and Image > Mirror.
Duplicate again and resize by 75%. Arrange further down on the side of your BeadedHeart and again, duplicate. Image > Mirror.
Once more, duplicate the original DecoFlower1 and center at the bottom tip of the heart. Drop shadow each of your flowers individually.
Open HangingHeartsCharm1. Resize by 30%. Copy and paste as new layer. Arrange on the top side of your heart. See my tag for reference. Duplicate this layer and Image > Mirror. Position as desired. Merge these two layers down.
Grab your magic wand and click inside each of the six hanging hearts.
Duplicate your HangingHeartsCharm1 layer twice, for a total of three layers. Highlight the bottom layer and go
Adjust > Add/Remove Noise > Add Noise with Uniform and Monochrome checked. Noise setting at 40. Hit okay.
Go now to the middle layer of hanging hearts and add noise again, this time with the noise setting at 45. Hit okay.
And finally, highlight the top hanging hearts layer and add noise at a setting of 50. Hit okay.
X out the top two layers of hanging hearts, and leave the bottom one open.
Selections > Select none.
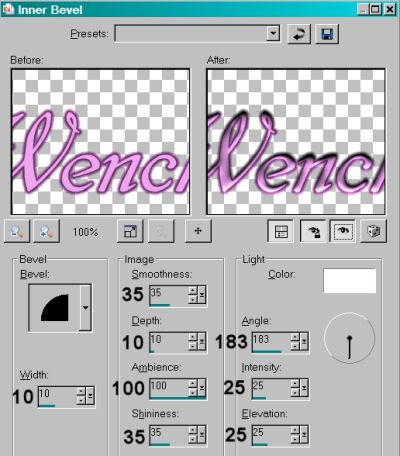
Add your name. I used color #eea6ef, then added a Gradient Glow of 5 - 0 - 100, preset of "Thick," color of #530453. I then added an inner bevel, like so:
Hit okay. Drop shadow your name. Add your copyright, license information if applicable, and your tagger's/watermark.
Resize your tag.
Edit > Copy merged
Open Animation Shop and right click on the desktop area. Paste as new animation.
Go back to PSP. X out of the bottom HangingHeartsCharm layer and open the middle one.
Edit > Copy merged
Return to Animation Shop and Edit > Paste > After current frame.
Once more back to PSP. X out of the middlle HangingHeartsCharm layer and open the top.
Edit > Copy merged
Finally, back to Animation Shop and Edit > Paste > After current frame
View > Animation
Save as .gif and we're done!
I hope you've enjoyed this tutorial, and I thank you for stopping by! Have a good one!
.


U'v got a very neat place.
ReplyDeletevanna