This tutorial was written on March 25, 2010 using Paint Shop Pro, version X.03. It should be okay to do with other versions as well. I just find X.03 more comfortable for me. You may download a free trial of Paint Shop Pro, version X2, from Corel.
You will also need:
Animation Shop. This is now a pay-for product, through Corel. That changed a while ago. I don't know why!!
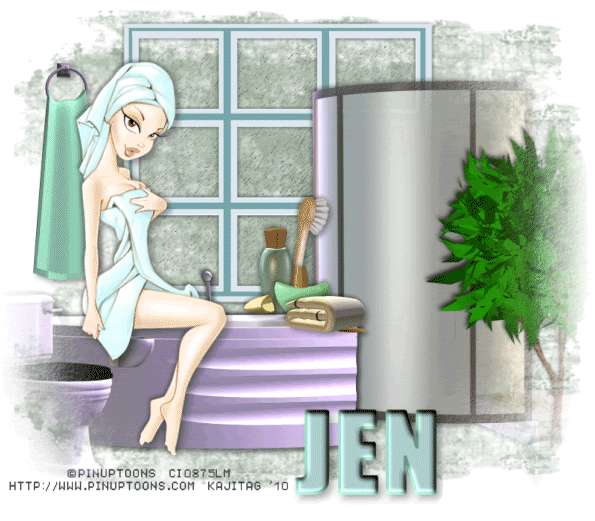
A tube of your choice. Obviously, a bathing-type tube would work best. Also, if you're stumped for ideas and using the exact things I'm using, a sitting, bathing tube would be best. I'm using the art of Rion Vernon, of Pinuptoons. You must have a license to use his artwork. You can get that license through C.I.L.M.
The scrap kit is by Jen, of Jen's Sweet Temptations. This is a FTU kit, called Rainy Day Driz.
[PLEASE NOTE: This tut came down more to the bath components than it did the scrap kit. I only used one paper from the kit, so it wouldn't be mandatory to get the kit if you didn't want to.]
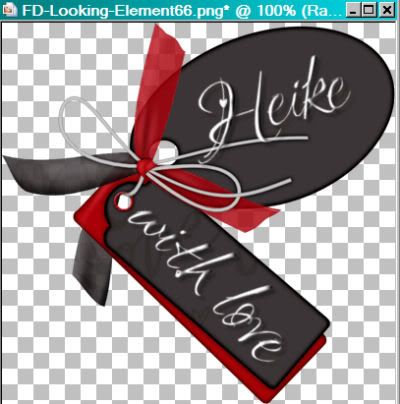
Supplies: Oh, boy. There's a bunch of stuff here. First, to my file of the supplies. Now, for most of the bath components, you'll go to this forum page. There are three sets, I think it is, of bath graphics on this page. The ones I used and to which I will be referring was the third file down. It's vague as to whom to credit for these graphics. The post was made by someone known as "Biggi." I just Googled for bath PSP tubes, and this is what I found. I did *not* have to join to get these files, so I don't think you will, either. They're available as .psd files or .psp files.
As for the contents of my .rar file: There is a bath brush and window. There is also a rain animation. The rain is obviously made by someone named Laura, but which Laura in the world, I don't know, unfortunately. If this is yours... let me know!! PLEASE!! So I may give you proper credit! I don't know the origins of the bath brush nor the window. Also included in the file are two masks. One I've used often, and I don't know from where I got it, either. Finally, the last mask was created by Chelle, or Wee Scots Lass. Thank you for sharing, Chelle! I appreciate your contributions to this community!!
Whew!
Filters: No outside filters used in this tutorial.
Font: I used Impact.
Okay, let me start off by telling (warning) you that this is a very "fiddly" tutorial. Lots of steps. So not much of the scrap kit -- just one sheet of paper -- but lots of parts, and most of the screen shots, of which there are many, are of the fiddling once we get to Animation Shop. I *am* including a *lot* of screen shots for that. I hope I can translate the steps and screen shots into something coherent!! Prior to Animation Shop, there will be "fiddly" stuff with the masks, as well. Tagger beware!! LOL! And thanks for trying it!!
Open your supplies provided and minimize. You could also file it all in the PSP files on your computer for use at a later date. (Just a suggestion: I created a file called "Bath Supplies" in with all my other tubes and things.) Open the rain animation and put where it will be handy once you get to Animation Shop.
Open a new canvas, 800 x 700, white.
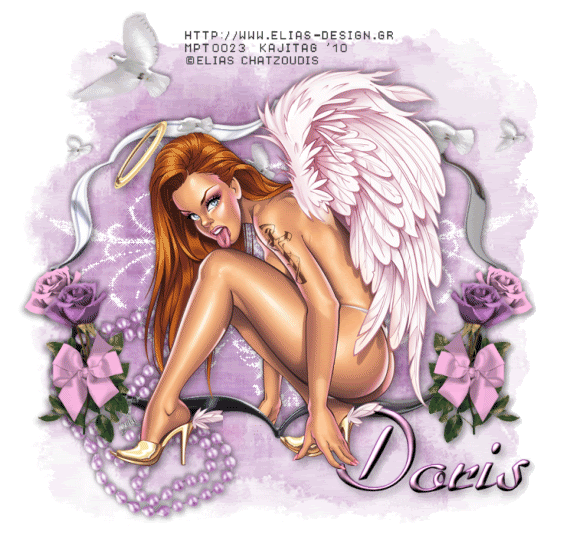
The beginning of this tutorial is just choosing which bath elements you want to use and placing them where you'd like them. To tell you the honest truth, I took my lead from the preview shot of the bathroom elements where they were offered for download. If you compare the two, it's very evident. So this is not all from my head! The ambiguous "Biggi," who offered the bath elements for download, actually put this together.
I will be referring to the elements I used. You may have downloaded the first or second files of elements, whereas I am using the third file. This is all up to you!!
From the bath elements file, open 0027. Choose the "Ebene4" layer. Copy and paste as a new layer. Resize 35%. Position where you think you might want it. Use my example (or Biggi's lol) for placement reference. Drop shadow. It would be a good idea for you to label this layer in some way that it will be easy for you to reference as we get further on in this tutorial. There were three layers that I labeled in this way. I just used A, B and C, and this is how I will be referring to them when we get to that spot.
Open 0031. Choose either the "Ebene10" or "Ebene11" (the tree) layer, based upon the coloration of your tag. Copy and paste as a new layer. Resize 30%. Image > Mirror. Place over on the right of your tag, so that it's actually falling off the right side of the canvas. Again, see my example for placement reference. Drop shadow. Label this layer so that it will be easy to find later in the tutorial.
Open 0030. Choose the "Ebene (must mean layer?) 4" layer. Copy and paste as a new layer. Resize 35%. Position on the left side, opposite the tree, so that it's now falling off the left side of the canvas. This will be below center. Drop shadow. Label this layer for ease of finding later.
This would probably be a good time to add your tube. Resize, position and drop shadow to your taste.
Open 0033. Choose the towel layer that again, color-coordinates with your particular tag. Copy and paste as a new layer. Resize 29%. Position where you would like it. See my example for placement reference. Drop shadow.
Okay, we've got our basics. Now, we need to do the "nesting." LOL!! Choose which lotions and potions, etc., you'd like in your bathroom. Here's what I did:
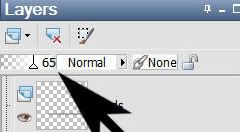
Open the bath brush that was in your supplies file. Copy and paste as a new layer. Resize 65%. Position where you would like it. Drop shadow.
Back to the supplies downloaded from that forum. Open 0039. Pick your color choice in the tall bottles. Copy and paste as a new layer. Resize 7%. Position where you'd like it. Drop shadow.
Back to 0039. Choose your color choice in the squatty-type bottles. Copy and paste as a new layer. Resize 7%. Position where you'd like it. Drop shadow.
Re-open 0031. Pick the towel of your choice. Copy and paste as a new layer. Resize 7%. Position and drop shadow.
Highlight your white background layer.
From the scrap kit (or a color and texture of your making), open Paper 4. Resize to 800x700. Copy and paste as a new layer.
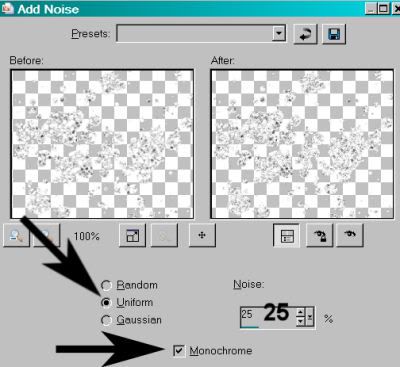
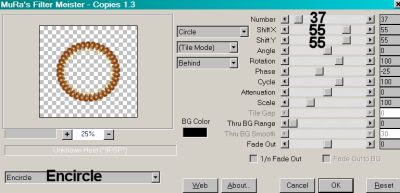
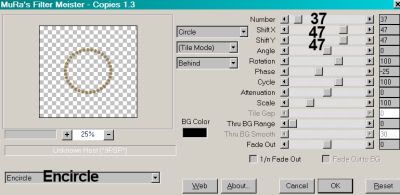
Apply the WSL_Mask83. Delete the mask layer, answer "yes" to the pop-up question and merge group.
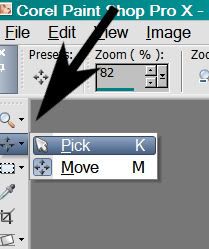
At this point, I took my pick tool
.. and dragged the sides and top out to a place I wanted them. This is up to you.
Now, from the supplies file I gave you, open the window1 file. Edit > Copy merged. Paste as a new layer. Position where you think it looks best. If your tag's coloration is differing from mine, then use Adjust > Hue and Saturation > Colorize to get the right color tone. In your layer palette, this layer should be dragged down to just above your mask layer.
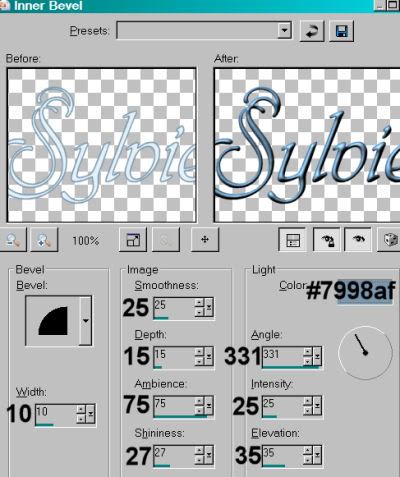
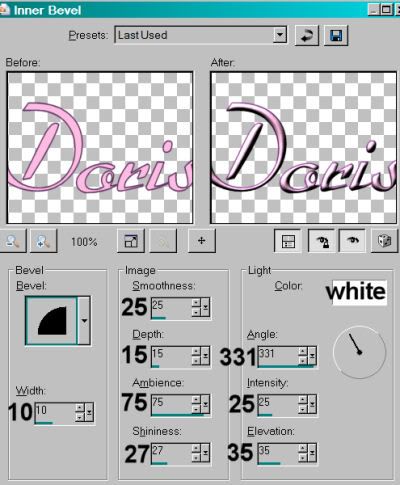
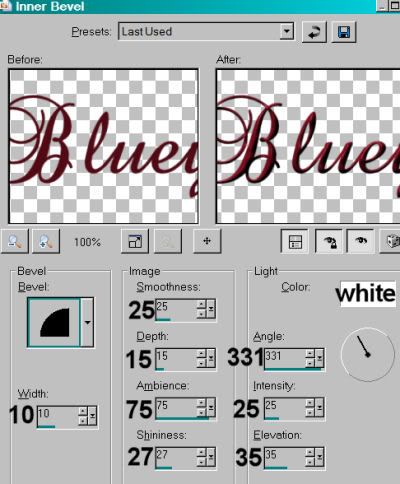
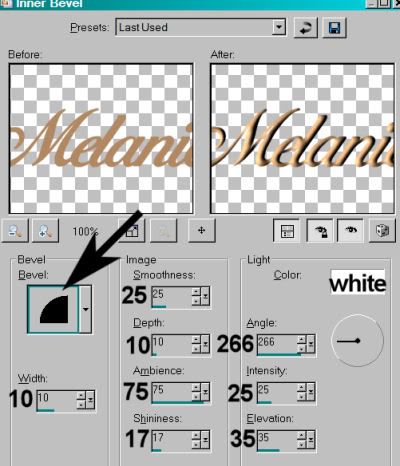
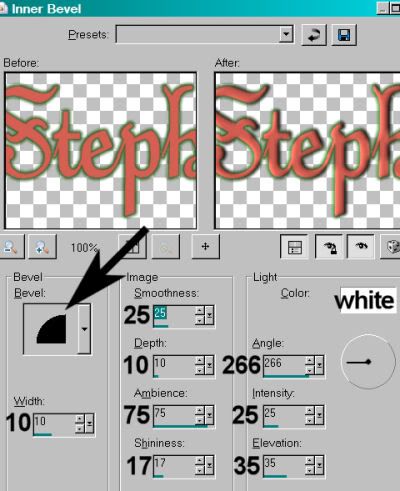
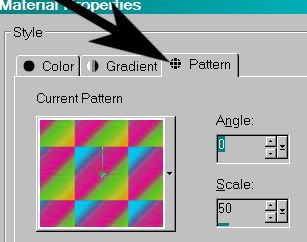
Go back to the top layer and add your name. I used color #d4fbfd as the fill, color #84bca6 as the stroke, stroke set on 4.
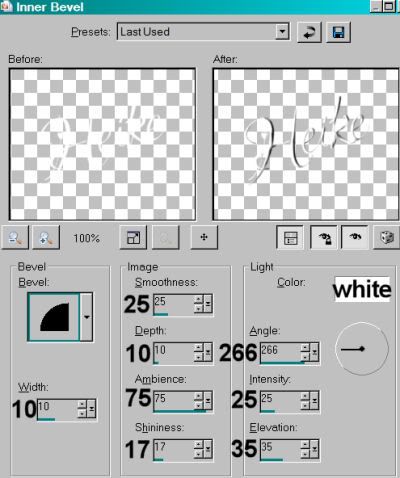
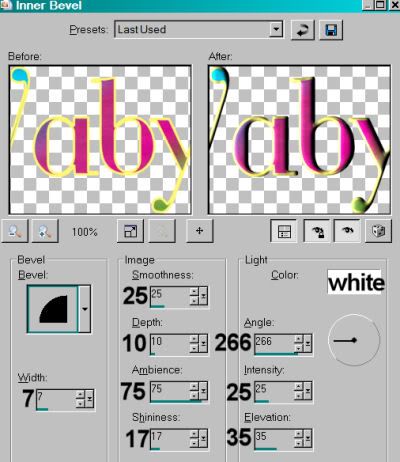
I added the following bevel:
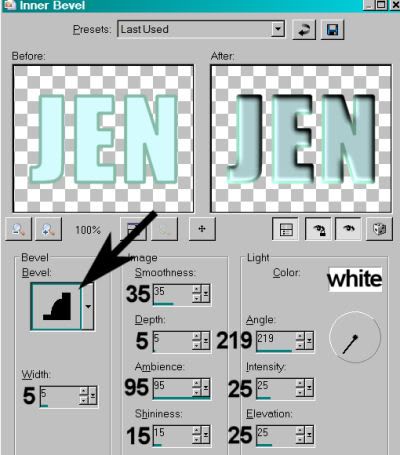
Hit okay.
Drop shadow your name.
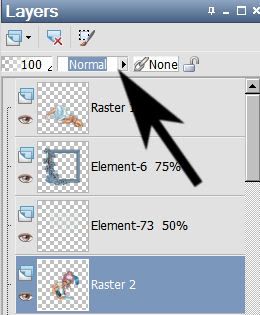
Now is the time we're going back to those layers I said earlier to label for ease of finding!!
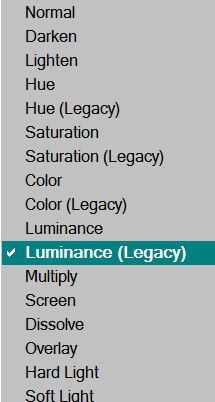
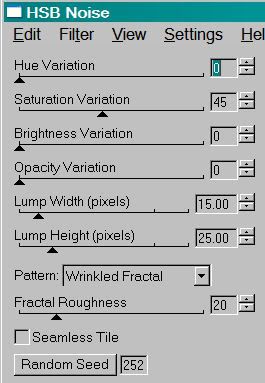
Find your "A" layer. Apply your Edge Texture mask. Delete mask layer, answer "yes" to the pop-up question and merge group. Duplicate this layer.
Find your "B" layer. Apply your Edge Texture mask again. Delete mask layer, answer "yes" to the pop-up question and merge group. Duplicate this layer.
Find your "C" layer. Apply your Edge Texture mask one last time. Delete mask layer, answer "yes" to the pop-up question and merge group. Duplicate this layer.
Now! *chuckle*
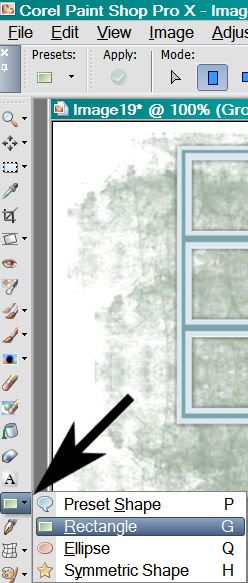
In your materials palette, close out the fill color and change the stroke color to something dark, so you can see it. Line width is 3.
Select Preset Shape > Rectangle
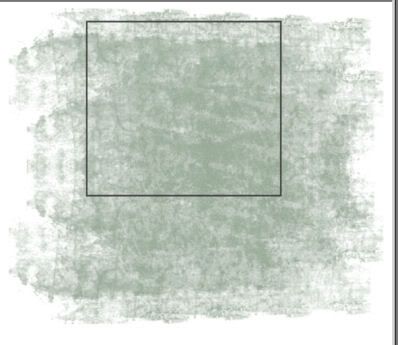
Draw a square around the window frame, as is depicted below:

Convert this to a raster layer. In your layer palette, drag this below the window and above the mask.
Resize your canvas to a size with which you are comfortable.
Add your copyright, license information if applicable, and taggers'/watermark.
If you choose not to animate, you're now done, and you can merge your layers and save!
A N I M A T I O N
Layers > View > None.
Open the bottom three layers. This should be your white background layer, your mask layer and the preset shape you created. It should look somewhat like so:
Edit > Copy Merged.
Open Animation Shop. Right-click on the desktop area and paste as a new animation.
Duplicate this frame until you have 3 frames. Move the slider at the bottom of this animation to the first frame.
Open your rain animation file from the supplies. We're going to be doing a bunch of tweaking to this file, because it is (A) too big and (B) not dark enough to show up against your background.
Edit > Select All.
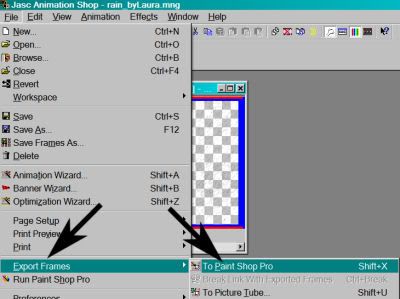
File > Export Frames > To Paint Shop Pro.
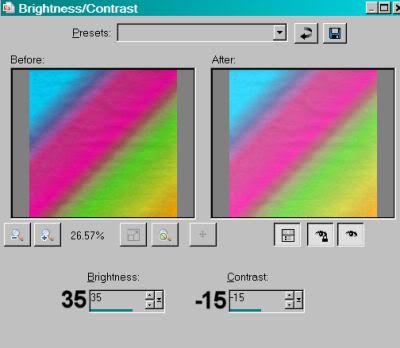
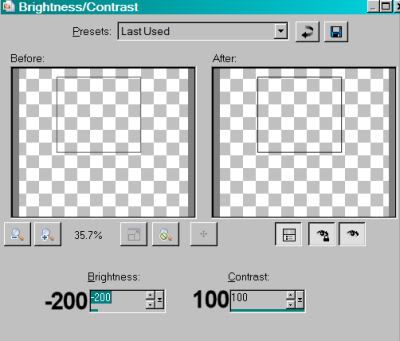
Go to PSP. We are going to adjust the brightness and contrast on all three layers. So, starting on the bottom layer, Adjust > Brightness and Contrast > Brightness/Contrast with the following settings:
Hit okay.
Highlight your middle layer, and apply the same brightness & contrast. Then your top layer. When done, click the "x" on the top right corner to close out the file. You will see the following:
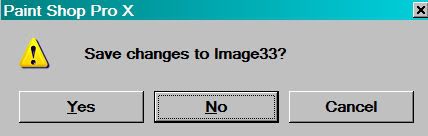
Answer "no."
Now, there is another question:

Answer "yes." Your frames are now back in Animation Shop, just darker than they were in the beginning.
Animation > Resize Animation
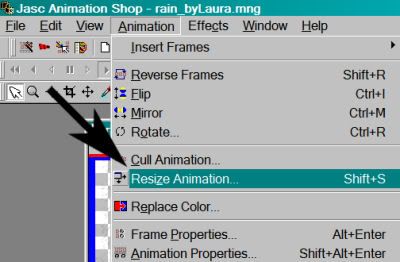
Set this to percentage, 45%.
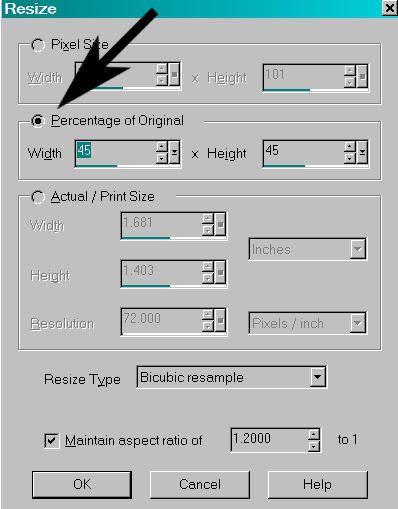
Hit okay.
Edit > Copy.
Back to the animation that we are building into your finished tag.
Edit > Select All. Edit > Paste > Into Selected Frame.
Hover your mouse until your rain file is centered in the square you created with your preset shape. Release your mouse button.
Now, go back to PSP.
Layers > View > All.
Close out the bottom three layers. This will be the white background, the mask and the preset shape layers.
Edit > Copy merged.
Back to Animation Shop. Right-click on the desktop area and paste as a new animation.
Duplicate this until you have three frames.
Edit > Select All. Edit > Copy.
Back to the tag we're building and Edit > Paste > Into Selected Frame.
Position your window so that it's right over the preset shape you made. Release your mouse button.
WHEW!! What a hassle, right??
View > Animation.
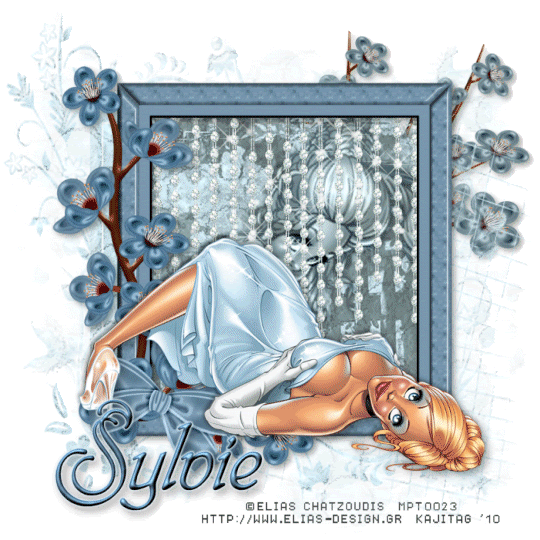
Save as a .gif file, and finally, we're done! I hope with all I've got that I explained this well enough! It's been a long time since I've made a tag this way. I do hope you're happy with your results. Thanks so much for trying my tut!
.