
This tutorial was written on March 22, 2010 using Paint Shop Pro, version X.03. It should be okay to do with other versions as well. I just find X.03 more comfortable for me. You may download a free trial of Paint Shop Pro, version X2, from Corel.
You will also need:
Animation Shop. This is now a pay-for product, through Corel. That changed a while ago. I don't know why!!
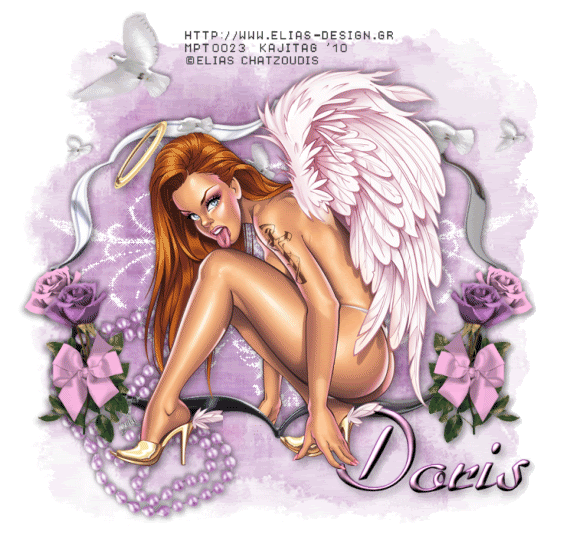
A tube of your choice. I'm using the fantastic artwork of Elias Chatzoudis. You must have a license to use his work. You can get that license and artwork from My PSP Tubes.
The scrap kit used was made by Doris of Scraps Dimensions. This is a FTU kit, called Sensitive Woman. Be sure to share the love with Doris for her beautiful freebies!!
Supplies: I've included the mask and the bling file used. They can be found here. The mask is by the wonderful-yet-missing Becky, and the bling was originally made by someone named Angel, I'm thinking, because that's on the files. I don't know who this particular Angel is, so cannot correctly credit her for this bling. If you know her, or you ARE her, please let me know so that I can do so!! I took 11 frames out of the beginning of this bling file. Just saying that so that you know this isn't EXACTLY the file made by Angel.
Filters: No outside filters are used in this tutorial.
Font: I used Dahrlin.
Okay, let's get started. Oh, just a warning: There will be some manipulation of the bling when it comes to the animation part of this tutorial. Nothing earth-shattering-ly hard to do or anything.
Open your mask in PSP and minimize. You could also file it in the PSP mask files on your computer for use at a later date. Open the bling file and put where it will be handy once you get to Animation Shop.
Open a new canvas, 750 x 700, white.
Open Frame 3. Resize 75%. Copy and paste as a new layer.
Open your tube and add it as a new layer. Resize, position, and drop shadow to your taste.
Highlight your frame layer. Grab your magic wand and click inside the frame.
Highlight your tube layer. Grab your eraser brush and erase any portion(s) of your tube that you don't want showing underneath or to the sides of the frame.
Selections > Select None.
Highlight the white background layer.
Open Paper 2. Resize to 750x700 pixels. Copy and paste as a new layer.
Apply your mask. Delete mask layer, answer "yes" to the pop-up question, and merge group.
Now, you could open, resize and use any of the elements if you wanted. Here's what I did:
Open Stone Necklace. Resize 35%. Copy and paste as a new layer. Rotate 23° left. Position in the left bottom corner area of the frame. Drop shadow.
Open Rose 4. Resize 25%. Copy and paste as a new layer. Position on the right bottom corner of the frame. See my example for placement reference, if you like. Drop shadow.
Open Rose 3. Resize 25%. Copy and paste as a new layer. Rotate 17° left. Position next to the first rose. Drop shadow.
Open Bow 5. Resize 15%. Copy and paste as a new layer. Position over the roses, as if it were holding them in a bunch. Drop shadow.
Merge down the two rose layers and the bow layer. Duplicate this layer and Image > Mirror.
Open "Nature Mix." Odd label. It's the doves. :) Resize 75%. Copy and paste as a new layer. I chose to Image > Mirror mine. You may not want to -- it's up to you. Position as you'd like them. In your layer palette, this should be dragged to just above the frame layer. Drop shadow.
Drop shadow your frame layer.
Go back to the top layer and add your name. I used color #febce3 as the fill, color #643566 as the stroke, stroke set on 1.5.
I added the following bevel:
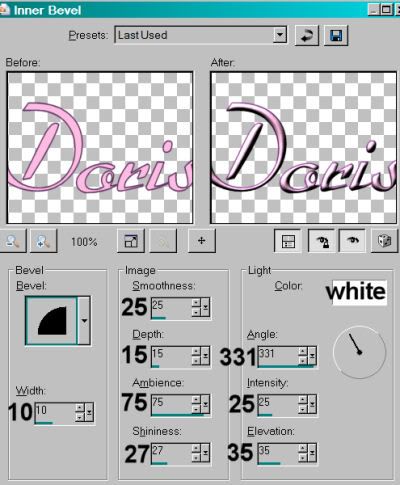
Hit okay.
Drop shadow your name.
Resize your canvas to a size with which you are comfortable.
Add your copyright, license information if applicable, and taggers'/watermark.
If you choose not to animate, you're now done, and you can merge your layers and save!
A N I M A T I O N
Layers > View > None.
Open the bottom two layers. This should be your white background layer and your mask layer.
Edit > Copy Merged.
Open Animation Shop. Right-click on the desktop area and paste as a new animation.
Duplicate this frame until you have 10 frames. Move the slider at the bottom of this animation to the first frame.
Open your bling file from the supplies.
Edit > Select All. Edit > Copy.
Before you do the next step, you may want to look at my example for placement reference of this bling.
Return to the animation that we are building and Edit > Paste > Into Selected Frame.
Your bling will be centered vertically. Hover your mouse and move the bling over so that the edge of the bling is on the outer left margin of the colored area of the mask layer. Release your mouse button.
Return to the bling file. Edit > Select All.
Animation > Mirror.
Edit > Copy.
Return to the animation we are building and Edit > Paste > Into Selected Frame.
Again, the bling is centered vertically. Move it so that the edge of the bling is on the outer right edge of the colored area of your mask layer, like we did last time. Release your mouse button.
Return to PSP.
Layers > View > All.
Close out the bottom two layers.
Edit > Copy Merged.
Return to Animation Shop, right-click on the desktop area and paste as a new animation.
Duplicate this layer, for a total of 10 layers.
Move the bottom slider to the first frame.
Edit > Select All. Edit > Copy.
Return to the animation we've built, with the bling file.
Edit > Select All. Edit > Paste > Into Selected Frame.
Hover your mouse until you have your new frames positioned where you like them. Release the mouse button.
View > Animation.
Save as a .gif file, and we're done! Thanks so much for trying my tut!
.


No comments:
Post a Comment