

This tutorial was written on March 4, 2010 using Paint Shop Pro, version X.03. It should be okay to do with other versions as well. I just find X.03 more comfortable for me. You may download a free trial of Paint Shop Pro, version X2, from Corel.
You will also need:
Animation Shop. This is now a pay-for product, through Corel. That changed a while ago. I don't know why!!
Five tubes of your choosing by the same artist. I used the great work of Dominic Marco. You must have a license to use his work. You can get that license at C.I.L.M.
The scrap kit is by Tina, of Tina's Magical Scrap World. This is a PTU kit, available through Exquisite Scraps, as well as Sophisti-Scraps and Just 4 Taggers. This kit is called I Love Music. Only $3.00 USD! It's a PACKED kit... I actually used just a few things from it. Beautiful!
The template used is by Missy, of Divine Intentionz. She's contributed a BUNCH of templates to our little world. Look in the left column, scroll down a few, and all her templates are linked there. You want number 183. Thanks, Missy!!
Supplies: Just the teeny-weeny little diamond file, which you can find here. I don't know who made this image, so cannot give proper credit. If you know from whence it came, let me know, and I'll make sure to put it here!! Thank you!!
Filters: Eye Candy 4000 > HSB Noise
Font: I used Tiamaria Script.
I remember when I did template-involved tuts (before I was writing them), they seemed so easy. This one took me a long time! So I'm not sure if it's easy to follow, but difficult to write, or what. Let's see where it takes us...
Open your diamond file in PSP and minimize.
Open your template.
Window > Duplicate. Close out the original template. Resize to 700x526 pixels.
Highlight the white background layer.
Image > Canvas Size as per the following:
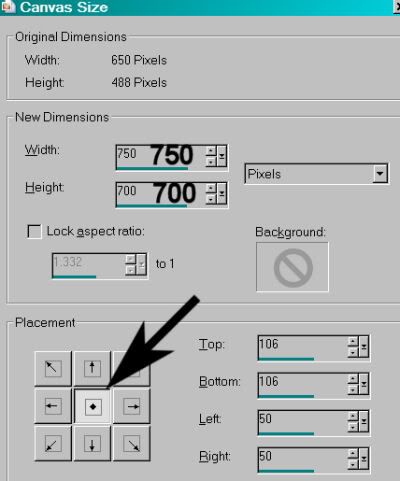
Hit okay.
Grab your flood fill tool, and fill in the background with white.
Add your tube. Resize and position to your liking. In the layer palette, drag this below the "bars" layer.
Duplicate your tube. Drag this layer ABOVE the "bars" layer.
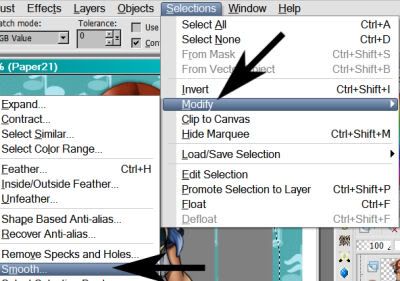
Highlight your "bars" layer. Grab your magic wand and click inside the bar on the bottom.
Selections > Modify > Expand by 1. Selections > Modify > Smooth:
With these settings:
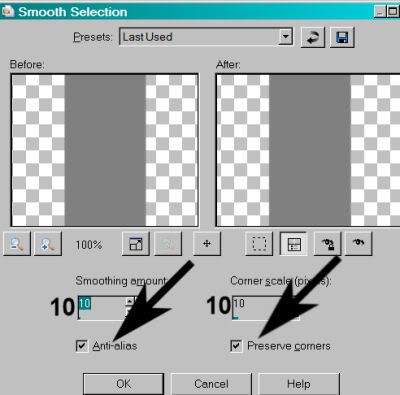
Hit okay.
Highlight your top tube layer. Hit delete. Selections > Select None.
Highlight your bottom tube layer. Drop shadow.
Now, to soften the bottom edge of your tube (if you're using a 3/4 tube as I have), grab your lasso tool, set on freehand. Set feather to 17. Draw a small smile with your freehand tool.
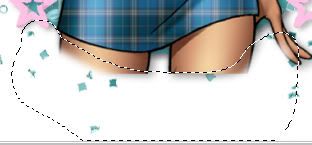
Hit delete until you have the effect you want (on BOTH tube layers). Selections > Select None.
Highlight again, the bars layer. Grab your magic wand and click inside one of the vertical bars in the layer. Selections > Modify > Expand by 1. Selections > Modify > Smooth, with the default settings.
Copy and paste another of your tubes. Position so that it shows in the bar you've selected.
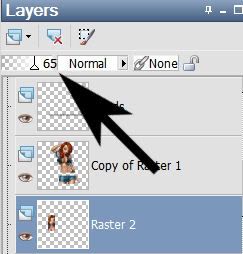
Selections > Invert. Hit delete. Selections > Select None. Change the opacity on this layer to 65:
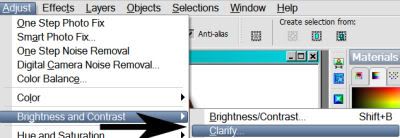
Adjust > Brightness and Contrast > Clarify:
With the following setting:
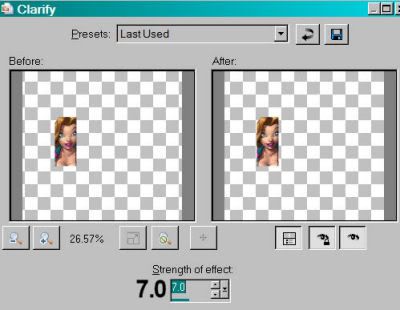
Hit okay.
Repeat the above steps for the remaining three vertical bars on the "bars" layer.
[PLEASE NOTE: The following steps (the choices of the papers) were based upon the tube *I* chose to be the main focus of the tag. You are most likely using a different tube. You can skew your tag to pink if you like, by using different choices of papers. This is just a guide!]
Highlight your "bars" layer again, and again, using your magic wand, click on the horizontal bar at the bottom. Selections > Modify > Expand by 1. Selections > Modify > Smooth with the default settings. Selections > Invert.
Open Paper33. Copy and paste as a new layer. Hit delete. Selections > Select None.
Drop shadow the bars layer.
Highlight the "music note" layer. (It's actually the treble clef.) Grab your magic wand, and click inside the treble clef. Selections > Modify > Expand by 1. Selections > Modify > Smooth with default settings. Selections > Invert.
Open Paper 7. Copy and paste as a new layer. Hit delete. Selections > Select None.
Delete the "music note" layer from the template. Drop shadow your paper treble clef.
Highlight the "circle" layer of the template. Grab your magic wand and click inside the circle. Selections > Modify > Expand by 1. Selections > Modify > Smooth with the default settings. Selections > Invert.
Open Paper21. Copy and paste as a new layer. Hit delete. Selections > Select None.
Delete the "circle" layer from the template. Drop shadow your paper circle.
Highlight the "stars" layer in the template. Grab your magic wand, and click OUTside the stars. Then click again in the middle of each star. Selections > Modify > Smooth with the default settings.
Open Paper5. Copy and paste as a new layer. Hit delete. Selections > Select None.
Delete your "stars" template layer. Drop shadow your paper stars.
Open MusicLoveChain2. Resize 50%. Copy and paste as a new layer. Position at the tip-top of the treble clef, as if it's hanging there. Drop shadow.
Open the diamond I supplied in the beginning. Resize 50%. Copy and paste as a new layer. Position at the tip-top (lol) of the MusichLoveChain2 element, as if it's holding it in place.
Open MusicNoteDoodle3. Copy and paste as a new layer. Rotate 25° left. Position in the bottom left corner of the canvas. In your layer palette, this should be below the circle layer. Drop shadow.
Open CrystalNote3. Copy and paste as a new layer. Rotate 20° right. Position where you'd like it. I have mine down below the circle layer, and in the right upper corner of the canvas. Drop shadow.
Open CrystalNote2. Copy and paste as a new layer. Rotate 20° left. Image > Mirror. Position as you'd like it, next to CrystalNote3. Drop shadow.
Open Glitter1 and Glitter2. Copy and paste them as you'd like them to be arranged. I have Glitter1 on the top right area of the canvas, and Glitter2 on the top left. Position them as you'd like. Duplicate them both. For each one, Image > Mirror. Image > Flip. Position these layers as you'd like. Now, merge all four layers down to one.
Go back to the top and add your name. I used color #0b4567 as the fill and #76c6c7 as the stroke, stroke set at 1.5.
I added the following bevel:
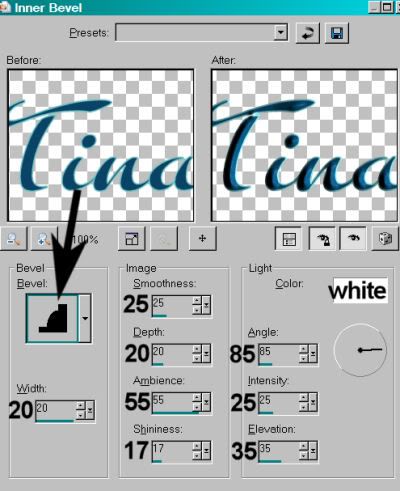
Hit okay.
Drop shadow your name. Arrange your name as you'd like it.
Resize your canvas to a size with which you are comfortable.
Add your copyright, license information if applicable, and taggers'/watermark.
If you choose not to animate, you're now done, and you can merge your layers and save!
A N I M A T I O N
Highlight your Glitter layer. Duplicate this layer twice, for a total of three Glitter layers.
Now highlight your bottom Glitter layer.
Effects > Plug-ins > Eye Candy 4000 > HSB Noise with the default settings, and hit okay.
Highlight the middle Glitter layer.
Add HSB Noise again, and click on the "Random Seed" tab.
Hit okay.
Highlight the top Glitter layer.
Add HSB Noise once more, again clicking "Random Seed."
Hit okay.
Close out your top two Glitter layers, leaving the bottom layer open.
Edit > Copy Merged.
Open Animation Shop. Right-click on the desktop area and paste as a new animation.
Return to PSP. Close out your bottom Glitter layer, and open the middle layer.
Edit > Copy merged.
Back to Animation Shop. Edit > Paste > After Current Frame.
Return again to PSP. Close out the middle layer, and open the top layer.
Edit > Copy merged.
Again, back to Animation Shop. Edit > Paste > After Current Frame.
Edit > Select All.
Right-click on the top bar of your animation, choose "Frame Properties," and change this number to 23.
View > Animation.
And there it is! This was much easier to type out than I thought it would be. If I've left anything out, PLEASE let me know!! LOL! I proof-read all of these things, but sometimes.... ya' never know! Have a great rest of your day!
.


No comments:
Post a Comment