
This tutorial was written on March 1, 2010 using Paint Shop Pro, version X.03. It should be okay to do with other versions as well. I just find X.03 more comfortable for me. You may download a free trial of Paint Shop Pro, version X2, from Corel.
You will also need:
Animation Shop. This is now a pay-for product, through Corel. That changed a while ago. I don't know why!!
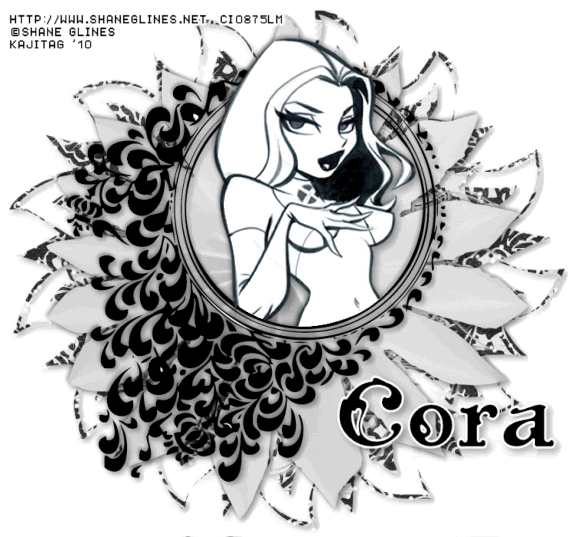
A tube of your choice. I chose to use artwork by Shane Glines. I fell in love with his art years ago, and don't find too many occasions where it fits, but here's one! You must have a license to use his art. That license may be purchased from C.I.L.M.
The scrap kit is by Cora, of Cora's Creations. This is a FTU kit, called Eclectic In Black & White. I jumped on this immediately when I found it, because I love black and white tags. But this one truly is eclectic, and my tag ended up the same, so I stole the name of the kit to label my tutorial! BTW, be sure to show Cora the love for the freebie!
Filters: Xenofex 2 > Constellation
Font: I used Cajalco.
Supplies: Just the mask, which you may find here. I have no clue who made this mask, so if you know who did, or if it's YOU, please let me know so that I may give credit where it's due! Thanks!
This is a pretty quick-n-easy tutorial, so let's get it done!
Open your mask in PSP and minimize. Alternatively, you could put it in your PSP masks file, for future use!
Open a new canvas, 750 x 700, white.
Open doodle-frame. Resize 44%. Copy and paste as a new layer.
Add your tube. Resize, position and drop shadow to your liking.
Highlight your frame layer. Grab your magic wand, and click inside the frame. Selections > Modify > Expand by 1. Selections > Invert.
Highlight your tube layer. Grab your eraser brush, and erase any part of your tube that you'd rather not be below the frame area.
Selections > Select None.
Open flower-01. Resize 27%. Copy and paste as a new layer. In your layer palette, drag this layer down below your tube layer. Drop shadow.
Highlight your white background layer.
Open pp-03. Resize to 750x700 pixels. Copy and paste as a new layer.
Apply your mask. Delete mask layer, answer "yes" to the pop-up question, and merge group.
Drop shadow your mask.
Go back to the top and add your name. I used black for the fill and white as the stroke, stroke set at 3.
Drop shadow your name.
Resize your canvas to a size with which you are comfortable.
Add your copyright, license information if applicable, and taggers'/watermark.
If you choose not to animate, you're now done, and you can merge your layers and save!
A N I M A T I O N
Highlight your mask layer. Duplicate this layer three times, for a total of four mask layers.
Now highlight your bottom mask layer.
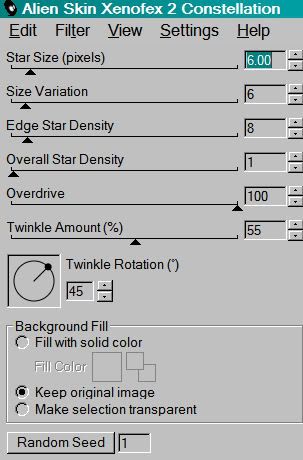
Effects > Plug-ins > Xenofex 2 > Constellation on the following setting:
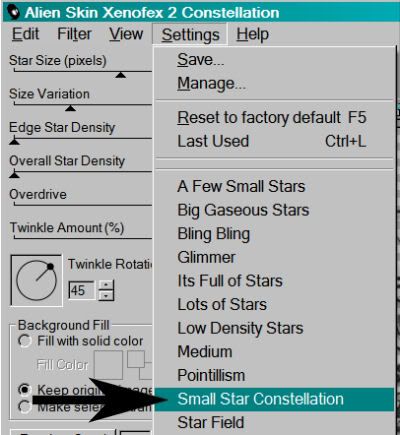
I believe these are the default settings for the above, but just in case they're not, here's the numbers:
Hit okay.
Highlight the next mask layer up.
Apply Constellation again, this time clicking on "Random Seed."
Hit okay.
Highlight the next mask layer up.
Apply Constellation once more, and click on "Random Seed" again.
Hit okay.
Highlight the top mask layer.
Apply Constellation the last time, clicking on "Random Seed."
Hit okay.
Close out your top three mask layers, leaving the bottom layer open.
Edit > Copy Merged.
Open Animation Shop. Right-click on the desktop area and paste as a new animation.
Return to PSP. Close out your bottom mask layer, and open the next layer up.
Edit > Copy merged.
Back to Animation Shop. Edit > Paste > After Current Frame.
Return again to PSP. Close out the mask layer just used, and open the next mask layer up.
Edit > Copy merged.
Again, back to Animation Shop. Edit > Paste > After Current Frame.
Once more, back to PSP. Close out the open mask layer and open the top mask layer.
Edit > Copy merged.
Finally, return to Animation Shop. Edit > Paste > After Current Frame.
Edit > Select All.
Right-click on the top bar of the animation, and select "Frame Properties." Change this number to 17.
View > Animation.
There you have it! A new, eclectic-looking black and white tag! Thanks for stopping by. I love that you like my tutorials!!
.


No comments:
Post a Comment