
This tutorial was written on March 24, 2010 using Paint Shop Pro, version X.03. It should be okay to do with other versions as well. I just find X.03 more comfortable for me. You may download a free trial of Paint Shop Pro, version X2, from Corel.
You will also need:
Animation Shop. This is now a pay-for product, through Corel. That changed a while ago. I don't know why!!
A tube or tubes of your choice. I'm once again using the great artwork of Elias Chatzoudis. You must have a license to use his work. You can get that license and his art through My PSP Tubes.
The scrap kit used is by Sylvie, of Fantasy Moments. This is a FTU kit, called Sounds of Sorrow. Be sure to leave your love and thanks to Sylvie for sharing her free to use artwork!!
Supplies: Two masks, which you can find here. One of the masks is by my ever-popular Essex Girl. Thank you, once again, for your contributions!! The other mask is by a person named Ivy. Now, I got this years ago from a now-defunct Yahoo! group she ran. I *have* found *an* Ivy online, but she appears to be "dealing" (for lack of a better term) in full-size, paper and digital scrapbooking, rather than tag-making. So I don't think it's the same Ivy. If anyone remembers the Ivy to which I'm referring, and knows where she's gone, please let me know!! Thank you!!
Filters: Alien Skin Xenofex 2 > Constellation
Font: I used Script-P720-Swashes.
Let us begin!
Open your masks in PSP and minimize. You could also file them in the PSP masks files on your computer for use at a later date.
Open a new canvas, 700 x 700, white.
Open Element-6. Resize 75%. Copy and paste as a new layer. This will be off-center, due to the flowers attached. Arrange on your canvas as you like it.
Open your main tube and add it as a new layer. Resize, position, and drop shadow to your taste.
Open Element-73. Resize 50%. Copy and paste as a new layer. Grab your pick tool...
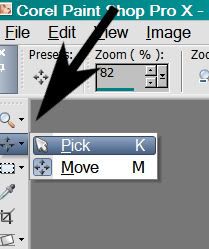
... and squeeze this element in by the sides, until it appears it will "fit" within the confines of your frame.
Drag this layer down below your frame layer.
Highlight your white background layer.
Open Paper-24. Copy and paste as a new layer.
Apply your ivy mask. Delete mask layer, answer "yes" to the pop-up question, and merge group. Resize this mask layer 60%. Make sure it fits behind your frame well.
Again, highlight your white background layer.
Open Paper-12. Copy and paste as a new layer.
Apply your other mask. Delete mask layer, answer "yes" to the pop-up question, and merge group.
Open your second tube. Resize and drop shadow to your liking. Position this tube so that it fits well within the frame. In your layer palette, drag this layer down below the Element-73 layer, but above your ivy mask layer.
Highlight your frame layer.
Grab your magic wand and click inside your frame. Selections > Modify > Expand by 20. Selections > Invert.
Highlight your second tube layer. Hit delete. Selections > Select None.
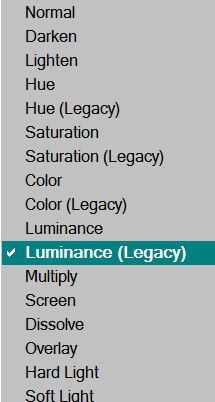
In your layer palette, change your opacity properties...
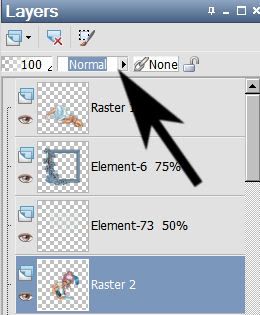
... to Luminance Legacy.
Open Element-3. Resize 75%. Copy and paste as a new layer. Position so that the flowers will show in the upper right area of your canvas, peeking out behind the frame. In your layer palette, drag this layer below both mask layers. Drop shadow.
Drop shadow your frame layer.
Go back to the top layer and add your name. I used color #e3f1f9 as the fill, color #7998af as the stroke, stroke set on 1.5.
I added the following bevel:
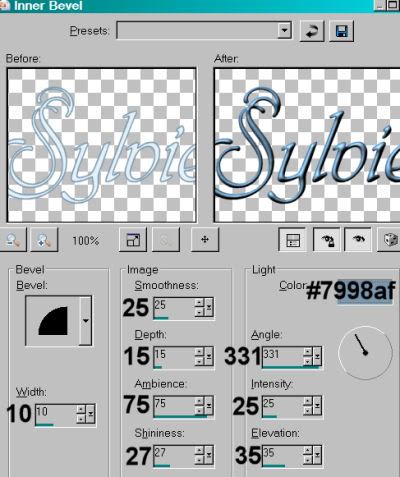
Hit okay.
Drop shadow your name.
Resize your canvas to a size with which you are comfortable.
Add your copyright, license information if applicable, and taggers'/watermark.
If you choose not to animate, you're now done, and you can merge your layers and save!
A N I M A T I O N
Highlight your Element-73 layer. Duplicate this layer three times, for a total of four Element-73 layers.
Highlight your bottom Element-73 layer.
Effects > Plug-ins > Alien Skin Xenofex 2 > Constellation set as so:
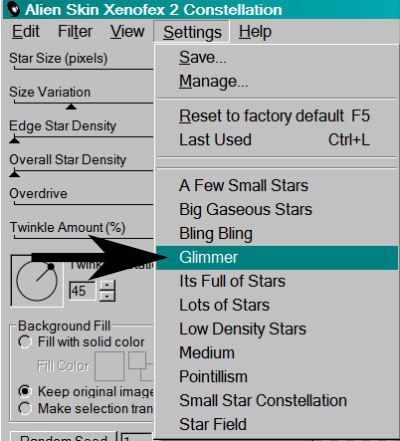
.. with these numbers:
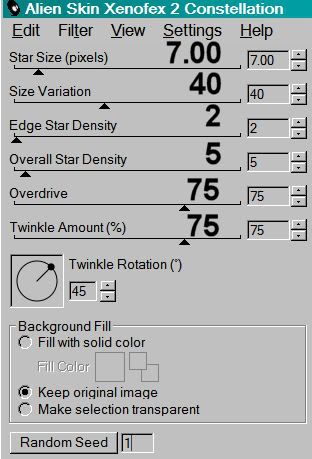
Hit okay.
Highlight your second Element-73 layer up. Apply Constellation again, this time hitting "Random Seed."
Hit okay.
Highlight your third Element-73 layer up. Apply Constellation once more, again, hitting "Random Seed."
Hit okay.
Highlight the top Element-73 layer. Apply Constellation one final time, again hitting "Random Seed."
Hit okay.
Close out the top three Element-73 layers.
Edit > Copy Merged.
Open Animation Shop, right-click on the desktop area, and paste as a new animation.
Return to PSP. Close out the bottom Element-73 layer and open the next layer up.
Edit > Copy Merged.
Back to Animation Shop.
Edit > Paste > After Current Frame.
Return again to PSP. Close out the previous Element-73 layer, and open the next layer up.
Edit > Copy Merged.
Return again to Animation Shop.
Edit > Paste > After Current Frame.
Return to PSP one last time. Close out the open Element-73 layer and open the top layer.
Edit > Copy Merged.
Back a final time to Animation Shop.
Edit > Paste > After Current Frame.
Edit > Select All.
Right-click on the top bar of your animation and choose "Frame Properties." Change this number to 23.
View > Animation.
Save as a .gif file, and we're done! I hope you like your results!! Thanks so much for trying my tut, and have a wonderful day!
.


No comments:
Post a Comment