
This tutorial was written on March 15, 2010 using Paint Shop Pro, version X.03. It should be okay to do with other versions as well. I just find X.03 more comfortable for me. You may download a free trial of Paint Shop Pro from Corel.
You will also need:
Animation Shop. This is now a pay-for product, through Corel. That changed a while ago. I don't know why!!
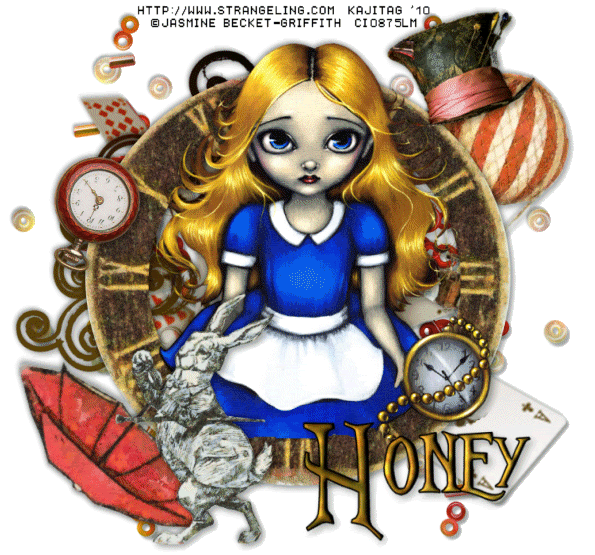
A tube of your choice. I'm using the wonderful artwork of Jasmine Becket-Griffith. You must have a license to use her art. You can get that license through C.I.L.M. She did a little mini-series of Alices a few years ago. I'm unsure from which packet these particular tubes came, though. There is also an Alice by Joel Adams. I'm sure there are others, but these are the ones that come to mind.
The scrap kit is by Miss Honey, of DigiScrapbooking.ch Boutique. This is a FTU kit, but available through this store. I don't understand it, but I found it and wanted to work with it right away! Hopefully, it will still be free when you get to it! The name of the kit is, easily enough, Alice in Wonderland. The place is all in French, so I'm unsure if there is a place to thank her. I wish I could!!
Supplies: No outside supplies needed for this tutorial!
Filters: Eye Candy 4000 > HSB Noise
Font: I used Nightmare Before Christmas.
My PSP crashed just as I was putting the labeling on my screen shots for this tut. So I lost the shot for the bevel -- I'm using the same bevel as I did in my previous tutorial, so I'm going to be using that screen shot. Also, I saved my finished product with frames and instructions intact prior to the crash, but that save seems to not have worked, so writing this tutorial is going to be quite a long and laborious task today. This is a full-sized kit, so EVERYTHING was resized. Please do bear with me! Thank you!!
Let's get started!
Open a new canvas, 750 x 700, white.
Open elem (2). Resize 22%. Copy and paste as a new layer.
Add your tube. Resize, position and drop shadow to your taste.
I found I didn't want to delete any of the tube that emerged from the bottom or sides of the tube I used. (Well, I *did* delete a bit of the watch fob.) If you want to tidy yours up on the bottom, then...
Highlight your frame layer. Grab your magic wand and click inside the frame.
Selections > Modify > Expand by 1. Selections > Invert.
Highlight your tube layer.
Grab your eraser brush and erase all the portions of your tube that you don't want showing under the frame or to the sides.
Selections > Select None.
Open elem (14). Resize 30%. Copy and paste as a new layer. Rotate 35° right. Position as you'd like it. I put mine to the left of the clock/frame, above center, and below the other layers in the palette. See my example for placement reference throughout this tutorial, if you wish. Drop shadow.
Open the element labeled simply "elem." This is the hot air balloon, just before your papers in the file. Resize 15%. Copy and paste as a new layer. Rotate 20° right. Position in the upper right corner of your canvas. In your layer palette, drag this below the tube layer, and above the other layers. Drop shadow.
Open elem (26). Resize 33%. Copy and paste as a new layer. Put this kinda-sorta in the bottom right quadrant of your canvas. Duplicate this layer. Image > Mirror. Merge these two layers down. Duplicate *that* layer. Image > Flip. Merge these two layers down. In your layer palette, drag this layer below all the other layers. Drop shadow.
Open elem (9). Resize 41%. Copy and paste as a new layer. Grab your pick tool, and stretch this layer out from the bottom right corner, until the ace of clubs is visible at the bottom right. In your layer palette, this should be just above all the nuts & bolts of the previous layer. Drop shadow.
Open elem (8). Resize 13%. Copy and paste as a new layer. Rotate 20° left. Position just above the hot air balloon, sorta like it's wearing the hat, ya' know? Drop shadow.
Open elem (4). Resize 17%. Copy and paste as a new layer. Rotate 135° left. Position in the bottom left area of your canvas. In your layer palette, this one can be on top. Drop shadow.
Open elem (13). Resize 15%. Copy and paste as a new layer. Position where you'd like it. I put mine just left of center, and in the layer palette, just above the umbrella. Drop shadow.
Open elem (25). Resize 20%. Copy and paste as a new layer. Position on the left, just above center, on the first element, the clock/frame. This one can be on top in the layer palette. Drop shadow.
Drop shadow your first layer, the frame.
Whew! I think I got it all right. Wasn't so bad on your end, was it? I just had to rebuild it all over again. Simple cut-n-paste, though.
Stay on the top layer and add your name. I used Paper 2 as the fill and black as the stroke, stroke set at 2.
Using Paper 2: Open Paper 2. Go to your Materials palette and choose "Pattern." Click on the pattern window and find Paper 2. Settings like so:
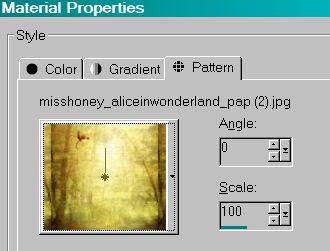
Hit okay.
I added the following bevel:
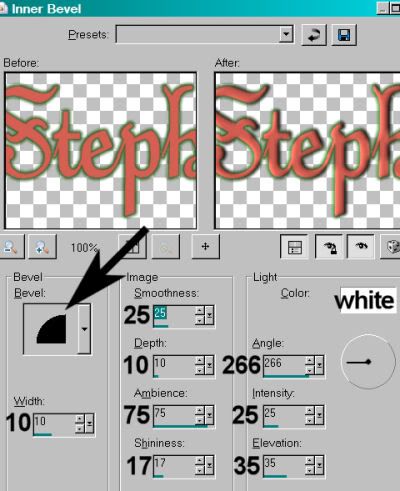
Hit okay.
Drop shadow your name. Arrange your name as you'd like it.
Resize your canvas to a size with which you are comfortable.
Add your copyright, license information if applicable, and taggers'/watermark.
If you choose not to animate, you're now done, and you can merge your layers and save!
A N I M A T I O N
Highlight your elem (26) layer. Duplicate this layer twice, for a total of three elem (26) layers.
Now highlight your bottom elem (26) layer.
Effects > Plug-ins > Eye Candy 4000 > HSB Noise using the default settings.
Hit okay.
Highlight the middle elem (26) layer.
Add HSB Noise again, and click on the "Random Seed" tab.
Hit okay.
Highlight the top elem (26) layer.
Add HSB Noise once more, again clicking "Random Seed."
Hit okay.
Close out your top two elem (26) layers, leaving the bottom layer open.
Edit > Copy Merged.
Open Animation Shop. Right-click on the desktop area and paste as a new animation.
Return to PSP. Close out your bottom elem (26) layer, and open the middle layer.
Edit > Copy merged.
Back to Animation Shop. Edit > Paste > After Current Frame.
Return again to PSP. Close out the middle layer, and open the top layer.
Edit > Copy merged.
Again, back to Animation Shop. Edit > Paste > After Current Frame.
Edit > Select All.
Right-click on the top bar of your animation, choose "Frame Properties," and change this number to 30.
View > Animation.
And, there ya' go! It really wasn't as bad as I'd thought it would be. I hope YOU liked it! Thank you so much for choosing to do one of my tuts!! I'd love a shout out if you're feeling like it!
.


No comments:
Post a Comment