
This tutorial was written on March 10, 2010 using Paint Shop Pro, version X.03. It should be okay to do with other versions as well. I just find X.03 more comfortable for me. You may download a free trial of Paint Shop Pro, version X2, from Corel.
You will also need:
Animation Shop. This is now a pay-for product, through Corel. That changed a while ago. I don't know why!!
Three tubes of your choice by the same artist. I am using the work of Elias Chatzoudis. You must have a license to use his work. You can get that license from My PSP Tubes.
The scrap kit is by Vabys, of Designs by Vabys. This is a FTU kit, called Rainbow Fling. Please be sure to leave a little love for the beautiful free kit!!
Supplies: Just the mask, which can be found here. This mask is by Ali, of Designs by Ali. Thank you again, Ali, for your great contributions to the PSP community!!
Filters: Eye Candy 4000 > HSB Noise
Font: I used Cantabile.
Let's get started!
Open your mask in PSP and minimize. Alternatively, you could file it in with the rest of your PSP masks, for use at a future date!
Open a new canvas, 800 x 700, white.
Open Frame 6. Copy and paste as a new layer.
Open your three tubes. Decide which one goes in which frame. Position, resize and drop shadow to your liking.
Highlight your frame layer. Grab your magic wand and click inside all three of the frames in the cluster.
Selections > Modify > Expand by 2. Selections > Invert.
Grab your eraser brush and erase all the portions of your tubes that you don't want showing under the frame or to the sides, going layer by layer, for all three tubes.
Selections > Select None.
Since this is a cluster frame, there may be portions of a tube within a frame where you don't want it. Highlight the frame layer. Again with your magic wand, click inside the frame in question. Selections > Modify > Expand by 2. Highlight the layer that contains the "offending" tube. Hit delete. Selections > Select None.
Highlight the white background layer.
Open Paper 7. Resize to 800x700 pixels. I wanted the colors to be a *bit* more muted, so I did the following:
Adjust > Brightness and Contrast > Brightness/Contrast with the following settings:
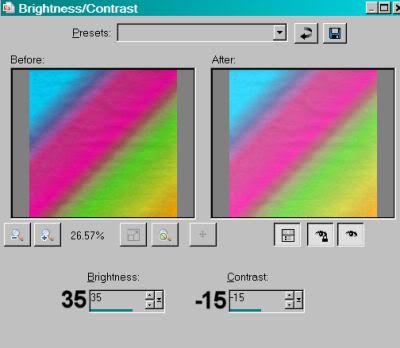
Hit okay.
Copy and paste Paper 7 as a new layer. TWICE!
Highlight your frame layer. Grab your magic wand and click inside all three frames. Selections > Modify > Expand by 10. Selections > Invert.
Highlight your top Paper 7 layer. Hit delete. Selections > Select None.
Highlight your bottom Paper 7 layer.
Apply your mask. Delete mask layer, answer "yes" to the pop-up question, and merge group.
Open Element 5. Copy and paste as a new layer. In your layer palette, this should be just above your mask layer. Rotate 45° left. Duplicate this layer. Image > Mirror. Duplicate that layer. Image > Flip. Arrange these three layers to your liking. Merge all three layers down. Drop shadow.
Open Element 45. Copy and paste as a new layer. In your layer palette, this should be just above the layer we just created with Element 5.
Open Element 51. Copy and paste as a new layer. (This should be just above the last layer you worked with.) I wanted the colors of this element in a different position than they were just like that, so I went Image > Mirror, Image >Flip. You might not want to do that. It's up to you. Drop shadow.
Open Element 8. Resize 50%. Copy and paste as a new layer. Rotate 30° right. Position in the bottom left corner of your canvas. Drop shadow.
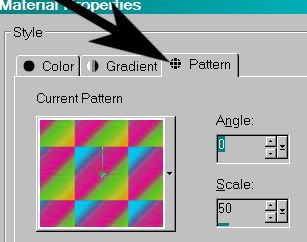
Go back to the top and add your name. I used Paper 7 as the fill and #fff674 as the stroke, stroke set at 3.
Using Paper 7: Open Paper 7. Go to your Materials palette and choose "Pattern." Click on the pattern window and find Paper 7. Settings like so:
I added the following bevel:
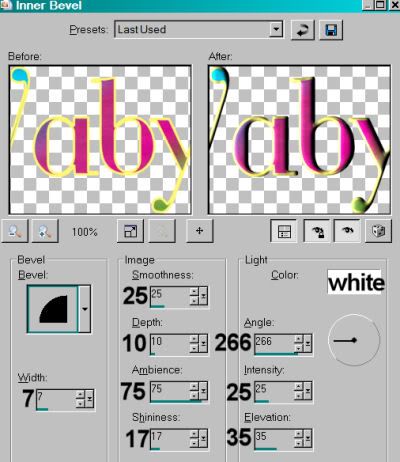
Hit okay.
Drop shadow your name. Arrange your name as you'd like it.
Resize your canvas to a size with which you are comfortable.
Add your copyright, license information if applicable, and taggers'/watermark.
If you choose not to animate, you're now done, and you can merge your layers and save!
A N I M A T I O N
Highlight your Element 45 (glitter) layer. Duplicate this layer twice, for a total of three glitter layers.
Now highlight your bottom glitter layer.
Effects > Plug-ins > Eye Candy 4000 > HSB Noise using the following setting:

and these numbers:
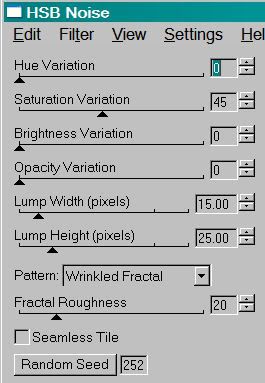
Hit okay.
[PLEASE NOTE: The settings I used on this tag create a VERY subtle animation. If you'd like more of a variation, change the numbers to whatever you like.]
Add HSB Noise again, and click on the "Random Seed" tab.
Hit okay.
Highlight the top glitter layer.
Add HSB Noise once more, again clicking "Random Seed."
Hit okay.
Close out your top two glitter layers, leaving the bottom layer open.
Edit > Copy Merged.
Open Animation Shop. Right-click on the desktop area and paste as a new animation.
Return to PSP. Close out your bottom glitter layer, and open the middle layer.
Edit > Copy merged.
Back to Animation Shop. Edit > Paste > After Current Frame.
Return again to PSP. Close out the middle layer, and open the top layer.
Edit > Copy merged.
Again, back to Animation Shop. Edit > Paste > After Current Frame.
Edit > Select All.
Right-click on the top bar of your animation, choose "Frame Properties," and change this number to 20.
View > Animation.
Et, voila! Another tag completed! Thank you for choosing one of my tuts! I appreciate your patronage. LOL! Have a great rest of your day!
.


No comments:
Post a Comment