skip to main |
skip to sidebar
...
 [Click image above to go to full sized image.]My tutorials presume that you have a working knowledge of Paint Shop Pro. This is just a guideline, and I know not everyone is going to be using the same tubes... so use your imagination as you go! Any similarities between this tut and any others you may see are purely coincidental.
This tutorial was written on June 18, 2010 using Paint Shop Pro, version X.03. It should be okay to do with other versions as well. I just find X.03 more comfortable for me. You may download a free trial of Paint Shop Pro, version X3, from Corel. The release of X3 is new to me, so hopefully Corel hasn't changed things up too much!!
You will also need:
Animation Shop. This is now a pay-for product, through Corel. That changed a while ago. I don't know why!!
A tube of your choice. I'm again using the pin up art of Jessica Dougherty. You must have a license to use her work. You can get that license and artwork from C.I.L.M. I tend to like these forward-leaning, coming-out-of-the-frame type tags. The tube used is a pretty specific posture again, so here is the tube I used! Hope that helps!
The scrap kit used is by the extremely talented Bel Vidotti, from Bel Vidotti Scraps. She put this great kit together a few months back, and it is available exclusively at Galeria Free. The kit is called Oh Lamour. This kit is full-sized, so there are multiple downloads. It's BEAUTIFUL, though, so I hope you don't mind the wait! Thanks, Bel!
Fact is, I d/l this kit and made this tag three months ago. I just went through and did it all again as a refresher course, so I could post the tut!
Supplies: Just the mask, which you can find here. It's another mask by the infamous Becky. Thanks, Becky, wherever you may be!
Filters: Eye Candy 4000 > Gradient Glow, dsb flux > Bright Noise
Font: I used Balmoral LET.
Okay, let us begin!
Open a new canvas, 800 x 700, white.
Open elemento 104. Resize 30%. Copy and paste as a new layer.
Add your tube. Resize, position and drop shadow to your liking.
If you'd like your tube to appear to be "comin' at ya'," here's what you do:
Highlight your frame layer. Grab your magic wand and click inside the frame.
Selections > Modify > Expand by 2. Selections > Invert
Highlight your tube layer. Grab your eraser brush and erase the parts you don't want showing in front of the frame. For my particular purposes, this just meant the heels on the shoes.
Selections > Select None.
Highlight your white background layer.
Open Paper13. Resize to 800 x 700. Copy and paste as a new layer.
Highlight your frame layer. Grab your magic wand and click inside again.
Selections > Modify > Expand by 10. Selections > Invert.
Highlight your paper layer. Hit delete. Selections > Select None.
Again, highlight your white background layer.
Open Paper14. Resize to 800 x 700. Copy and paste as a new layer.
Apply your mask. Delete mask layer, answer "yes" to the pop-up question, and merge group.
I always work on the top layer when arranging the background stuff, so I think it's easier if you now go back to the top layer.
Open elemento 108. Resize 35%. Copy and paste as a new layer. Image > Mirror. Position to the left side of the canvas. See my example for placement reference, if you like. Position above center.
Duplicate this layer. Image > Flip. Merge these two layers down.
Drag this layer down below your solid paper, but above the mask layer.
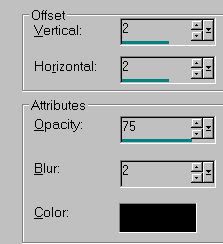
Apply a small, but dark drop shadow. I used the following:
Back again to the top for working purposes.
Open elemento 095. Resize 13%. Copy and paste as a new layer. Rotate 10° left. Position in the upper right area of your canvas. See my example for placement reference.
Duplicate this layer. Rotate 20° right. Drop shadow both of these layers.
Open elemento 085. Resize 20%. Copy and paste as a new layer. Bring this element up to the right corner of the canvas, so it looks good with the leaves. *chuckle* Drop shadow.
Open elemento 096. Resize 25%. Copy and paste as a new layer. Rotate 20° right. Position with the rest of the group, in the upper right of the canvas. Drop shadow.
You can merge all these layers down for ease of movement, if you like.
Drag these element layers down to below your solid paper layer, but above the doodle layer.
Drop shadow your frame layer.
Back to the top and add your name. I used color #f7f1ee for the fill, #fa7c78 for the stroke, stroke set on 1.5.
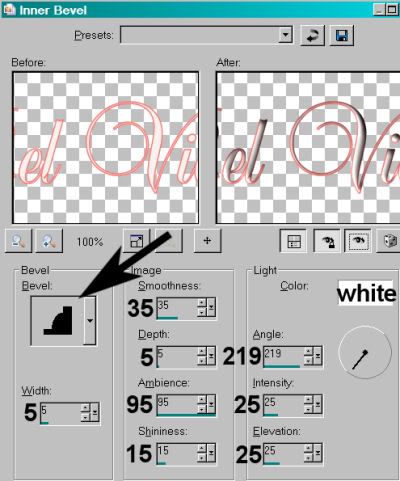
I added the following bevel:
Hit okay.
I then added a Gradient Glow of 5 - 25 - 100, color white.
Drop shadow your name to your liking.
Resize your canvas to a size with which you are comfortable.
Add your copyright, license information if applicable, and taggers'/watermark.
If you choose not to animate, you're now done, and you can merge your layers and save!
A N I M A T I O N
Highlight your doodle layer. Duplicate this layer twice, for a total of three doodle layers.
Highlight the bottom doodle layer.
Effects > Plug-ins > dsb flux > Bright Noise, with the following settings:
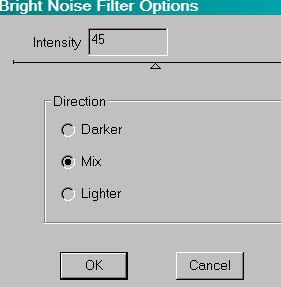
Hit okay.
Highlight your middle doodle layer.
Apply Bright Noise again, but change the number to 50.
Hit okay.
Highlight your top doodle layer.
Again apply Bright Noise, this time changing the number to 55.
Hit okay.
Close the top two doodle layers.
Edit > Copy Merged.
Open Animation Shop. Right-click on the desktop area and paste as a new animation.
Return to PSP.
Close your bottom layer and open the middle.
Edit > Copy Merged.
Go back to Animation Shop. Edit > Paste > After Current Frame.
Return again to PSP.
Close out the middle doodle layer, and open the top.
Edit > Copy Merged.
Again, back to Animation Shop. Edit > Paste > After Current Frame.
We are done!
Now, View > Animation.
If you like what you see, save as a .gif file, and we are, indeed, done! Thanks for stopping and trying this tut! Would love to see what you've made, if you want to share it, and I hope your weekend will be whatever you want it to be!
.
...
 [Click image above to go to full sized image.]My tutorials presume that you have a working knowledge of Paint Shop Pro. This is just a guideline, and I know not everyone is going to be using the same tubes... so use your imagination as you go! Any similarities between this tut and any others you may see are purely coincidental.
This tutorial was written on June 17, 2010 using Paint Shop Pro, version X.03. It should be okay to do with other versions as well. I just find X.03 more comfortable for me. You may download a free trial of Paint Shop Pro, version X3, from Corel. The release of X3 is new to me, so hopefully Corel hasn't changed things up too much!!
You will also need:
Animation Shop. This is now a pay-for product, through Corel. That changed a while ago. I don't know why!!
A tube of your choice. I'm using the great artwork of Jamie Kidd. You must have a license to use her work. You can get that license and artwork from C.I.L.M.
The scrap kit used is by Twinky, of Twinky Dezines, and is called Happiness. While waiting for download, be sure to give Twinky lots of love for her freebies!
Template is by Yvette, from Essence Of Creativity,, and can be found there if you scroll down a bit on the right column to where it says "downloads." We're using template 80. Thanks, Yvette!!
Filters: Alien Skin > Xenofex 2 > Constellation, Eye Candy 4000 > Gradient Glow
Font: I used 25.
There's really not much, supply-wise, to this tut. But I did a lot of fiddling with settings 'n' stuff. Okay, let's get started!
Open Template 80. Duplicate template and close the original. Delete the top layer -- the one with the credits.
Resize template, keeping aspect ratio, but making it 800 pixels wide -- all layers.
The order in which I accomplished this one may seem weird to some of you, but this is how I did it!
Open the tube that you're going to place in the square. Copy and paste as a new layer. Resize, position in the square and drop shadow to your taste.
Highlight the "square" layer in the template.
Open Paper4. Copy and paste as a new layer. Move this paper so it covers the entire square.
Highlight the square layer again.
Grab your magic wand and click OUTSIDE the square.
Highlight your tube layer. Hit delete.
Selections > Modify > Contract by 2.
Highlight the paper layer. Hit delete.
Selections > Select none.
Delete the square template layer.
Highlight your tube layer again.
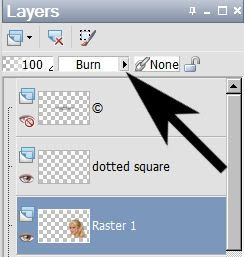
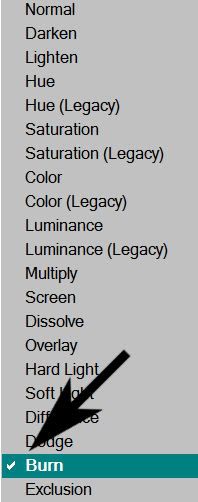
Change the blend mode on this layer to "Burn."
Drop shadow your square paper layer.
Highlight the dotted square layer of the template. Add a small, dark drop shadow. This is what I used:
Hit okay.
Highlight the rectangle layer in the template.
Open Paper3. Copy and paste as a new layer. You could either resize this layer wider, or choose your pick tool
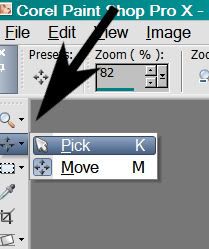
and widen it that way -- so that it covers the rectangle completely.
Highlight the rectangle layer again.
Grab your magic wand and click OUTSIDE the rectangle.
Selections > Modify > Contract by 2.
Highlight your Paper3 layer. Hit delete.
Selections > Select none.
Delete the template rectangle layer, and drop shadow your rectangle paper layer to your taste.
Open the other (fuller?) copy of your tube. Copy and paste as a new layer. Resize, position over the doodle, and drop shadow to your taste.
If you don't want this tube or its drop shadow to just be "sitting there," take these steps:
Grab your lasso tool, set on freehand, with feather set at 15. Draw a "smile" shape at the bottom of your tube.
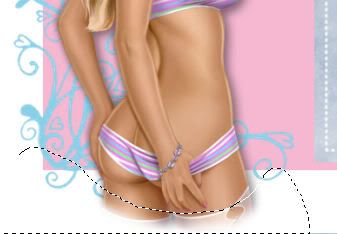
Hit delete.
Selections > Select none. There!
Highlight your doodle template layer.
Adjust > Hue and Saturation > Colorize, with the following settings:
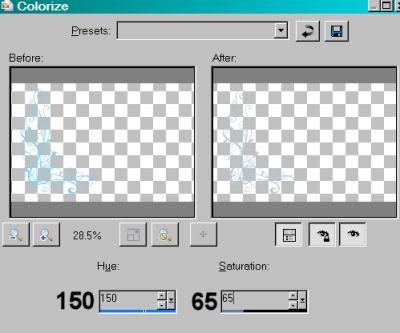
Hit okay.
Add the same small but dark drop shadow to the doodle as we did with the dots:
Hit okay.
You can choose to keep the text template layer or not. I just left it in.
In order to fit the name at the bottom, I moved my layers up a notch. Click on each layer, one at a time, and hit Ctrl + the up arrow. I left the tube on the left alone -- didn't move that layer up.
Go to the top layer and add your name. I used color #bdc9da for the fill and stroke, stroke set at 2. I drew this one out wider and squished it down a bit while it was still a vector layer. Wanted to make it look "right" in the tag. You may choose not to -- up to you!
I added a Gradient Glow of 5 - 25 - 100, color white.
Drop shadow your name like we did with the dots and the doodle.
Resize your canvas to a size with which you are comfortable. My larger size ended up 600 x 389.
Add your copyright, license information if applicable, and taggers'/watermark.
If you choose not to animate, you're now done, and you can merge your layers and save!
A N I M A T I O N
Highlight the dotted square layer. Duplicate this layer three times, for a total of four dot layers.
Highlight the bottom of the four layers.
Effects > Plug-ins > Alien Skin Xenofex 2 > Constellation, with the following setting:
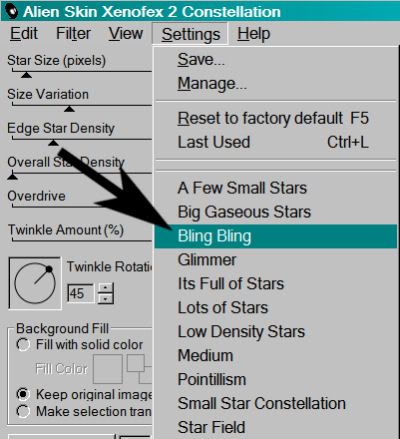
and the following numbers:
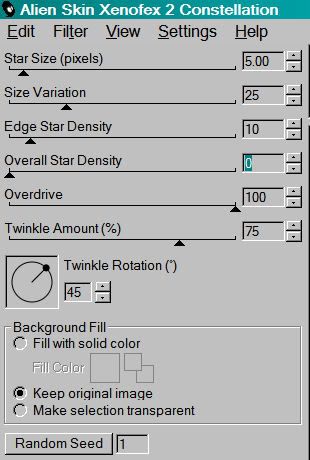
Hit okay.
Highlight the second layer up of your dot layers.
Apply Constellation again, but this time click on "Random Seed."
Hit okay.
Highlight the next layer up.
Again apply Constellation, again clicking on "Random Seed."
Hit okay.
Finally, highlight the top layer of the four.
Apply Constellation one last time, again hitting "Random Seed."
Hit okay.
Close the top three dot layers.
Edit > Copy Merged.
Open Animation Shop. Right-click on the desktop area and paste as a new animation.
Return to PSP.
Close your bottom layer and open the next layer up.
Edit > Copy Merged.
Go back to Animation Shop. Edit > Paste > After Current Frame.
Return again to PSP.
Close out the current layer, and open the next layer up.
Edit > Copy Merged.
Again, back to Animation Shop. Edit > Paste > After Current Frame.
One last time, back to PSP. Close out the open layer, and open the top layer.
Edit > Copy Merged>
Back to Animation Shop and Edit > Paste > After Current Frame.
We are done!
Now, View > Animation.
If you like what you see, save as a .gif file, and we're done! Thanks so much for trying out this tutorial! Would love to have some feedback, now that I'm in the groove again!! I hope you're having a spectacular day!
.
...
 [Click image above to go to full sized image.]My tutorials presume that you have a working knowledge of Paint Shop Pro. This is just a guideline, and I know not everyone is going to be using the same tubes... so use your imagination as you go! Any similarities between this tut and any others you may see are purely coincidental.
This tutorial was written on June 16, 2010 using Paint Shop Pro, version X.03. It should be okay to do with other versions as well. I just find X.03 more comfortable for me. You may download a free trial of Paint Shop Pro, version X3, from Corel. The release of X3 is new to me, so hopefully Corel hasn't changed things up too much!!
You will also need:
Animation Shop. This is now a pay-for product, through Corel. That changed a while ago. I don't know why!!
A tube of your choice. I understand that the one I'm using is quite specific, but there are a lot of candles included in this scrap kit, so you could put something together with a bit of imagination!! I'm using the great artwork of Martin Abel. You must have a license to use his work. You can get that license and artwork from C.I.L.M.
The animation in this tutorial relies upon the fact there are flames included in my choice of tube. For instance, the candles in this kit do not include flames. The tube does. You will need the flame to get the effect. If you wish to purchase this tube, you may find it here. Hope that helps!
The scrap kit used was made by "Peace" of Scrapin Designs. This is a FTU kit, called Colors of Martin Abel. As soon as I found this kit, I grabbed it. I've found Martin's tubes some of the most difficult around which to design. Be sure to leave some love for Peace, for making us this fantastic FTU kit!
Supplies: No outside supplies used in this tutorial!
Filters: I used a couple! Alien Skin Eye Candy5 > Impact > Extrude and Eye Candy 4000 > Fire
Font: I used Parisian.
Okay, here we go!
Open a new canvas, 700 x 700, white.
Open the element simply called, "element." If you're using a different tube, there are other elements of the same design, but in differing colors. Copy and paste as a new layer.
Adjust > Brightness and Contrast > Brightness/Contrast, with the following settings:
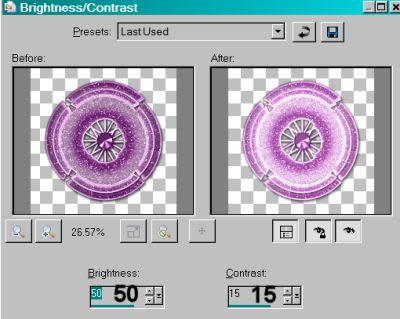
Hit okay.
Drop shadow this element.
Add your tube. Resize, position, and drop shadow to your taste.
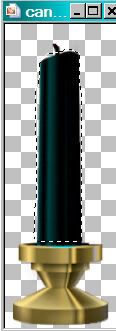
Open candle2. If you're using a different color scheme, there are other candles from which to choose. Resize 45%.
Grab your lasso tool, set on Point-to-Point, and draw a selection around just the body of the candle.
Adjust > Brightness and Contrast > Brightness/Contrast with the same settings as above.
Hit okay.
Now, Adjust > Hue and Saturation > Colorize, with the following settings:
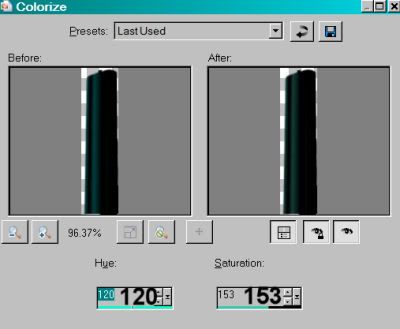
Hit okay.
Copy and paste as a new layer. Position this candle as you'd like it on your canvas. Drop shadow. Now, duplicate, or use others of differing colors if you like, and set them around.
Open bubble3. Resize 35%. Copy and paste as a new layer. Position where you'd like it. I gave the bubbles a small but dark drop shadow. Duplicate this layer and position where you'd like. I put three of this bubble around the canvas on differing levels and positions on the canvas.
Open bubble. Resize 35%. Copy and paste as a new layer. Use this in the same way as your other bubbles. Drop shadow, duplicate, and position where you'd like them.
Open boxes4. Resize 65%. Copy and paste as a new layer. Position on your canvas where you'd like them. Drop shadow.
This was easiest for me by going back to the top layer:
Open doodle. Resize 160%. Copy and paste as a new layer. Position so the part you want will be sticking out behind the first, round element we used. Duplicate this layer. Image > Mirror. Merge these two layers down. Drag this layer down to the bottom (just above the white layer). Drop shadow.
Back to the top and add your name.
I then extruded the name. This isn't necessary, but it was just something I wanted to try. Here are the steps:
Position your name where you'd like it.
Effects > Plug-ins > Alien Skin Eye Candy 5 > Impact > Extrude, with the following settings:
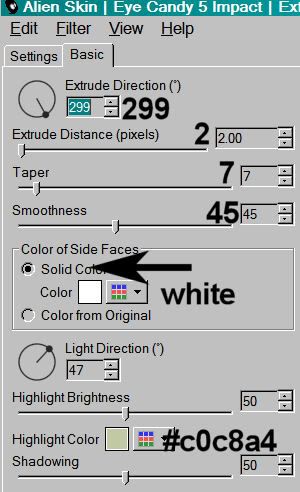
Hit okay.
Drop shadow your name.
Resize your canvas to a size with which you are comfortable.
Add your copyright, license information if applicable, and taggers'/watermark.
If you choose not to animate, you're now done, and you can merge your layers and save!
A N I M A T I O N
The following animation is possible only if you're using a tube with the flame drawn in. For example, the tube I used has flames on its candles. The candles in the kit do not. So if you have flames, let's animate them!
Highlight your tube layer. Zoom in close.
Grab your lasso tool, set on point-to-point, and draw a selection around each of the flames on your candles.
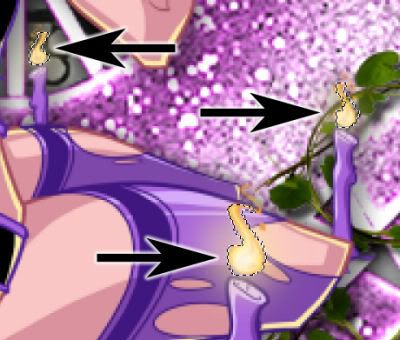
This screen shot only shows three of the four in the tube I used, but I did do this with all of them.
Hit okay.
Duplicate this layer three times, for a total of four tube layers.
Highlight the bottom of the four layers.
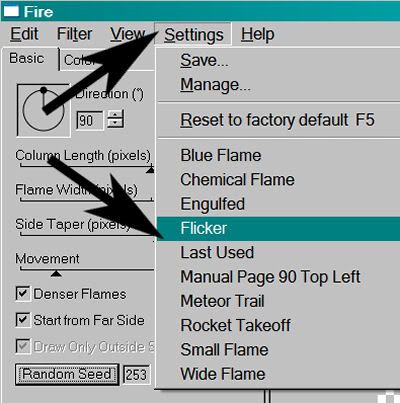
Effects > Plug-ins > Eye Candy 4000 > Fire, with the following settings:
Hit okay.
Highlight the second layer up of your group of four.
Apply Fire again, but this time, click on "Random Seed." You can watch the effect in the preview window as you click "Random Seed." So you can click it until you like what you see!
Hit okay.
Highlight the next layer up.
Again apply Fire, again clicking on "Random Seed."
Hit okay.
Finally, highlight the top layer of the four.
Apply Fire one last time, again hitting "Random Seed."
Selections > Select None.
Now, close the top three tube layers.
Edit > Copy Merged.
Open Animation Shop. Right-click on the desktop area and paste as a new animation.
Return to PSP.
Close your bottom layer and open the next layer up.
Edit > Copy Merged.
Go back to Animation Shop. Edit > Paste > After Current Frame.
Return again to PSP.
Close out the current layer, and open the next layer up.
Edit > Copy Merged.
Again, back to Animation Shop. Edit > Paste > After Current Frame.
One last time, back to PSP. Close out the open layer and open the top layer.
Edit > Copy Merged>
Back to Animation Shop and Edit > Paste > After Current Frame.
We are done!
Now, View > Animation.
If you like what you see, save as a .gif file, and we're done! Thanks so much for trying out this tutorial! Have a GREAT rest of your day!
.
...
 [Click image above to go to full sized image.]My tutorials presume that you have a working knowledge of Paint Shop Pro. This is just a guideline, and I know not everyone is going to be using the same tubes... so use your imagination as you go! Any similarities between this tut and any others you may see are purely coincidental.
This tutorial was written on June 15, 2010 using Paint Shop Pro, version X.03. It should be okay to do with other versions as well. I just find X.03 more comfortable for me. You may download a free trial of Paint Shop Pro, version X3, from Corel. The release of X3 is new to me, so hopefully Corel hasn't changed things up too much!!
You will also need:
Animation Shop. This is now a pay-for product, through Corel. That changed a while ago. I don't know why!!
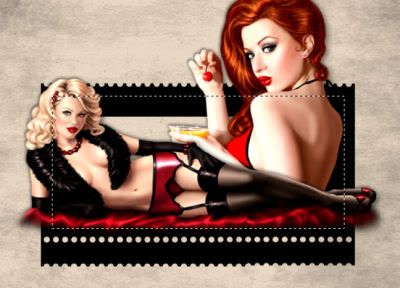
A tube (or two) of your choice. If you're going for the same "vibe," a laying-down posture would work best. I'm using the fantastic artwork of Jessica Dougherty. You must have a license to use her work. You can get that license and artwork from C.I.L.M.
The scrap kit used was made by Vabys of Designs by Vabys. This is a FTU kit, called Gold Rush. This kit is chock full of stuff! I only used a small amount of it! Be sure to leave some love for Vabys, for making us a great FTU kit!
Supplies: Just the mask, which can be found here. I do not know from whom I got this mask. I only know it's really handy! If you know who made this mask, or if it is YOU!, then let me know so that I can give you credit where it's due!!
Filters: Mura's Meister > Copies, dsb flux > Bright Noise
Font: I used ViceroyJF.
Okay, let's try this again!
Open a new canvas, 800 x 700, white.
Open frame (21). Copy and paste as a new layer. Move it down from center a bit.
Open your (first, laying down) tube and add it as a new layer. Resize, position, and drop shadow to your taste.
Highlight the white background layer.
Open paper (11). Resize to 800x700 pixels. Copy and paste as a new layer.
Apply your mask. Delete mask layer, answer "yes" to the pop-up question, and merge group.
I duplicated the mask layer twice, for a total of three mask layers. This is up to you. If you do the duplicates, merge your layers down.
Open element (65). Resize 50%. Copy and paste as a new layer.
Effects > Plug-Ins > Mura's Meister > Copies with the following settings:
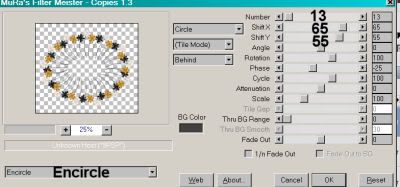
Hit okay.
Position this as you like it. I moved mine down and over to the left a bit. Totally up to you! Drag this layer below your frame layer, but above your mask layer. Drop shadow.
Add your second tube here, if you're using one. This layer should be below the first tube layer, but above the frame layer. Resize, position and drop shadow to your liking.
Open paper (15). Copy and paste as a new layer. Drag this layer below the frame layer, but above your circle of flowers layer.
Grab your selection tool, set on rectangle, and draw a selection around the outside of the frame. Like so, if you can see it. It's kinda hidden here. :)
Selections > Invert.
Make sure you're on the paper (15) layer you just added. Hit delete.
Selections > Select None.
Drop shadow your frame layer.
Open element (40). Copy and paste as a new layer. This should be above your newer paper layer, and below the frame layer. Give this a small drop shadow. Lower the opacity of this layer to 65.

Go back to the top layer.
Open element (54). Resize 65%. Copy and paste as a new layer. Position as you would like it. Drop shadow.
Back again to the top layer, and add your name. I used color #f6c112 as the fill, black as the stroke. Stroke set at 2.
I added the following bevel:
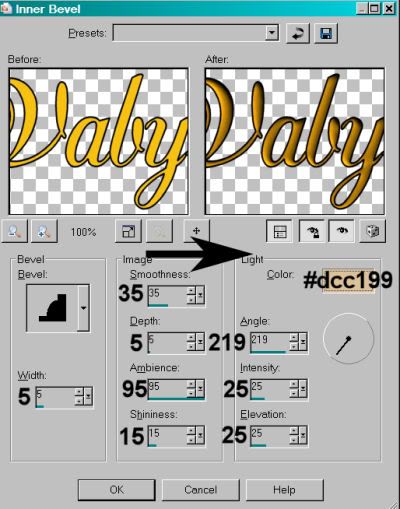
Hit okay.
Drop shadow your name.
Resize your canvas to a size with which you are comfortable.
Add your copyright, license information if applicable, and taggers'/watermark.
If you choose not to animate, you're now done, and you can merge your layers and save!
A N I M A T I O N
I started this out intending to just animate the wire heart element. When I had it all done, it was barely visible. So I went back and animated the flower oval afterward. So both those layers are animated in my example. You may choose to do that, or not. I am including all the steps for both. You don't have to do it if you don't want to. :)
Highlight your element (40) layer. Duplicate this layer three times, for a total of four element (40) layers.
Now, highlight your element (65) layer. Duplicate *this* layer three times, for a total of four element (65) layers.
Go to the bottom layer of one of those groups of four.
Effects > Plug-ins > dsb flux > Bright Noise, with the following settings:
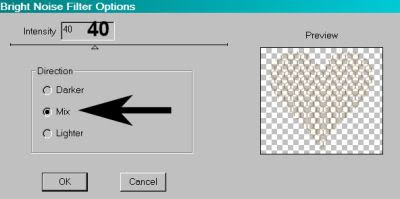
Hit okay.
Apply this plug-in to the bottom layer of your other element grouping, as well. Hope I'm saying this well enough for you to follow!!
Go to the second layer up of your group of four. Apply Bright Noise again, this time with the setting at 45.
Hit okay, then go to your second grouping of four and apply this effect to the second layer up in that group.
Now, go to the third layer up in that same group.
Apply Bright Noise again, this time with the setting on 50.
Hit okay, and go back to your other grouping of four layers, highlight the third layer up and apply the effect the same way.
Finally, now open the top layer of that grouping. Apply Bright Noise again, this time with the setting on 55.
Hit okay. Find your other group of four layers, and highlight the top layer. Apply Bright Noise with the setting on 55.
Whew!
Now, close the top three layers in both groups of four.
Edit > Copy Merged.
Open Animation Shop. Right-click on the desktop area and paste as a new animation.
Return to PSP.
Close your bottom layers and open the next layers up in each group of four.
Edit > Copy Merged.
Go back to Animation Shop. Edit > Paste > After Current Frame.
Return again to PSP.
Close out the current layers, and open the next layers up, in both groups.
Edit > Copy Merged.
Again, back to Animation Shop. Edit > Paste > After Current Frame.
One last time, back to PSP. Close out the open layers and open the top layers in each group of four.
Edit > Copy Merged>
Back to Animation Shop and Edit > Paste > After Current Frame.
We are done!
Now, View > Animation.
I hope you like what you see (and I hope I explained that well enough)!! If so, save as a .gif file, and we're done! Thanks so much sticking with it!!
.
.
As you can see, I've changed my look. I actually put together a tag the other day. I don't have it all written up as a tutorial yet, but it's coming.
I have to tell you, it's been so long that I have allowed myself to FORGET how to do stuff! I feel so awkward, just trying to put stuff together. That's just WRONG! I need to get back into this. I need my mojo to come home.
Let's hope it happens! I want to thank all of y'all who've still been coming back. I need to apologize to you, too, though. I've been gone THREE months! What's up wit dat??
Until next tut!!! Hang in there, I'm comin' 'round!!
P.S. As it turns out, the first tut is below this post. I started writing it on the 10th, so I guess Blogger goes with the original date! Thanks for stopping by!
kajira
.
...
 [Click image above to go to full sized image.]My tutorials presume that you have a working knowledge of Paint Shop Pro. This is just a guideline, and I know not everyone is going to be using the same tubes... so use your imagination as you go! Any similarities between this tut and any others you may see are purely coincidental.
This tutorial was written on June 14, 2010 using Paint Shop Pro, version X.03. It should be okay to do with other versions as well. I just find X.03 more comfortable for me. You may download a free trial of Paint Shop Pro, version X3, from Corel. The release of X3 is new to me at this time, so hopefully Corel hasn't changed things up too much!!
You will also need:
Animation Shop. This is now a pay-for product, through Corel. That changed a while ago. I don't know why!!
A tube of your choice. I'm using the fantastic artwork of Jennifer Janesko. You must have a license to use her work. You can get that license and artwork from C.I.L.M.
The scrap kit used was made by Tina of Tina's Magical World. This is a FTU kit, called Eleganzia. This is the 10th kit down on this post. Tina created this to answer a challenge from Creative Misfits. Be sure to share the love with Tina for this great black & white freebie!! Snag some of the others if the mood strikes you! Thanks to Missy and Yvette for making the challenge!
Supplies: Just the mask, which can be found here. The mask is by the wonderful-yet-still-missing Becky!! Thanks go out to Becky for her fabulous contributions to the PSP cause!
Filters: No outside filters are used in this tutorial.
Font: I used KB ChopinScript.
Okay, let's see if I can still drive this thing! LOL! I started out reallllllly slow, because three months off made everything really foreign to me!
Open a new canvas, 700 x 700, white.
Open RopeFrame1. Resize 87%. Copy and paste as a new layer.
Open your tube and add it as a new layer. Resize, position, and drop shadow to your taste.
Highlight your frame layer. Grab your magic wand and click inside the frame. Make sure you get all the little nooks & crannies in this one!! Selections > Invert.
Highlight your tube layer. Grab your eraser brush and erase any portion(s) of your tube that you don't want showing underneath or to the sides of the frame.
Selections > Select None.
Highlight the white background layer.
Open Paper22. Copy and paste as a new layer.
Apply your mask. Delete mask layer, answer "yes" to the pop-up question, and merge group.
Now, you could open, resize and use any of the elements if you wanted. Here's what I did:
Open ElegantFlower1. Resize 70%. Copy and paste as a new layer. Position to the left side of the frame. See my example for placement reference. Drop shadow.
Open ElegantFlower2. Resize 75%. Copy and paste as a new layer. Rotate 10° left. Position to the left portion of the frame, on top of the previous flower. Drop shadow.
Open Flower1. Resize 65%. Rotate 20° right. Copy and paste as a new layer. Position on the right bottom corner of the frame. See my example for placement reference, if you like. Drop shadow.
Highlight your mask layer.
Open SeedBeads2. Copy and paste as a new layer. Position to the left center of the canvas. Drop shadow. Duplicate this layer. Image > Mirror. Merge these two layers down.
Open Doodle2. Copy and paste as a new layer. Rotate 35° left. Position above center. See my example for placement reference. Duplicate this layer. Image > Mirror. Merge these two layers down. Drop shadow. Duplicate *this* layer. Image > Flip. Merge those two layers down.
Drop shadow your frame layer.
Go back to the top layer and add your name. I used white as the fill, no stroke.
Drop shadow your name.
Resize your canvas to a size with which you are comfortable.
Add your copyright, license information if applicable, and taggers'/watermark.
If you choose not to animate, you're now done, and you can merge your layers and save!
A N I M A T I O N
On your name layer,
Grab your magic wand and carefully click inside the open areas on your name.
Duplicate your name layer twice, for a total of three name layers.
Highlight your bottom name layer.
Adjust > Add/Remove Noise > Add Noise with the following settings:
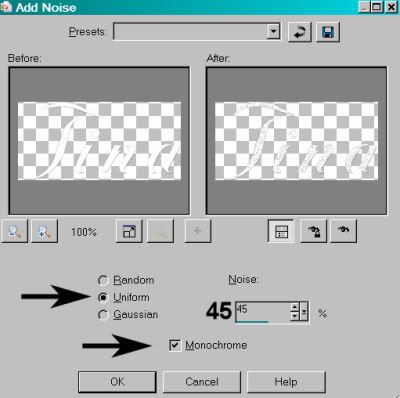
Hit okay.
Highlight your middle name layer.
Adjust > Add/Remove Noise > Add Noise, changing the setting to 48.
Hit okay.
Highlight your top name layer.
Adjust > Add/Remove Noise > Add Noise, this time changing your setting to 53.
Hit okay.
Selections > Select None.
Close out your top two name layers, leaving just the bottom name layer open.
Edit > Copy Merged.
Open Animation Shop. Right-click on the desktop area and paste as a new animation.
Return to PSP.
Close your bottom name layer and open the middle layer.
Edit > Copy Merged.
Go back to Animation Shop. Edit > Paste > After Current Frame.
Return again to PSP.
Close out your middle name layer, and open the top layer.
Edit > Copy Merged.
Once more, back to Animation Shop. Edit > Paste > After Current Frame.
View > Animation.
Save as a .gif file, and we're done! Thanks so much for trying my tut!
.


©kajira hill 2009
http://kajituts.blogspot.com


