
This tutorial was written on June 16, 2010 using Paint Shop Pro, version X.03. It should be okay to do with other versions as well. I just find X.03 more comfortable for me. You may download a free trial of Paint Shop Pro, version X3, from Corel. The release of X3 is new to me, so hopefully Corel hasn't changed things up too much!!
You will also need:
Animation Shop. This is now a pay-for product, through Corel. That changed a while ago. I don't know why!!
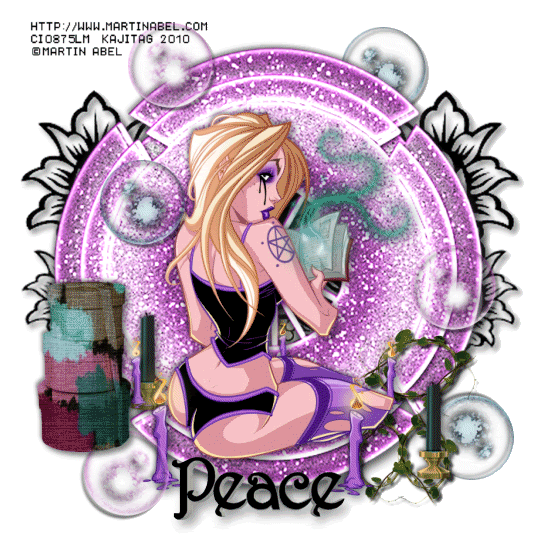
A tube of your choice. I understand that the one I'm using is quite specific, but there are a lot of candles included in this scrap kit, so you could put something together with a bit of imagination!! I'm using the great artwork of Martin Abel. You must have a license to use his work. You can get that license and artwork from C.I.L.M.
The animation in this tutorial relies upon the fact there are flames included in my choice of tube. For instance, the candles in this kit do not include flames. The tube does. You will need the flame to get the effect. If you wish to purchase this tube, you may find it here. Hope that helps!
The scrap kit used was made by "Peace" of Scrapin Designs. This is a FTU kit, called Colors of Martin Abel. As soon as I found this kit, I grabbed it. I've found Martin's tubes some of the most difficult around which to design. Be sure to leave some love for Peace, for making us this fantastic FTU kit!
Supplies: No outside supplies used in this tutorial!
Filters: I used a couple! Alien Skin Eye Candy5 > Impact > Extrude and Eye Candy 4000 > Fire
Font: I used Parisian.
Okay, here we go!
Open a new canvas, 700 x 700, white.
Open the element simply called, "element." If you're using a different tube, there are other elements of the same design, but in differing colors. Copy and paste as a new layer.
Adjust > Brightness and Contrast > Brightness/Contrast, with the following settings:
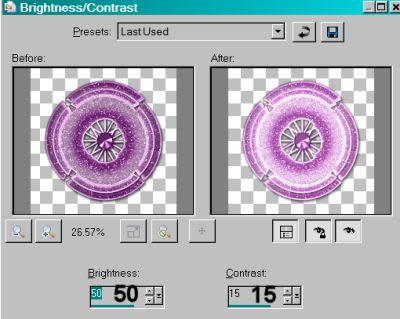
Hit okay.
Drop shadow this element.
Add your tube. Resize, position, and drop shadow to your taste.
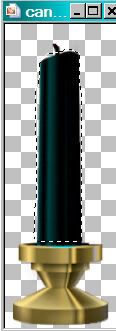
Open candle2. If you're using a different color scheme, there are other candles from which to choose. Resize 45%.
Grab your lasso tool, set on Point-to-Point, and draw a selection around just the body of the candle.
Adjust > Brightness and Contrast > Brightness/Contrast with the same settings as above.
Hit okay.
Now, Adjust > Hue and Saturation > Colorize, with the following settings:
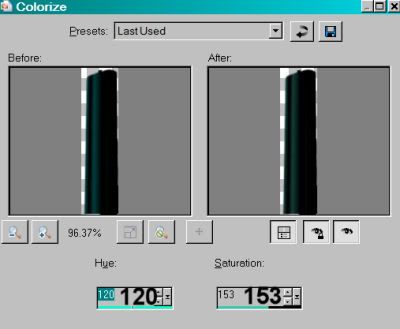
Hit okay.
Copy and paste as a new layer. Position this candle as you'd like it on your canvas. Drop shadow. Now, duplicate, or use others of differing colors if you like, and set them around.
Open bubble3. Resize 35%. Copy and paste as a new layer. Position where you'd like it. I gave the bubbles a small but dark drop shadow. Duplicate this layer and position where you'd like. I put three of this bubble around the canvas on differing levels and positions on the canvas.
Open bubble. Resize 35%. Copy and paste as a new layer. Use this in the same way as your other bubbles. Drop shadow, duplicate, and position where you'd like them.
Open boxes4. Resize 65%. Copy and paste as a new layer. Position on your canvas where you'd like them. Drop shadow.
This was easiest for me by going back to the top layer:
Open doodle. Resize 160%. Copy and paste as a new layer. Position so the part you want will be sticking out behind the first, round element we used. Duplicate this layer. Image > Mirror. Merge these two layers down. Drag this layer down to the bottom (just above the white layer). Drop shadow.
Back to the top and add your name.
I then extruded the name. This isn't necessary, but it was just something I wanted to try. Here are the steps:
Position your name where you'd like it.
Effects > Plug-ins > Alien Skin Eye Candy 5 > Impact > Extrude, with the following settings:
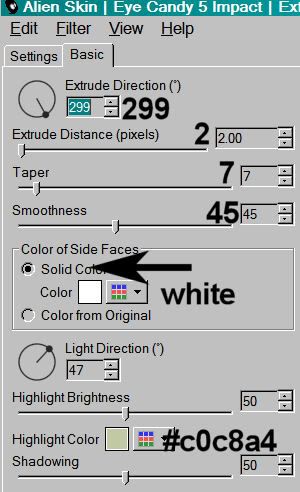
Hit okay.
Drop shadow your name.
Resize your canvas to a size with which you are comfortable.
Add your copyright, license information if applicable, and taggers'/watermark.
If you choose not to animate, you're now done, and you can merge your layers and save!
A N I M A T I O N
The following animation is possible only if you're using a tube with the flame drawn in. For example, the tube I used has flames on its candles. The candles in the kit do not. So if you have flames, let's animate them!
Highlight your tube layer. Zoom in close.
Grab your lasso tool, set on point-to-point, and draw a selection around each of the flames on your candles.
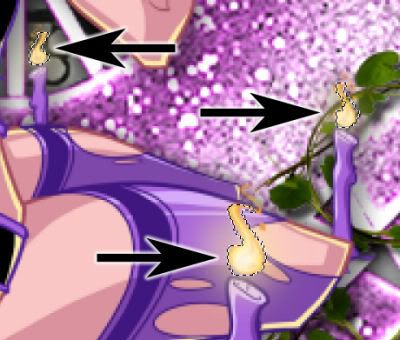
This screen shot only shows three of the four in the tube I used, but I did do this with all of them.
Hit okay.
Duplicate this layer three times, for a total of four tube layers.
Highlight the bottom of the four layers.
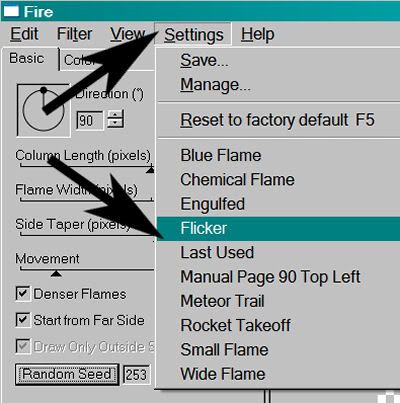
Effects > Plug-ins > Eye Candy 4000 > Fire, with the following settings:
Hit okay.
Highlight the second layer up of your group of four.
Apply Fire again, but this time, click on "Random Seed." You can watch the effect in the preview window as you click "Random Seed." So you can click it until you like what you see!
Hit okay.
Highlight the next layer up.
Again apply Fire, again clicking on "Random Seed."
Hit okay.
Finally, highlight the top layer of the four.
Apply Fire one last time, again hitting "Random Seed."
Selections > Select None.
Now, close the top three tube layers.
Edit > Copy Merged.
Open Animation Shop. Right-click on the desktop area and paste as a new animation.
Return to PSP.
Close your bottom layer and open the next layer up.
Edit > Copy Merged.
Go back to Animation Shop. Edit > Paste > After Current Frame.
Return again to PSP.
Close out the current layer, and open the next layer up.
Edit > Copy Merged.
Again, back to Animation Shop. Edit > Paste > After Current Frame.
One last time, back to PSP. Close out the open layer and open the top layer.
Edit > Copy Merged>
Back to Animation Shop and Edit > Paste > After Current Frame.
We are done!
Now, View > Animation.
If you like what you see, save as a .gif file, and we're done! Thanks so much for trying out this tutorial! Have a GREAT rest of your day!
.


No comments:
Post a Comment