
This tutorial was written on June 18, 2010 using Paint Shop Pro, version X.03. It should be okay to do with other versions as well. I just find X.03 more comfortable for me. You may download a free trial of Paint Shop Pro, version X3, from Corel. The release of X3 is new to me, so hopefully Corel hasn't changed things up too much!!
You will also need:
Animation Shop. This is now a pay-for product, through Corel. That changed a while ago. I don't know why!!
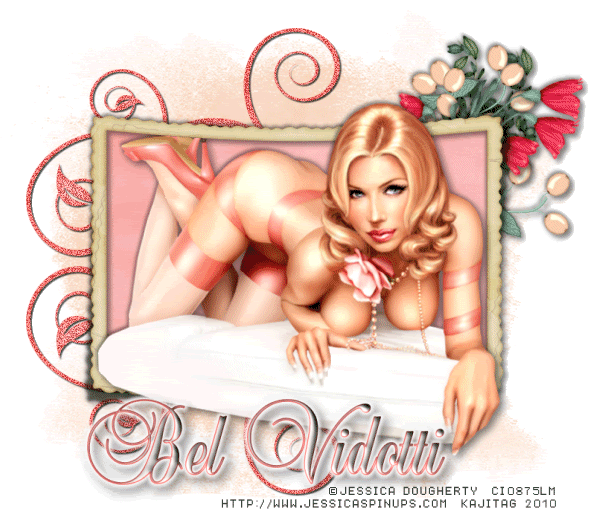
A tube of your choice. I'm again using the pin up art of Jessica Dougherty. You must have a license to use her work. You can get that license and artwork from C.I.L.M. I tend to like these forward-leaning, coming-out-of-the-frame type tags. The tube used is a pretty specific posture again, so here is the tube I used! Hope that helps!
The scrap kit used is by the extremely talented Bel Vidotti, from Bel Vidotti Scraps. She put this great kit together a few months back, and it is available exclusively at Galeria Free. The kit is called Oh Lamour. This kit is full-sized, so there are multiple downloads. It's BEAUTIFUL, though, so I hope you don't mind the wait! Thanks, Bel!
Fact is, I d/l this kit and made this tag three months ago. I just went through and did it all again as a refresher course, so I could post the tut!
Supplies: Just the mask, which you can find here. It's another mask by the infamous Becky. Thanks, Becky, wherever you may be!
Filters: Eye Candy 4000 > Gradient Glow, dsb flux > Bright Noise
Font: I used Balmoral LET.
Okay, let us begin!
Open a new canvas, 800 x 700, white.
Open elemento 104. Resize 30%. Copy and paste as a new layer.
Add your tube. Resize, position and drop shadow to your liking.
If you'd like your tube to appear to be "comin' at ya'," here's what you do:
Highlight your frame layer. Grab your magic wand and click inside the frame.
Selections > Modify > Expand by 2. Selections > Invert
Highlight your tube layer. Grab your eraser brush and erase the parts you don't want showing in front of the frame. For my particular purposes, this just meant the heels on the shoes.
Selections > Select None.
Highlight your white background layer.
Open Paper13. Resize to 800 x 700. Copy and paste as a new layer.
Highlight your frame layer. Grab your magic wand and click inside again.
Selections > Modify > Expand by 10. Selections > Invert.
Highlight your paper layer. Hit delete. Selections > Select None.
Again, highlight your white background layer.
Open Paper14. Resize to 800 x 700. Copy and paste as a new layer.
Apply your mask. Delete mask layer, answer "yes" to the pop-up question, and merge group.
I always work on the top layer when arranging the background stuff, so I think it's easier if you now go back to the top layer.
Open elemento 108. Resize 35%. Copy and paste as a new layer. Image > Mirror. Position to the left side of the canvas. See my example for placement reference, if you like. Position above center.
Duplicate this layer. Image > Flip. Merge these two layers down.
Drag this layer down below your solid paper, but above the mask layer.
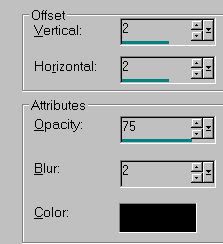
Apply a small, but dark drop shadow. I used the following:
Back again to the top for working purposes.
Open elemento 095. Resize 13%. Copy and paste as a new layer. Rotate 10° left. Position in the upper right area of your canvas. See my example for placement reference.
Duplicate this layer. Rotate 20° right. Drop shadow both of these layers.
Open elemento 085. Resize 20%. Copy and paste as a new layer. Bring this element up to the right corner of the canvas, so it looks good with the leaves. *chuckle* Drop shadow.
Open elemento 096. Resize 25%. Copy and paste as a new layer. Rotate 20° right. Position with the rest of the group, in the upper right of the canvas. Drop shadow.
You can merge all these layers down for ease of movement, if you like.
Drag these element layers down to below your solid paper layer, but above the doodle layer.
Drop shadow your frame layer.
Back to the top and add your name. I used color #f7f1ee for the fill, #fa7c78 for the stroke, stroke set on 1.5.
I added the following bevel:
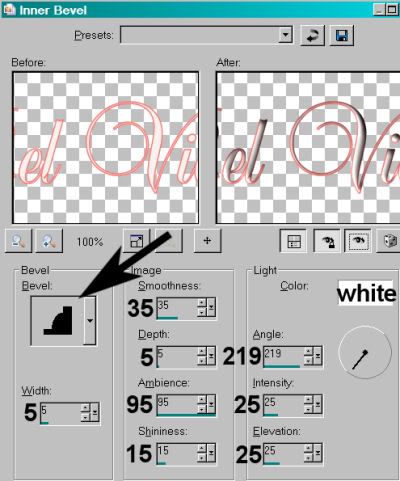
Hit okay.
I then added a Gradient Glow of 5 - 25 - 100, color white.
Drop shadow your name to your liking.
Resize your canvas to a size with which you are comfortable.
Add your copyright, license information if applicable, and taggers'/watermark.
If you choose not to animate, you're now done, and you can merge your layers and save!
A N I M A T I O N
Highlight your doodle layer. Duplicate this layer twice, for a total of three doodle layers.
Highlight the bottom doodle layer.
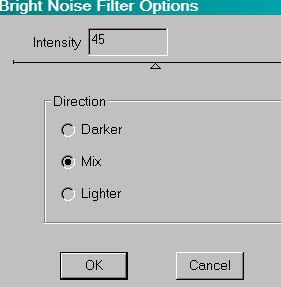
Effects > Plug-ins > dsb flux > Bright Noise, with the following settings:
Hit okay.
Highlight your middle doodle layer.
Apply Bright Noise again, but change the number to 50.
Hit okay.
Highlight your top doodle layer.
Again apply Bright Noise, this time changing the number to 55.
Hit okay.
Close the top two doodle layers.
Edit > Copy Merged.
Open Animation Shop. Right-click on the desktop area and paste as a new animation.
Return to PSP.
Close your bottom layer and open the middle.
Edit > Copy Merged.
Go back to Animation Shop. Edit > Paste > After Current Frame.
Return again to PSP.
Close out the middle doodle layer, and open the top.
Edit > Copy Merged.
Again, back to Animation Shop. Edit > Paste > After Current Frame.
We are done!
Now, View > Animation.
If you like what you see, save as a .gif file, and we are, indeed, done! Thanks for stopping and trying this tut! Would love to see what you've made, if you want to share it, and I hope your weekend will be whatever you want it to be!
.


No comments:
Post a Comment