skip to main |
skip to sidebar
.
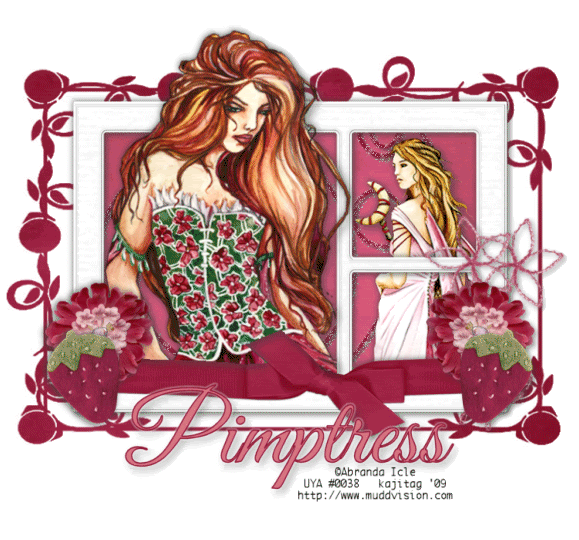 [Click image above to go to full sized image.]This tutorial was written on April 29, 2009, using Paint Shop Pro, version X.03. It should be okay to do with other versions as well. I just find X.03 more comfortable for me. You may download a free trial of Paint Shop Pro, version X2, from Corel. Any similarities between this tut and any others you may see are purely coincidental.
You will also need:
Animation Shop. This is from CNET, so it's a safe download.
A tube or two of your choice. I'm using the wonderful artwork of Abranda Icle. You must have a license to use her work. You may purchase that license at Up Your Art.
Scrap kit is by Cora, of Pimp'd DesignZ. It's a PTU kit, is available at Scrap Heaven Boutique in tagger size only, and at Paradise 4 Scrappers in both taggers' and scrappers' sizes. It's called Sweet Tart.
Filters: Alien Skin > Xenofex2 > Constellation
Font: I used Good Vibrations.
Supplies: The mask, by the ever-talented Butterfly Flutterby Creations. I just PAID ATTENTION to her TOU (unless that's new, and I hope it is), and therefore cannot supply this mask, but I CAN point you to her blog to download it from there. It's mask 39. You'll have to download numbers 30-40 to get it.
Okay! Let's do it!!
Open your mask in PSP and minimize. Alternatively, you could load it into your PSP masks file. This way, you'd have it to use later on....
Open a new image, 750 x 700, white.
Open frame01. Resize 75%. Copy and paste as a new layer.
Highlight your white background layer. Add a new raster layer.
Selections > Select all.
Open pp04. Copy and paste INTO SELECTION. Selections > Select none.
Highlight your frame layer. Grab your magic wand and click inside the three open areas of the frame. Selections > Modify > Expand by 7. Selections > Invert.
Highlight your pp04 layer. Hit delete. Selections > Select none.
Now, to change the paper a bit, Adjust > Brightness and Contrast > Brightness/Contrast with the following settings:
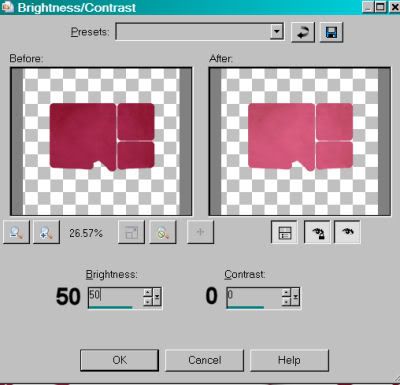
Hit okay.
Open your "secondary" tube, if you're using one. Copy and paste as a new layer. Drag this layer below the frame layer. Resize, position under the two smaller side sections of the frame and drop shadow.
Highlight the frame layer. Grab your magic wand and click inside the two smaller, side sections of the frame. Selections > Modify > Expand by 7. Selections > Invert.
Highlight your tube layer and hit delete. Selections > Select none.
Now open your "main" tube. Copy and paste as a new layer. Resize, position and drop shadow. This one, in the layer palette, is above the frame.
Highlight your frame layer once more. Grab the magic wand and click inside the main, larger section of the frame. Selections > Modify > Expand by 1. Selections > Invert.
Highlight your "main" tube layer. Grab your eraser brush and erase the portions of your tube that overlap the bottom area of the frame and ribbon.
Selections > Select none.
Open the twine. Resize 75%. Rotate right 90° all layers checked. Copy and paste as a new layer onto your canvas. In the layer palette, this should be below both tube layers, but above the pp04 layer.
Selections > Select all. Selections > Modify > Contract by 1.
Open pp04 again. Copy and paste as a new layer over the twine. Selections > Invert. Hit delete. Selections > Select none. Delete the original twine layer. Give your new layer a small drop shadow.
Open flower-03. Resize 35%. Copy and paste as a new layer. Position in the right lower corner area of your frame. See my tag for placement reference. Duplicate this layer. Image > Mirror. Merge these two layers down and drop shadow.
Open strawberry-sweet. Resize 35%. Copy and paste as a new layer. Position this over the flower in lower right area of the frame. See my tag for placement reference. Duplicate this layer and Image > Mirror. Put this strawberry into place with the left-side flower. Merge the two strawberry layers down and drop shadow.
Open flower-02. Resize 35%. Copy and paste as a new layer. Rotate 20° right. In the layer palette, drag this layer below the flower-03 layer. Duplicate this layer, and rotate back 20° left. I know, I know. lol. Arrange your flower-02 layers as you would like them behind the flower-03 and strawberry on the right side. Apply a small drop shadow to both. See my tag for placement reference.
Highlight the white background layer. Add a new raster layer. Selections > Select all.
Open pp04 for a last time. Copy and paste INTO SELECTION. Selections > Select none.
Apply your mask. Delete mask layer, answer "yes" to the pop-up question and merge group.
You'll need to move your mask layer up a teensy bit to make it appear centered.
Add your name. I used color #d97486 for the fill, and #901935 for the stroke, stroke set at 1.5. Drop shadow your name.
Add your copyright, license information if applicable, and taggers'/watermark.
Resize your tag to a size with which you're comfortable. At this point, you can just merge and save, if you choose not to animate!!
A N I M A T I O N
Highlight your twine layer. Duplicate this layer twice, for a total of three layers.
Still on the bottom twine layer...
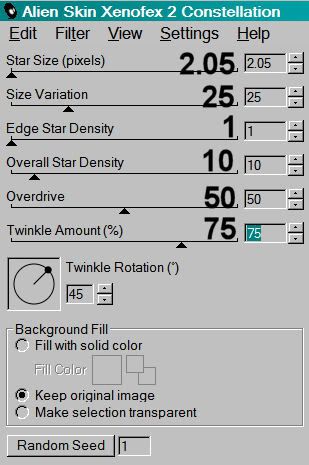
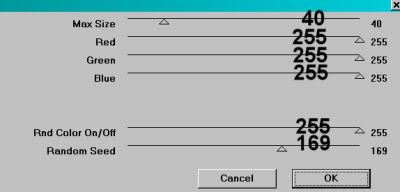
Effects > Plugins > Alien Skin > Xenofex 2 > Constellation with the following preset:
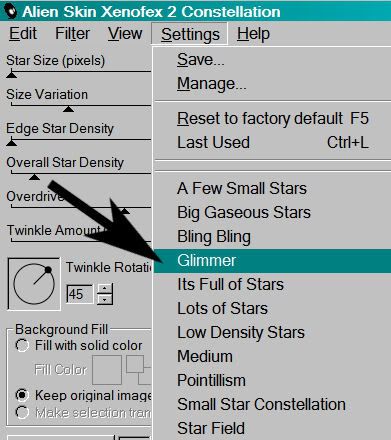
And the following settings:
Hit okay.
Highlight the middle twine layer. Again, apply Constellation, this time clicking on "Random Seed" button.
Hit okay.
Highlight the top twine layer. Apply Constellation again, clicking "Random Seed" once more.
Hit okay.
Close out the top two twine layers, leaving the bottom twine layer open.
Edit > Copy merged
Open Animation Shop, right-click on the desktop area, and paste as a new animation.
Return to PSP. Close out the bottom twine layer, and open the middle twine layer.
Edit > Copy merged.
Return to Animation Shop and Edit > Paste > After Current Frame.
Back to PSP. Close out the middle twine layer and open the top twine layer.
Edit > Copy merged.
And, back to Animation Shop. Edit > Paste > After Current Frame.
View > Animation. And we're done! I hope you've enjoyed this tutorial! Thanks for stopping by!
.
.
 [Click image above to go to full sized image.]This tutorial was written on April 27, 2009, using Paint Shop Pro, version X.03. It should be okay to do with other versions as well. I just find X.03 more comfortable for me. You may download a free trial of Paint Shop Pro, version X2, from Corel. Any similarities between this tut and any others you may see are purely coincidental.
[This tag was put together on Friday, April 24, 2009 and then for the weekend I was gone. So figuring it all out to post here will be a challenge, because for me, this is a bit of a "picky" one! I hope it all is understandable here, now that I'm posting it!]
You will also need:
Animation Shop. This is from CNET, so it's a safe download.
[GOOD NEWS!!! The previously-supplied animation of the purple butterfly, which I wrecked somehow and could not fix, and about which I apologized profusely here, HAS BEEN FIXED!! A marvelous, wonderful woman by the name of Joyce worked on it and worked on it, and got it perfected. I found the file in my e-mail this morning (04/28/2009), and it's the first thing I'm doing! The files have been fixed, and everything's beautiful!]
A tube your choice. I'm using the fun & beautiful artwork of Elias Chatzoudis. You must have a license to use his work. You may purchase that license at My PSP Tubes.
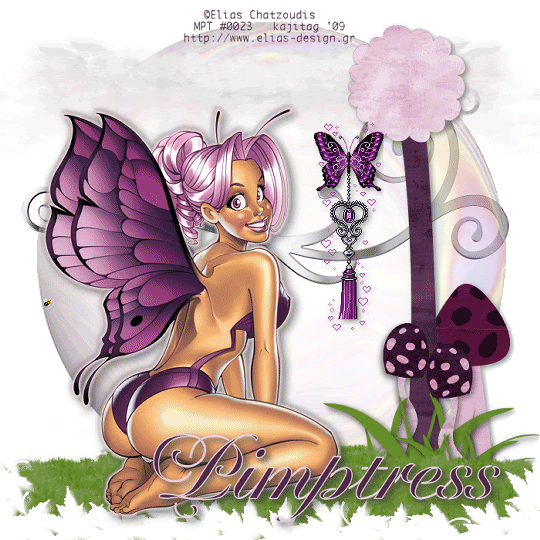
Scrap kit is by Pimptress. It's a PTU kit, is available *exclusively* at Scrap Heaven Boutique, and is called Fairy Purple. According to Pimptress, she was inspired to make this kit especially for the tube I've used, by Elias Chatzoudis!
Filters: No outside filters were used in this tut!
Font: I used Chateau
Supplies: I've included the mask, two animations and the grass image. I don't know where I got ANY of them! It's a crime! I didn't know when I started out about giving credit, etc. So if they're yours, let me know and I'll give you proper credit! You can get the file here.
Also, please, if you have problems with the download link for supplies, drop me a line via e-mail. Leaving a comment without a way for me to contact you back doesn't help. If you e-mail me, I'll send you the supplies.
Okay, let's begin...
Open your grass and your mask, and minimize in PSP. Alternatively, you can load your mask into your PSP masks folder for use at a later date. Put your animations where they'll be easily accessible when you're in Animation Shop.
Open a new image, 700 x 700, white.
I started with the tube. So, add your tube. Resize, position and drop shadow to your taste.
Open tree. Resize 75%. Copy and paste as a new layer. Drop shadow.
Open toadstool-02. Resize 50%. Copy and paste as a new layer. Drop shadow.
Open toadstool-01. Resize 30%. Copy and paste as a new layer. Drop shadow. Duplicate and arrange the toadstools as you'd like them to be.
Open grass-02. Copy and paste as a new layer. Resize 90%. Mirror. Arrange this at the base of the tree. Soft drop shadow. Duplicate this layer, resize and mirror as necessary to arrange at the base of the toadstools, as well. See my tag for placement reference, and to just see what I'm trying to say! lol!!
Open grass.pspimage from your supplies. We need to change the color of this grass.
Adjust > Brightness and Contrast > Brightness/Contrast with the following settings:
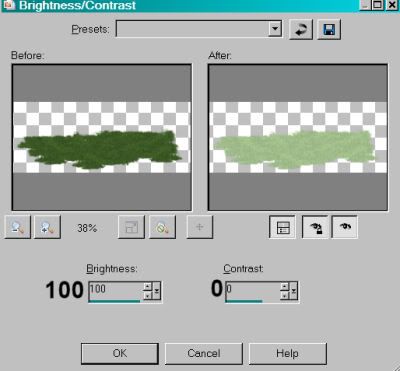
Hit okay.
Now,
Adjust > Hue and Saturation > Colorize with the following settings:
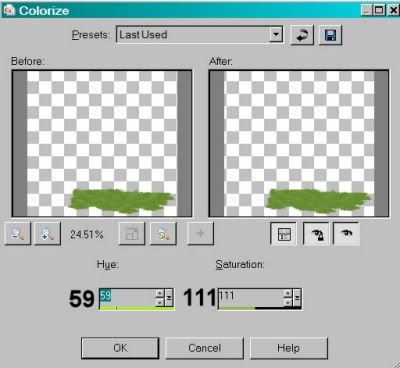
Hit okay.
Go back to Adjust > Brightness and Contrast > Brightness/Contrast, this time with the following settings:
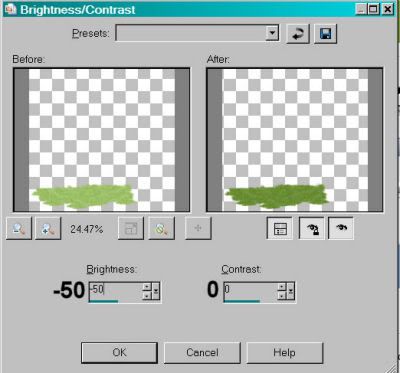
Hit okay.
Now, arrange this grass on the left hand side of your canvas, so that it extends past the side edge of your tag. Duplicate and Image > Mirror. Arrange this on the opposite side. Merge these layers down and duplicate that. Move that down on the tag. You're going to build the bottom of your tag with these layers of grass. When your grass looks good to you, merge all these grass layers down.
In your layer palette, this grass should be above the grass layers from the scrap kit. Move them all around until they are grouped as you'd like them, and so they're below the grass.pspimage base that you've just created. See my tag for placement reference, if you like.
Open bubble-01. Copy and paste as a new layer. In your layer palette, the bubble should be on the bottom, just above your white background.
Open swirl. Copy and paste as a new layer. Use your pick tool if necessary, to stretch it to your choice of size. In your layer palette, this should be below your bubble.
Open cloud. Copy and paste as a new layer. Place this toward the top of your canvas (see my tag for placement reference), to one side or the other. In your layer palette, this should be above the bubble. Duplicate and Image > Mirror. Merge these two layers down.
Highlight your grass.pspimage layer.
Apply your mask. This is tricky! BEFORE YOU DELETE YOUR MASK LAYER:
Duplicate your mask layer three times, for a total of four layers. Now, delete all four mask layers. Answer "yes" to the pop-up question all four times. Merge group.
Add your name. I used color #4f2c48 as the fill, the stroke is color #fe6d1de, stroke set at 1.5.
Drop shadow your name.
Add your copyright, license information if applicable, and taggers'/watermark.
I did not resize my tag before animating on this one. I was concerned with the size of the butterfly animation. So at this point, if you do NOT want to add the animations I included in supplies, you can merge your layers now, resize, save, and be done!!
A N I M A T I O N
Edit > Copy merged.
Open Animation Shop. Right-click on the desktop area and paste as a new animation.
Duplicate this frame until you have 14 frames. Bring the slider on the bottom of your tag to the first frame.
Open PplBflyJeweledTassle.gif. Edit > Select All.
Highlight the last frame of this animation and Edit > Paste > After Current Frame. Now you have 14 frames!
So now, Edit > Select All again.
Go to your original canvas and Edit > Select All. Edit > Paste > Into Selected Frame. Hover your mouse until you have your purple butterfly positioned as you like it, then release the mouse button. Again, SORRY for the white border!
Open abeillecouer2.gif.
Edit > Select All.
Return to the original canvas and Edit > Select All. Edit > Paste > Into Selected Frame. Position, and release your mouse button.
Right-click on the top bar of your animation and choose "Frame Properties." Change this number to 15.
Animation > Resize Animation to a size with which you're most comfortable.
View > Animation. And we're done! I hope you've enjoyed this tutorial! Thanks for stopping by!
.
.
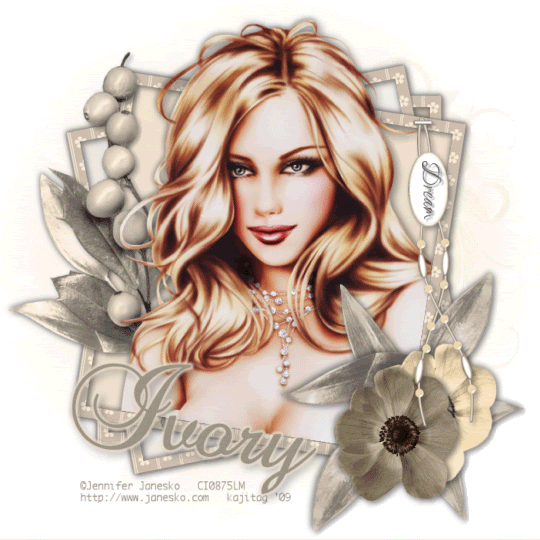 [Click image above to go to full sized image.]This tutorial was written on April 23, 2009, using Paint Shop Pro, version X.03. It should be okay to do with other versions as well. I just find X.03 more comfortable for me. You may download a free trial of Paint Shop Pro, version X2, from Corel. Any similarities between this tut and any others you may see are purely coincidental.
You will also need:
Animation Shop. This is from CNET, so it's a safe download.
[NOTE: There IS animation here, but it is SO subtle, it's almost not seeable, if that's a word. lol. So it would definitely be great to not animate, as well. Won't make that much difference. This is especially true if you're not using a tube with a beaded necklace.]
A tube your choice. I'm using the gorgeous artwork of Jennifer Janesko. You must have a license to use her work. You may purchase that license at CILM.
Scrap kit is by Ivory, of Ivorys Designz. It's a PTU kit, is available at Scrap Heaven Boutique, and is called Au Naturelle. I guess I'm in another one of my "soft pastels" kinda moods....
Filters: dsb Flux > Bright Noise & Eye Candy 4000 > Gradient Glow (for the name only)
Font: I used Brock Script
Supplies: The mask, which is again by Butterfly Flutterby, and the word art from where I do not know. Let me know if it's yours, and I'll give you proper credit! You can get these supplies
here.
Okay! Let's party... lol!!
Open your supplies in PSP and minimize. Alternatively, you could load your mask into your PSP masks file. This way, you'd have it to use later on....
Open a new image, 700 x 700, white.
Open paper14. Copy and paste as a new layer.
Open frame2. Copy and paste as a new layer.
Add your tube. Resize, position and drop shadow to your taste.
Highlight your frame layer. Grab your magic wand and click inside the main area of the frame. Also, click inside any of the other, much smaller areas of the frame that your tube may be overlapping. Selections > Modify > Expand by 1. Selections > Invert.
Highlight your tube layer. Grab your eraser brush and erase any of your tube that you don't want overlapping the frame areas you clicked. Selections > Select none.
Open paper5. Copy and paste as a new layer. Drag this layer below your frame layer.
Highlight your frame layer again. Click inside the main portion of the frame. Selections > Modify > Expand by 7. Selections > Invert.
Highlight the paper5 layer. Hit delete. Selections > Select none.
Now, highlight your frame layer again. Click inside the "next layer down" areas of the frame, if you get my drift. The top and bottom corners that appear to be layers of the frame below the main portion. Selections > Modify > Expand by 7. Selections > Invert.
Open another paper. I chose paper15. Copy and paste as a new layer. Drag this below your paper5 layer. Hit delete. Selections > Select none.
Again, highlight your frame layer. Now, click inside the areas of the bottom-looking layer of the frame. Selections > Modify > Expand by 7. Selections > Invert.
Open yet another paper. I chose paper4. Copy and paste as a new layer. Drag this layer down below your last paper layer. Hit delete. Selections > Select none.
Okay, we're done with that! lol! Drop shadow your frame.
Open fern3. Resize 75%. Copy and paste as a new layer. Image > Mirror. Drag this layer below your tube. Position to the left of your tube. See my tag for placement reference. Drop shadow.
Open berries2. Copy and paste as a new layer. Rotate left 45°. Drag this layer above your fern3 layer. Position to your liking. Drop shadow.
Open flower2. Resize 35%. Copy and paste as a new layer. Position as you like. I placed mine in the bottom right-hand corner area of the frame. See my tag for placement reference. Drop shadow.
Open flower1. Resize 35%. Copy and paste as a new layer. Position this next to your flower2 layer. Drop shadow.
Open fern2. Resize 75%. Copy and paste as a new layer. Drag this layer below your flower layers. Duplicate this layer. Image > Mirror. Image > Flip. Move so that this layer is clustered with the other fern and the flowers. Again, see my tag for placement reference. Merge these two layers down. Drop shadow.
Open beadstring2. Resize 75%. Copy and paste as a new layer. Position so the staple appears to be attached to the frame. See my tag for placement refrence. Drop shadow.
Now, this is where the word art I supplied comes in. I chose the word "Dream" from the saying on the top right. I know it's small. I used my lasso tool set on point-to-point and drew a selection carefully around the word "dream," then Edit > Copied and pasted onto the canvas of my tag. I then rotated right 90° and moved it so that it sat on the tag in the beadstring layer.
Adjust > Brightness and Contrast > Brightness/Contrast with settings at 100 and 0. Adjust > Hue and Saturation > Colorize with color #9a9083. Small drop shadow.
Highlight your first paper layer. I used paper14.
Apply your mask. Delete the mask layer, answer "yes" to the pop-up question, and merge group.
Add your name. I again used color #9a9083 for the fill AND the stroke, stroke set at 2. I then added Eye Candy 4000 > Gradient Glow with settings at 5 - 0 - 100, color #eee1ce and preset of "medium."
Drop shadow your name.
Add your copyright, license information if applicable, and taggers'/watermark.
If you want to animate, it's best if you do this next part before resizing your tag. At this point, you can just merge and save, if you choose not to animate!!
Highlight your tube layer. Take your magic wand, mode on Add(shift) and click verrrry carefully in each bead of the necklace. I found there was one particular bead that didn't work.
Duplicate your tube layer twice, for a total of three tube layers.
Still on the bottom tube layer...
Effects > Plugins > dsb Flux > Bright Noise, intensity set on 30. Click on "mix" once.
Hit okay.
Highlight the middle tube layer. Again, apply Bright Noise, this time clicking on "mix" twice.
Hit okay.
Highlight the top tube layer. Apply Bright Noise again, clicking "mix" three times.
Hit okay.
Close out the top two tube layers, leaving the bottom tube layer open.
Selections > Select none.
Resize your tag to a size with which you're most accustomed.
A N I M A T I O N
Edit > Copy merged
Open Animation Shop, right-click on the desktop area, and paste as a new animation.
Return to PSP. Close out the bottom tube layer, and open the middle tube layer.
Edit > Copy merged.
Return to Animation Shop and Edit > Paste > After Current Frame.
Back to PSP. Close out the middle tube layer and open the top tube layer.
Edit > Copy merged.
And, back to Animation Shop. Edit > Paste > After Current Frame.
View > Animation. Et, voila! We are done! I hope you've enjoyed this tutorial! Thanks for stopping by!
.
.
[Click image above to go to full sized image.]This tutorial was written on April 23, 2009, using Paint Shop Pro, version X.03. It should be okay to do with other versions as well. I just find X.03 more comfortable for me. You may download a free trial of Paint Shop Pro, version X2, from Corel. Any similarities between this tut and any others you may see are purely coincidental.
You will also need:
Animation Shop. This is from CNET, so it's a safe download.
[NOTE: There IS animation here, but it is SO subtle, it's almost not seeable, if that's a word. lol. So it would definitely be great to not animate, as well. Won't make that much difference. This is especially true if you're not using a tube with a beaded necklace.]
A tube your choice. I'm using the gorgeous artwork of Jennifer Janesko. You must have a license to use her work. You may purchase that license at CILM.
Scrap kit is by Ivory, of Ivorys Designz. It's a PTU kit, is available at Scrap Heaven Boutique, and is called Au Naturelle. I guess I'm in another one of my "soft pastels" kinda moods....
Filters: dsb Flux > Bright Noise & Eye Candy 4000 > Gradient Glow (for the name only)
Font: I used Brock Script
Supplies: The mask, which is again by Butterfly Flutterby, and the word art from where I do not know. Let me know if it's yours, and I'll give you proper credit! You can get these supplies
here.
Okay! Let's party... lol!!
Open your supplies in PSP and minimize. Alternatively, you could load your mask into your PSP masks file. This way, you'd have it to use later on....
Open a new image, 700 x 700, white.
Open paper14. Copy and paste as a new layer.
Open frame2. Copy and paste as a new layer.
Add your tube. Resize, position and drop shadow to your taste.
Highlight your frame layer. Grab your magic wand and click inside the main area of the frame. Also, click inside any of the other, much smaller areas of the frame that your tube may be overlapping. Selections > Modify > Expand by 1. Selections > Invert.
Highlight your tube layer. Grab your eraser brush and erase any of your tube that you don't want overlapping the frame areas you clicked. Selections > Select none.
Open paper5. Copy and paste as a new layer. Drag this layer below your frame layer.
Highlight your frame layer again. Click inside the main portion of the frame. Selections > Modify > Expand by 7. Selections > Invert.
Highlight the paper5 layer. Hit delete. Selections > Select none.
Now, highlight your frame layer again. Click inside the "next layer down" areas of the frame, if you get my drift. The top and bottom corners that appear to be layers of the frame below the main portion. Selections > Modify > Expand by 7. Selections > Invert.
Open another paper. I chose paper15. Copy and paste as a new layer. Drag this below your paper5 layer. Hit delete. Selections > Select none.
Again, highlight your frame layer. Now, click inside the areas of the bottom-looking layer of the frame. Selections > Modify > Expand by 7. Selections > Invert.
Open yet another paper. I chose paper4. Copy and paste as a new layer. Drag this layer down below your last paper layer. Hit delete. Selections > Select none.
Okay, we're done with that! lol! Drop shadow your frame.
Open fern3. Resize 75%. Copy and paste as a new layer. Image > Mirror. Drag this layer below your tube. Drop shadow.
Open berries2. Copy and paste as a new layer. Rotate left 45°. Drag this layer above your fern3 layer. Position to your liking. Drop shadow.
Open flower2. Resize 35%. Copy and paste as a new layer. Position as you like. I placed mine in the bottom right-hand corner area of the frame. See my tag for placement reference. Drop shadow.
Open flower1. Resize 35%. Copy and paste as a new layer. Position this next to your flower2 layer. Drop shadow.
Open fern2. Resize 75%. Copy and paste as a new layer. Drag this layer below your flower layers. Duplicate this layer. Image > Mirror. Image > Flip. Move so that this layer is clustered with the other fern and the flowers. Again, see my tag for placement reference. Merge these two layers down. Drop shadow.
Open beadstring2. Resize 75%. Copy and paste as a new layer. Position so the staple appears to be attached to the frame. See my tag for placement refrence. Drop shadow.
Now, this is where the word art I supplied comes in. I chose the word "Dream" from the saying on the top right. I know it's small. I used my lasso tool set on point-to-point and drew a selection carefully around the word "dream," then Edit > Copied and pasted onto the canvas of my tag. I then rotated right 90° and moved it so that it sat on the tag in the beadstring layer.
Adjust > Brightness and Contrast > Brightness/Contrast with settings at 100 and 0. Adjust > Hue and Saturation > Colorize with color #9a9083. Small drop shadow.
Add your name. I again used color #9a9083 for the fill AND the stroke, stroke set at 2. I then added Eye Candy 4000 > Gradient Glow with settings at 5 - 0 - 100, color #eee1ce and preset of "medium."
Drop shadow your name.
Add your copyright, license information if applicable, and taggers'/watermark.
If you want to animate, it's best if you do this next part before resizing your tag. At this point, you can just merge and save, if you choose not to animate!!
Highlight your tube layer. Take your magic wand, mode on Add(shift) and click verrrry carefully in each bead of the necklace. I found there was one particular bead that didn't work.
Duplicate your tube layer twice, for a total of three tube layers.
Still on the bottom tube layer...
Effects > Plugins > dsb Flux > Bright Noise, intensity set on 30. Click on "mix" once.
Hit okay.
Highlight the middle tube layer. Again, apply Bright Noise, this time clicking on "mix" twice.
Hit okay.
Highlight the top tube layer. Apply Bright Noise again, clicking "mix" three times.
Hit okay.
Close out the top two frame layers, leaving the bottom frame layer open.
Selections > Select none.
Resize your tag to a size with which you're most accustomed.
A N I M A T I O N
Edit > Copy merged
Open Animation Shop, right-click on the desktop area, and paste as a new animation.
Return to PSP. Close out the bottom tube layer, and open the middle tube layer.
Edit > Copy merged.
Return to Animation Shop and Edit > Paste > After Current Frame.
Back to PSP. Close out the middle tube layer and open the top tube layer.
Edit > Copy merged.
And, back to Animation Shop. Edit > Paste > After Current Frame.
View > Animation. Et, voila! We are done! I hope you've enjoyed this tutorial! Thanks for stopping by!
.
.
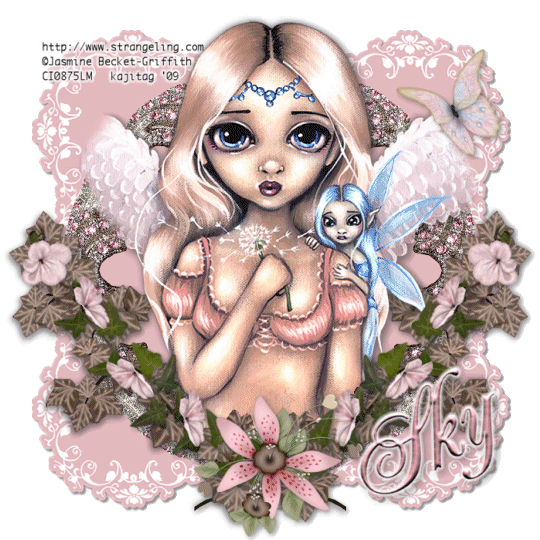 [Click image above to go to full sized image.]This tutorial was written on April 22, 2009, using Paint Shop Pro, version X.03. It should be okay to do with other versions as well. I just find X.03 more comfortable for me. You may download a free trial of Paint Shop Pro, version X2, from Corel. Any similarities between this tut and any others you may see are purely coincidental.
You will also need:
Animation Shop. This is from CNET, so it's a safe download.
A tube your choice. I'm using the stunning artwork of Jasmine Becket-Griffith. You must have a license to use her work. You may purchase that license at CILM.
Scrap kit is by Sky, of Sky Scraps. It's a PTU kit, is available at Scrap It Sassy, and is called Romance. This kit is currently on sale!! This is also available in scrappers' size.
Filters: dsb Flux > Bright Noise
Font: I used Renaissance
Supplies: No outside supplies in this tutorial!
Okay, let's begin...
Open a new image, 700 x 700, white.
Open eleganceCutout2. Resize 110%. Copy and paste as a new layer. Add a small drop shadow.
Open Frame1. Copy and paste as a new layer.
Add your tube. Resize, position and drop shadow to your taste.
Highlight your frame layer. Grab your magic wand and click inside the frame. Selections > Modify > Expand by 1. Selections > Invert.
Highlight your tube layer. Grab your eraser brush and erase any of your tube that you don't want overlapping the bottom of the frame.
Selections > Select none.
Open Ivy1. Copy and paste as a new layer. Drag this layer below your tube layer. Position in the bottom right area of your canvas. Duplicate this layer and Image > Mirror. Merge these two layers down and apply a drop shadow.
Open DecoFlower3. Resize 75%. Copy and paste as a new layer. Rotate right 30°. Position above your ivy layer on the right. Duplicate this layer and Image > Mirror. Merge these two layers down and apply a drop shadow.
Open DecoFlower2. Resize 65%. Copy and paste as a new layer. Position in the center of the ivy and the first deco flower layers. See my tag for placement reference. Apply a drop shadow.
Open Butterfly4. Resize 55%. Image > Mirror. Copy and paste as a new layer. Position where you'd like. I chose the top right side of the tag. Again, see my tag for placement reference.
Add your name. I used color #e5b9bf as the fill AND the stroke, the stroke set at 2.
Drop shadow your name.
Add your copyright, license information if applicable, and taggers'/watermark.
Resize your tag to a size with which you're comfortable. At this point, you can just merge and save, if you choose not to animate!!
A N I M A T I O N
Highlight your frame layer. Duplicate this layer twice, for a total of three layers.
Still on the bottom frame layer...
Effects > Plugins > dsb Flux > Bright Noise, intensity set on 30. Click on "mix" once.
Hit okay.
Highlight the middle frame layer. Again, apply Bright Noise, this time clicking on "mix" twice.
Hit okay.
Highlight the top frame layer. Apply Bright Noise again, clicking "mix" three times.
Hit okay.
Close out the top two frame layers, leaving the bottom frame layer open.
Edit > Copy merged
Open Animation Shop, right-click on the desktop area, and paste as a new animation.
Return to PSP. Close out the bottom frame layer, and open the middle frame layer.
Edit > Copy merged.
Return to Animation Shop and Edit > Paste > After Current Frame.
Back to PSP. Close out the middle frame layer and open the top frame layer.
Edit > Copy merged.
And, back to Animation Shop. Edit > Paste > After Current Frame.
View > Animation. Et, voila! We are done! I hope you've enjoyed this tutorial! Thanks for stopping by!
.
.
 [Click image above to go to full sized image.]This tutorial was written on April 21, 2009, using Paint Shop Pro, version X.03. It should be okay to do with other versions as well. I just find X.03 more comfortable for me. You may download a free trial of Paint Shop Pro, version X2, from Corel. Any similarities between this tut and any others you may see are purely coincidental.
You will also need:
Animation Shop. This is from CNET, so it's a safe download.
A tube your choice. I'm using the great artwork of Jessica Dougherty. You must have a license to use her work. You may purchase that license at CILM.
Scrap kit is by Kimmie's Kreations. It's a PTU kit, is available at Scrap It Sassy, and is called Summertime Fun. This kit is currently on sale for 50% off!
Filters: Alien Skin > Xenfex 2 > Constellation
Font: I used Pea Cara in TX
Supplies: Just the mask, here. This came from Butterfly Flutterby. You can get the whole group of them at that link. Thanks, girlie!!
Also, please, if you have problems with the download link for supplies, drop me a line via e-mail. Leaving a comment without a way for me to contact you back doesn't help. If you e-mail me, I'll send you the supplies.
Just to let you know, it's killer heat here the past couple of days. The idea of "refreshing" is just dominating my thoughts! Oh, what I'd give for a Popsicle and some sparkly water to play in!
Okay then!! Let's begin...
Open your mask and minimize in PSP. Alternatively, you can load it into your PSP masks folder for use at a later date.
Open a new image, 750 x 700, white.
Open scallop frame2. Copy and paste as a new layer.
Add your tube. Resize, position and drop shadow to your taste.
Highlight your frame layer. Grab your magic wand and click inside the frame. Selections > Modify > Expand by 1. Selections > Invert.
Highlight your tube layer. Grab your eraser brush and erase any of your tube that you don't want overlapping the frame. In my case, I wanted the little heart "purse" or whatever it is to hang over the frame. It's up to you.
Selections > Select none.
Highlight your white background layer. Open paper14. Copy and paste as a new layer.
Once again, highlight your frame layer. Grab your magic wand and click inside the frame. Selections > Modify > Expand by 10. Selections > Invert.
Highlight paper14 layer. Hit delete. Selections > Select none.
This is going to sound like a lot of repetition (and it is!), but here we go.
Highlight your white background layer. Add a new raster layer. Selections > Select all.
Open paper14 again. Copy and paste INTO SELECTION. Selections > Select none.
Apply your mask. Delete your mask layer, answer "yes" to the pop-up question, and merge group.
Open string1. Resize 50%. Copy and paste as a new layer. Drag this layer above your frame layer. Position on the top right corner of your frame. Duplicate this layer and Image > Mirror. Merge these two layers down and drop shadow.
Open butterfly2. Resize 40%. Copy and paste as a new layer. I positioned mine on the bottom left portion of the frame. See my tag for placement reference.
Highlight your mask layer.
Open bling2. Copy and paste as a new layer.
Open bling4. Mirror this element. Copy and paste as a new layer. Merge these two layers down. No drop shadow.
Add your name. I used color #ff859a as the fill, the stroke is color #fefcd9, stroke set at 3.
Drop shadow your name.
Add your copyright, license information if applicable, and taggers'/watermark.
Resize your tag to a size with which you're comfortable. At this point, you can just merge and save, if you choose not to animate!!
A N I M A T I O N
Highlight your merged bling layer. Duplicate this layer twice, for a total of three layers.
Still on the bottom bling layer...
Effects > Plugins > Alien Skin > Xenofex 2 > Constellation with the following preset:
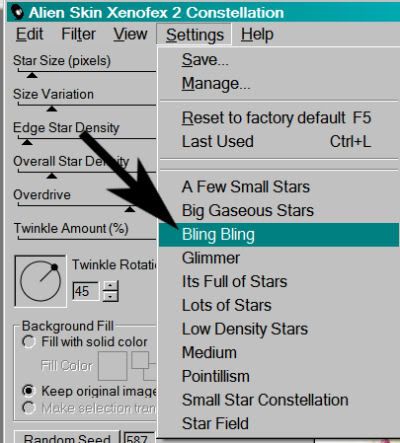
And the following settings:
Hit okay.
Highlight the middle bling layer. Again, apply Constellation, this time clicking on "Random Seed" button.
Hit okay.
Highlight the top bling layer. Apply Constellation again, clicking "Random Seed" once more.
Hit okay.
Close out the top two bling layers, leaving the bottom bling layer open.
Edit > Copy merged
Open Animation Shop, right-click on the desktop area, and paste as a new animation.
Return to PSP. Close out the bottom bling layer, and open the middle bling layer.
Edit > Copy merged.
Return to Animation Shop and Edit > Paste > After Current Frame.
Back to PSP. Close out the middle bling layer and open the top bling layer.
Edit > Copy merged.
And, back to Animation Shop. Edit > Paste > After Current Frame.
View > Animation. And we're done! I hope you've enjoyed this tutorial! Thanks for stopping by!
.
.
 [Click image above to go to full sized image.]This tutorial was written on April 18, 2009, using Paint Shop Pro, version X.03. It should be okay to do with other versions as well. I just find X.03 more comfortable for me. You may download a free trial of Paint Shop Pro, version X2, from Corel. Any similarities between this tut and any others you may see are purely coincidental.
You will also need:
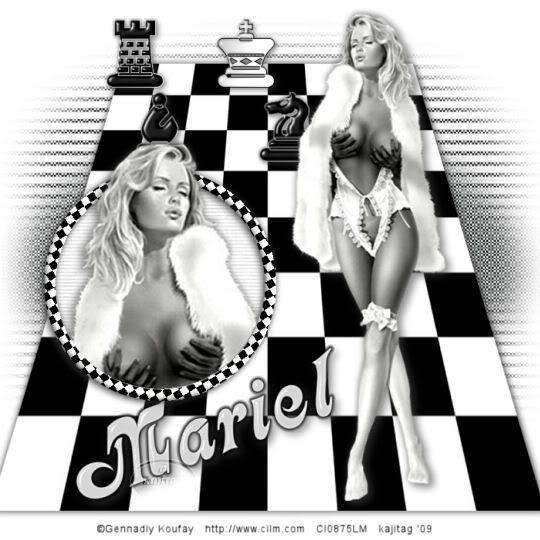
A tube your choice. I'm using the sexy artwork of Gennadiy Koufay. You must have a license to use his work. You may purchase that license at CILM. Koufay is leaving CILM soon, so get them while they're extra-sizzle hot!
Scrap kit is by Malu, of Armazem Scraps. It's a FTU kit, called Xeque Mate. This is a very small kit, but it's black and white, so I had to go for it! Loving those black and white tags!
[Please Note: I made this tag for Mariel, as I had gotten the impression it was Mariel's site and scrap kit. I've just been notified (04-22-2009) by Malu that SHE owns Armazem Scraps, and Mariel is a member of her CT. I'm so sorry Malu! I didn't mean to get that wrong, believe me! So you're all clear, this scrap kit is by Malu!!!]
Filters: Eye Candy 3.1 > Glass, Eye Candy 4000 > Gradient Glow
Font: I used Fleetwood
Supplies: Just the mask. I don't know where I got this one, either. Please let me know if it's yours! I'll give you proper credit! You can get the mask here.
Also, please, if you have problems with the download link for supplies, drop me a line via e-mail. Leaving a comment without a way for me to contact you back doesn't help. If you e-mail me, I'll send you the supplies.
Let's create!! This tut is a little fiddly. I had to consult the help files in PSP to figure out what I was doing. It was so easy, I'm sure you guys already know how to do it!!
Open a new image, 700 x 700, white.
Open Paper 3. Copy and paste as a new layer. Now we get to use our pick tool. (This is for PSP X.03. I keep referring to the pick tool, and I'm not sure the earlier versions had it.) Here's a shot:
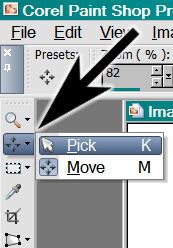
Hold down the CTRL button while using the pick tool, to move the corners of your paper in (on the top) and out (on the bottom) AND up and down, 'til you get a good looking perspective on the paper. You can see my tag for reference purposes. Notice that I didn't bring it ALL the way down to the bottom, nor to the top of the canvas. The sides, on the bottom, run off the canvas a bit. When you've got it like you want it, then drop shadow softly, both positive and negative. Meaning, for example my shadows are set at 3 - 3 - 55 - 3. And then I went back to go -2 - -1 - 55 - 3.
Open your "pecas" elements. (These are the chess pieces.) I don't know if you're familiar with chess or not, but I tried to make a check mate situation on my "board." I have looked at it and looked at it, and I know it's NOT a check mate situation, but oh well.
You'll need to draw a selection around each piece you want to use, and then copy... then paste on your "board." I chose the rook, the king, the bishop and the knight. Drop shadow your chess pieces.
Add your full-body tube. Resize, position and drop shadow to taste.
Open Frame 1. Copy and paste as a new layer. Position where you think it would look good on your tag. I chose the lower left area, sort of. lol. See my tag for placement reference, if you like.
Mirror your full-body tube and resize as you wish. Copy and paste as a new layer, positioned over the frame. Get it the way you'd like it and drop shadow.
Highlight your frame layer. Grab your magic wand and click inside the frame. Selections > Modify > Expand by 5. Selections > Invert.
Highlight your tube layer. Now grab your eraser brush and erase any part of the tube you don't want showing below the frame. DO NOT DESELECT!!
Open Paper 4. Copy and paste as a new layer. Drag this layer below the frame layer. Hit delete. Selections > Select none.
Highlight your white background layer. Add a new raster layer. Selections > Select All.
Open Paper 2. Copy and paste INTO SELECTION. Selections > Select none.
Apply your mask. Delete mask layer, answer "yes" to pop-up question and merge group.
Add your name. I used white for the fill. No stroke.
Effects > Plugins > Eye Candy 3.1 > Glass with the following settings:
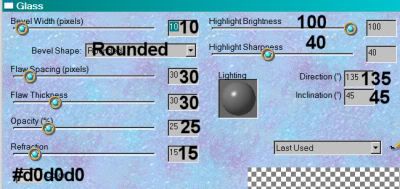
Click on the check mark (means okay lol).
Effects > Plugins > Eye Candy 4000 > Gradient Glow set at 5 - 0 - 100, preset of "medium," color black.
Hit okay.
Drop shadow your name.
I chose to rotate the name, 20° left.
Add your copyright, license information if applicable and taggers'/watermark.
Resize your tag to the size of your choice. Now, just merge your layers, and save! Et, voila! I hope for you it was quick-n-easy!! Thanks for stopping by!
.
.
 [Click image above to go to full sized image.]This tutorial was written on April 17, 2009, using Paint Shop Pro, version X.03. It should be okay to do with other versions as well. I just find X.03 more comfortable for me. You may download a free trial of Paint Shop Pro, version X2, from Corel. Any similarities between this tut and any others you may see are purely coincidental.
You will also need:
Animation Shop. This is from CNET, so it's a safe download.
A tube your choice. I'm using the great artwork of Jessica Dougherty. You must have a license to use her work. You may purchase that license at CILM.
Scrap kit is by Becky. It's a FTU kit, and is called Full of Energy. This is Becky's FIRST kit, and she did quite well!! Be sure to leave some love for offering this freebie! This kit is scrappers' sized. Just a heads up!
Filters: No outside filters used in this tut!
Font: I used UpperEastSide
Supplies: Just the mask, here. I don't know where I got this mask. If you recognize it as yours, please let me know and I'll give you proper credit!
Also, please, if you have problems with the download link for supplies, drop me a line via e-mail. Leaving a comment without a way for me to contact you back doesn't help. If you e-mail me, I'll send you the supplies.
Okay then!! Let's begin...
Open your mask and minimize in PSP. Alternatively, you can load it into your PSP masks folder for use at a later date.
Open a new image, 700 x 700, white.
Open Frame 2. Resize 19%. Copy and paste as a new layer. Rotate right 90°.
Add your tube. Resize, position and drop shadow to your taste.
Highlight your frame layer. Grab your magic wand and click inside the frame. Selections > Modify > Expand by 1. Selections > Invert.
Highlight your tube layer. Grab your eraser brush and erase any of your tube that you don't want overlapping the frame. In my case, I had the hair of the tube I wanted to still be outside the frame. It's up to you.
Selections > Select none.
Highlight your white background layer. Open Paper 7. Resize to 700 x 700. Copy and paste as a new layer.
Apply your mask. Delete your mask layer, answer "yes" to the pop-up question, and merge group.
Open Doodle 1. Resize 15%. Copy and paste as a new layer. Drag this layer above your mask layer. Drop shadow. Duplicate this layer and Image > Mirror. Merge these two layers down.
Add your name. I used color #fdaf5e as the fill, the stroke is black, stroke set at 1.5.
Drop shadow your name.
Add your copyright, license information if applicable, and taggers'/watermark.
Resize your tag to a size with which you're comfortable. At this point, you can just merge and save, if you choose not to animate!!
A N I M A T I O N
Highlight your Doodle 1 layer. Duplicate this layer twice, for a total of three layers.
Still on the bottom Doodle 1 layer, grab your magic wand and click inside the doodle.
Adjust > Add/Remove Noise > Add Noise and make the setting at 20. Monochrome, Uniform.
Hit okay.
Highlight the middle Doodle 1 layer. Again, add noise, this time with the setting at 25.
Hit okay.
Highlight the top Doodle 1 layer. Add noise again, this time with the setting at 30.
Hit okay.
Selections > Select None.
Close out the top two doodle layers, leaving the bottom doodle layer open.
Edit > Copy merged
Open Animation Shop, right-click on the desktop area, and paste as a new animation.
Return to PSP. Close out the bottom doodle layer, and open the middle doodle layer.
Edit > Copy merged.
Return to Animation Shop and Edit > Paste > After Current Frame.
Back to PSP. Close out the middle doodle layer and open the top doodle layer.
Edit > Copy merged.
And, back to Animation Shop. Edit > Paste > After Current Frame.
View > Animation. And we're done! I hope you've enjoyed this tutorial! Thanks for stopping by!
.
.
 [Click image above to go to full sized image.]This tutorial was written on April 16, 2009, using Paint Shop Pro, version X.03. It should be okay to do with other versions as well. I just find X.03 more comfortable for me. You may download a free trial of Paint Shop Pro, version X2, from Corel. Any similarities between this tut and any others you may see are purely coincidental.
You will also need:
Animation Shop. This is from CNET, so it's a safe download.
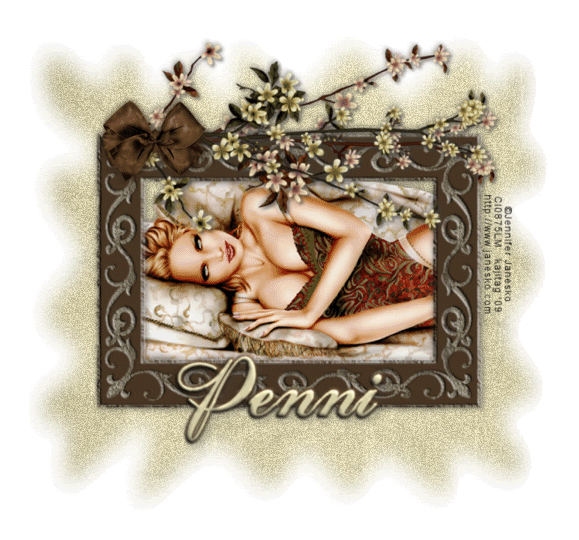
A tube your choice. A horizontally-oriented tube works best for this tutorial. I'm using the glamorous artwork of Jennifer Janesko. You must have a license to use her work. You may purchase that license at CILM.
Scrap kit is by Penni. It's a FTU kit, and is called Coffee & Cream. Be sure to leave Penni some love for offering this freebie!
Filters: Eye Candy 4000 > Gradient Glow
Font: I used University Script
Supplies: The mask and flower branch, here. I don't know from where I acquired these files. If you recognize them as yours, please let me know and I'll give you proper credit!
[NOTE: May 18, 2009 -- Someone JUST e-mailed me about the fact the wrong file was included in the .zip file referenced above. 35 people have downloaded that .zip file and no one told me until today! I've fixed the error, and changed the link, so it should work from now on. Thank you, kind person, for letting me know!!!]
Also, please, if you have problems with the download link for supplies, drop me a line via e-mail. Leaving a comment without a way for me to contact you back doesn't help. If you e-mail me, I'll send you the supplies.
Onward!! Let's begin...
Open your supplies and minimize in PSP. Alternatively, you can load your mask into the PSP masks folder for use at a later date.
Open a new image, 750 x 700, white.
Open scrollframe. Resize 20%. Copy and paste as a new layer. Rotate 90° either way.
Add your tube. Resize, position and drop shadow to your liking.
Highlight your frame layer. Grab your magic wand and click inside the frame. Selections > Modify > Expand by 15. Selections > Invert.
Open paper # p15. Copy and paste as a new layer. Hit delete. Selections > Select none. Drag this layer below your frame layer.
Still on your paper layer, apply your mask. Delete the mask layer, answer "yes" to the pop-up question and merge group. Resize your mask layer 90%.
Open flowerblossoms1 from your supplies. Copy and paste as a new layer. Rotate right 100°. Position at the top of your frame. See my tag for placement reference. Drop shadow the branch. Now, duplicate. Resize 110%. Bring the duplicate below the other branch layer. I colorized one of the branches to go with the mask coloring. You may choose to do that, or not.
Open smallbow. Resize 10%. Copy and paste as a new layer. Position on the upper left corner of the frame, over the branches. Again, see my tag for placement reference. Drop shadow your bow.
Add your name. I used color #d7cfaa as the fill AND the stroke, stroke set at 2.
Effects > Plugins > Eye Candy 4000 > Gradient Glow set at 5 - 0 - 100, color #483623.
Drop shadow your name.
Add your copyright, license information if applicable, and taggers'/watermark.
Resize your tag to a size with which you're comfortable. At this point, you can just merge and save, if you choose not to animate!!
A N I M A T I O N
Highlight your mask layer. Duplicate this layer twice, for a total of three layers.
Still on the bottom mask layer,
Adjust > Add/Remove Noise > Add Noise and make the setting at 20. Monochrome, Uniform.
Hit okay.
Highlight the middle mask layer. Again, add noise, this time with the setting at 23.
Hit okay.
Highlight the top mask layer. Add noise again, this time with the setting at 25.
Hit okay.
Close out the top two mask layers, leaving the bottom mask layer open.
Edit > Copy merged
Open Animation Shop, right-click on the desktop area, and paste as a new animation.
Return to PSP. Close out the bottom mask layer, and open the middle mask layer.
Edit > Copy merged.
Return to Animation Shop and Edit > Paste > After Current Frame.
Back to PSP. Close out the middle mask layer and open the top mask layer.
Edit > Copy merged.
And, back to Animation Shop. Edit > Paste > After Current Frame.
View > Animation. And we're done! I hope you've enjoyed this tutorial! Thanks for stopping by!
.
.
 [Click image above to go to full sized image.]This tutorial was written on April 16, 2009, using Paint Shop Pro, version X.03. It should be okay to do with other versions as well. I just find X.03 more comfortable for me. You may download a free trial of Paint Shop Pro, version X2, from Corel. Any similarities between this tut and any others you may see are purely coincidental.
You will also need:
Animation Shop. This is from CNET, so it's a safe download.
Some tubes of your choice, by the same artist. Obviously, having one reclining or in that posture as the main tube will work best for this tutorial. I'm using the fantastic artwork of Dean Yeagle. You must have a license to use his work. You may purchase that license at CILM.
Scrap kit is by Barbara, of Just Passing Through. It's a FTU kit, and is called Colorful Grunge. This kit is in two parts, so be sure to get the papers, too. This is a beautiful free kit, so be sure to leave Barbara some love!
Filters: Eye Candy 4000 > Gradient Glow, Alien Skin Xenofex > Constellation
Font: I used Old Fashioned Script Flourishes
Supplies: Just the mask, which you can find here.
Let's begin... another quickie...
Open your mask in PSP and minimize. Alternatively, you could load your mask into your PSP masks file for use at a later date, as well.
Open a new image, 750 x 700, white.
Open Frame2. Rotate 90° left or right ALL LAYERS CHECKED! Resize 35%. Copy and paste as a new layer. Move this layer down on the canvas. See my tag for placement reference.
Open your three (or more.... or less) tubes you've decided to use in the frame. Copy each and paste as a new layer. Resize, position and drop shadow as needed. Position them in the frame the way you'd like them.
Highlight your frame layer. Grab your magic wand and click inside the frame. Selections > Modify > Expand by 3. Selections > Invert.
Highlight each of your tube frames and hit delete. DO NOT DESELECT!!
Highlight your white background layer. Open Paper2. Resize to 750 x 750 pixels. Copy and paste as a new layer. Hit delete. Selections > Select none.
Merge together your tube layers. Drop shadow your frame.
Again, highlight your white background layer. Open Paper1. Resize to 750 x 750 pixels. Mirror. Copy and paste as a new layer.
Apply your mask. Delete mask layer, answer "yes" to pop-up question, and merge group.
You'll notice the "fade" on the mask goes right up to the edges of your tag. If you'd like to soften that, grab your lasso tool, set on freehand, with feather set at 17. Draw curves (like "smiles") upside down on the top, right side up on the bottom, and on the two sides. Hit delete. Selections > Select none.
Add your main tube. Resize, position and drop shadow.
Add your name. I used color #08655d as the fill AND stroke, stroke set at 2.
Effects > Plugins > Eye Candy 4000 > Gradient Glow set at 3 - 0 - 100, color #7c7a27.
Drop shadow your name.
Add your copyright, license information if applicable, and taggers'/watermark.
Resize your tag to a size with which you're comfortable. At this point, you can just merge and save, if you choose not to animate!!
A N I M A T I O N
Highlight your frame layer. Grab your magic wand. BE SURE YOU ZERO OUT THE FEATHER SETTING. Click on the inner color of the frame. For instance, with the frame I used, I clicked on the green.
Duplicate this layer twice, for a total of three layers.
Be sure you're still highlighting the bottom layer.
Effects > Plugins > Alien Skin Xenofex 2 > Constellation, and choose the "Bling Bling" preset
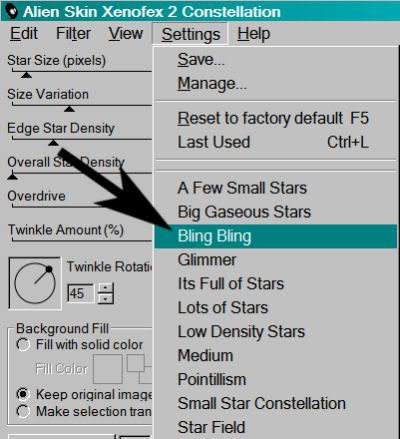
And then change the top setting to 5
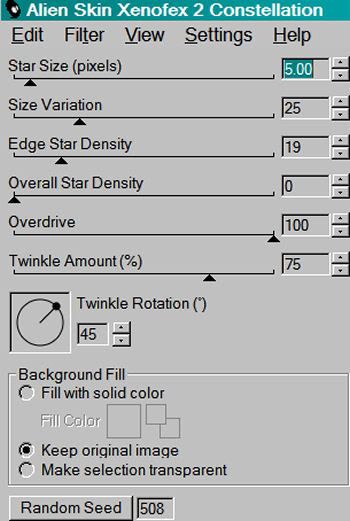
Hit okay.
Highlight the middle frame layer, and apply Constellation again, but click the "Random Seed" button to a different setting. The point is, that it's different. No special number, just so it's different. Do you think I used the word "different" enough in this paragraph? LOL!
Highlight your top frame layer and again apply Constellation, again clicking on the "Random Seed" button.
Selections > Select none.
Close out the top two frame layers. Make sure the bottom frame layer is open.
Edit > Copy merged
Open Animation Shop, right-click on the desktop area, and paste as a new animation.
Return to PSP. Close out the bottom frame layer, and open the middle frame layer.
Edit > Copy merged.
Return to Animation Shop and Edit > Paste > After Current Frame.
Again, back to PSP. Close out the middle frame layer and open the top frame layer.
Edit > Copy merged.
And again, back to Animation Shop. Edit > Paste > After Current Frame.
Edit > Select All. Right click on the top bar of your animation and choose "Frame Properties." Change this number to 17.
View > Animation. And we're done! I hope you've enjoyed this tutorial! Thanks for stopping by!
.
.
 [Click image above to go to full sized image.]This tutorial was written on April 15, 2009, using Paint Shop Pro, version X.03. It should be okay to do with other versions as well. I just find X.03 more comfortable for me. You may download a free trial of Paint Shop Pro, version X2, from Corel. Any similarities between this tut and any others you may see are purely coincidental.
You will also need:
Animation Shop. This is from CNET, so it's a safe download.
A tube your choice. I'm using the great artwork of Shawli. You must have a license to use her work. You may purchase that license at My PSP Tubes.
Scrap kit is by Bel Vidotti. It's a FTU kit, and is called Tatiana. This is the beginning of a series of kits she will be doing, based upon friendship.
Filters: No outside filters used in this tut!
Font: I used Oberon LET
Supplies: The mask and the golden sparkle, which you can find here. Please, if you have problems with the download link for supplies, drop me a line via e-mail. Leaving a comment without a way for me to contact you back doesn't help. If you e-mail me, I'll send you the supplies.
[NOTE: This is a simple two-frame animation. I used the sparkle to accentuate the necklace on my tube. It may well be possible you won't need the sparkle or to animate. It all depends upon your tube choice.]
Onward!! Let's begin...
Open your supplies and minimize in PSP. Alternatively, you can load your mask into the PSP masks folder for use at a later date.
Open a new image, 700 x 700, white.
Open TornPaper. Copy and paste as a new layer. Rotate 25° left. Position to the left side of your canvas. Soft drop shadow.
Open Wire. Copy and paste as a new layer. Position to the right side of your canvas, and in the layer palette, below the torn paper. Soft drop shadow.
Add your tube. Resize, position, and drop shadow to your taste.
Open TiedRibbon01. Copy and paste as a new layer. Resize 95%. In the layer palette, drag this below your tube. I had to use the pick tool to drag it out a bit on the right side. I tried to make it seem as if it were wrapping around the torn paper and wire. The wire doesn't exactly come up far enough, but I think it looks okay???
Open Leaves04. Resize 65%. Copy and paste as a new layer. Move under your tied ribbon, and to the right. Duplicate this layer and Image > Mirror. Using your move tool, move it over to cluster with the other layer. Have the stem cross over just below the ribbon. Drop shadow these layers. Merge down.
Open Flower04. Resize 65%. Copy and paste as a new layer. Mirror. Move over your leaves layers. Drop shadow.
Again at Flower04 (the original, from the kit, at its original size). Resize 50%. Copy and paste as a new layer. Move this to cluster with the other flowers and leaves. Drop shadow.
Open Flower02. Resize 65%. Copy and paste as a new layer. Rotate 90° right. Position on the left side of the torn paper. See my tag for placement reference. I colorized the flowers to go better with the rest of the tag. Drop shadow these flowers.
Add your name. I used color #f7e1bd as the fill. Color #a36e19 for the stroke, stroke set at 1.
Drop shadow your name.
Add your copyright, license information if applicable, and taggers'/watermark.
Resize your tag to a size with which you're comfortable. At this point, you can just merge and save, if you choose not to animate!!
A N I M A T I O N
Open Afbeelding1. Copy and paste as a new layer. Position so it accentuates the jewelry on your tube.
Edit > Copy merged
Open Animation Shop, right-click on the desktop area, and paste as a new animation.
Return to PSP. Close out the Afbeelding1 layer.
Edit > Copy merged.
Return to Animation Shop and Edit > Paste > After Current Frame.
Highlight your first frame. Change frame properties to 125.
Highlight your second frame. Change the frame properties to 35.
View > Animation. And we're done! I hope you've enjoyed this tutorial! Thanks for stopping by!
.
.
 [Click image above to go to full sized image.]This tutorial was written on April 15, 2009, using Paint Shop Pro, version X.03. It should be okay to do with other versions as well. I just find X.03 more comfortable for me. You may download a free trial of Paint Shop Pro, version X2, from Corel. Any similarities between this tut and any others you may see are purely coincidental.
You will also need:
Tube of your choice. I'm using the great artwork of Shane Glines. BE AWARE: There is adult content on the very first page you get to at Shane's site. Use your own discretion. A little blurb from me: Shane was the first artist that actually caught my eye and that I could identify with certainty I *really* liked when I first started PSPing. This was long before I'd ever heard of licensing companies, or any of the FABULOUS artists that could be found through those outlets. I'm SO glad he's out there now, and so available! You must have a license to use his work. You may purchase that license at CILM. (Previously, he'd been with My PSP Tubes, but I don't have this image from there. It's from CILM.
Animation Shop. This is from CNET, so it's a safe download.
Scrap kit by Bluey of Bluedream Designs. It's a FTU kit, called April Showers. It's an easy basic tut, until you get to the animation!
Filters: Eye Candy 4000 > Gradient Glow
Font: I used CarattereROB
Supplies: Just the mask, by Becky, which you can find here.
Okay, let's start!
Open a new image, 700 x 700, white.
Open Frame1. Resize 90% Copy and paste as new layer.
Add your tube. Resize, position, and drop shadow to your liking.
Highlight your frame layer. Grab your magic wand and click inside the frame. Selections > Modify > Expand by 1. Selections > Invert.
Highlight your tube layer. Now get your eraser tool and erase any portions of your tube that overlap the bottom and/or side of the frame. Selections > Select none.
Highlight your white background layer. Add a new raster layer. Selections > Select all.
Open Paper6. Copy and paste INTO SELECTION. Selections > Select none.
Apply your mask. Delete the mask layer, answer "yes" to the pop-up question, and merge group.
In your layer palette, go to the top layer of your canvas.
Open Doodle3. Copy and paste as a new layer. Move this to the upper left orientation on the canvas. Not all the way to the top. See my tag for placement reference. Duplicate this layer and Image > Mirror. Merge these two layers down. Duplicate that layer. Image > Flip. Play around with the doodles until you can almost see it like a "splash" effect. At least, that's what I see! I've been told I'm weird before!! Merge your doodle layers down, and drag it to just above the mask layer.
Open Raindrops. Copy and paste as a new layer. This layer should be just below your frame.
Highlight your frame layer. Grab your magic wand and click inside the frame. Selections > Modify > Expand by 10. Selections > Invert.
Highlight your Raindrops layer. Hit delete. Selections > Select none. Apply a soft drop shadow to the Raindrops.
Drop shadow your frame.
Open Flower3. Resize 65%. Copy and paste as a new layer. Place this on the lower left arc of the frame. Again, see my tag for placement reference. Drop shadow your flower.
Open Flower1. Resize 50%. Copy and paste as a new layer. Arrange this next to your Flower3 layer. Drop shadow and duplicate. Move the duplicate to the opposite end of this cluster of flowers. Sorry, didn't word that very well. See my tag for what I really meant! LOL!
Add your name. I used color #bbd9da as the fill AND the stroke, stroke set at 2.
Apply Eye Candy 4000 > Gradient Glow, settings on 3 - 0 - 100, color #fff3c9.
Drop shadow your name.
Add your copyright, license information if applicable, and taggers'/watermark.
Resize your tag to your desired size.
You can save now and be done if you choose not to animate. The animation makes the tag quite a heavy file. But it's my favorite image effect in Animation Shop, and goes with the "theme."
A N I M A T I O N
Layers > View > None.
Open the doodle layer and the mask layer.
Edit > Copy merged
Open Animation Shop, right-click on the desktop layer and paste as new animation.
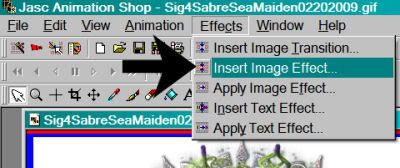
Go to Effects > Insert Image Effects
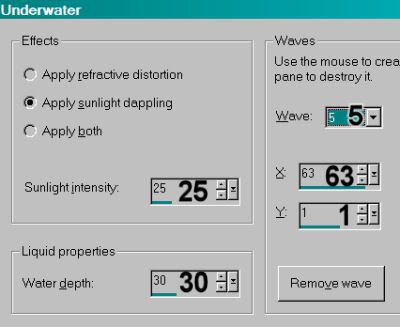
Choose "Underwater," with the settings shown below:
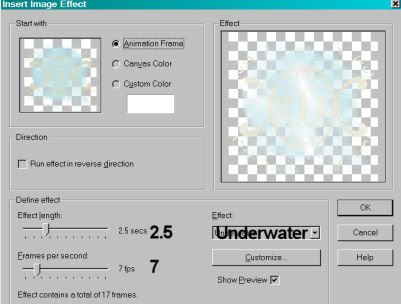
I'm including the settings I had when I clicked on "Customize" -- to tell the truth, I'm not REALLY sure what this does, but here are my settings:
This gives you 18 frames. Delete the first frame. Bring the slider at the bottom of this animation to the first frame.
Return to PSP. Layers > View All.
Close out the mask, doodle, and white background layers.
Edit > Copy merged
Return to Animation Shop, right-click on the desktop area and paste as new animation.
Duplicate this frame until you have a total of 17 frames. Again, bring the slider at the bottom of this animation to the first frame.
Edit > Select All
Edit > Copy
Go to your animation with the underwater effects.
Edit > Select All
[NOTE: On the next step, do not release your mouse button until you have positioned your frames where you want them to be on the finished product!]
Edit > Paste > Into Selected Frame
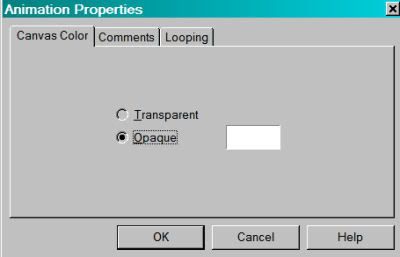
Animation > Animation Properties with the following settings:
View > Animation! Save as .gif and we're done!! Thanks for trying my tut, I hope it was clear for you.
.
.
 [Click image above to go to full sized image.]This tutorial was written on April 13, 2009, using Paint Shop Pro, version X.03. It should be okay to do with other versions as well. I just find X.03 more comfortable for me. You may download a free trial of Paint Shop Pro, version X2, from Corel. Any similarities between this tut and any others you may see are purely coincidental.
You will also need:
Animation Shop - I've found it here! This is from CNET, so it's a safe download, too!
A tube your choice. I'm using the fantasy artwork of Molly Harrison. You must have a license to use her work. You may purchase that license at CILM.
Scrap kit is by QueenBrat, of Scraps With Attitude. It's a PTU kit, and is called Spring Sonnet. This is a BEAUTIFUL kit, and matches this particular tube as though they were made for each other! This kit is also on sale for 50% off!
Filters: VM Natural > Sparkle
Font: I used JeffrianaJF
Supplies: No outside supplies used in this tut!
Let's begin... another quickie...
Open a new image, 750 x 700, white.
Open Vellum1. Copy and paste as a new layer. Resize 97%. Soft drop shadow.
Open Flower4. Copy and paste as a new layer. Resize 125%. Soft drop shadow.
Add your tube. Resize, position, and drop shadow to your taste.
Open BeadString1. Rotate right 90° ALL LAYERS CHECKED! Resize 40%. Copy and paste as a new layer. Position on either side of your tube. In the layer palette, drag this layer below your flower layer. Duplicate this BeadString1 layer and move it just to the side and a bit down on your canvas. See my tag for placement reference. Merge these two layers down, and duplicate that layer. Image > Mirror. Drop shadow both layers. Merge them down, so that you only have one layer of four beadstrings.
Open Brad1. Copy and paste as a new layer. Position at the top of the highest BeadString1 layer. Duplicate this brad layer and Image > Mirror. Duplicate again and position toward the outside center of the vellum. Duplicate this and Image > Mirror. Position all your brads the way you like them, then drop shadow all.
Add your name. I used color #feb98e as the fill AND stroke, stroke set at 2.
Drop shadow your name.
Add your copyright, license information if applicable, and taggers'/watermark.
Resize your tag to a size with which you're comfortable. At this point, you can just merge and save, if you choose not to animate!!
A N I M A T I O N
Highlight your beadstring1 layer. Duplicate this layer three times, for a total of four layers.
Be sure you're still highlighting the bottom of these layers.
Effects > Plugins > VM Natural > Sparkle with the following settings:
Hit okay.
Highlight the next beadstring1 layer up, and apply sparkles again, but move the "Random Seed" slider to wherever you like. The point is, that it's different. There's no special way to move it.
Highlight your next highest beadstring1 layer and again apply the sparkles, moving the "Random Seed" slider.
Now, highlight the top beadstring1 layer and apply the sparkles, again moving the "Random Seed" slider.
Whenever I use this particular filter, I go over the entire filter application twice. So, highlight the bottom beadstring1 layer.
Effects > VM Natural > Sparkle and move your "Random Seed" slider to a number you've not yet moved it to.
Highlight the next beadstring1 layer up and apply sparkles again, moving the slider for the "Random Seed" to a new number.
Highlight your next highest beadstring1 layer and again apply the sparkles, moving the "Random Seed" slider.
Highlight the top beadstring1 layer and apply sparkles one last time, moving your slider for a new "Random Seed."
Close out the top three beadstring1 layers. Make sure the bottom beadstring1 layer is open.
Edit > Copy merged
Open Animation Shop, right-click on the desktop area, and paste as a new animation.
Return to PSP. Close out the bottom beadstring1 layer, and open the next highest beadstring1 layer.
Edit > Copy merged.
Return to Animation Shop and Edit > Paste > After Current Frame.
Again, back to PSP. Close out the beadstring1 layer and open the next highest beadstring1 layer.
Edit > Copy merged.
And again, back to Animation Shop. Edit > Paste > After Current Frame.
For the last time, back to PSP. Close out the open beadstring1 layer and open the top layer.
Edit > Copy merged.
Back to Animation ship and Edit > Paste > After Current Frame.
View > Animation. And we're done! I hope you've enjoyed this tutorial! Thanks for stopping by!
.
.
 [Click image above to go to full sized image.]This tutorial was written on April 11, 2009, using Paint Shop Pro, version X.03. It should be okay to do with other versions as well. I just find X.03 more comfortable for me. You may download a free trial of Paint Shop Pro, version X2, from Corel. Any similarities between this tut and any others you may see are purely coincidental.
You will also need:
A tube your choice. I'm using the fun artwork of Gary Ham. You must have a license to use his work. You may purchase that license at CILM.
Scrap kit is by Pimptress, of Pimp'd Tag Scraps. It's a PTU kit, available through Paradise 4 Scrappers, and is called A Royal Tea Party. Remember, Paradise 4 Scrappers is having their awesome Easter sale!!
Filters: No outside filters were used in this tut!
Font: I used JessamineScriptSSK
Supplies: Just the mask, which I got from Blendid Style YEARS ago. It appears she is no longer offering her masks. You can get the mask here.
Let's create!! This is another quick-n-easy tut!
Open a new image, 700 x 700, white.
Open frame-02. Copy and paste as a new layer. I colorized mine to go with my tube. That's up to you.
Add your tube. Resize, position, and drop shadow to your taste.
Highlight your frame layer. Click inside the frame with your magic wand. Selections > Modify > Expand by 1. Selections > Invert
Highlight your tube layer. Grab your eraser brush and erase any of your tube that is overlapping the bottom and/or sides of your frame. Do not deselect!
Highlight your white background layer.
Open pp02. (Of course, you may either use a different paper, if you're using a tube with different colors, or colorize the paper as I did.) Copy and paste as a new layer.
Hit delete again. Selections > Select none.
Highlight the white background layer again. Add a new raster layer. Selections > Select All.
Again, open pp02. Copy and paste INTO SELECTION. Selections > Select none.
Apply your mask. Delete your mask layer, answer "yes" to the pop-up question, and merge group.
Give your mask layer a soft drop shadow. Drop shadow your frame.
Open cupcake-01. Resize 25%. Copy and paste as a new layer, positioning as you like. You may reference my tag for placement. Drop shadow your cupcake.
Open cupcake-03. Resize 25%. Copy and paste as a new layer. Place this one close to the first one. Again, see my tag for placement reference. Drop shadow this cupcake.
Add your name. I used color #f6a3b1 for the fill. Stroke of 2, color #c71640.
I added an inner bevel, with the following settings:
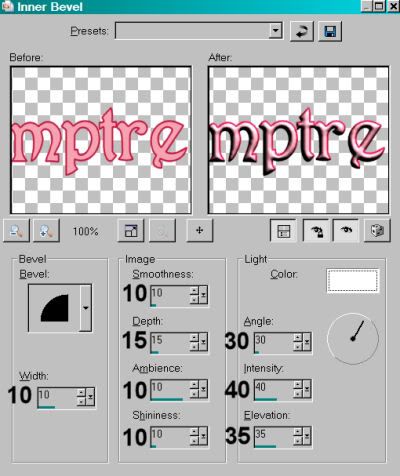
Hit okay.
Drop shadow your name.
Add your copyright, license information if applicable and taggers'/watermark.
Resize your tag to the size of your choice. Now, just merge your layers, and save! Et, voila! Told you it was quick-n-easy!! Thanks for stopping by!
.
.
FYI. If you have any problems with the download links, TELL ME via direct e-mail. I got a comment from Gypsy that she was having problems with a link and she left me no way to get the supplies to her. If you e-mail me, I send them right back to you. Okay? Have a great weekend!!.
.
Here is the announcement for Scrap Heaven Boutique!! They will also be having a great sale this weekend! Get 'em while they're hot!!

Finally, here is the "official" ad from Paradise 4 Scrappers.

Y'all have fun, and Happy Easter to everyone!!!
.
 [Click image above to go to full sized image.]This tutorial was written on April 9, 2009, using Paint Shop Pro, version X.03. It should be okay to do with other versions as well. I just find X.03 more comfortable for me. You may download a free trial of Paint Shop Pro, version X2, from Corel. Any similarities between this tut and any others you may see are purely coincidental.
You will also need:
Animation Shop - I've found it here! This is from CNET, so it's a safe download, too!
A tube your choice. I'm using the glamorous artwork of Jennifer Janesko. You must have a license to use her work. You may purchase that license at CILM.
Scrap kit is by Tina, of Scraps With Attitude. It's a PTU kit, and is called Something Beautiful.
Filters: VM Natural > Sparkle
Font: I used Balmoral ICG
Supplies: Just the mask, by Teresa, at Boundless Bliss. Thank you, Teresa! You can get the mask here.
Let's go for it!!
Open your mask in PSP and minimize. Alternatively, you could load the mask into your PSP masks folder and load it from there. That way, you'll have it for use at a later date. Be sure to give credit where it's due!
Open a new image, 700 x 700, white.
Open stringframe2. Copy and paste as a new layer.
Add your tube. Resize, position, and drop shadow to your taste.
Highlight your frame layer. Click inside the frame with your magic wand. Selections > Modify > Contract by 3. Selections > Invert
Highlight your tube layer. Grab your eraser brush and erase any of your tube that overlaps the bottom and/or sides of the frame.
DO NOT DESELECT!!!
Highlight your white background layer. Open paper3. Copy and paste as a new layer.
Hit delete. Selections > Select none.
Highlight your white background layer again.
Open paper14. Copy and paste as a new layer.
Apply your mask. Delete the mask layer. Answer "yes" to the pop-up question and merge group.
Softly drop shadow your stringframe2.
Open calla2. Resize 70%. Copy and paste as a new layer. Image > Mirror. Rotate 30° left. See my tag for placement reference. Drop shadow.
Open calla1. Resize 60%. Drag this above calla2. Rotate 15° left. Maneuver as you can to get these two together, as a bunch, and position on the stringframe in a way that you find you like. Merge these two layers down.
Open butterfly3. Mirror. Resize 35%. Copy and paste as a new layer. Position where you like. Drop shadow.
Open bowflower3. Resize 35%. Copy and paste as a new layer. I chose to put mine opposite the calla lillies. See my tag for placement reference. Drop shadow. Duplicate this layer and position a bit away from the first, on the stringframe.
Open bowflower2. Resize 35%. Copy and paste as a new layer. Position this between the two bowflowers3. In the layer palette, bring this layer above the two other flowers. Drop shadow.
Add your name. I used color #1dcce3 as the fill. No stroke. I also added the following inner bevel:
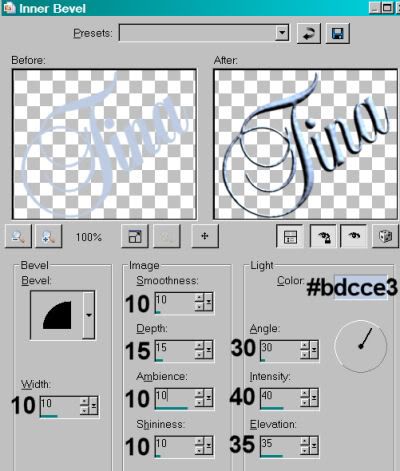
Hit okay.
Drop shadow your name.
Add your copyright, license information if applicable, and taggers'/watermark.
Resize your tag to a size with which you're comfortable. At this point, you can just merge and save, if you choose not to animate!!
A N I M A T I O N
Highlight your stringframe2 layer. Duplicate this layer twice, for a total of three layers.
Be sure you're still highlighting the bottom of these layers.
Effects > Plugins > VM Natural > Sparkle with the following settings:
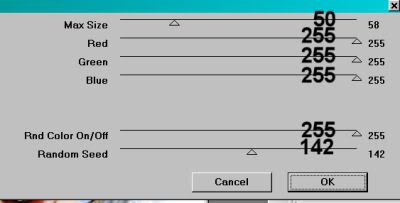
Hit okay.
Highlight the middle stringframe2 layer and apply sparkles again, but move the "Random Seed" slider to wherever you like. The point is, that it's different. There's no special way to move it.
Highlight your top stringframe2 layer and again apply the sparkles, moving the "Random Seed" slider once more.
Whenever I use this particular filter, I go over the entire filter application twice. So, highlight the bottom stringframe2 layer.
Effects > VM Natural > Sparkle and move your "Random Seed" slider to a number you've not yet moved it to.
Highlight the middle stringframe2 layer and apply sparkles again, moving the slider for the "Random Seed" to a new number.
Highlight the top stringframe2 layer and apply sparkles one last time, moving your slider for a new "Random Seed."
Close out the top two stringframe2 layers. Make sure the bottom stringframe2 layer is open.
Edit > Copy merged
Open Animation Shop, right-click on the desktop area, and paste as a new animation.
Return to PSP. Close out the bottom stringframe2 layer, and open the middle stringframe2 layer.
Edit > Copy merged.
Return to Animation Shop and Edit > Paste > After Current Frame.
Once more back to PSP. Close out the middle stringframe2 layer and open the top stringframe2 layer.
Edit > Copy merged.
And again, back to Animation Shop. Edit > Paste > After Current Frame.
Edit > Select All. Right-click on the top bar of your animation and choose "Frame Properties." Change this number to 50.
View > Animation. And we're done! I hope you've enjoyed this tutorial! Thanks for stopping by!
.


©kajira hill 2009
http://kajituts.blogspot.com


