
You will also need:
A tube of your choice. I'm again using the gorgeous artwork of Maxine Gadd. You must have a license to use her work. You may purchase that license at My PSP Tubes.
Scrap kit is by Tina, of Tina's Magical Scrap World. It's a PTU kit, available at Bitchin' Scraps Boutique, and is called Cheeky Princess.
Filters: No outside filters used in this tut!
Font: I used Fairydust
Supplies: The mask and the doodle, both of which you can find here!
Let's begin!!
Open your supplies in PSP and minimize. Alternatively, you can load the mask into your PSP masks folder, for use at a later date. Always give proper credit!!
Open a new image, 700 x 750, white.
Open squareframe5. Copy and paste as a new layer.
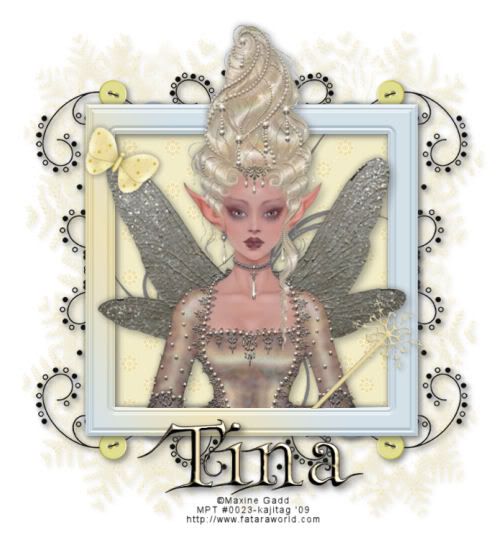
Add your tube. Resize, position and drop shadow to taste.
Highlight your frame layer. Grab your magic wand and click inside the frame. Selections > Modify > Expand by 1. Selections > Invert.
Highlight your tube layer. Grab your eraser brush and erase any portion of your tube that is overlapping the bottom of the frame.
Selections > Invert. Selections > Modify > Expand by 9.
Add a new raster layer. Drag this layer below your frame and tube layers.
Open paper10. Copy and paste as a new layer. Hit delete. Selections > Select none.
Highlight your white background layer. Add a new raster layer. Selections > Select all.
Open paper10 again. Copy and paste into selection. Selections > Select none.
Apply your mask, INVERT TRANSPARENCY CHECKED! Delete the mask layer, answer "yes" to the pop-up question, and merge group.
Resize your mask layer by 92%. Give it a VERY soft drop shadow.
Open doodle3 from your supplies. Resize 140%. Copy and paste as a new layer, above the first paper10 layer in your layer palette. Image > Flip. Adjust > Brightness and Contrast > Brightness/Contrast with the following settings:
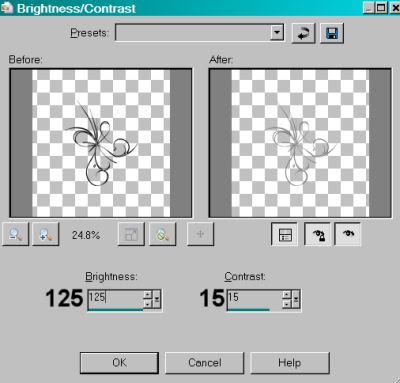
Hit okay.
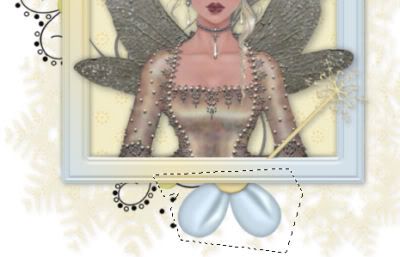
Open magicwand5. Resize 45%. Copy and paste as a new layer, above your tube layer. The placement of this will be totally up to you. You may not even want to use this. It's all your choice. If you're using it in a situation kinda like mine, here's what I did:
Rotate 45° right. Position so that it appears the tube could be holding it. Using your selection tool, set on rectangle, draw a selection around the part of the tube that may be overlapping your frame. Selections > Select none. Add a drop shadow to the magic wand.
Open the flowerbutterfly5. Resize by 25%. Copy and paste as a new layer. Rotate right, 30°. Position where you like. Mine is on my tube's right top wing. lol. Drop shadow.
Open flowerpaint3. Copy and paste as a new layer. Resize by 110%. Position where you'd like it. I didn't want my partial flowers showing up so I grabbed my selection tool, set on point-to-point, and drew selections around the flower areas of this element.
Hit delete. Selections > Select none.
Duplicate this layer and Image > Mirror. Merge these two layers down. Now, duplicate this layer and Image > Flip. Merge these two down. Add a soft drop shadow to your now-doodles. lol.
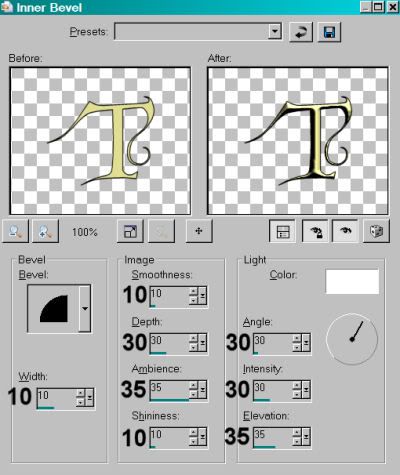
Add your name. I used color #f4deb5 as the fill, stroke set at 1.5, color black. I added the following inner bevel:
Drop shadow your name.
Add your copyright, license information if applicable and taggers'/watermark.
Resize your tag to the size of your choice. At this point merge your layers and save, and you're done! I hope you've enjoyed this tutorial! Thanks for stopping by!
.


No comments:
Post a Comment