
You will also need:
Animation Shop. This is from CNET, so it's a safe download.
A tube or two of your choice. I'm using the wonderful artwork of Abranda Icle. You must have a license to use her work. You may purchase that license at Up Your Art.
Scrap kit is by Cora, of Pimp'd DesignZ. It's a PTU kit, is available at Scrap Heaven Boutique in tagger size only, and at Paradise 4 Scrappers in both taggers' and scrappers' sizes. It's called Sweet Tart.
Filters: Alien Skin > Xenofex2 > Constellation
Font: I used Good Vibrations.
Supplies: The mask, by the ever-talented Butterfly Flutterby Creations. I just PAID ATTENTION to her TOU (unless that's new, and I hope it is), and therefore cannot supply this mask, but I CAN point you to her blog to download it from there. It's mask 39. You'll have to download numbers 30-40 to get it.
Okay! Let's do it!!
Open your mask in PSP and minimize. Alternatively, you could load it into your PSP masks file. This way, you'd have it to use later on....
Open a new image, 750 x 700, white.
Open frame01. Resize 75%. Copy and paste as a new layer.
Highlight your white background layer. Add a new raster layer.
Selections > Select all.
Open pp04. Copy and paste INTO SELECTION. Selections > Select none.
Highlight your frame layer. Grab your magic wand and click inside the three open areas of the frame. Selections > Modify > Expand by 7. Selections > Invert.
Highlight your pp04 layer. Hit delete. Selections > Select none.
Now, to change the paper a bit, Adjust > Brightness and Contrast > Brightness/Contrast with the following settings:
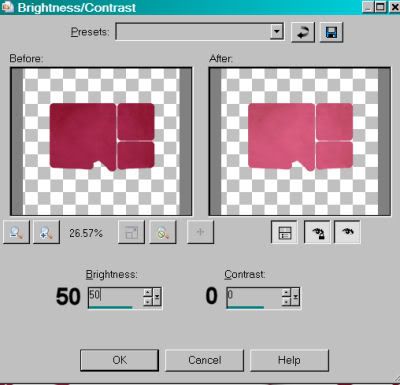
Hit okay.
Open your "secondary" tube, if you're using one. Copy and paste as a new layer. Drag this layer below the frame layer. Resize, position under the two smaller side sections of the frame and drop shadow.
Highlight the frame layer. Grab your magic wand and click inside the two smaller, side sections of the frame. Selections > Modify > Expand by 7. Selections > Invert.
Highlight your tube layer and hit delete. Selections > Select none.
Now open your "main" tube. Copy and paste as a new layer. Resize, position and drop shadow. This one, in the layer palette, is above the frame.
Highlight your frame layer once more. Grab the magic wand and click inside the main, larger section of the frame. Selections > Modify > Expand by 1. Selections > Invert.
Highlight your "main" tube layer. Grab your eraser brush and erase the portions of your tube that overlap the bottom area of the frame and ribbon.
Selections > Select none.
Open the twine. Resize 75%. Rotate right 90° all layers checked. Copy and paste as a new layer onto your canvas. In the layer palette, this should be below both tube layers, but above the pp04 layer.
Selections > Select all. Selections > Modify > Contract by 1.
Open pp04 again. Copy and paste as a new layer over the twine. Selections > Invert. Hit delete. Selections > Select none. Delete the original twine layer. Give your new layer a small drop shadow.
Open flower-03. Resize 35%. Copy and paste as a new layer. Position in the right lower corner area of your frame. See my tag for placement reference. Duplicate this layer. Image > Mirror. Merge these two layers down and drop shadow.
Open strawberry-sweet. Resize 35%. Copy and paste as a new layer. Position this over the flower in lower right area of the frame. See my tag for placement reference. Duplicate this layer and Image > Mirror. Put this strawberry into place with the left-side flower. Merge the two strawberry layers down and drop shadow.
Open flower-02. Resize 35%. Copy and paste as a new layer. Rotate 20° right. In the layer palette, drag this layer below the flower-03 layer. Duplicate this layer, and rotate back 20° left. I know, I know. lol. Arrange your flower-02 layers as you would like them behind the flower-03 and strawberry on the right side. Apply a small drop shadow to both. See my tag for placement reference.
Highlight the white background layer. Add a new raster layer. Selections > Select all.
Open pp04 for a last time. Copy and paste INTO SELECTION. Selections > Select none.
Apply your mask. Delete mask layer, answer "yes" to the pop-up question and merge group.
You'll need to move your mask layer up a teensy bit to make it appear centered.
Add your name. I used color #d97486 for the fill, and #901935 for the stroke, stroke set at 1.5. Drop shadow your name.
Add your copyright, license information if applicable, and taggers'/watermark.
Resize your tag to a size with which you're comfortable. At this point, you can just merge and save, if you choose not to animate!!
A N I M A T I O N
Highlight your twine layer. Duplicate this layer twice, for a total of three layers.
Still on the bottom twine layer...
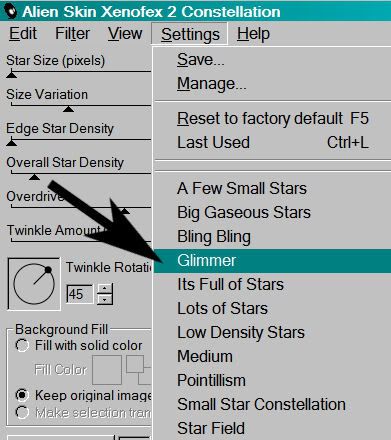
Effects > Plugins > Alien Skin > Xenofex 2 > Constellation with the following preset:
And the following settings:
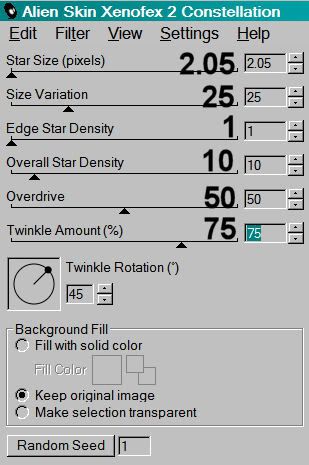
Hit okay.
Highlight the middle twine layer. Again, apply Constellation, this time clicking on "Random Seed" button.
Hit okay.
Highlight the top twine layer. Apply Constellation again, clicking "Random Seed" once more.
Hit okay.
Close out the top two twine layers, leaving the bottom twine layer open.
Edit > Copy merged
Open Animation Shop, right-click on the desktop area, and paste as a new animation.
Return to PSP. Close out the bottom twine layer, and open the middle twine layer.
Edit > Copy merged.
Return to Animation Shop and Edit > Paste > After Current Frame.
Back to PSP. Close out the middle twine layer and open the top twine layer.
Edit > Copy merged.
And, back to Animation Shop. Edit > Paste > After Current Frame.
View > Animation. And we're done! I hope you've enjoyed this tutorial! Thanks for stopping by!
.


No comments:
Post a Comment