
You will also need:
Animation Shop - I've found it here! This is from CNET, so it's a safe download, too!
A tube your choice. I'm using the glamorous artwork of Jennifer Janesko. You must have a license to use her work. You may purchase that license at CILM.
Scrap kit is by Pimptress, of Pimp'd Tag Scraps. It's a PTU kit, and is available at Paradise 4 Scrappers. The kit is called Mid-Summer Night.
Filters: Eye Candy 4000 > Gradient Glow, Eye Candy 4000 > HSB Noise
Font: I used Fontleroy Brown
Supplies: Two masks. You can find the masks here.
Let's begin!!
Open a new image, 700 x 750, white.
Open frame-01. Copy and paste as a new layer.
Add your tube. Resize, position, and drop shadow to your taste.
Highlight the frame layer. Grab your magic wand and click inside the frame. Selections > Modify > Expand by 1. Selections > Invert.
Highlight your tube layer. Get your eraser brush and erase any of the tube that overlaps the frame on the bottom. Selections > Select none.
Highlight your white background layer. Add a new raster layer. Selections > Select All.
Open pp29. Copy and paste INTO SELECTION. Selections > Select none.
Apply BflyFlbyMask43. Delete the mask layer. Answer "yes" to the pop-up question and merge group. This mask is a bit too wide for the frame. Use your pick tool to manipulate the outer side edges of the mask, until it's hidden *just barely* behind the frame. See my tag for reference.
Open pp17. Copy and paste as a new layer.
Highlight your frame layer. Grab your magic wand and click inside the frame. Selections > Modify > Expand by 20. Selections > Invert.
Highlight the pp17 layer. Hit delete. Selections > Select None.
Highlight your frame layer.
Open green-01. Resize by 40%. Adjust > Brightness and Contast > Brightness/Contrast with the following settings:
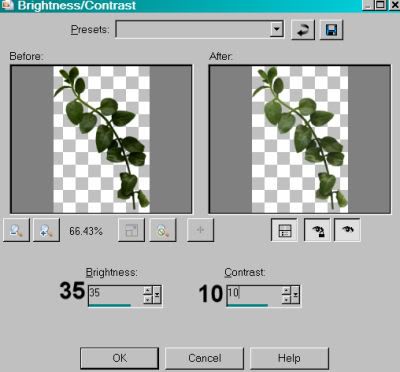
Hit okay.
Position these leaves up on the top of the frame. See my tag for reference (although it's a bit covered up on the tag above.... sorry about that). Duplicate this layer. Image > Mirror. Merge these two layers down. Drop shadow. Drag this layer below the tube layer.
Open flower-05. Resize 65%. Copy and paste as a new layer. Rotate right 60°. Position the flowers above your leaves layer. Duplicate this layer. Image > Mirror. Merge these two layers down. Drop shadow.
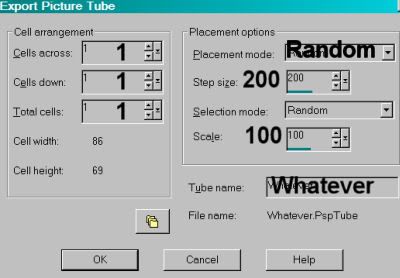
Open silver-stars. Resize by 20%. I converted a couple of these stars into individual tubes so I could scatter them about. To do this....
Grab your lasso tool, set on point-to-point, and draw around a star of your choice.
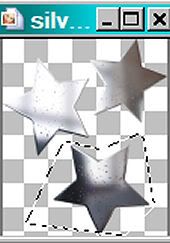
Edit > Copy. Right click on your workspace area and Edit > Paste as a new image.
Next:
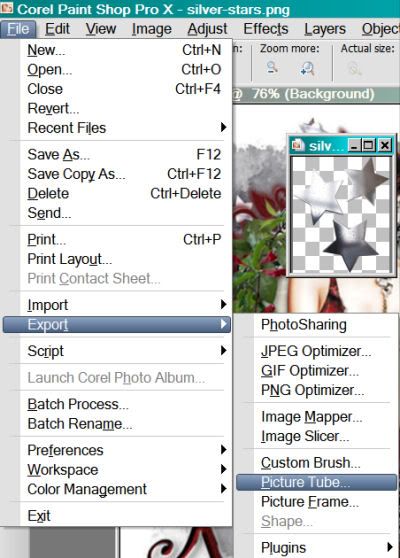
When you get to the next screen, then:
Back to your canvas, click on the white background layer. Add a new raster layer.
Grab your picture tube tool and scatter the tubes about as you like them. You can undo, or you can add another layer, or you can select the area around some of the stars and delete them. It's all up to you. If you have more than one layer of these stars, merge them down together. Drop shadow your stars.
Again, highlight your white background layer. Add a new raster layer. Selections > Select All.
Open pp26. Copy and paste INTO SELECTION. Selections > Select none.
Apply your Becky_Mask022. Delete the mask layer, answer "yes" to the pop-up question and merge group.
Add your name. I used color #611617 as the fill, and a silver gradient as the stroke, stroke set at 1.5.
Effects > Plugins > Eye Candy 4000 > Gradient Glow, set at 6 - 0 - 100, preset of "diffuse," color white. I then added the following inner bevel:
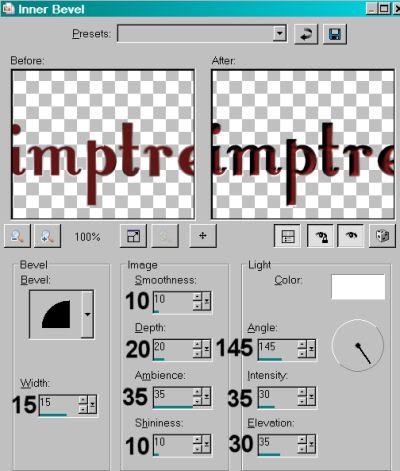
Hit okay. Drop shadow your name.
Add your copyright, license information if applicable and taggers'/watermark.
Resize your tag to the size of your choice. At this point you could stop, if you choose not to animate. Just merge your layers, and save!
A N I M A T I O N
Go to your silver stars layer. Duplicate this layer twice, for a total of three layers.
Highlight the bottom of these layers.
Effects > Plugins > Eye Candy 4000 > HSB Noise with the following settings:
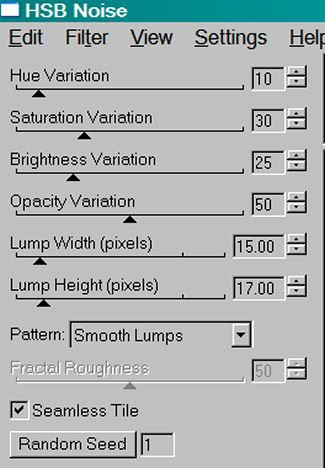
Hit okay.
Highlight the middle silver stars layer and do the same thing, but change the "Random Seed" setting.
Hit okay.
Highlight the top silver stars layer and use HSB Noise again, changing the "Random Seed" setting again.
Hit okay.
Close out the top two silver stars layers. Make sure the bottom silver stars layer is open.
Edit > Copy merged
Open Animation Shop, right-click on the desktop area, and paste as a new animation.
Return to PSP. Close out the bottom silver stars layer, and open the middle silver stars layer.
Edit > Copy merged.
Return to Animation Shop and Edit > Paste > After Current Frame.
Once more back to PSP. Close out the middle silver stars layer and open the top silver stars layer.
Edit > Copy merged.
And again, back to Animation Shop. Edit > Paste > After Current Frame.
Edit > Select All.
Right-click on the bar on top of your animation and choose "Frame Properties." Change this number to 30.
View > Animation. And we're done! I hope you've enjoyed this tutorial! Thanks for stopping by!
.


No comments:
Post a Comment