
You will also need:
Animation Shop - I've found it here! This is from CNET, so it's a safe download, too!
A tube of your choice. I'm using some fun artwork by Pinuptoons. You must have a license to use this work. You may purchase that license at CILM.
Scrap kit is by Bel Vidotti. It's a FTU kit, and is is called, simply, Easter Freebie. Be sure to leave some love if you download this great free kit! This kit comes in both taggers' size and scrappers' size.
Filters: Eye Candy 4000 > Gradient Glow
Font: I used Balmoral D
Supplies: In this file I've provided the grass, the sky and the two "lil anis" as I call them. I don't know where I got ANY of these files. So much was going on when I first started PSPing and I grabbed stuff I thought I might need someday. I've deleted most of that stuff, but have kept some. The mask included is, again, by Becky. Here. is the file.
Let's do it!!
Open your mask, sky and grass in PSP and minimize. Alternatively, you can load the mask into your PSP masks folder for use at a later date. :) Put your animation files wherever they will be handily available when you're in Animation Shop.
Open a new image, 700 x 700, white.
Open Box01. Resize 50%. Copy and paste as a new layer. Position as you like. Drop shadow.
At this time, I added my tube. I have a tube that is leaning on something, and I chose the box. I wanted to get these things situated, so I'd know what the core of my tag would look like. So position, resize and drop shadow your tube as you like.
Open Rabbit02. Resize 50%. Copy and paste as a new layer. I put mine in the box! Drop shadow.
Highlight your white background layer. Open your sky image from the supplies. Copy and paste as a new layer. Resize 105%.
Open your grass image from your supplies. Copy and paste as a new layer. This will be under the tube, box and rabbit on the layer palette. Position your grass to one side or the other. Duplicate and Image > Mirror. Duplicate and move the grass around until you get a full coverage of grass at the bottom of your canvas. Merge all your grass layers down.
Open the tree. Copy and paste as a new layer. Image > Mirror. Move to the left side of the tag.
Grab your magic wand, mode on Add (shift), and click inside every leaf of the tree. Selections > Modify > Expand by 3.
Adjust > Brightness and Contrast > Brightness/Contrast with the settings shown below. Ignore the color, just use the setting. lol.

Hit okay.
Adjust > Hue and Saturation > Colorize using the settings below:
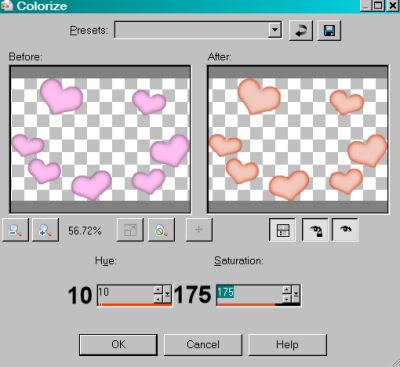
Hit okay.
I realize that many of you will not be using the same tube I'm using, so your colors would be different. All you do is to pick your color in your materials palette. Look above the area that shows the color#. Make note of the hue and saturation numbers. Those are the two numbers I use to colorize. Hope that helps!
Selections > Select none.
Position your tree behind the box. If any of the tree shows under the box like mine did, grab your lasso tool set on point-to-point and draw a selection around the excess tree. lol. Hit delete. Selections > Select none. Drop shadow your tree.
Open Mushroom02. Resize 45%. Copy and paste as a new layer. Position this below the grass in your layer palette. I put mine right next to the left side of the box. It's up to you. Drop shadow.
Open Mushroom01. Resize 35%. Copy and paste as a new layer. Position this above the grass in your layer palette. Position next to your other mushroom, as you like. Drop shadow.
Open Butterfly02. Resize 50%. Copy and paste as a new layer. Position this where you like. I chose to have it "light" on my box. Drop shadow.
Open the Sun. Resize 50%. Copy and paste as a new layer. I put this in the upper right corner of my tag, below the tube on the layer palette. Drop shadow.
Open Cloud01. Resize 65%. Copy and paste as a new layer. I put mine behind the tree. Place yours where you'd like it. Give it a soft drop shadow.
Grab your lasso tool, set on freehand, feather 5. Make sure your cloud layer is highlighted. Draw a freehand selection around the very bottom of the cloud. We're trying to erase the line of demarcation. Hit delete. Selections > Select none. Duplicate this cloud. Move the duplicate over to another position you like. See my tag for reference purposes.
Highlight your sky layer. Apply your mask, making sure fit to CANVAS is checked. Delete your mask layer, answer "yes" to the pop-up question, and merge group.
Highlight your grass layer. Apply your mask again. Delete the mask layer, answer "yes" to this pop-up question, and merge group.
Move now up to the top of your layer palette, and add your name. I used color #fna589 as the fill AND the stroke color. Stroke of 2. Effects > Plugins > Eye Candy 4000 > Gradient Glow set at 3 - 0 - 100, color black.
Drop shadow your name. Position as desired.
Add your copyright, license information if applicable and taggers'/watermark.
Resize your tag to the size of your choice. At this point you could stop, if you choose not to animate. Just merge your layers, and save!
A N I M A T I O N
Edit > Copy merged
Open Animation Shop, right-click on the desktop area, and paste as a new animation.
Duplicate this frame until you have 16 frames. Move the slider at the bottom of your animation to the first frame.
Open the bee-and-flowers file. Edit > Select All. Edit > Copy.
Go to the main animation we're building. Edit > Select All and Edit > Paste > Into Selected frame.
Hover your mouse until you get these flowers where you want them on your tag. Release mouse button.
Open yellow-twobutterflies-yellow (lol - never noticed the title before). Highlight the first frame only on this file. Edit > Copy. Go to the last frame on this file and highlight that. Edit > Paste > After Current Frame. Now this file has 16 frames like the rest.
Edit > Select All. Edit > Copy
Return to the main animation we're making and Edit > Select All. Edit > Paste > Into Selected Frame.
Place the butterflies where you'd like them to be in the final product, and release mouse button.
Edit > Select All. Right-click on the bar on top of your animation and choose "Frame Properties." Change this number to 15.
Now click on the first frame, so that is the only frame highlighted. Again, right-click on the top bar and choose "Frame Properties." Change that number to 5.
View > Animation. And we're done! I hope you've enjoyed this tutorial! Thanks for stopping by!
.


No comments:
Post a Comment