
You will also need:
Animation Shop. This is from CNET, so it's a safe download.
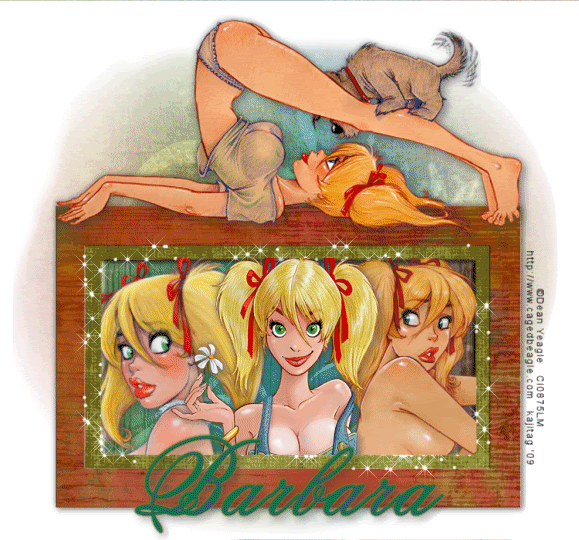
Some tubes of your choice, by the same artist. Obviously, having one reclining or in that posture as the main tube will work best for this tutorial. I'm using the fantastic artwork of Dean Yeagle. You must have a license to use his work. You may purchase that license at CILM.
Scrap kit is by Barbara, of Just Passing Through. It's a FTU kit, and is called Colorful Grunge. This kit is in two parts, so be sure to get the papers, too. This is a beautiful free kit, so be sure to leave Barbara some love!
Filters: Eye Candy 4000 > Gradient Glow, Alien Skin Xenofex > Constellation
Font: I used Old Fashioned Script Flourishes
Supplies: Just the mask, which you can find here.
Let's begin... another quickie...
Open your mask in PSP and minimize. Alternatively, you could load your mask into your PSP masks file for use at a later date, as well.
Open a new image, 750 x 700, white.
Open Frame2. Rotate 90° left or right ALL LAYERS CHECKED! Resize 35%. Copy and paste as a new layer. Move this layer down on the canvas. See my tag for placement reference.
Open your three (or more.... or less) tubes you've decided to use in the frame. Copy each and paste as a new layer. Resize, position and drop shadow as needed. Position them in the frame the way you'd like them.
Highlight your frame layer. Grab your magic wand and click inside the frame. Selections > Modify > Expand by 3. Selections > Invert.
Highlight each of your tube frames and hit delete. DO NOT DESELECT!!
Highlight your white background layer. Open Paper2. Resize to 750 x 750 pixels. Copy and paste as a new layer. Hit delete. Selections > Select none.
Merge together your tube layers. Drop shadow your frame.
Again, highlight your white background layer. Open Paper1. Resize to 750 x 750 pixels. Mirror. Copy and paste as a new layer.
Apply your mask. Delete mask layer, answer "yes" to pop-up question, and merge group.
You'll notice the "fade" on the mask goes right up to the edges of your tag. If you'd like to soften that, grab your lasso tool, set on freehand, with feather set at 17. Draw curves (like "smiles") upside down on the top, right side up on the bottom, and on the two sides. Hit delete. Selections > Select none.
Add your main tube. Resize, position and drop shadow.
Add your name. I used color #08655d as the fill AND stroke, stroke set at 2.
Effects > Plugins > Eye Candy 4000 > Gradient Glow set at 3 - 0 - 100, color #7c7a27.
Drop shadow your name.
Add your copyright, license information if applicable, and taggers'/watermark.
Resize your tag to a size with which you're comfortable. At this point, you can just merge and save, if you choose not to animate!!
A N I M A T I O N
Highlight your frame layer. Grab your magic wand. BE SURE YOU ZERO OUT THE FEATHER SETTING. Click on the inner color of the frame. For instance, with the frame I used, I clicked on the green.
Duplicate this layer twice, for a total of three layers.
Be sure you're still highlighting the bottom layer.
Effects > Plugins > Alien Skin Xenofex 2 > Constellation, and choose the "Bling Bling" preset
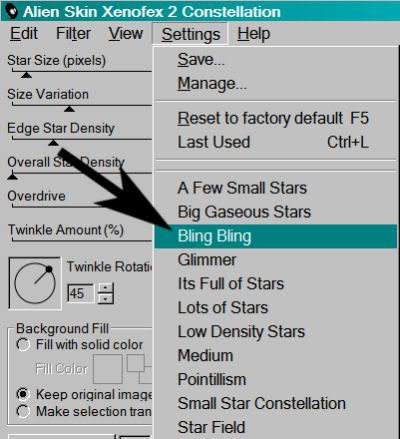
And then change the top setting to 5
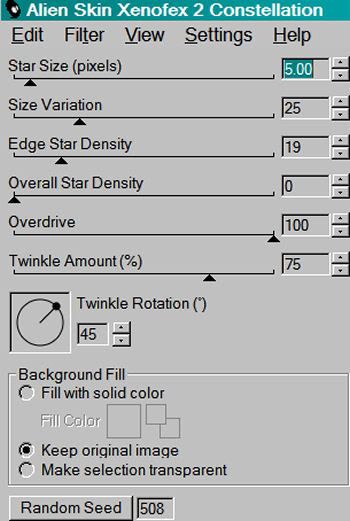
Hit okay.
Highlight the middle frame layer, and apply Constellation again, but click the "Random Seed" button to a different setting. The point is, that it's different. No special number, just so it's different. Do you think I used the word "different" enough in this paragraph? LOL!
Highlight your top frame layer and again apply Constellation, again clicking on the "Random Seed" button.
Selections > Select none.
Close out the top two frame layers. Make sure the bottom frame layer is open.
Edit > Copy merged
Open Animation Shop, right-click on the desktop area, and paste as a new animation.
Return to PSP. Close out the bottom frame layer, and open the middle frame layer.
Edit > Copy merged.
Return to Animation Shop and Edit > Paste > After Current Frame.
Again, back to PSP. Close out the middle frame layer and open the top frame layer.
Edit > Copy merged.
And again, back to Animation Shop. Edit > Paste > After Current Frame.
Edit > Select All. Right click on the top bar of your animation and choose "Frame Properties." Change this number to 17.
View > Animation. And we're done! I hope you've enjoyed this tutorial! Thanks for stopping by!
.


No comments:
Post a Comment