
You will also need:
Animation Shop - I've found it here! This is from CNET, so it's a safe download, too!
A couple of tubes of your choice. I'm using the fun artwork by Pinuptoons. You must have a license to use this work. You may purchase that license at CILM.
Scrap kit is by Stacey, of Stacey's Designs. It's a PTU kit, and is available at Treasured Scraps. The kit is called Gemini. This is a continuation of Stacey's Zodiac Series. I love the colors, and I'm a Gemini (explains a lot, eh?)!! There is a taggers' size and a scrappers' size of this kit.
Filters: Eye Candy 3.1 > Glass, Eye Candy 4000 > Gradient Glow
Font: I used Forelle
Supplies: The mask, from whom I know not. If it is yours, please let me know so that I may give you proper credit! And the set of doodles, which come from Lorna at Simply Sensational Scraps. You can find these supplies here.
Let's go for it!!
Open your supplies in PSP and minimize. Alternatively, you can load the mask into your PSP masks folder for use at a later date. :)
Open a new image, 750 x 700, white.
Open Triple Frame 2. Copy and paste as a new layer.
Open the tube you'd like to use for your frame. Copy and paste as a new layer. Resize and position to your liking. On the layer palette, drag this layer below your frame layer. Center it in one of the outer frames. Duplicate this layer and Image > Mirror. Merge these two layers down and drop shadow.
Open your main tube. Copy and paste as a new layer. Resize, position, and drop shadow to your liking.
Highlight your white background layer.
Open paper 6. Copy and paste as a new layer.
Apply your mask. Delete the mask layer, answer "yes" to the pop-up question, and merge group.
Resize your mask layer by 95%. If it still appears that your mask layer will cut off sharply on the four sides, use your lasso tool, set to freehand, feather set at 17. Draw selections at the center of the top, bottom, and both sides where it extends out. Hit delete. Selections > Select none.
Make sure you're still highlighting your mask layer.
Open the doodles4 from your supplies. Highlight the Doodle 1 layer. Edit > Copy
Move back to your original canvas and Edit > Paste. Resize 175%. Duplicate this layer and rotate 45° right. Duplicate this layer and rotate it 45° right. Duplicate this and rotate it 45° right. You should now have four copies of this doodle, in effect making a circle now on your canvas. Merge these four layers down.
Add your name. I used color #0c789f as the fill color. Stroke set at one, stroke color #173b42. From these two colors, create a foreground-background gradient:
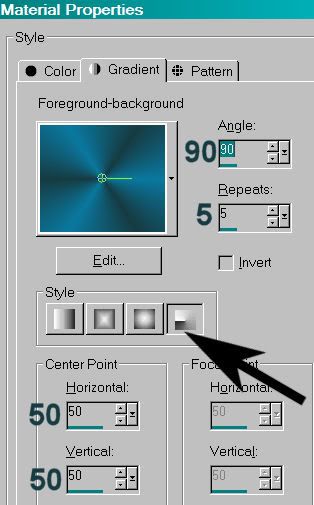
Make the gradient your fill, and the darker color your stroke. Add your name.
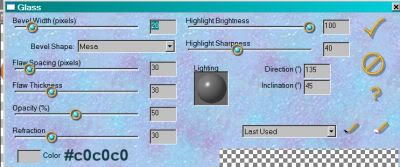
Effects > Plugins > Eye Candy 3.1 > Glass. Use the default settings, except change the color to #c0c0c0.
Effects > Plugins > Eye Candy 4000 > Gradient Glow set at 5 - 25 - 100, color white, preset on "diffuse."
Drop shadow your name. I then rotated it 20° left and positioned it on the right bottom of the tag. See my tag for reference purposes.
Add your copyright, license information if applicable and taggers'/watermark.
Resize your tag to the size of your choice. At this point you could stop, if you choose not to animate. Just merge your layers, and save!
A N I M A T I O N
Layers > View > None. Open the doodles layer.
Edit > Copy merged
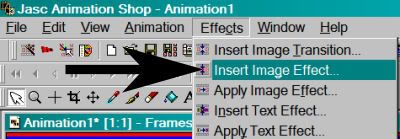
Open Animation Shop, right-click on the desktop area, and paste as a new animation.
Insert Image Effect:
Choose Noise, with these settings:
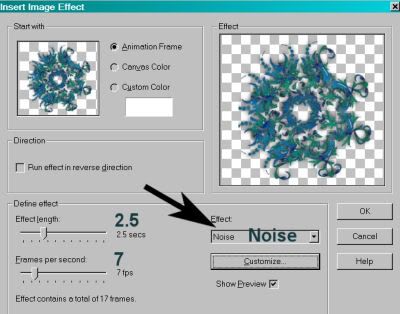
Click on Customize, and use the following:
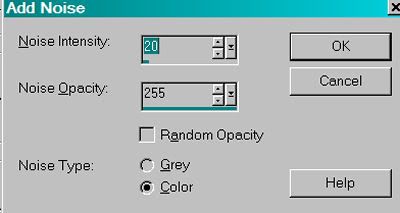
You will end up with 18 frames. Delete the first frame. Make sure your slider at the bottom of your animation is set at the first frame.
Return to PSP. Close the doodle layer and open the mask and white background layers.
Edit > Copy merged.
Return to Animation Shop, right-click on the desktop area, and paste as a new animation.
Duplicate this frame until you have 17 frames. Move your slider to the first frame.
Return to the doodle animation you created and
Edit > Select All
Back to the mask and background animation and Edit > Select all. Edit > Paste > Into Selected Frame.
Make sure your doodle animation is centered well and release your mouse button.
Once more back to PSP. Layers > View > All. Close out the doodle, mask, and white background layers.
Edit > Copy merged.
And again, back to Animation Shop. Right-click on the desktop area and paste as a new animation.
Duplicate this frame until you have 17 frames. Move your slider to the first frame.
Edit > Select All. Edit > Copy.
Return to the main animation we're making and Edit > Select All. Edit > Paste > Into Selected Frame.
Again, center nicely, then release the mouse button.
View > Animation. And we're done! I hope you've enjoyed this tutorial! Thanks for stopping by!
.


No comments:
Post a Comment