
You will also need:
Animation Shop - I've found it here! This is from CNET, so it's a safe download, too!
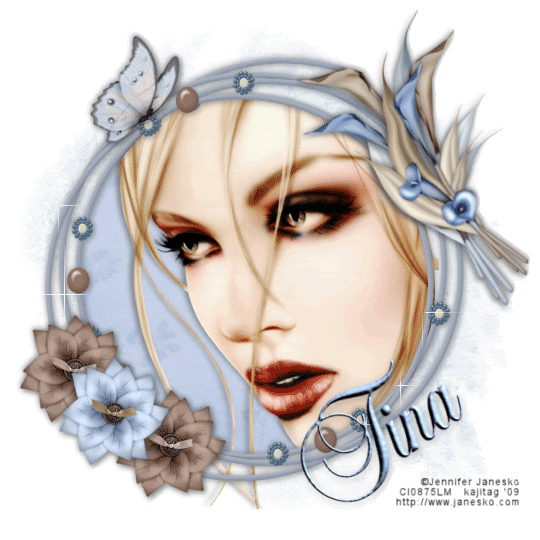
A tube your choice. I'm using the glamorous artwork of Jennifer Janesko. You must have a license to use her work. You may purchase that license at CILM.
Scrap kit is by Tina, of Scraps With Attitude. It's a PTU kit, and is called Something Beautiful.
Filters: VM Natural > Sparkle
Font: I used Balmoral ICG
Supplies: Just the mask, by Teresa, at Boundless Bliss. Thank you, Teresa! You can get the mask here.
Let's go for it!!
Open your mask in PSP and minimize. Alternatively, you could load the mask into your PSP masks folder and load it from there. That way, you'll have it for use at a later date. Be sure to give credit where it's due!
Open a new image, 700 x 700, white.
Open stringframe2. Copy and paste as a new layer.
Add your tube. Resize, position, and drop shadow to your taste.
Highlight your frame layer. Click inside the frame with your magic wand. Selections > Modify > Contract by 3. Selections > Invert
Highlight your tube layer. Grab your eraser brush and erase any of your tube that overlaps the bottom and/or sides of the frame.
DO NOT DESELECT!!!
Highlight your white background layer. Open paper3. Copy and paste as a new layer.
Hit delete. Selections > Select none.
Highlight your white background layer again.
Open paper14. Copy and paste as a new layer.
Apply your mask. Delete the mask layer. Answer "yes" to the pop-up question and merge group.
Softly drop shadow your stringframe2.
Open calla2. Resize 70%. Copy and paste as a new layer. Image > Mirror. Rotate 30° left. See my tag for placement reference. Drop shadow.
Open calla1. Resize 60%. Drag this above calla2. Rotate 15° left. Maneuver as you can to get these two together, as a bunch, and position on the stringframe in a way that you find you like. Merge these two layers down.
Open butterfly3. Mirror. Resize 35%. Copy and paste as a new layer. Position where you like. Drop shadow.
Open bowflower3. Resize 35%. Copy and paste as a new layer. I chose to put mine opposite the calla lillies. See my tag for placement reference. Drop shadow. Duplicate this layer and position a bit away from the first, on the stringframe.
Open bowflower2. Resize 35%. Copy and paste as a new layer. Position this between the two bowflowers3. In the layer palette, bring this layer above the two other flowers. Drop shadow.
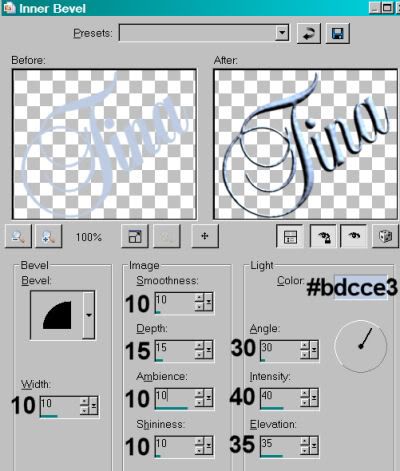
Add your name. I used color #1dcce3 as the fill. No stroke. I also added the following inner bevel:
Hit okay.
Drop shadow your name.
Add your copyright, license information if applicable, and taggers'/watermark.
Resize your tag to a size with which you're comfortable. At this point, you can just merge and save, if you choose not to animate!!
A N I M A T I O N
Highlight your stringframe2 layer. Duplicate this layer twice, for a total of three layers.
Be sure you're still highlighting the bottom of these layers.
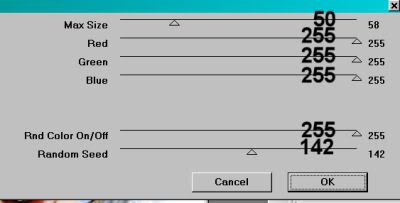
Effects > Plugins > VM Natural > Sparkle with the following settings:
Hit okay.
Highlight the middle stringframe2 layer and apply sparkles again, but move the "Random Seed" slider to wherever you like. The point is, that it's different. There's no special way to move it.
Highlight your top stringframe2 layer and again apply the sparkles, moving the "Random Seed" slider once more.
Whenever I use this particular filter, I go over the entire filter application twice. So, highlight the bottom stringframe2 layer.
Effects > VM Natural > Sparkle and move your "Random Seed" slider to a number you've not yet moved it to.
Highlight the middle stringframe2 layer and apply sparkles again, moving the slider for the "Random Seed" to a new number.
Highlight the top stringframe2 layer and apply sparkles one last time, moving your slider for a new "Random Seed."
Close out the top two stringframe2 layers. Make sure the bottom stringframe2 layer is open.
Edit > Copy merged
Open Animation Shop, right-click on the desktop area, and paste as a new animation.
Return to PSP. Close out the bottom stringframe2 layer, and open the middle stringframe2 layer.
Edit > Copy merged.
Return to Animation Shop and Edit > Paste > After Current Frame.
Once more back to PSP. Close out the middle stringframe2 layer and open the top stringframe2 layer.
Edit > Copy merged.
And again, back to Animation Shop. Edit > Paste > After Current Frame.
Edit > Select All. Right-click on the top bar of your animation and choose "Frame Properties." Change this number to 50.
View > Animation. And we're done! I hope you've enjoyed this tutorial! Thanks for stopping by!
.


No comments:
Post a Comment