

You will also need:
Animation Shop - I've found it here! This is from CNET, so it's a safe download, too!
A tube your choice. I'm using a fun piece of artwork by Elias Chatzoudis. You must have a license to use his work. You may purchase that license at My PSP Tubes.
Scrap kit is by Yvette, of Misfits Scrapz. It's a FTU kit, and is available there at Misfits Scrapz. The kit is called Diva-Licious. This is one portion of the April Goodie Train. Be sure to check it out! And while downloading these freebies, ladies, PLEASE leave some thanks with the designers!
Filters: Eye Candy 4000 > Gradient Glow, Mura's Meister > Copies
Font: I used Fleurish Script
Supplies: Just the mask!!
Let's do it!!
Open your mask in PSP and minimize. Alternatively, you can load into your PSP masks folder for use at a later date. :)
Open a new image, 700 x 700, white.
Open Frame 4. Copy and paste as a new layer.
Add your tube. Resize, position, and drop shadow to your taste. My tube is a rather specialized one. So much so that I doubted I'd ever use it. But with this kit, it worked beautifully!
Highlight your white background layer. Open paper 4. Copy and paste as a new layer.
Apply your mask. Delete the mask layer in your layer palette, answer "yes" to the pop-up question, and merge the group.
When I was done doing these steps, the mask and the heart frame didn't seem "in synch," so I resized the mask layer by 105% and used my move tool to move the mask and frame slightly so they were more centered with each other.
Open MobilePhone2. Resize 65%. Copy and paste as a new layer. Rotate right 20°. Place to your liking. See my tag for reference. Drop shadow your mobile phone.
Open NailPolish1. Resize 35%. Copy and paste as a new layer. Rotate right 15°. Position to your liking. Drop shadow your nail polish.
Open iPod2. Resize 35%. Copy and paste as a new layer. Rotate left 15°. Position to your liking. Drop shadow your iPod.
Open the wordart. Resize 35%. Copy and paste as a new layer. Position to your liking. I put mine in the background, just above the paper mask layer. See my tag for reference.
Duplicate the wordart. Bring to the center of the canvas.
Effects > Plugins > Mura's Meister > Copies with the following settings..... with a twist:

Notice the preset. All I did was click on "reset" over and over until I got a configuration that looked appealing to me. Hit okay.
If you have any of the wordart that seems to fall over the edges of your canvas, grab your lasso tool, set on freehand, feather 17. Draw a curve around the edge of your canvas where the wordart is "falling over" the edge. Hit delete a couple times. Selections > Select none.
Also, if you have any of the wordart about which you don't exactly like the placement, use your lasso tool, set on point-to-point to draw a selection around the ones you don't like and hit delete. Selections > Select none.
Move the copies layer down below everything else. Just above the white background layer.
Add your name. I used color #e68fa7. No stroke. I added a gradient glow of 3 - 0 - 100, color black, preset "medium." Drop shadow your name.
Add your copyright, license information if applicable and taggers'/watermark.
Resize your tag to the size of your choice. At this point you could stop, if you choose not to animate. Just merge your layers, and save!
A N I M A T I O N
Go to your name layer. Duplicate this layer twice, for a total of three layers.
Highlight the bottom of these layers.
Grab your magic wand, and click inside each of the letters of your name.
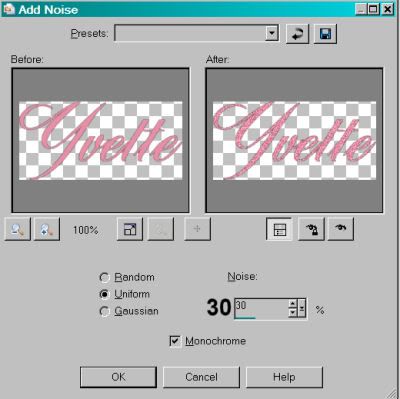
Adjust > Add/Remove Noise > Add Noise with the following settings:
Hit okay.
Highlight your middle name layer and add noise again, but change the noise setting to 35.
Hit okay.
Highlight your top name layer and again add noise, changing the setting to 40.
Hit okay.
Close out the top two name layers. Make sure the bottom name layer is open.
Edit > Copy merged
Open Animation Shop, right-click on the desktop area, and paste as a new animation.
Return to PSP. Close out the bottom name layer, and open the middle name layer.
Edit > Copy merged.
Return to Animation Shop and Edit > Paste > After Current Frame.
Once more back to PSP. Close out the middle name layer and open the top name layer.
Edit > Copy merged.
And again, back to Animation Shop. Edit > Paste > After Current Frame.
View > Animation. And we're done! I hope you've enjoyed this tutorial! Thanks for stopping by!
.


No comments:
Post a Comment