skip to main |
skip to sidebar
.
 [Click image above to go to full sized image.]This tutorial was written on October 30, 2009, using Paint Shop Pro, version X.03. It should be okay to do with other versions as well. I just find X.03 more comfortable for me. You may download a free trial of Paint Shop Pro, version X2, from Corel. Any similarities between this tut and any others you may see are purely coincidental.
You will also need:
Animation Shop. This is from CNET, so it's a safe download. However, it costs. That changed pretty recently. I don't know why!!
HOWEVER ..... a LOVELY person named solshne (and another named Chris) wrote to let me know that one might find Animation Shop for free at this location. This is an FTP link and I have no idea if it's safe or not. So keep your antivirus handy to scan it after download!
Squirlz Water Reflection. That can be found here. This one is TOTALLY different. I do have a plethora of screen shots to help you through. I do hope I explain this so that it's easily understood!
A tube of your choice. I'm using the amazing artwork of Zindy S.D. Neilsen. You must have a license to use her artwork. You can get that license and art at Zindy's own site. You may notice that my info says My PSP Tubes. When I got this particular tube, she was with them. That's why I've done it that way. That's where I got the tube!
The scrap kit is by Doris of Scraps Dimensions. This is a FTU kit called Night Passion. I was SO happy to find a black and white kit! I love to do black and white tags!!
Filters: Eye Candy 4000 > Gradient Glow
Font: I used Alexandra Script.
Supplies: None! I figured Squirlz is quite enough!
Okay, so start this puppy!
Open a new canvas, 800 x 700, white.
Open Romantic Skyline 2. Resize 150%. Copy and paste as a new layer.
Open Frame 1. Resize 85%. Copy and paste as a new layer.
Add your tube. Resize, position and drop shadow to your taste. With the tube I used, I didn't have any overlap on the bottom of the frame, so I didn't need to erase anything. I'm skipping that step here. If you need to know how to do that, go to the next tutorial and it will be there, right after "Add your tube."
Open Lillies. Resize 50%. Copy and paste as a new layer. Rotate 60° left. Resize again 110%. Position at the bottom left of the frame. Drop shadow.
Open Lillies again, resizing 50%. Copy and paste as a new layer. Rotate 60° left. Position at the bottom left, grouping it somewhat with the first layer of lillies. Drop shadow.
Open Bow 4. Resize 35%. Copy and paste as a new layer. Rotate 90° left. Position over your lillies as though they're wrapped in the bow. Drop shadow.
Open old clock. Resize 40%. Copy and paste as a new layer. Position as you like. I chose to put mine in the top left corner of the frame. See my example for placement reference, if you like. Drop shadow.
Open Romantic Moon. Resize 40%. Copy and paste as a new layer. I positioned mine in the top right corner of the frame, then in the layer palette, dragged it down below the frame layer. Drop shadow the moon.
Go back to the top layer and add your name. I used color #dbdbdb for the fill and the stroke, stroke set at 2.
Add a Gradient Glow of 3-0-100, color black.
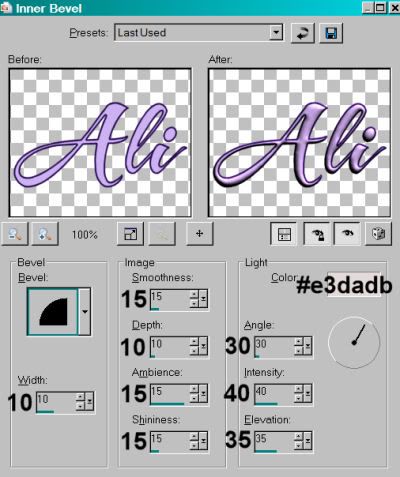
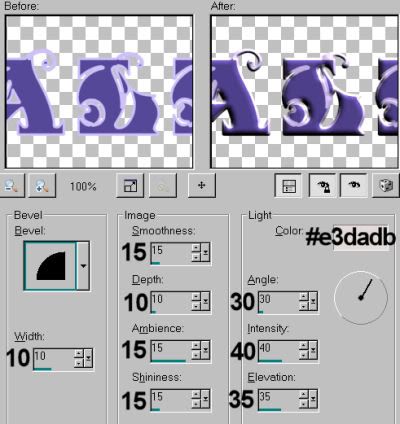
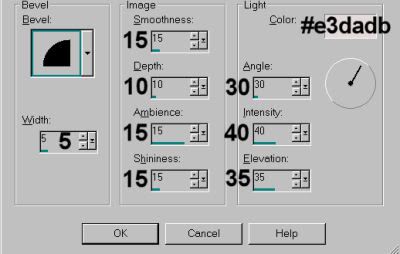
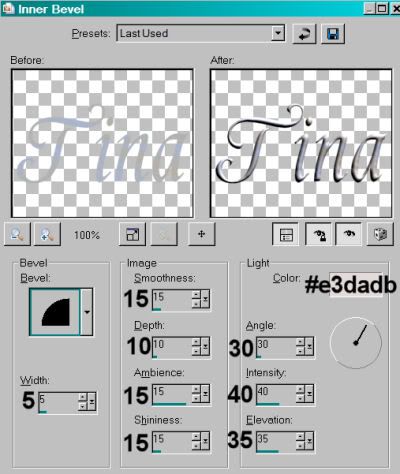
I then added a bevel, set as below:
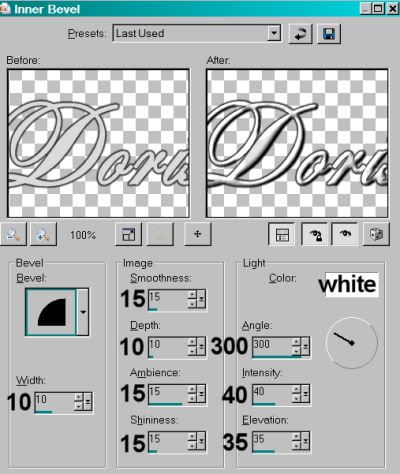
Hit okay.
Drop shadow your name.
I then rotated mine 30° left, and positioned it in the bottom right corner of the frame.
I chose, in this particular instance, to drag the name below the bow. It's up to you.
Resize your canvas to a size with which you are comfortable.
Add your copyright, license information if applicable, and taggers'/watermark.
If you choose not to animate, you're now done, and you can merge your layers and save! Just a note: The animation on this tag entails a lot of steps. If you choose not to do it, you're not really missing out on a LOT, but it does add to it, IMHO.
A N I M A T I O N
Layers > View > None
Open white background layer, and the romantic skyline layer.
Layers > Merge > Visible
Save this as a .jpg to somewhere you'll be able to find it easily. I named mine "Night Magic Squirlz." It's up to you.
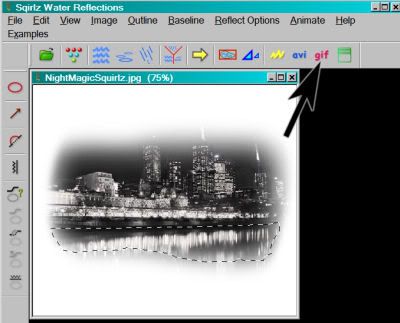
Open up Squirlz. File > Open > Find the file you just saved. You should have something like this:
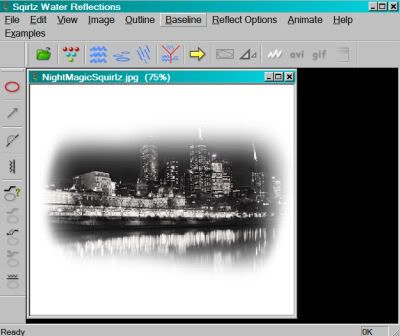
Click on the red circle button to the top left
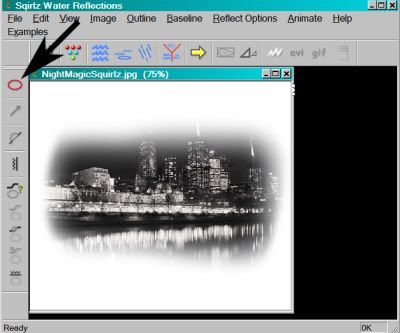
You now have a plus-sign cursor. This is used to draw an outline around the body of water you want to move. Press down the cursor as you outline the water reflection in the romantic skyline image.
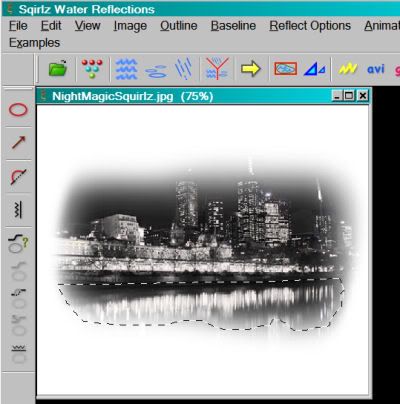
I did my best to follow the bottom of the water line in the image. I liked the blur, but Squirlz doesn't let that stay.
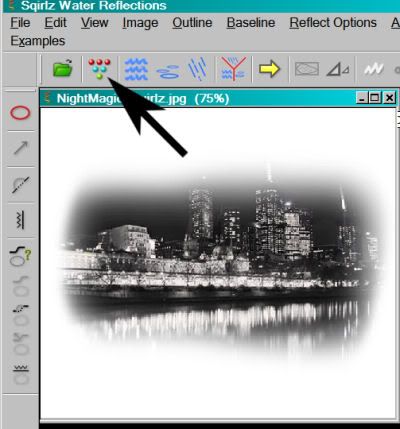
Now, click on the button on the top that looks kinda like bowling pins or something.... lol
Change the number to 10.
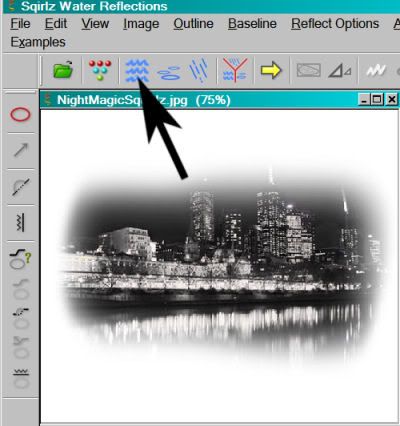
Now, click on the button right next to that.
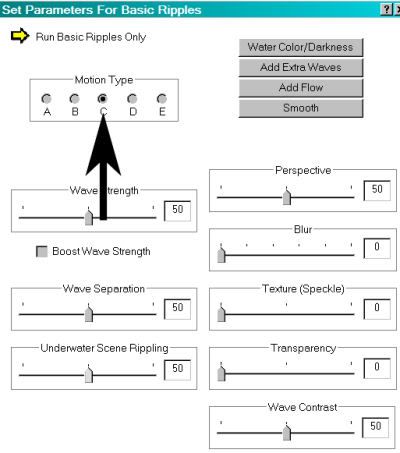
Choose "C," all other settings on the default.
Your animation should be running. To close it, just click on the X in the top right corner of the frame, and the animated image will close, leaving you with the original.
Click on the button that says gif.
Again, name it something you'll be able to easily find from Animation Shop.
Now you're seeing a running guy while the animation saves. lol.
Open Animation Shop and then open the animation you just saved. It should have 10 frames. Make sure the slider at the bottom is placed at the first frame.
Go to PSP. Layers > View > All.
Close out the white background layer and the romantic skyline layer.
Edit > Copy merged.
Go to Animation Shop, right-click on the desktop area and paste as a new animation.
Duplicate your frames until you have a total of 10. Move the slider on the bottom back to the first frame.
Edit > Select All. Edit > Copy
Move to your Squirlz animation and Edit > Select All. Edit > Paste Into Selected Frame.
Edit > Select All again.
Right-click on the top bar of your animation, choose "Frame Properties," and change the number to 25.
View > Animation
And we're done! I hope you like your creation! And I hope I explained it well enough!! Thanks for using my tutorial!
.
.
 [Click image above to go to full sized image.]This tutorial was written on October 30, 2009, using Paint Shop Pro, version X.03. It should be okay to do with other versions as well. I just find X.03 more comfortable for me. You may download a free trial of Paint Shop Pro, version X2, from Corel. Any similarities between this tut and any others you may see are purely coincidental.
You will also need:
Animation Shop. This is from CNET, so it's a safe download. However, it costs. That changed pretty recently. I don't know why!!
HOWEVER ..... a LOVELY person named solshne (and another named Chris) wrote to let me know that one might find Animation Shop for free at this location. This is an FTP link and I have no idea if it's safe or not. So keep your antivirus handy to scan it after download!
A tube of your choice. I'm using the vivid artwork of Jamie Kidd. You must have a license to use her artwork. You can get that license and art at C.I.L.M.
The scrap kit is by Tina of Tina's Magical Scrap World. This is a PTU kit, available through Exquisite Scraps. The kit is called Black Star - Blue. This is one in a series of scrap kits called Black Star. The kit is available in Blue, Pink, Purple and Yellow. (Well, it's shown in Yellow in the bundle, and on her blog, but apparently the yellow is not offered at the store...) The kit is currently 35% off at $1.95!
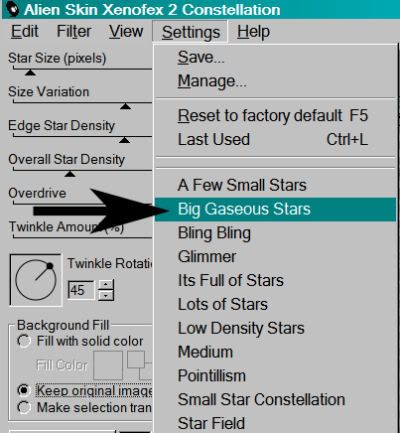
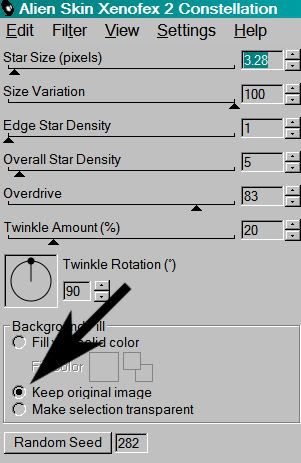
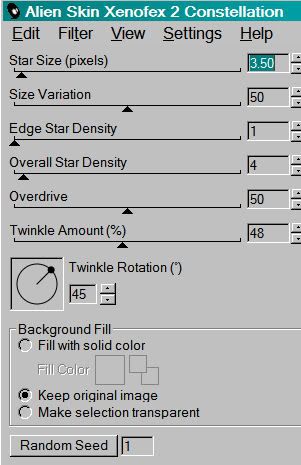
Filters: Alien Skin > Xenofex 2 > Constellation
Font: I used Marnie Regular.
Supplies: The mask, which you can find here. Again, I don't know from whence this came, so if you can help me with that, let me know!! I hate not giving proper credit for so many of these masks!!
Also, please... if you have problems with any download link for supplies, drop me a line via e-mail. Leaving a comment without a way for me to contact you back doesn't help. If you e-mail me, I'll do my best to send you the supplies.
Okay, so let's begin!
Open your mask in PSP and minimize. Alternatively, you can file it away wherever you keep your mask files!
Open a new canvas, 750 x 700, white.
Open StarFrame9. Copy and paste as a new layer.
Add your tube. Resize, position, and drop shadow to your taste.
Highlight your frame layer.
Grab your magic wand and click inside the frame. Be sure to click on the little opening at the bottom, too!
Selections > Modify > Expand by 1. Selections > Invert
Highlight your tube layer.
Grab your eraser brush and erase that part of your tube that you do not want showing at the bottom of the frame.
Selections > Select none.
Highlight your white background layer.
Open paper13. Copy and paste as a new layer. Use your pick tool
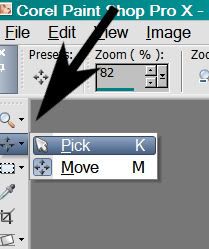
to stretch the paper out at the sides, covering the entire canvas.
Apply your mask. Delete the mask layer, answer "yes" to the pop-up question, and merge group.
Resize your mask layer 95%.
You may notice the sides and bottom of the mask layer stop in abrupt edges. This bugs the heck out of me, so here's what I did to lose it!
Grab your lasso tool again, this time set on freehand, feather set at 30.
Draw curved selections on each side and on the top & bottom. Here's an example:
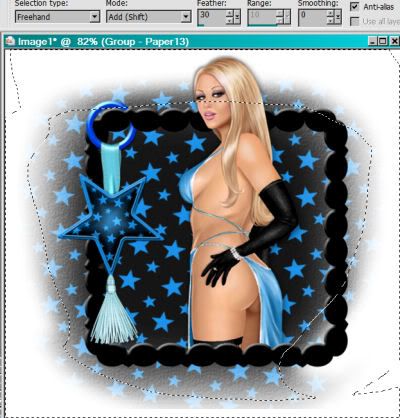
Hit delete. Selections > Select none.
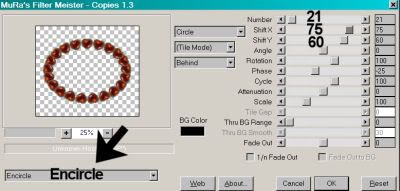
Open GlitterStarDoodle1. Resize 75%. Copy and paste as a new layer.
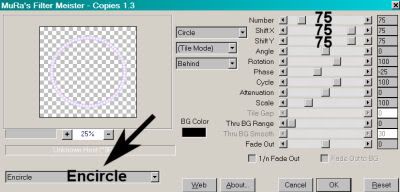
Effects > Mura's Meister > Copies with the following settings:
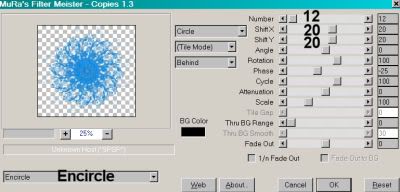
Hit okay. Drag the layer below the mask layer.
Open DazzlingFlower1 and DazzlingFlower2. Resize them both 35%. Copy and paste as new layers. Duplicate your DazzlingFlower2. Arrange flowers as you like and drop shadow. You can use my example for placement reference if you like.
Open ParfumeBottle1. Resize 50%. Copy and paste as a new layer. I placed mine at a 20° left angle. Drop shadow.
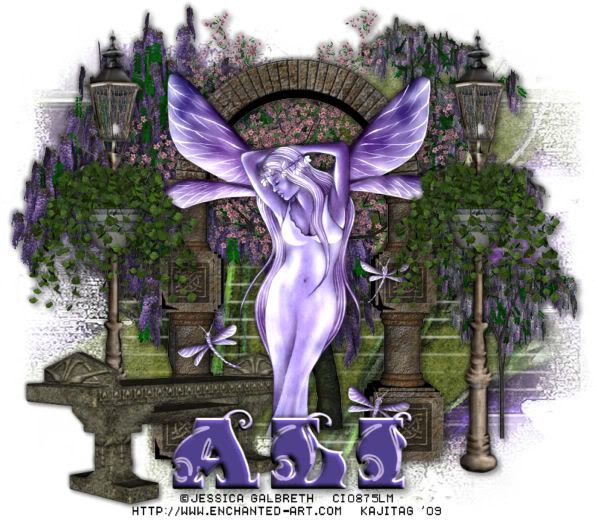
Go back to the top layer and add your name. I used color #1d85dc for the fill and black for the stroke, stroke set at 3.
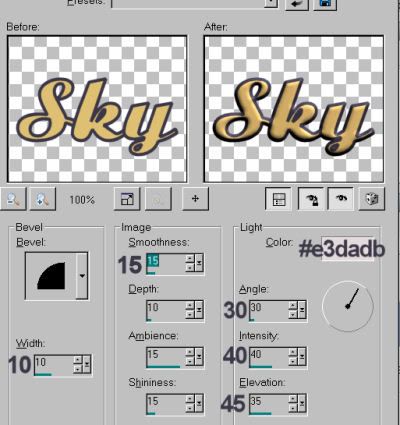
I added a bevel, set as below (This is from a previous tutorial -- I used the same bevel):
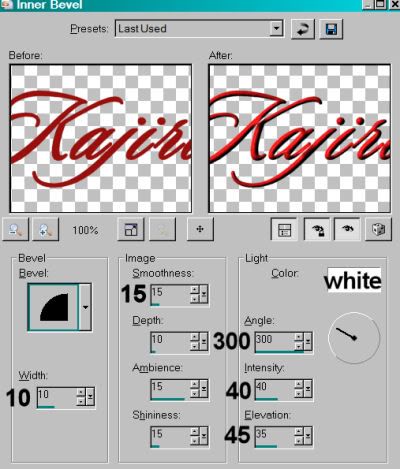
Hit okay.
Drop shadow your name.
I chose, in this particular instance, to drag the name below the parfume bottle. It's up to you.
Resize your canvas to a size with which you are comfortable.
Add your copyright, license information if applicable, and taggers'/watermark.
If you choose not to animate, you're now done, and you can merge your layers and save! Just a note: The animation on this tag is very subtle. If you choose not to do it, you're not really missing out on a LOT, but it does add to it a bit, and to the "star" theme.
A N I M A T I O N
Highlight your GlitterStarDoodle layer (the layer to which you applied the copies filter). Duplicate three times, for a total of four GlitterStarDoodle layers.
Highlight your bottom GlitterStarDoodle layer.
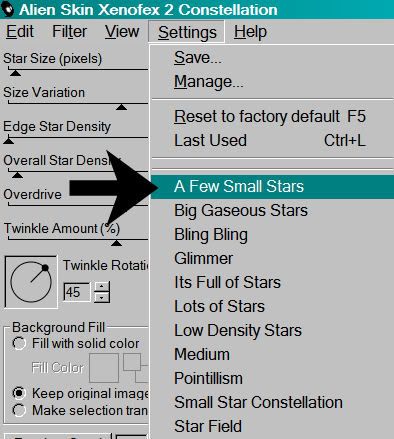
Effects > Alien Skin Xenofex 2 > Constellation with the following setting:
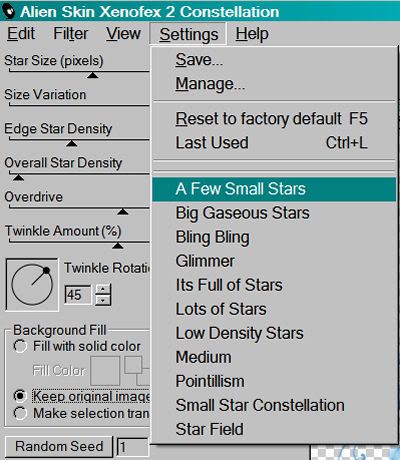
.. and these numbers:
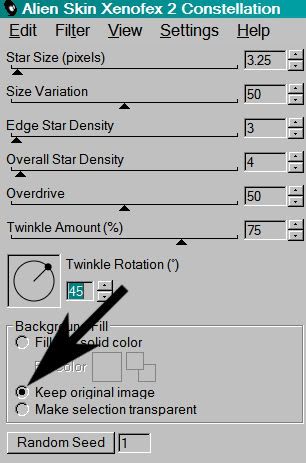
Hit okay.
Highlight the next GlitterStarDoodle layer up.
Add Constellation again, this time hitting "Random Seed" once.
Hit okay.
Now, highlight the third GlitterStarDoodle layer. Again, add Constellation, hitting "Random Seed" once.
Hit okay.
And finally, the top GlitterStarDoodle layer. Add Constellation, again hitting "Random Seed."
Hit okay.
Close out the top three GlitterStarDoodle layers, leaving the bottom GlitterStarDoodle layer open.
Edit > Copy Merged.
Open Animation Shop. Right-click on the desktop area and paste as a new animation.
Return to PSP. Close out the bottom GlitterStarDoodle layer and open the next GlitterStarDoodle layer.
Edit > Copy merged.
Back to Animation Shop. Edit > Paste > After Current Frame.
Return again to PSP. Close out the open GlitterStarDoodle layer and open the next GlitterStarDoodle layer up.
Edit > Copy merged.
Again, back to Animation Shop. Edit > Paste > After Current Frame.
One last time, back to PSP. Close out the open GlitterStarDoodle layer, opening the top GlitterStarDoodle layer.
Edit > Copy Merged.
Back to Animation Shop. Edit > Paste > After Current Frame.
View > Animation.
It's done! I hope you like your creation! Thanks for using my tutorial!
.
.
 [Click image above to go to full sized image.]This tutorial was written on October 28, 2009, using Paint Shop Pro, version X.03. It should be okay to do with other versions as well. I just find X.03 more comfortable for me. You may download a free trial of Paint Shop Pro, version X2, from Corel. Any similarities between this tut and any others you may see are purely coincidental.
You will also need:
Animation Shop. This is from CNET, so it's a safe download. However, it costs. That changed pretty recently. I don't know why!!
HOWEVER ..... a LOVELY person named solshne (and another named Chris) wrote to let me know that one might find Animation Shop for free at this location. This is an FTP link and I have no idea if it's safe or not. So keep your antivirus handy to scan it after download!
A tube of your choice. I'm using the glamorous artwork of Jennifer Janesko. You must have a license to use her artwork. You can get that license and art at C.I.L.M.
The scrap kit is by Lynne of Baby Cakes Scraps. This is a FTU kit called After Midnight. Be sure to leave some love for the free ones!!
Filters: Eye Candy 4000 > Gradient Glow -=- Mura's Meister > Copies -=- VM Natural > Sparkle
Font: I used Sloop Script One.
Supplies: The 20-20 mask. Again, I don't know where this came from, but I know it's been in use for years.... Let me know if YOU know who made this handy mask, and I'll give proper credit where it's due!
Also, please... if you have problems with any download link for supplies, drop me a line via e-mail. Leaving a comment without a way for me to contact you back doesn't help. If you e-mail me, I'll do my best to send you the supplies.
Okay, so let's begin!
Open your mask in PSP and minimize. Alternatively, you can file it away wherever you keep your mask files!
Open a new canvas, 750 x 700, white.
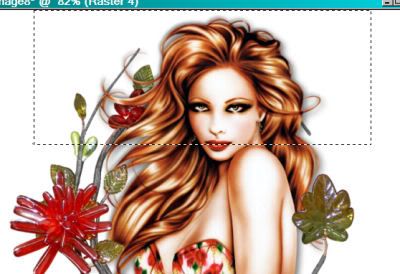
Open branch. Resize 85%. Copy and paste as a new layer.
Add your tube. Resize, position, and drop shadow to your taste. Drag this below the branch layer.
Highlight your branch layer.
Grab your lasso tool, set on point-to-point, and draw a line around the branch, doing your best to keep it steady and circular on the area where the actual branch layer stops and starts.
Selections > Invert
Highlight your tube layer.
Grab your eraser brush and erase that part of your tube that you do not want showing at the bottom of the branch layer.
Selections > Select none.
Open branch again. Resize 85%. Copy and paste as a new layer, above the tube.
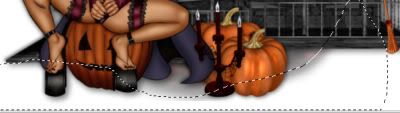
Now grab your selection tool, set on rectangle, and draw a selection around the top part of the branch layer, that you don't want covering your tube layer. Example:
Hit delete. Selection > Select none.
Drop shadow the bottom branch layer.
Highlight your white background layer.
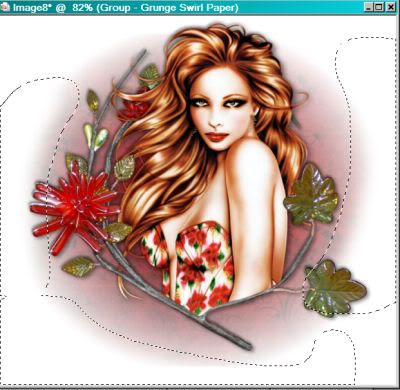
Open Grunge Swirl Paper. Copy and paste as a new layer.
Apply your mask. Delete the mask layer, answer "yes" to the pop-up question, and merge group.
Resize your mask layer 90%.
You may notice the sides and bottom of the mask layer stop in abrupt edges. This bugs the heck out of me, so here's what I did to lose it!
Grab your lasso tool again, this time set on freehand, feather set at 30.
Draw curved selections on each side and on the bottom. Here's an example:
Hit delete. Selections > Select none.
The following steps may be easier if you go back to the top layer.
Open feather. Resize 200%. Copy and paste as a new layer. Position so that it sticks out past the branch circle and your tube, on the right side of your canvas. See my example for placement reference.
Duplicate the feather layer and Image > Mirror
Go back to your original feather layer and duplicate again. Rotate this new feather 20° to the right. Position this one next to the first, in toward the middle a bit, and down a bit. Again, see my example for placement reference.
When you've got it where you want it, duplicate that feather and Image > Mirror.
Drop shadow your feathers lightly. Merge all feather layers down to one. Drag them down below the mask layer.
Open floral wire. Resize 50%. Copy and paste as a new layer.
Effects > Mura's Meister > Copies with the following settings:
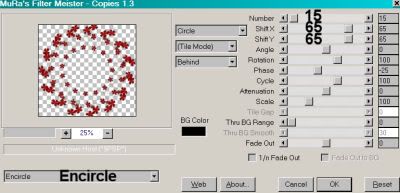
Hit okay.
Resize this layer 85%. Drag the layer below the feather layer. Drop shadow lightly.
Go back to the top layer and add your name. I used color #98100f for the fill and the stroke, stroke set at 3.
I added a bevel, set as below:
Hit okay.
Eye Candy 4000 > Gradient Glow of 5-25-100, color #929a98.
Drop shadow your name.
Resize your canvas to a size with which you are comfortable.
Add your copyright, license information if applicable, and taggers'/watermark.
If you choose not to animate, you're now done, and you can merge your layers and save!
A N I M A T I O N
Highlight your feather layer. Duplicate three times, for a total of four feather layers.
Highlight your bottom feather layer.
Effects > VM Natural > Sparkle with the following settings:
Hit okay.
Highlight the next feather layer up.
Add Sparkle again, this time moving the top and bottom sliders to different numbers. It doesn't matter, really, what numbers. But watch the preview to see where you sparkles are being positioned as you slide the control. Set them where you want.
Hit okay.
Now, highlight the third feather layer. Again, add sparkle, adjusting the slider controls.
Hit okay.
And finally, the top feather layer. Add Sparkle, again adjusting the sliders.
Hit okay.
Whenever I use the Sparkle plug-in, I do this process twice. Start at the bottom and do it all over again. I do this to get more sparkle... just something I do. You may choose not to. It's totally up to you!
Close out the top three feather layers, leaving the bottom feather layer open.
Edit > Copy Merged.
Open Animation Shop. Right-click on the desktop area and paste as a new animation.
Return to PSP. Close out the bottom feather layer and open the next feather layer.
Edit > Copy merged.
Back to Animation Shop. Edit > Paste > After Current Frame.
Return again to PSP. Close out the open feather layer and open the next feather layer up.
Edit > Copy merged.
Again, back to Animation Shop. Edit > Paste > After Current Frame.
One last time, back to PSP. Close out the open feather layer, opening the top feather layer.
Edit > Copy Merged.
Back to Animation Shop. Edit > Paste > After Current Frame.
Still in Animation Shop, Edit > Select All.
Right-click on the top bar of your animation. Select "Frame Properties" and change that number to 30.
View > Animation.
We've finished! Thanks for being here! I'm happy that you chose my tut!!
.
.
 [Click image above to go to full sized image.]This tutorial was written on October 27, 2009, using Paint Shop Pro, version X.03. It should be okay to do with other versions as well. I just find X.03 more comfortable for me. You may download a free trial of Paint Shop Pro, version X2, from Corel. Any similarities between this tut and any others you may see are purely coincidental.
You will also need:
Animation Shop. This is from CNET, so it's a safe download. However, it costs. That changed pretty recently. I don't know why!!
HOWEVER ..... a LOVELY person named solshne (and another named Chris) wrote to let me know that one might find Animation Shop for free at this location. This is an FTP link and I have no idea if it's safe or not. So keep your antivirus handy to scan it after download!
A tube of your choice. I'm using the artwork of Elias Chatzoudis. You must have a license to use his artwork. You can get that license and his art at My PSP Tubes.
The scrap kit is collaboration between Fall3n Angel (Yarrow), Chaos Priestess, and Blue Dream Designs. This was offered in June of this year. This is a FTU kit, and can be found here. Yarrow didn't really say it had a particular name, so.... who knows? I listed it as "Chaos Angels" in my scraps folder. Don't forget to leave love for the free ones!!
Filters: Eye Candy 4000 > Gradient Glow -=- Eye Candy 4000 > HSB Noise
Font: I used Alexandra Script.
Supplies: None! Nada! Zip! Zilch! Can you believe that???
There's really not that much to this tut. The worst part is building the starry background.
Let's get this started....
Open a new canvas, 750 x 700, white.
Since this is a collab kit, the files are labeled with each artist's initials first, so you'll have three sets of files. I used *mostly* the third kit, with the initials YW, but I did use at least one of the BD elements!
Open YW_Frame03. Copy and paste as a new layer. Resize 115%.
Add your tube. Resize, position, and drop shadow to your taste.
Highlight your frame layer. Grab your magic wand and click inside the frame. Make sure you also get the opening in at the bottom of the two frames! Actually, in my example, you can't even see that part anymore... so it's up to you. Selections > Modify > Expand by 1. Selections > Invert.
Highlight your tube layer. Grab your eraser brush and erase that part of your tube that you do not want showing at the bottom of the frame.
Selections > Select none.
Highlight your white background layer.
Open BD-paper11. Copy and paste as a new layer.
Highlight your frame layer. Again, grab the magic wand and click inside the frame, including the bottom and top spaces between the frames. Selections > Modify > Expand by 10. Selections > Invert.
Highlight your BD-paper11 layer. Hit delete.
Selections > Select none.
I find it easier to do the following few of steps on the top layer.
Open YW_Vine. Resize 85%. Copy and paste as a new layer. Rotate 15° left. Place on the right side of the frame. Duplicate this layer. Image > Mirror. Merge these two layers down. Drop shadow.
Open YW_SparklyStars2. Copy and paste as a new layer. Now, we're going to be working a lot with these stars, so keep them open!
Position the stars in the upper right corner of your canvas. Duplicate this layer and Image > Mirror. Merge these layers down. Duplicate THAT layer and Image > Flip. Merge these two layers down.
Copy the stars again and paste as a new layer. Rotate 90° left. Position at the top area of your canvas. Duplicate this layer and Image > Flip. Merge these two layers down.
Now, copy the stars again and paste as a new layer. Position this layer so the stars fill in the background behind the tube on either side. Duplicate this layer and Image > Mirror. Merge these two layers down.
Now merge all three sparkly stars layers down to one. Whew!
Open some of the flowers... choose the ones you prefer in the collab. Lots of stuff to use there! I preferred to use the YW flowers 02, 03 and 04. I resized each of them at different percentages. One was 65%, one 60% and one 55%. Arrange them along the bottom of the frame. Drop shadow your flowers.
Open BD-flower2. Resize 50%. Copy and paste as a new layer. Position to the left of the other flowers, and below them in the layer palette. Duplicate this layer and Image > Mirror. Merge these two layers down and drop shadow.
You can merge all the flower layers down if you like. Not needed, but I find it cleans up the layer palette somewhat.
Go back to the top layer and add your name. I used color #b2517e and black to create a foreground-background gradient for the fill, and black for the stroke, stroke set at .5.
Add a Gradient Glow of 5-25-100, color #c0c0c0.
Drop shadow your name.
Resize your canvas to a size with which you are comfortable.
Add your copyright, license information if applicable, and taggers'/watermark.
If you choose not to animate, you're now done, and you can merge your layers and save!
A N I M A T I O N
Highlight your stars layer. Duplicate twice, for a total of three stars layers.
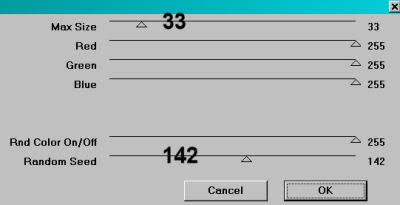
Highlight your bottom stars layer.
Effects > Eye Candy 4000 > HSB Noise with the following settings:
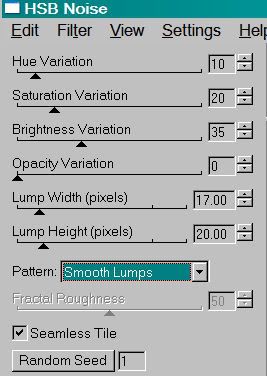
Hit okay.
Highlight the middle stars layer.
Add HSB Noise again, this time hitting "Random Seed" once.
Hit okay.
Now, highlight the top stars layer. Add HSB Noise, again hitting "Random Seed."
Hit okay.
Close out the top two stars layers, leaving the bottom stars layer open.
Edit > Copy Merged.
Open Animation Shop. Right-click on the desktop area and paste as a new animation.
Return to PSP. Close out the bottom stars layer and open the middle stars layer.
Edit > Copy merged.
Back to Animation Shop. Edit > Paste > After Current Frame.
Return again to PSP. Close out the middle stars layer and open the top stars layer.
Edit > Copy merged.
Again, back to Animation Shop. Edit > Paste > After Current Frame.
Still in Animation Shop, Edit > Select All
Right-click on the top bar of your animation and choose "Frame Properties." Change this number to 25.
View > Animation.
And we've finished another tut! I hope you like your results! I wouldn't mind seeing any.... Thanks for being here!
.
.
 [Click image above to go to full sized image.]This tutorial was written on October 27, 2009, using Paint Shop Pro, version X.03. It should be okay to do with other versions as well. I just find X.03 more comfortable for me. You may download a free trial of Paint Shop Pro, version X2, from Corel. Any similarities between this tut and any others you may see are purely coincidental.
You will also need:
Animation Shop. This is from CNET, so it's a safe download. However, it costs. That changed pretty recently. I don't know why!!
BUT..... a LOVELY person named solshne wrote to let me know that one might find Animation Shop for free at this location. This is an FTP link and I have no idea if it's safe or not. So keep your antivirus handy to scan it after download!
A tube of your choice. I used the beautiful artwork of Barbara Jensen. You must have a license to use her art. You may obtain that license and her art from Erotic Artist Gallery. I chose to use two of her tubes, since they are of the same girl. It's totally up to you!
The scrap kit is by Ali, from Designs by Ali. This is a FTU kit, called Be Happy. Scroll down a bit, it's the third kit in the post. Leave Ali some love for the freebies!!
Supplies: The animation, the gradient and the mask, which can be found here. The mask comes from Monti's Pixel Playground. The animation I used to know. The name has slipped my mind at the moment. This bling's original label starts wtih Nm_ . If anyone out there can help me to recall who made this bling, I'd appreciate it so that I may give proper credit where it's due. Thank you! I also could not find the origin of the gradient. I can't even find the thing to try and convert it. So as it is, the gradient I've supplied is a file type for PSP X and up. Sorry, I could not find how to convert to a .jgd.
Other than that, please, if you have problems with any download link for supplies, drop me a line via e-mail. Leaving a comment without a way for me to contact you back doesn't help. If you e-mail me, I'll send you the supplies.
Filters: Mura's Meister > Copies -=- Eye Candy 4000 > Gradient Glow
Font: I used Snappy Script Light.
Okay, let's go!
Open the mask in PSP and minimize. Alternatively, you can file it with the rest of your PSP masks, for future use! Put your gradient into your gradients file, and file the bling to where it will be handy when we get to Animation Shop.
Open a new image, 750 x 700, white.
Open clear brad 2. Resize 35%. Copy and paste as a new layer.
Effects > Plug-Ins > Mura's Meister > Copies with the following settings:
Hit okay.
Add your tube(s). Resize, position and drop shadow to your liking.
Highlight the circle of beads layer you just made. Grab your magic wand and click in the middle of that circle. Selections > Modify > Expand by 5. Selections > Invert.
Highlight your tube layer. Grab your eraser brush and erase any of your tube(s) that may be overlapping the bottom of your circle of beads. Selections > Select None.
Highlight your white background layer. Add a new raster layer.
In your materials palette, change either the foreground or background to the gold gradient I've supplied. Angle 45, Repeats 0, Style Linear.
Flood fill your new raster layer with the gold gradient.
Highlight the circle of beads layer again. Again, grab your magic wand and click inside the circle. Selections > Modify > Expand by 15. Selections > Invert.
Highlight your gold gradient layer. Hit delete. Selections > Select None.
Highlight your white background layer again, add a new raster layer, and fill with the gold gradient, THIS time with Angle at 135, all else the same.
Apply your mask. Delete the mask layer, answer "yes" to the pop-up question, and merge group.
Resize your mask layer by 105%.
Open brad 3. Copy and paste as a new layer.
Effects > Plug-Ins > Mura's Meister > Copies with the following settings:
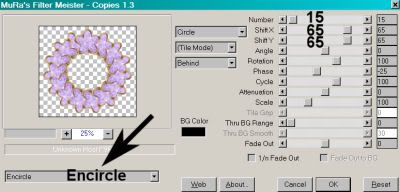
Hit okay.
In your layer palette, drag this layer to just above your mask layer. Drop shadow.
Drop shadow your circle of beads layer.
Open bow2. Resize 50%. Copy and paste as a new layer. I positioned mine in the lower left area of the original circle of beads. Place yours where you'd like it. Drop shadow.
Open badge1. Resize 35%. Copy and paste as a new layer. Position in the center of the bow. Drop shadow.
Now, this is a quirk. I re-resized these two by 85% after I had them all situated. They were just out of "synch" with the rest, so I made them slightly smaller. You may choose to do this or not. Up to you!
On your top layer, add your name. I used color #cdb2f3 for the fill, #2b0e54 for the stroke, stroke set at 2.
I added the following bevel:
Effects > Plug-Ins > Eye Candy 4000 > Gradient Glow set at 5-25-100, color #e7e19f.
Drop shadow your name.
Add your copyright, license information if applicable, and taggers'/watermark.
If you choose not to animate, you're done! Merge your layers and save!! Congrats!
A N I M A T I O N
Edit > Copy merged
Open Animation Shop, right-click on the desktop area and paste as a new animation.
Duplicate this frame until you have a total of 16 frames. Move your slider at the bottom back to the first frame.
Locate and open your bling. Edit > Select All. Edit > Copy
Return to your animation that you're building and Edit > Select All. Edit > Paste into Selected Frame.
Hover your mouse until the tip of the bling appears. I chose to have the butterfly positioned on the top of the hand of one of my tubes. If you're not using a similar-type tube, go your own way! :)
Release the mouse button. View > Animation. If you like what you see and there's no changes, then:
Animation > Resize Animation > Size the finished product to a size with which you're comfortable.
View > Animation. Save as .gif and, again! We are done!! Thanks for taking it on! I hope you enjoy your results!
.
.
 [Click image above to go to full sized image.]This tutorial was written on October 21, 2009, using Paint Shop Pro, version X.03. It should be okay to do with other versions as well. I just find X.03 more comfortable for me. You may download a free trial of Paint Shop Pro, version X2, from Corel. Any similarities between this tut and any others you may see are purely coincidental.
You will also need:
Animation Shop. This is from CNET, so it's a safe download. However, it costs. That changed pretty recently. I don't know why!!
HOWEVER ..... a LOVELY person named solshne (and another named Chris) wrote to let me know that one might find Animation Shop for free at this location. This is an FTP link and I have no idea if it's safe or not. So keep your antivirus handy to scan it after download!
A tube of your choice. I'm using the artwork of Angie Monasterio. You must have a license to use her artwork. You can get that license and art at C.I.L.M.
The scrap kit is by Babs of Babs Bitzy Beez. This is a FTU kit called Orange Blush. Leave love for the free ones!!
Filters: Alien Skin > Xenofex 2 > Constellation, Eye Candy 3.1 > Glass, Eye Candy 4000 > Gradient Glow
Font: I used Rapier LET.
Supplies: The mask. Again, I don't know where it came from. PLEASE let me know if it's yours, and I'll give you credit!! I got reported to 4shared for the vague crime of "abuse," and I ask all the time if it's yours, let me know. Either that or I link directly to the artist. *sigh*
UPDATE: I asked 4shared who reported me for what, and it's a MUSIC site! Saying I'm sharing copyrighted MUSIC. I assured them I had nothing to do with music sharing and pointed them here. Hopefully my name will be cleared. Although, I *have* deleted the file they put in an abuse folder. Ah, the whys and wherefores of the Internet....
Let's get this started....
Open your mask in PSP and minimize. Alternatively, you can file it away wherever you keep your mask files!
Open a new canvas, 700 x 700, white.
Open frame1. Copy and paste as a new layer.
Add your tube. Resize, position, and drop shadow to your taste.
Highlight your frame layer. Grab your magic wand and click inside the frame. Selections > Modify > Expand by 1. Selections > Invert.
Highlight your tube layer. Grab your eraser brush and erase that part of your tube that you do not want showing at the bottom of the frame.
Selections > Select none.
Highlight your white background layer.
Open paper6. Copy and paste as a new layer.
Highlight your frame layer. Again, grab the magic wand and click inside the frame. Selections > Modify > Expand by 10. Selections > Invert.
Highlight your paper6 layer. Hit delete.
Selections > Select none.
Now, highlight your white background layer again. Open paper6 again, & copy and paste as a new layer.
Apply your mask. Delete the mask layer, answer "yes" to the pop-up question, and merge group.
I find it easier to do the following couple of steps on the top layer.
Open doodle2. Copy and paste as a new layer. Position to the upper center area of your canvas. You may refer to my example for placement reference if you like. Duplicate this layer. Image Rotate 90° either direction. Position so the flowers stick out on the side. Duplicate this layer. Image > Mirror. Merge these three layers down. Now in your layer palette, drag this layer down to just above the mask layer. Drop shadow.
Drop shadow your frame....
I guess this next step depends upon whether or not you have chosen to use a tube with a hand sticking out.
Open charm1. Resize 35%. Position as though it may be hanging from the hand. Grab your selection tool, set on rectangle, and draw a selection around the top part of the chain. Hit delete. Selections > Select None. Drag this layer down below the tube layer. Drop shadow.
Go back to the top layer and add your name. I used color #f7b2ad for the fill and the stroke, stroke set at 3.
Eye Candy 3.1 > Glass with the following settings. Basically it's all the default settings, except the color.
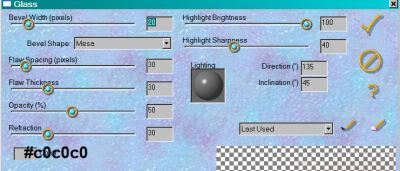
Hit okay.
Add a Gradient Glow of 4-0-100, color #3c3323.
Drop shadow your name.
Resize your canvas to a size with which you are comfortable.
Add your copyright, license information if applicable, and taggers'/watermark.
If you choose not to animate, you're now done, and you can merge your layers and save!
A N I M A T I O N
Highlight your mask layer. Duplicate three times, for a total of four mask layers.
Highlight your bottom mask layer.
Effects > Alien Skin Xenofex 2 > Constellation with the following setting:
and the following numbers:
Hit okay.
Highlight the next mask layer up.
Add Constellation again, this time hitting "Random Seed" once.
Hit okay.
Now, highlight the third mask layer. Add Constellation, again hitting "Random Seed."
Hit okay.
And finally, the top mask layer. Add Constellation, hitting "Random Seed."
Hit okay.
Close out the top three mask layers, leaving the bottom mask layer open.
Edit > Copy Merged.
Open Animation Shop. Right-click on the desktop area and paste as a new animation.
Return to PSP. Close out the bottom mask layer and open the next mask layer.
Edit > Copy merged.
Back to Animation Shop. Edit > Paste > After Current Frame.
Return again to PSP. Close out the open mask layer and open the next layer up.
Edit > Copy merged.
Again, back to Animation Shop. Edit > Paste > After Current Frame.
One last time, back to PSP. Close out the open mask layer, opening the top mask layer.
Edit > Copy Merged.
Back to Animation Shop. Edit > Paste > After Current Frame.
View > Animation.
We've finished! I hope I explained this well enough for y'all. Thanks for being here! I'm happy that you chose my tut!!
.
.
 [Click image above to go to full sized image.]This tutorial was written on October 16, 2009, using Paint Shop Pro, version X.03. It should be okay to do with other versions as well. I just find X.03 more comfortable for me. You may download a free trial of Paint Shop Pro, version X2, from Corel. Any similarities between this tut and any others you may see are purely coincidental.
You will also need:
A tube of your choice. I'm using the beautiful artwork of Karen Middleton. You must have a license to use her art. You may obtain that license and her art from C.I.L.M. (You'll note, if you click on the link to Karen... it brings you to another page at C.I.L.M. The URL we were given no longer works, and we've been told by those at C.I.L.M. to just refer folks to them.)
The scrap kit is by Kairinakat, of Kairinakat Kreations. This is a PTU kit, which can be found at Scrap it Sassy. This kit is titled "Fall Wishes." Now on sale for $1!!!
Supplies: No outside supplies in this tutorial!
Filters: Mura's Meister > Copies, Eye Candy 4000 > Gradient Glow
Font: I used ExPonto.
Let's get to it! This is another easy tut. Cut-n-Paste all the way. The part that's NOT easy is the fact that the kit artist did not label the elements & papers. They're all numbered. So I'll refer to them by a name I chose to label them with, in my layer palette, AND by the number assigned. Clear as mud? Good! LOL...
Open a new canvas, 800 x 700, white.
Open Jewel Heart (16). Resize 50%. Copy and paste as a new layer.
Effects > Plug-Ins > Mura's Meister > Copies with the settings below:
Hit okay.
Add your tube. Resize, position and drop shadow to your taste. Drag below the frame we made with the hearts. If you're using a tube similar to mine, with just the face, then follow along with me!
Highlight your copies layer. Grab your magic wand and click inside the oval of hearts you just made.
Selections > Modify > Expand by 1. Selections > Invert.
Highlight your tube layer. Hit delete.
Highlight your white background layer.
Open paper (81). Copy and paste as a new layer. Hit delete.
Selections > Select none.
Go back to the top layer.
Open the sunflowers (53). Copy and paste as a new layer. Position in the upper right-hand area of your canvas. See my example for placement reference. Drop shadow.
Duplicate this layer and Image > Mirror. Merge these two layers down.
Grab your selection tool, set on rectangle, and draw a box around the stems sticking out on the bottom. Hit delete. Selections > Select none.
Go back to your sunflowers layer and duplicate. Image > Flip. Merge these two layers down. Drag this layer down to just above your white background layer.
Open the golden leaf (51). Resize 75%. Copy and paste as a new layer. Position in the upper right-hand corner of the canvas, between the two sunflowers, where the space is open. Again, see my example for placement reference. Drop shadow.
Duplicate this layer. Image > Mirror. Merge these two layers down. Duplicate THIS layer. Image > Flip. Merge those two layers down. Drag to just above the sunflowers layer.
Open Butterfly (19) Resize 65%. Copy and paste as a new layer. Position in the space at the top center of your arrangement. Drop shadow.
Go to the top layer and add your name. I used color #b23828 as the fill and the stroke. Stroke set at 3.
Add a Gradient Glow, settings at 4-0-100, color #e8c542. Drop shadow your name.
Resize your canvas to a size with which you're comfortable.
Add your copyright, license information if applicable, and taggers'/watermark.
Layers > Merge > and save! We are done!
And there you go! Another finished tag! I hope you liked this tutorial. I thank you SO much for choosing to work with it!!
.
.
 [Click image above to go to full sized image.]This tutorial was written on October 15, 2009, using Paint Shop Pro, version X.03. It should be okay to do with other versions as well. I just find X.03 more comfortable for me. You may download a free trial of Paint Shop Pro, version X2, from Corel. Any similarities between this tut and any others you may see are purely coincidental.
You will also need:
A tube of your choice. I'm using the artwork of Jessica Galbreth. You must have a license to use her art. You may obtain that license and her art from C.I.L.M.
The scrap kit is by Ali, of Designs by Ali. This is a FTU kit titled "Green Green Garden." Be sure to leave Ali some love for posting freebies for us!!
Supplies: The mask. Don't know where I got it, and as usual, let me know if it's yours, or you know whose it is, so that I may give credit for the free mask!
Filters: No outside filters used in this tutorial!
Font: I used Fantastic MF Initials.
Let's get to it! This is a VERRRRRY easy tut. Cut-n-Paste all the way.
Open your mask in PSP and minimize. Alternatively, you could file it in with the rest of your PSP masks for use at a later date. Totally up to you!
Open a new canvas, 800 x 700, white.
Open Tree2. Copy and paste as a new layer. Position as you like. I mirrored mine and placed it to the left. Drop shadow.
Open Tree3. Copy and paste as a new layer. Position as you like. Mine is to the right. Drop shadow.
All this positioning of your trees will be changing once you get all the stuff in there, so .... just sayin'...
Open Tree1. Copy and paste as a new layer. Position this as you like. Mine is between and above the other two trees. Drop shadow.
Open Garden Arch. Copy and paste as a new layer. Drop shadow.
Open Seat1. Resize 75%. Copy and paste as a new layer. Position to the left. Drop shadow.
Add your tube. Resize, position and drop shadow to your liking.
Open Lamp Post 1. Resize 75%. Copy and paste as a new layer. Position this to the right of the arch. Duplicate this layer. Image > Mirror. Merge these two layers down. Drop shadow your lamp posts.
Open Hanging Basket1. Resize 50%. Copy and paste as a new layer. Position as if it's hanging off the hooks on one of the lamp posts. Duplicate this layer and Image > Mirror. Merge these two layers down and drop shadow.
Highlight your white background layer.
Open Paper4. Copy and paste as a new layer.
Apply your mask. Delete mask layer, answering "yes" to the pop-up question, and merge group.
Resize your mask layer 105%.
Go to the top layer and add your name. I used color #cdc1f9 as the fill, #554899 as the stroke. Stroke set at 3.
I added a bevel:
Hit okay.
Resize your canvas to a size with which you're comfortable.
Add your copyright, license information if applicable, and taggers'/watermark.
Layers > Merge > and save! We are done!
Et, voila, we are done with another! I hope you enjoyed this. I think it was super easy to do, don't you? Thanks for stopping by, and I hope your day is going swimmingly!! LOL!
.
.
 [Click image above to go to full sized image.]This tutorial was written on October 14, 2009, using Paint Shop Pro, version X.03. It should be okay to do with other versions as well. I just find X.03 more comfortable for me. You may download a free trial of Paint Shop Pro, version X2, from Corel. Any similarities between this tut and any others you may see are purely coincidental.
You will also need:
Animation Shop. This is from CNET, so it's a safe download. However, it costs. That changed pretty recently. I don't know why!!
HOWEVER ..... a LOVELY person named solshne (and another named Chris) wrote to let me know that one might find Animation Shop for free at this location. This is an FTP link and I have no idea if it's safe or not. So keep your antivirus handy to scan it after download!
A tube of your choice. I'm using the artwork of Scott Blair. You must have a license to use his artwork. You can get that license and art at My PSP Tubes.
The scrap kit is by Sky of Sky Scraps Design. This is a recently FTU kit (that use to be PTU). You can find the kit here. It's called "Adore." Leave love for the free ones!!
Filters: Alien Skin > Xenofex 2 > Constellation
Font: I used HABIT Regular.
Supplies: No outside supplies used in this tutorial!
Let's get this started....
Open a new canvas, 750 x 750, white. Now, I started at this size and I have no idea why. I resized to 700x700 mid-tag-making. I don't know at exactly what step I did this... I'm a bit concerned about sizing, but if you need things sized a bit smaller or larger, you can do that for yourselves, right? *crossed fingers*
Here we go...
Open Bracket8. Copy and paste as a new layer. Drop shadow.
Add your tube. Resize, position, and drop shadow to your taste.
Highlight your white background layer.
Open Bracket6. Copy and paste as a new layer. Resize 115%. Drop shadow.
Open Daisie3. Copy and paste as a new layer. This layer goes above Bracket8. Resize 125%. Drop shadow.
Open Beadstring6. Copy and paste as a new layer. Resize 75%. Position where you'd like it to be. I found it difficult to place mine, because of the tube I'd chosen. I chose the upper left area of the dark denim "Bracket" layer. Drop shadow.
Open PrettyButterfly1. Resize 50%. Copy and paste as a new layer. Image > Mirror. Position where you'd like it. Drop shadow.
I find it easier to do the following couple of steps on the top layer.
Open Bling5. Copy and paste as a new layer. Position to the left upper area of your canvas. Duplicate this layer. Image > Mirror. Merge these two layers down. Duplicate THIS layer. Image > Flip. Merge those two layers down. Now in your layer palette, drag this layer down to the bottom, just above your white background.
Back to the top layer...
Open Bling7. Copy and paste as a new layer. Position it so that the top of the loop shows just at the top of the dark denim Bracket layer. Duplicate this layer. Image > Rotate 90° right. Position this one so that the loop will show from under the Bracket layer, to the right. Duplicate this layer. Image > Mirror. Go back to the first Bling7 and duplicate that layer. Image > Flip. Merge all these layers down. In your layer palette, drag this one below the Bling5 layer.
Go back to the top layer and add your name. I used color #dfbf71 for the fill and #3b3848 for the stroke, stroke set at 3. Add the following bevel:
Hit okay. Drop shadow your name.
Resize your canvas to a size with which you are comfortable.
Add your copyright, license information if applicable, and taggers'/watermark.
If you choose not to animate, you're now done, and you can merge your layers and save!
A N I M A T I O N
Highlight your Bling5 layer. Duplicate three times, for a total of four Bling5 layers.
Highlight your bottom Bling5 layer.
Effects > Alien Skin Xenofex 2 > Constellation with the following setting:
and the following numbers:
Hit okay.
Highlight the next Bling5 layer up.
Add Constellation again, this time hitting "Random Seed" once.
Hit okay.
Now, open the third Bling5 layer. Add Constellation, again hitting "Random Seed."
Hit okay.
And finally, the top Bling5 layer. Add Constellation, hitting "Random Seed."
Hit okay.
Close out the top three Bling5 layers, leaving the bottom Bling5 layer open.
NOW
Highlight your Bling7 layer. Duplicate this layer three times, for a total of four Bling7 layers.
Add Constellation the same way -- same settings -- we did for the first Bling5 layer, just hitting "Random Seed" for each layer.
When done, close out the top three Bling7 layers, leaving the bottom Bling7 layer open.
Edit > Copy Merged.
Open Animation Shop. Right-click on the desktop area and paste as a new animation.
Return to PSP. Close out the bottom Bling5 layer and open the next Bling5 layer. Same with your Bling7 layers.
Edit > Copy merged.
Back to Animation Shop. Edit > Paste > After Current Frame.
Return again to PSP. Close out the open Bling5 and Bling7 layers and open the next layers up.
Edit > Copy merged.
Again, back to Animation Shop. Edit > Paste > After Current Frame.
One last time, back to PSP. Close out the open Bling5 and Bling7 layers, opening the top on both.
Edit > Copy Merged.
Back to Animation Shop. Edit > Paste > After Current Frame.
View > Animation.
We've finished! I hope I explained this well enough for y'all. Thanks for being here! I love that you like my tutorials!!
.
.
 [Click image above to go to full sized image.]This tutorial was written on October 13, 2009, using Paint Shop Pro, version X.03. It should be okay to do with other versions as well. I just find X.03 more comfortable for me. You may download a free trial of Paint Shop Pro, version X2, from Corel. Any similarities between this tut and any others you may see are purely coincidental.
You will also need:
A tube of your choice. I'm using the artwork of Jennifer Janesko. You must have a license to use her art. You may obtain that license and her art from C.I.L.M.
The scrap kit is by Ali, of Designs by Ali. This is a FTU kit titled "My Quiet Space." Be sure to leave Ali some love for posting freebies for us!!
Supplies: Just the two masks. I don't know where I got these, but if you do, or if the person who made them sees them, let me know and I'll give you credit!
Filters: Eye Candy 4000 > Gradient Glow (on the name only)
Font: I used Fanciful Condensed.
Okay, let's try this! This kit is FULL of great elements to use, so there will be a lot of steps, but it's an easy to do tutorial!
Open your masks in PSP and minimize. Alternatively, you could file them in with the rest of your PSP masks for use at a later date. Totally up to you!
Open a new canvas, 800 x 700, white.
Open Chair2. Copy and paste as a new layer. Position as you like. You'll note I used a tube that just seems like it was made for this chair. Hopefully you have the same one, or one like it!
Add your tube. Resize, position and drop shadow to your liking.
If you are using the same tube, I did the lasso thing with feather on 17 to soften the cropped off legs and hair. (Grab the lasso tool, set on add/shift, feather at 17, and draw curves over the legs and hair a bit.... leg curve should look like a smile of sorts, the hair one, the opposite. Here is an example of what I mean, but it's from a different tutorial. Just want to make sure you get what I'm saying:
Something like that, okay? When all are drawn, make sure you're on the tube layer and hit delete a couple times until you like what you see. Selections > Select None.)
Open Standing Mirror3. Resize 65%. Copy and paste as a new layer. I mirrored my mirror. LOL. Position where you'd like it to be. Drop shadow. In the layer palette, this one is below the chair.
Highlight your tube layer.
Now, using your selection tool set on rectangle, (make sure feather is set to zero!) draw a selection around the top of the body of your tube. Edit > Copy. Edit > Paste as a new layer. Selections > Select none. Image > Mirror.
Position this copy of your tube so that it appears to be a reflection of the main scene. I had a lot of over-hang on this one. So if you do too, lower the opacity on your mirrored tube to 57. Take your lasso tool, set on point-to-point, and draw selections along the inside edges of the mirror and around the portions of your tube that don't belong. Hit delete. Selections > Select none. Leave the opacity at 57 -- it looks more like a reflection, IMO, that way.
Bravo! I hope I explained that well enough for you!
Open Nesting Boxes1. Resize 50%. Copy and paste as a new layer. Position, again, to one side or the other, dragging this layer, too, below the chair. Drop shadow.
Open Lamp2. Resize 50%. Copy and paste as a new layer. Position so it looks as if it's sitting on the nested boxes. Drop shadow.
Open Quilt1. Resize 35%. Copy and paste as a new layer. Rotate 45° right. Place so that it looks a bit like it might be covering the legs. It doesn't have to be perfect, as we have pillows and cushions coming!! Aha!! Drop shadow the quilt.
Open Pillow3. Resize 45%. Copy and paste as a new layer. Position somewhere in front of the chair and tube. Drop shadow. Note my example for placement reference on all of this, if you like.
Open Cushion10. Resize 35%. Copy and paste as a new layer. Same rotation as before, 45° right. Put it so it looks as best you can like a "normal" pile of pillows in the house. LOL! I wish I had this room!! Drop shadow.
Open Cushion12. Resize 75%. Copy and paste as a new layer. Position in front of the nesting boxes but behind the chair. Drop shadow.
Open Candle2. Resize 35%. Copy and paste as a new layer. Position as you'd like it... mine is just in front of the mirror, behind the pillow and cushions. Drop shadow your candles.
Highlight your white background.
Add a new raster layer.
Now, we're going to form a gradient. Go to your materials palette and on the stroke, use color #521d48. Now change your fill color to #e5aaa5.
Click on your foreground (stroke) color and choose Gradient. Then Foreground-Background Gradient and use these settings:
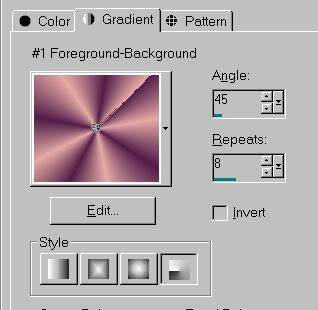
Note we're using the radial gradient style, the fourth button under the color. Angle 45, repeats 8.
Hit okay.
Your materials palette should now look somewhat like this:
Flood fill your new raster layer with this gradient.
Apply the LAD_Frosted mask. Delete mask layer, answering "yes" to the pop-up question, and merge group.
Now apply the Edge Oval mask. Delete that mask layer, answer "yes" to the pop-up question, and merge group again.
There! Looks a bit more cohesive now!
Go to the top layer and add your name. I used the same gradient as the fill, no stroke. Since Ali's name is so short, it was easy to postion upon the pillow. I did this tag for myself as well, and it wouldn't fit, so it positioned it to the left of that. Up to you!!
I added a bevel:
Hit okay.
Add a Gradient Glow, 3-0-100, Under the color tab click on "medium," and use color #e5aaa5. Hit okay. Drop shadow your name.
Resize your canvas to a size with which you're comfortable.
Add your copyright, license information if applicable, and taggers'/watermark.
Layers > Merge > and save! We are done!
There, we're done! I really do hope I explained myself well enough for you on this one. Let me know if you have any questions... Thanks for deciding upon this tutorial!! Have a grrrrrreat day!
.
.
 [Click image above to go to full sized image.]This tutorial was written on October 11, 2009, using Paint Shop Pro, version X.03. It should be okay to do with other versions as well. I just find X.03 more comfortable for me. You may download a free trial of Paint Shop Pro, version X2, from Corel. Any similarities between this tut and any others you may see are purely coincidental.
You will also need:
Animation Shop. This is from CNET, so it's a safe download. However, it costs. That changed pretty recently. I don't know why!!
HOWEVER ..... a LOVELY person named solshne (and another named Chris) wrote to let me know that one might find Animation Shop for free at this location. This is an FTP link and I have no idea if it's safe or not. So keep your antivirus handy to scan it after download!
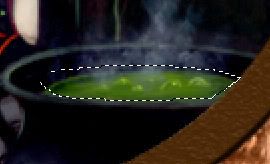
[NOTE: The animation on this tag depends upon the use of this particular tube. Otherwise, you could find a "witches' brew" type pot to add to yours and add the same effect. But do note that this animation starts with the brew already showing in the tube I've chosen to use.]
A tube of your choice. I'm using the great artwork of Jasmine Becket-Griffith. You must have a license to use her artwork. You can get that license and art at C.I.L.M.
The scrap kit is by Heza of Heza Scraps and Tags. This is a PTU kit. The kit is available from Treasured Scraps. It's called "Hallowsweet."
Filters: Eye Candy 4000 > Smoke
Font: I used Amethyst Script.
Supplies: Just the two masks. I don't know where I got either of them, but they're what I used. Please let me know if they are yours, so that I might give proper credit where it's due!
The spider I used is by Jasmine Becket-Griffith, from a different tube. So that is not included in with the supplies nor the scrap kit. You might be able to find one from elsewhere, if you really want to use one. I will include steps for the spider in the tutorial. If you find you're not using one, just skip over that part.
Let's get this started....
Open your masks in PSP and minimize. Alternatively, you could file them where your PSP masks are filed for use in the future.
Open a new canvas, 750 x 700, white.
Open Frame2. Copy and paste as a new layer.
Add your tube. Resize, position, and drop shadow to your taste.
Highlight your frame layer. Grab your magic wand, and click inside the center of the frame. Selections > Modify > Expand by 1. Selections > Invert.
Highlight your tube layer. Grab your eraser brush and erase any of the tube that overhangs the bottom of the frame.
Selections > Select none.
Highlight your white background layer.
Open paper1. Copy and paste as a new layer.
Using your pick tool,
drag out the sides of the paper until it just covers your canvas.
Apply Mask 001. Delete mask layer, answer "yes" to the pop-up question and merge group. Rotate mask layer 90° either way.
Highlight your white background layer again.
Open paper4. Copy and paste as a new layer. Again, using your pick tool, stretch the paper out until it just fills the canvas.
Apply the Edge Oval Mask. Delete the mask layer, answer "yes" to the pop-up question and merge group.
Go back to the top layer.
Open Moon from the scrap kit. Resize 35%. Copy and paste as a new layer. Pick where you'd like your moon to be positioned. Drop shadow the moon. In your layer palette, drag it down to below the mask layers.
Open the spider. Copy and paste as a new layer. Position under the moon, kinda flirting with scaring the daylights out of your tube. LOL. Drop shadow. In your layer palette, this should be your top layer.
Using your pen tool, line set on solid, stroke 2, draw a line between the bottom of the moon and the spider. Drop shadow this line. In your layer palette, drag it down below the moon layer.
Open Bat2. Resize 35%. Copy and paste as a new layer. Position wherever you'd like it. I wanted mine by the moon. See my tag for placement reference. Drop shadow your bat, and drag this to just above the moon layer.
Open feather2. Copy and paste as a new layer. Image > Mirror. Place on the bottom left area of the frame. Drop shadow your feather.
Open Flower 7. Resize 50%. Copy and paste as a new layer. Position and arrange on top of the feather. Drop shadow your flower.
Open the witch. Resize 40%. Copy and paste as a new layer. Image > Mirror. I chose to position mine opposite the moon. See my example for placement reference if you like. Drop shadow your witch.
Go back to the top layer and add your name. I used color #d24e07 for the fill and stroke, stroke set at 2. Add a bevel if you like. (I'm using an old screen shot here from a different tutorial, but it's the same bevel!)
Hit okay.
Drop shadow your name.
Resize your canvas to a size with which you are comfortable.
Add your copyright, license information if applicable, and taggers'/watermark.
If you choose not to animate, you're now done, and you can merge your layers and save!
A N I M A T I O N
Highlight your tube layer.
Grab your lasso tool, set on point-to-point. Zoom in on your pot of brew. lol. What is it called? Oh yes, the cauldron. Zoom in on the contents of the cauldron. Draw a selection around the contents of the cauldron.
Duplicate this layer three times, for a total of four tube layers.
Highlight your bottom tube layer.
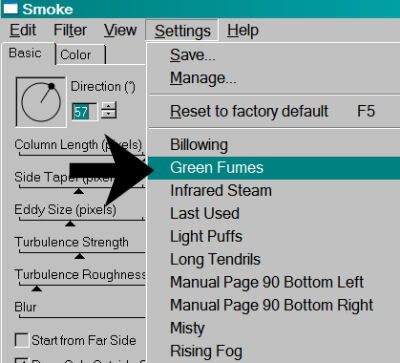
Effects > Eye Candy 4000 > Smoke with the following setting:
Hit okay.
Highlight the next tube layer up.
Add Smoke > Green Fumes again, this time hitting "Random Seed" once.
Hit okay.
Now, open the third tube layer. Add more Smoke > Green Fumes, again hitting "Random Seed."
Hit okay.
And finally, the top tube layer. Add Smoke > Green Fumes, hitting "Random Seed."
Hit okay.
Selections > Select None.
Close out the top three tube layers, leaving the bottom tube layer open.
Edit > Copy Merged.
Open Animation Shop. Right-click on the desktop area and paste as a new animation.
Return to PSP. Close out the bottom tube layer and open the next tube layer.
Edit > Copy merged.
Back to Animation Shop. Edit > Paste > After Current Frame.
Return again to PSP. Close out the open tube layer and open the next layer up.
Edit > Copy merged.
Again, back to Animation Shop. Edit > Paste > After Current Frame.
One last time, back to PSP. Close out the open tube layer and open the top.
Edit > Copy Merged.
Back to Animation Shop. Edit > Paste > After Current Frame.
Edit > Select All.
Right-click on the top bar of your animation, and choose "Frame Properties."
Change this number to 17.
View > Animation.
Here we are, done with another! I hope you enjoyed this tutorial, and I thank you for stopping by!!
.


©kajira hill 2009
http://kajituts.blogspot.com


