
You will also need:
Animation Shop. This is from CNET, so it's a safe download. However, it costs. That changed pretty recently. I don't know why!!
HOWEVER ..... a LOVELY person named solshne (and another named Chris) wrote to let me know that one might find Animation Shop for free at this location. This is an FTP link and I have no idea if it's safe or not. So keep your antivirus handy to scan it after download!
A tube of your choice. I'm using the fun & sexy artwork of Dominic Marco. You must have a license to use his artwork. You can get that license and art at C.I.L.M.
The scrap kit is by Leigh of Heartfelt Perfections. This is a FTU kit, but I could not find it on this blog. You'll have to go through the store thing, but the kit IS free. You can find it at Creative Scraps.. It's called Easterfest. On the far left is a long list of categories. Find "Freebies." Click there. As I'm looking at this page now, it's the fourth (or last) row down, first kit. It has moved around since I first found it, so I hope it stays there!! The rest of the freebies don't appear to be full kits. That's why I chose this one.
Filters: Alien Skin > Xenofex 2 > Constellation, Eye Candy 4000 > Gradient Glow
Font: I used Good VibrationsROB.
Supplies: I used the word art that was included in one of Missy's templates, at Divine Intentions. It's template number 214, and can be found here. Scroll down just a bit, and you'll find the post with templates 211-220. Remember, we're using the word art from number 214.
Let's get this started....
Open a new canvas, 700 x 700, white.
Open frame2. Copy and paste as a new layer.
Add your tube. Resize, position, and drop shadow to your taste.
Highlight your frame layer. Grab your magic wand, and click inside the center of the frame. Selections > Modify > Expand by 1. Selections > Invert.
Highlight your tube layer. Grab your eraser brush and erase any of the tube that overhangs the bottom of the frame.
Selections > Select none.
Highlight your white background layer.
Open paper4. Copy and paste as a new layer. Resize 50%.
I find it easier doing the next two steps on the top layer, then dragging the layer down. You can do whatever you like. Just a suggestion.
Open glitterswirl2. Copy and paste as a new layer. Resize 110%. Duplicate this layer. Image > Mirror. Merge these two layers down.
Open stars bpink. Copy and paste as a new layer. I positioned mine so that it was in the upper left corner of the canvas. Duplicate and mirror. Merge these two layers down. Duplicate and flip. Merge these two layers down.
My stars layer is below my glitterswirl layer.
Open butterfly 2. Resize 30%. Copy and paste as a new layer. Position as you like. I chose the upper right corner area of the frame. Drop shadow.
Drop shadow your frame, too! LOL! Keep forgetting that!
Okay, now go to your template214 from Missy.
Layers > View > None.
Now open the "wordart" and the "wordart temp" layers. Edit > Copy merged. Right-click on the desktop area in PSP and paste as new image.
Grab your magic wand, mode on "add." Click inside each of the letters of "Attitude." Top and bottom.
Selections > Modify > Smooth with both options checked and your numbers both on 10.
Use your flood fill tool to fill the letters with color #6858af. Selections > Select none.
Resize the wordart by 50%. Copy and paste as a new layer. I put mine on the bottom left hand corner of the frame. Drop shadow.
Go back to the top layer and add your name. I used color #6858af for the fill and the stroke, stroke set at 1.
Add a bevel as shown below:
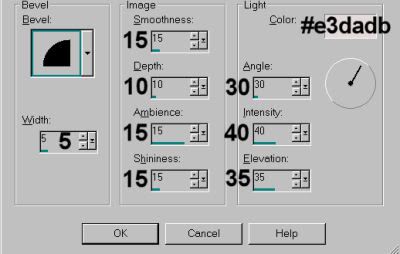
Hit okay.
I then added a Gradient Glow of 3-0-100 in color #ffa9e1.
Drop shadow your name.
Resize your canvas to a size with which you are comfortable.
Add your copyright, license information if applicable, and taggers'/watermark.
If you choose not to animate, you're now done, and you can merge your layers and save!
A N I M A T I O N
Highlight your glitterswirl2 layer. Duplicate three times, for a total of four glitterswirl2 layers.
Highlight your bottom glitterswirl layer.
Effects > Alien Skin Xenofex 2 > Constellation with the following settings:
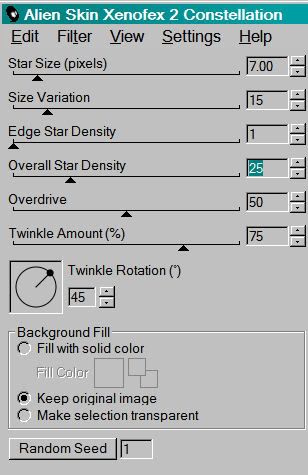
Hit okay.
Highlight the next glitterswirl layer.
Add Constellation again, this time hitting "Random Seed" once.
Hit okay.
Now, open the third glitterswirl layer. Add Constellation, again hitting "Random Seed."
Hit okay.
And finally, the top glitterswirl layer. Add Constellation, hitting "Random Seed."
Hit okay.
Close out the top three glitterswirl layers, leaving the bottom glitterswirl layer open.
Edit > Copy Merged.
Open Animation Shop. Right-click on the desktop area and paste as a new animation.
Return to PSP. Close out the bottom glitterswirl layer and open the next glitterswirl layer.
Edit > Copy merged.
Back to Animation Shop. Edit > Paste > After Current Frame.
Return again to PSP. Close out the open glitterswirl layer and open the next layer up.
Edit > Copy merged.
Again, back to Animation Shop. Edit > Paste > After Current Frame.
One last time, back to PSP. Close out the open glitterswirl layer and open the top.
Edit > Copy Merged.
Back to Animation Shop. Edit > Paste > After Current Frame.
View > Animation.
Et, voila! I hope you enjoyed this tutorial, and I thank you for stopping by!!
.


No comments:
Post a Comment