
You will also need:
Animation Shop. This is from CNET, so it's a safe download. However, it costs. That changed pretty recently. I don't know why!!
BUT..... a LOVELY person named solshne wrote to let me know that one might find Animation Shop for free at this location. This is an FTP link and I have no idea if it's safe or not. So keep your antivirus handy to scan it after download!
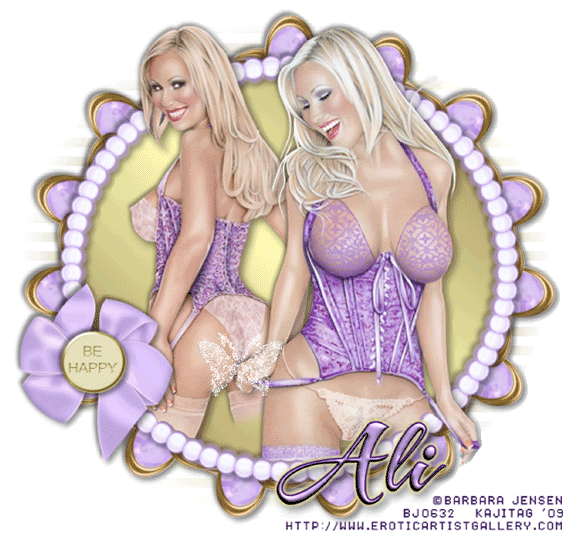
A tube of your choice. I used the beautiful artwork of Barbara Jensen. You must have a license to use her art. You may obtain that license and her art from Erotic Artist Gallery. I chose to use two of her tubes, since they are of the same girl. It's totally up to you!
The scrap kit is by Ali, from Designs by Ali. This is a FTU kit, called Be Happy. Scroll down a bit, it's the third kit in the post. Leave Ali some love for the freebies!!
Supplies: The animation, the gradient and the mask, which can be found here. The mask comes from Monti's Pixel Playground. The animation I used to know. The name has slipped my mind at the moment. This bling's original label starts wtih Nm_ . If anyone out there can help me to recall who made this bling, I'd appreciate it so that I may give proper credit where it's due. Thank you! I also could not find the origin of the gradient. I can't even find the thing to try and convert it. So as it is, the gradient I've supplied is a file type for PSP X and up. Sorry, I could not find how to convert to a .jgd.
Other than that, please, if you have problems with any download link for supplies, drop me a line via e-mail. Leaving a comment without a way for me to contact you back doesn't help. If you e-mail me, I'll send you the supplies.
Filters: Mura's Meister > Copies -=- Eye Candy 4000 > Gradient Glow
Font: I used Snappy Script Light.
Okay, let's go!
Open the mask in PSP and minimize. Alternatively, you can file it with the rest of your PSP masks, for future use! Put your gradient into your gradients file, and file the bling to where it will be handy when we get to Animation Shop.
Open a new image, 750 x 700, white.
Open clear brad 2. Resize 35%. Copy and paste as a new layer.
Effects > Plug-Ins > Mura's Meister > Copies with the following settings:
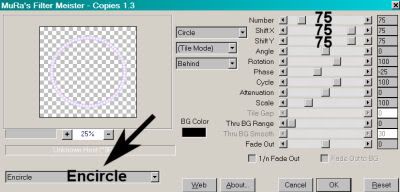
Hit okay.
Add your tube(s). Resize, position and drop shadow to your liking.
Highlight the circle of beads layer you just made. Grab your magic wand and click in the middle of that circle. Selections > Modify > Expand by 5. Selections > Invert.
Highlight your tube layer. Grab your eraser brush and erase any of your tube(s) that may be overlapping the bottom of your circle of beads. Selections > Select None.
Highlight your white background layer. Add a new raster layer.
In your materials palette, change either the foreground or background to the gold gradient I've supplied. Angle 45, Repeats 0, Style Linear.
Flood fill your new raster layer with the gold gradient.
Highlight the circle of beads layer again. Again, grab your magic wand and click inside the circle. Selections > Modify > Expand by 15. Selections > Invert.
Highlight your gold gradient layer. Hit delete. Selections > Select None.
Highlight your white background layer again, add a new raster layer, and fill with the gold gradient, THIS time with Angle at 135, all else the same.
Apply your mask. Delete the mask layer, answer "yes" to the pop-up question, and merge group.
Resize your mask layer by 105%.
Open brad 3. Copy and paste as a new layer.
Effects > Plug-Ins > Mura's Meister > Copies with the following settings:
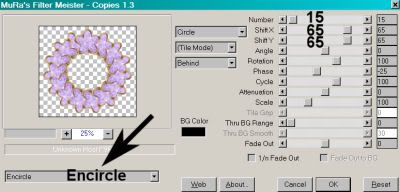
Hit okay.
In your layer palette, drag this layer to just above your mask layer. Drop shadow.
Drop shadow your circle of beads layer.
Open bow2. Resize 50%. Copy and paste as a new layer. I positioned mine in the lower left area of the original circle of beads. Place yours where you'd like it. Drop shadow.
Open badge1. Resize 35%. Copy and paste as a new layer. Position in the center of the bow. Drop shadow.
Now, this is a quirk. I re-resized these two by 85% after I had them all situated. They were just out of "synch" with the rest, so I made them slightly smaller. You may choose to do this or not. Up to you!
On your top layer, add your name. I used color #cdb2f3 for the fill, #2b0e54 for the stroke, stroke set at 2.
I added the following bevel:
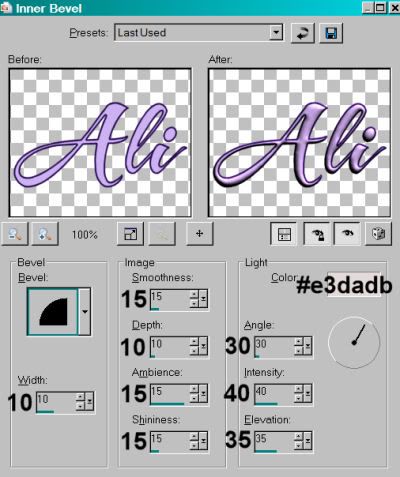
Effects > Plug-Ins > Eye Candy 4000 > Gradient Glow set at 5-25-100, color #e7e19f.
Drop shadow your name.
Add your copyright, license information if applicable, and taggers'/watermark.
If you choose not to animate, you're done! Merge your layers and save!! Congrats!
A N I M A T I O N
Edit > Copy merged
Open Animation Shop, right-click on the desktop area and paste as a new animation.
Duplicate this frame until you have a total of 16 frames. Move your slider at the bottom back to the first frame.
Locate and open your bling. Edit > Select All. Edit > Copy
Return to your animation that you're building and Edit > Select All. Edit > Paste into Selected Frame.
Hover your mouse until the tip of the bling appears. I chose to have the butterfly positioned on the top of the hand of one of my tubes. If you're not using a similar-type tube, go your own way! :)
Release the mouse button. View > Animation. If you like what you see and there's no changes, then:
Animation > Resize Animation > Size the finished product to a size with which you're comfortable.
View > Animation. Save as .gif and, again! We are done!! Thanks for taking it on! I hope you enjoy your results!
.


No comments:
Post a Comment