

You will also need:
Animation Shop. This is from CNET, so it's a safe download. However, it costs. That changed pretty recently. I don't know why!!
HOWEVER ..... a LOVELY person named solshne (and another named Chris) wrote to let me know that one might find Animation Shop for free at this location. This is an FTP link and I have no idea if it's safe or not. So keep your antivirus handy to scan it after download!
A tube (or two!) of your choice. I'm using the grreat artwork of Keith Garvey. You must have a license to use his artwork. You can get that license and art at My PSP Tubes.
The scrap kit is from Incognito Scrapz. This is a FTU kit, and it's called Denim Delight. This is an older kit (from 2008), but leave her love anyway!
This scrap kit is a multi-layer kit. Meaning, it's all one file with the elements and papers on different layers. It is in .pspimage format. I hate to admit it, but I don't know how to convert it so that those of you using older versions of PSP can use it.
Filters: No outside filters used in this tutorial!
Font: I used Arriere Garde.
Supplies: Just good-old Becky Mask022!! Again, I don't know where Becky went, but her masks live on and on!!
Let's start this!!
Since the kit is multi-layers, and the person who made it didn't bother to label her layers, I'll refer to them as their layer numbers, and then give them a name to help guide. Hope this works out!
Open your mask and minimize in PSP. Alternatively, you could file it in with your other PSP masks for use in the future. Up to you!
Open a new canvas, 700 x 700, white.
Open Raster19, the daisy-looking frame. Copy and paste as a new layer. I positioned mine in the upper right of the canvas. Yours is up to you.
Add your tubes. Resize, position, and drop shadow to your taste.
Highlight your frame layer. Grab your magic wand, and click inside the center of the frame. Selections > Modify > Expand by 1. Selections > Invert.
Highlight your tube layer. Hit delete.
Selections > Select none.
Drop shadow your frame.
With your other tube, if it is a full standing tube, you may want to feather it out as I tried to do. LOL. Highlight your "full" tube layer. Grab your lasso set on freehand, feather set at 14, and draw a big ole smile at the bottom of the tube. Hit delete a few times. Selections > Select none. Don't forget to set your feather back to zero!
Highlight your white background layer.
Open Raster3 paper. Copy and paste as a new layer. Resize 120%.
Apply your mask. Delete mask layer, answer "yes" to the pop-up question, and merge group.
Open Raster14, the butterfly charm. Resize 65%. Copy and paste as a new layer. Drop shadow. I positioned mine on the bottom of the frame.
Open Raster10, the bow. Resize 50%. Copy and paste as a new layer. Place it over the large loop at the top of the butterfly charm. Drop shadow.
Go back to the top layer and add your name. I used black for the stroke, set at 2. This was an outline font, so after situating the name, I clicked inside each of the letters. Opened the Raster2 paper, dragging it below the font layer, then hit delete. Selections > Select none.
Drop shadow your name.
Resize your canvas to a size with which you are comfortable.
Add your copyright, license information if applicable, and taggers'/watermark.
If you choose not to animate, you're now done, and you can merge your layers and save!
A N I M A T I O N
Highlight your butterfly charm layer. Duplicate four times, for a total of five butterfly charm layers.
When I do this type of animation, I put the original in the middle of the four others. I don't know, it makes it easier for me for some reason. It's probably not necessary, just a quirk of mine. I will, however, be giving instructions for someone doing so. So, put your original butterfly charm layer in the middle of the five. lol..
Highlight the layer just above the middle of the five butterfly layers.
Image > Rotate > 10° left.
Note what you have:
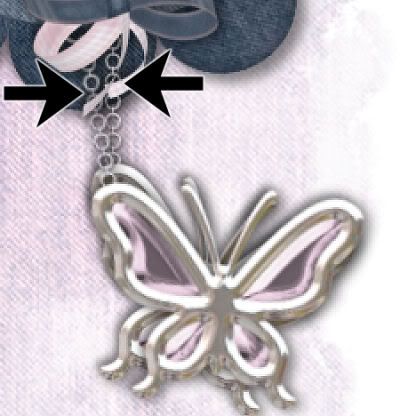
See how the chain doesn't line up? Now, you need to use your mover tool to bring the chain back in "synch" with the first.
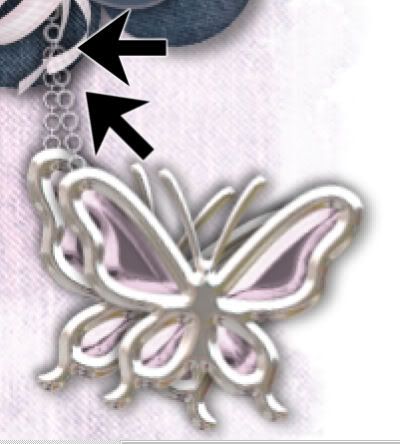
Like so. Do you understand? I sure hope so!!
Now, highlight the next layer up. This should be the top layer of the five.
Image > Rotate > 20° left.
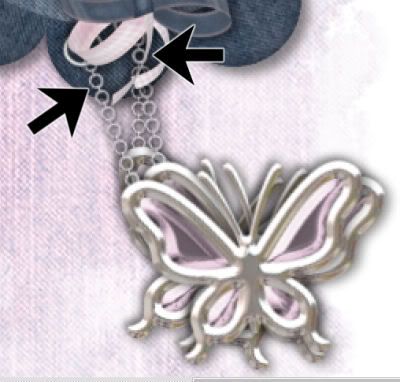
And adjust your chain so it lines up.
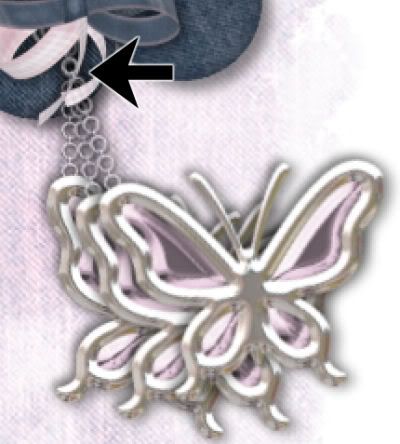
Now, go to the layer just below the middle layer of the five.
Image > Rotate > 10° right.
Do the same thing as above, re-adjusting so the chains line up the best you can.
Highlight the bottom layer of the five, and rotate that one 20° right. Re-adjust so the chains line up.
I did the best I thought I could, and it turned out a little raggedy. But just do your best.
Close out all the butterfly layers except the middle one.
Edit > Copy Merged.
Open Animation Shop. Right-click on the desktop area and paste as a new animation.
Return to PSP. Close out the middle butterfly layer and open the next buttefly layer up.
Edit > Copy merged.
Back to Animation Shop. Edit > Paste > After Current Frame.
Return again to PSP. Close out the open butterfly layer and open the next layer up.
Edit > Copy merged.
Again, back to Animation Shop. Edit > Paste > After Current Frame.
Close out the top buttefly layer and re-open the layer just beneath it.
Edit > Copy merged.
Animation Shop. Edit > Paste > After Current Frame.
Return to PSP. Close out the open butterfly layer and open the middle.
Edit > Copy merged.
Animation Shop. Edit > Paste > After Current Frame.
Return again to PSP. Close out the middle butterfly charm layer and open the layer just beneath it.
Edit > Copy merged.
Animation Shop. Edit > Paste > After Current Frame.
Back to PSP. Close out the open butterfly charm layer and open the bottom one.
Edit > Copy merged.
Animation Shop. Edit > Paste > After Current Frame.
Now, for the last time, back to PSP. Close the bottom butterfly charm layer and re-open the layer just above it.
Edit > Copy merged.
Animation Shop. Edit > Paste > After Current Frame.
Now, in Animation Shop, Edit > Select All.
Right-click on the top bar of your animation an choose "Frame Properties." Change this number to 15.
View > Animation.
Et, voila! I hope you were able to easily understand this tutorial, and I thank you for stopping by!!
.


No comments:
Post a Comment