
You will also need:
Animation Shop. This is from CNET, so it's a safe download. However, it costs. That changed pretty recently. I don't know why!!
HOWEVER ..... a LOVELY person named solshne (and another named Chris) wrote to let me know that one might find Animation Shop for free at this location. This is an FTP link and I have no idea if it's safe or not. So keep your antivirus handy to scan it after download!
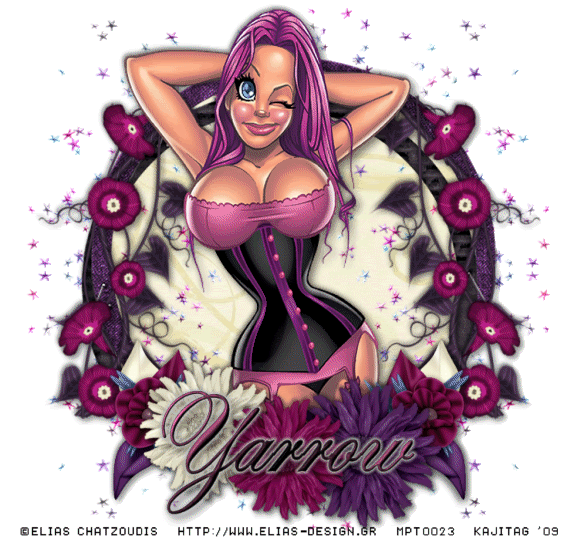
A tube of your choice. I'm using the artwork of Elias Chatzoudis. You must have a license to use his artwork. You can get that license and his art at My PSP Tubes.
The scrap kit is collaboration between Fall3n Angel (Yarrow), Chaos Priestess, and Blue Dream Designs. This was offered in June of this year. This is a FTU kit, and can be found here. Yarrow didn't really say it had a particular name, so.... who knows? I listed it as "Chaos Angels" in my scraps folder. Don't forget to leave love for the free ones!!
Filters: Eye Candy 4000 > Gradient Glow -=- Eye Candy 4000 > HSB Noise
Font: I used Alexandra Script.
Supplies: None! Nada! Zip! Zilch! Can you believe that???
There's really not that much to this tut. The worst part is building the starry background.
Let's get this started....
Open a new canvas, 750 x 700, white.
Since this is a collab kit, the files are labeled with each artist's initials first, so you'll have three sets of files. I used *mostly* the third kit, with the initials YW, but I did use at least one of the BD elements!
Open YW_Frame03. Copy and paste as a new layer. Resize 115%.
Add your tube. Resize, position, and drop shadow to your taste.
Highlight your frame layer. Grab your magic wand and click inside the frame. Make sure you also get the opening in at the bottom of the two frames! Actually, in my example, you can't even see that part anymore... so it's up to you. Selections > Modify > Expand by 1. Selections > Invert.
Highlight your tube layer. Grab your eraser brush and erase that part of your tube that you do not want showing at the bottom of the frame.
Selections > Select none.
Highlight your white background layer.
Open BD-paper11. Copy and paste as a new layer.
Highlight your frame layer. Again, grab the magic wand and click inside the frame, including the bottom and top spaces between the frames. Selections > Modify > Expand by 10. Selections > Invert.
Highlight your BD-paper11 layer. Hit delete.
Selections > Select none.
I find it easier to do the following few of steps on the top layer.
Open YW_Vine. Resize 85%. Copy and paste as a new layer. Rotate 15° left. Place on the right side of the frame. Duplicate this layer. Image > Mirror. Merge these two layers down. Drop shadow.
Open YW_SparklyStars2. Copy and paste as a new layer. Now, we're going to be working a lot with these stars, so keep them open!
Position the stars in the upper right corner of your canvas. Duplicate this layer and Image > Mirror. Merge these layers down. Duplicate THAT layer and Image > Flip. Merge these two layers down.
Copy the stars again and paste as a new layer. Rotate 90° left. Position at the top area of your canvas. Duplicate this layer and Image > Flip. Merge these two layers down.
Now, copy the stars again and paste as a new layer. Position this layer so the stars fill in the background behind the tube on either side. Duplicate this layer and Image > Mirror. Merge these two layers down.
Now merge all three sparkly stars layers down to one. Whew!
Open some of the flowers... choose the ones you prefer in the collab. Lots of stuff to use there! I preferred to use the YW flowers 02, 03 and 04. I resized each of them at different percentages. One was 65%, one 60% and one 55%. Arrange them along the bottom of the frame. Drop shadow your flowers.
Open BD-flower2. Resize 50%. Copy and paste as a new layer. Position to the left of the other flowers, and below them in the layer palette. Duplicate this layer and Image > Mirror. Merge these two layers down and drop shadow.
You can merge all the flower layers down if you like. Not needed, but I find it cleans up the layer palette somewhat.
Go back to the top layer and add your name. I used color #b2517e and black to create a foreground-background gradient for the fill, and black for the stroke, stroke set at .5.
Add a Gradient Glow of 5-25-100, color #c0c0c0.
Drop shadow your name.
Resize your canvas to a size with which you are comfortable.
Add your copyright, license information if applicable, and taggers'/watermark.
If you choose not to animate, you're now done, and you can merge your layers and save!
A N I M A T I O N
Highlight your stars layer. Duplicate twice, for a total of three stars layers.
Highlight your bottom stars layer.
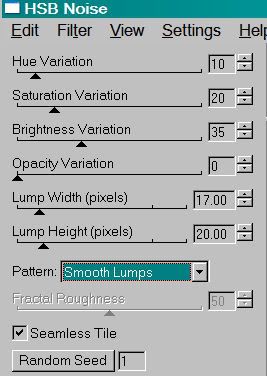
Effects > Eye Candy 4000 > HSB Noise with the following settings:
Hit okay.
Highlight the middle stars layer.
Add HSB Noise again, this time hitting "Random Seed" once.
Hit okay.
Now, highlight the top stars layer. Add HSB Noise, again hitting "Random Seed."
Hit okay.
Close out the top two stars layers, leaving the bottom stars layer open.
Edit > Copy Merged.
Open Animation Shop. Right-click on the desktop area and paste as a new animation.
Return to PSP. Close out the bottom stars layer and open the middle stars layer.
Edit > Copy merged.
Back to Animation Shop. Edit > Paste > After Current Frame.
Return again to PSP. Close out the middle stars layer and open the top stars layer.
Edit > Copy merged.
Again, back to Animation Shop. Edit > Paste > After Current Frame.
Still in Animation Shop, Edit > Select All
Right-click on the top bar of your animation and choose "Frame Properties." Change this number to 25.
View > Animation.
And we've finished another tut! I hope you like your results! I wouldn't mind seeing any.... Thanks for being here!
.


No comments:
Post a Comment