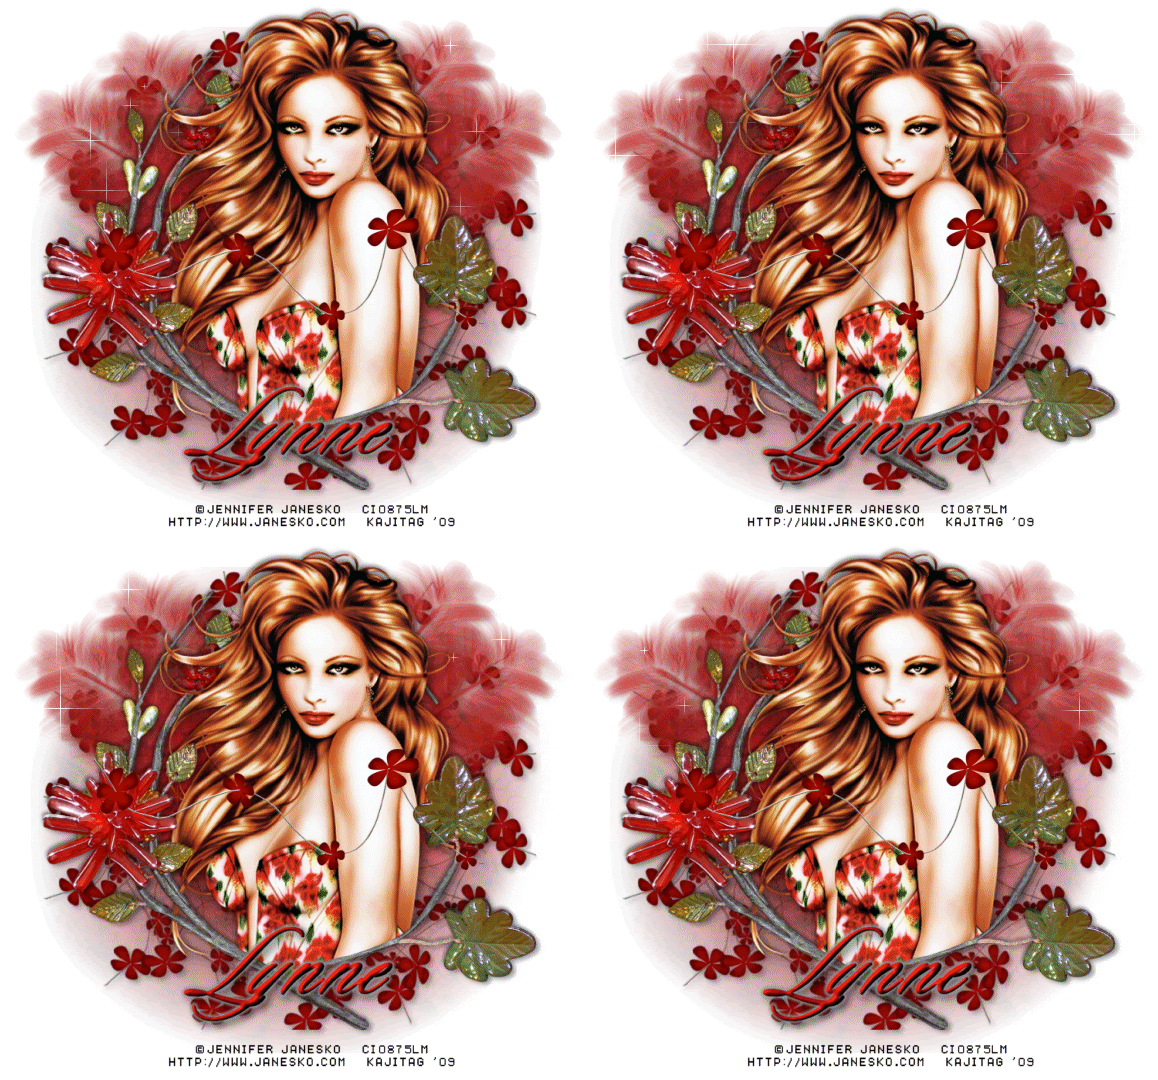
You will also need:
Animation Shop. This is from CNET, so it's a safe download. However, it costs. That changed pretty recently. I don't know why!!
HOWEVER ..... a LOVELY person named solshne (and another named Chris) wrote to let me know that one might find Animation Shop for free at this location. This is an FTP link and I have no idea if it's safe or not. So keep your antivirus handy to scan it after download!
A tube of your choice. I'm using the glamorous artwork of Jennifer Janesko. You must have a license to use her artwork. You can get that license and art at C.I.L.M.
The scrap kit is by Lynne of Baby Cakes Scraps. This is a FTU kit called After Midnight. Be sure to leave some love for the free ones!!
Filters: Eye Candy 4000 > Gradient Glow -=- Mura's Meister > Copies -=- VM Natural > Sparkle
Font: I used Sloop Script One.
Supplies: The 20-20 mask. Again, I don't know where this came from, but I know it's been in use for years.... Let me know if YOU know who made this handy mask, and I'll give proper credit where it's due!
Also, please... if you have problems with any download link for supplies, drop me a line via e-mail. Leaving a comment without a way for me to contact you back doesn't help. If you e-mail me, I'll do my best to send you the supplies.
Okay, so let's begin!
Open your mask in PSP and minimize. Alternatively, you can file it away wherever you keep your mask files!
Open a new canvas, 750 x 700, white.
Open branch. Resize 85%. Copy and paste as a new layer.
Add your tube. Resize, position, and drop shadow to your taste. Drag this below the branch layer.
Highlight your branch layer.
Grab your lasso tool, set on point-to-point, and draw a line around the branch, doing your best to keep it steady and circular on the area where the actual branch layer stops and starts.
Selections > Invert
Highlight your tube layer.
Grab your eraser brush and erase that part of your tube that you do not want showing at the bottom of the branch layer.
Selections > Select none.
Open branch again. Resize 85%. Copy and paste as a new layer, above the tube.
Now grab your selection tool, set on rectangle, and draw a selection around the top part of the branch layer, that you don't want covering your tube layer. Example:
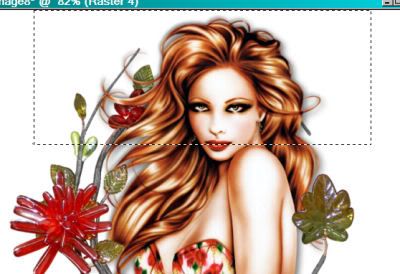
Hit delete. Selection > Select none.
Drop shadow the bottom branch layer.
Highlight your white background layer.
Open Grunge Swirl Paper. Copy and paste as a new layer.
Apply your mask. Delete the mask layer, answer "yes" to the pop-up question, and merge group.
Resize your mask layer 90%.
You may notice the sides and bottom of the mask layer stop in abrupt edges. This bugs the heck out of me, so here's what I did to lose it!
Grab your lasso tool again, this time set on freehand, feather set at 30.
Draw curved selections on each side and on the bottom. Here's an example:
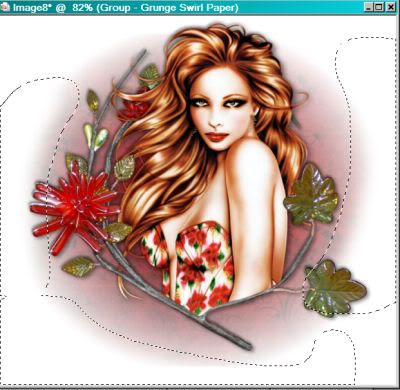
Hit delete. Selections > Select none.
The following steps may be easier if you go back to the top layer.
Open feather. Resize 200%. Copy and paste as a new layer. Position so that it sticks out past the branch circle and your tube, on the right side of your canvas. See my example for placement reference.
Duplicate the feather layer and Image > Mirror
Go back to your original feather layer and duplicate again. Rotate this new feather 20° to the right. Position this one next to the first, in toward the middle a bit, and down a bit. Again, see my example for placement reference.
When you've got it where you want it, duplicate that feather and Image > Mirror.
Drop shadow your feathers lightly. Merge all feather layers down to one. Drag them down below the mask layer.
Open floral wire. Resize 50%. Copy and paste as a new layer.
Effects > Mura's Meister > Copies with the following settings:
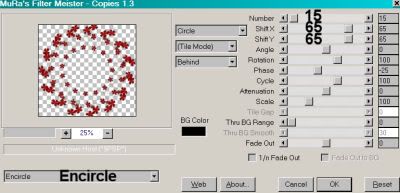
Hit okay.
Resize this layer 85%. Drag the layer below the feather layer. Drop shadow lightly.
Go back to the top layer and add your name. I used color #98100f for the fill and the stroke, stroke set at 3.
I added a bevel, set as below:
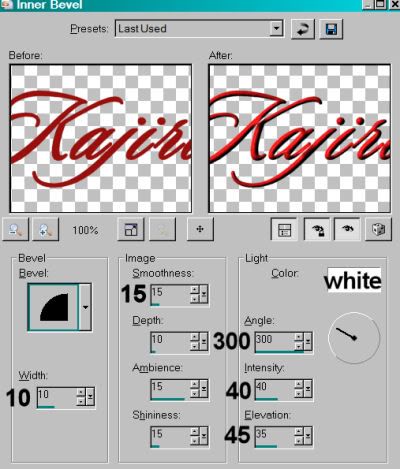
Hit okay.
Eye Candy 4000 > Gradient Glow of 5-25-100, color #929a98.
Drop shadow your name.
Resize your canvas to a size with which you are comfortable.
Add your copyright, license information if applicable, and taggers'/watermark.
If you choose not to animate, you're now done, and you can merge your layers and save!
A N I M A T I O N
Highlight your feather layer. Duplicate three times, for a total of four feather layers.
Highlight your bottom feather layer.
Effects > VM Natural > Sparkle with the following settings:
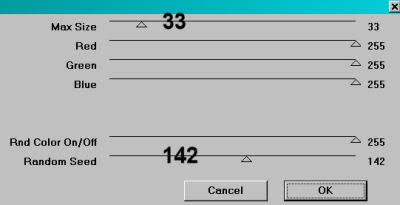
Hit okay.
Highlight the next feather layer up.
Add Sparkle again, this time moving the top and bottom sliders to different numbers. It doesn't matter, really, what numbers. But watch the preview to see where you sparkles are being positioned as you slide the control. Set them where you want.
Hit okay.
Now, highlight the third feather layer. Again, add sparkle, adjusting the slider controls.
Hit okay.
And finally, the top feather layer. Add Sparkle, again adjusting the sliders.
Hit okay.
Whenever I use the Sparkle plug-in, I do this process twice. Start at the bottom and do it all over again. I do this to get more sparkle... just something I do. You may choose not to. It's totally up to you!
Close out the top three feather layers, leaving the bottom feather layer open.
Edit > Copy Merged.
Open Animation Shop. Right-click on the desktop area and paste as a new animation.
Return to PSP. Close out the bottom feather layer and open the next feather layer.
Edit > Copy merged.
Back to Animation Shop. Edit > Paste > After Current Frame.
Return again to PSP. Close out the open feather layer and open the next feather layer up.
Edit > Copy merged.
Again, back to Animation Shop. Edit > Paste > After Current Frame.
One last time, back to PSP. Close out the open feather layer, opening the top feather layer.
Edit > Copy Merged.
Back to Animation Shop. Edit > Paste > After Current Frame.
Still in Animation Shop, Edit > Select All.
Right-click on the top bar of your animation. Select "Frame Properties" and change that number to 30.
View > Animation.
We've finished! Thanks for being here! I'm happy that you chose my tut!!
.


No comments:
Post a Comment