
You will also need:
A tube of your choice. I'm using the grrrrrrrrrreat artwork of Keith Garvey. You must have a license to use his art. You may obtain that license and his art from My PSP Tubes.
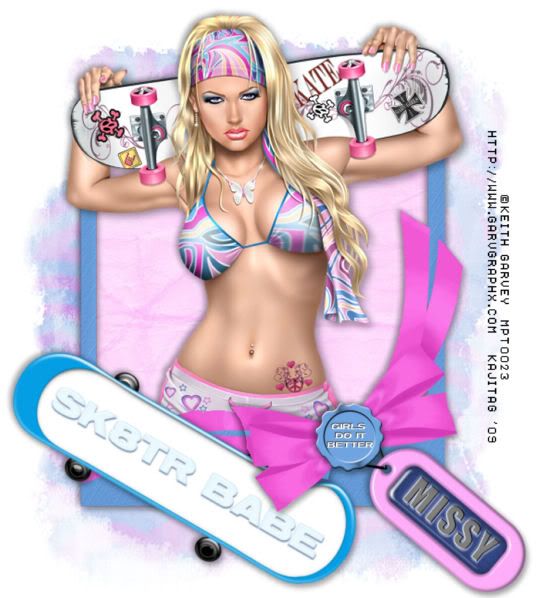
The scrap kit is by Missy, from Scraps With Attitude. This is a PTU kit titled "Garv's Board Sk8tr." Right now, it says it's on sale, but it also says "0% off" so ... go figure! It's a great kit, though!!
Supplies: You can find the mask here. This is by Becky. I haven't used a Becky mask in a long while! I don't know how to get in touch with her, but her masks rock, so if you know how to find her, let me know, so I can give her the credit she's due!!
Filters: No outside filters used in this tutorial!
Font: I used Impact.
Notes: This is a pretty straight-forward tutorial, but it has some tricky parts. The trickiest is the name on the tag. The tags included with the kit have a domed plastic on them. So the name has to go below that. I will do my best to explain how I did that!!! But if you would rather not go through that, you can just put your name on it any old way you like! Just a little warning.
Also, the main frame has a bit of trick to it. Easy enough to accomplish, just a step I wish I'd not had to do.
Let's go!!
Open your mask in PSP and minimize. Alternatively, you could file it in with the rest of your PSP masks for use at a later date. Totally up to you!
Open a new canvas, 775 x 700, white.
Open Wrapped Frame 1. Resize 75%. Copy and paste as a new layer.
Add your tube. Resize, position and drop shadow to your liking.
Highlight your frame layer. Grab your magic wand, and click inside the frame. Selections > Modify > Expand by 1. Selections > Invert.
Highlight your tube layer. Grab your eraser brush and delete the portions of your tube that you do not want showing at the bottom (and/or sides) of the frame.
Selections > Select none.
Highlight your white background.
Open paper12. Copy and paste as a new layer.
Highlight your frame layer. Grab your selection tool, set on rectangle, and draw a line around the frame... just a rectangle following the shape of the frame. We're doing this to include that teeny-tiny hole created on the right bottom by the criss-crossing of the bow.
Selections > Invert.
Highlight the paper layer. Hit delete. Selections > Select none.
Again, highlight your white background layer.
Open paper7. Copy and paste as a new layer.
Apply your mask. Delete mask layer, answer "yes" to the pop-up question, and merge group.
Open "Scateboard" 3. Resize 65%. Copy and paste as a new layer. Rotate 30° right. Position in the bottom left corner of your canvas. Now, if yours is where mine was, I was a bit anxious about the bow on the frame. I wanted it to overlap the board. First, drop shadow your board.
Open Wrapped Frame 1 again. Resize 75%. Copy and paste as a new layer. Make sure this is your top layer.
Grab your eraser brush and start erasing all the frame that doesn't include the bow. Yes, that's almost all of it. When it gets to the tricky part -- the ins and outs of the bow -- grab your lasso tool set on point-to-point, add mode. Zoom into your canvas and draw selections around the blue of the frame you DON'T want there, while leaving the bow you do want. I had to do this about three or four times for the complete bow. Each time you draw a selection, hit delete. Or else, you can draw them all and then just hit delete once. Selections > Select none. Zoom back out. You can add a small drop shadow, if you like, to the portion of the bow you've just made appear over your board by using minus numbers. Like -5, -3, 35, 5 on your drop shadow screen. Take a look. You like?
Open Wax Seal 4. Resize 15%. Copy and paste as a new layer. I put mine as if it were the button holding the bow together. Drop shadow.
Okay, here we go on the name/tag combo.
Open tag 1. Rotate 90° left, ALL LAYERS CHECKED!
Open a new image, 800x354.
Open paper20. Copy and paste as a new layer on your new canvas.
Go back to the tag. Copy and paste as a new layer on your new canvas.
Again, grab your lasso tool, set on point-to-point, add mode. Draw around the pink area of your tag. Just outside the domed area, don't worry about the hole where the string comes through. Selections > Invert.
Highlight the paper20 layer. Hit delete. Selections > Select none.
As I said earlier, I used Impact as the font. All caps. To get the name situated right was a bit tricky. I used white as the fill and black as the stroke, stroke set to 1.
Type out your name. Resize the font as many times as needed to get it to fit right in the domed area.
The problem with *arranging* the name, is that you have to close the tag to move the name, then open the tag to see if you got it right. But two or three times should get it pretty much done.
Once done with placement, add a drop shadow to the name. Now:
Effects > Texture Effects > Emboss
Hit okay.
There!
Now, close out the white background layer. Merge visible the rest of the layers. Edit > Copy.
Return to your original canvas and Edit > Paste as new layer. Resize 35%. Rotate 40° right. Drag this layer below the wax seal layer. Position your tag as you like, and drop shadow your tag.
I hope I explained that well enough for y'all!!
Now would be a good time to drop shadow the frame!! lol.
Resize your canvas to a size with which you're comfortable.
Add your copyright, license information if applicable, and taggers'/watermark.
Layers > Merge > and save! We are done!
Thanks SO much for trying my tut!! I hope it was easy to understand and follow! Have a wonderful weekend!!
.


No comments:
Post a Comment