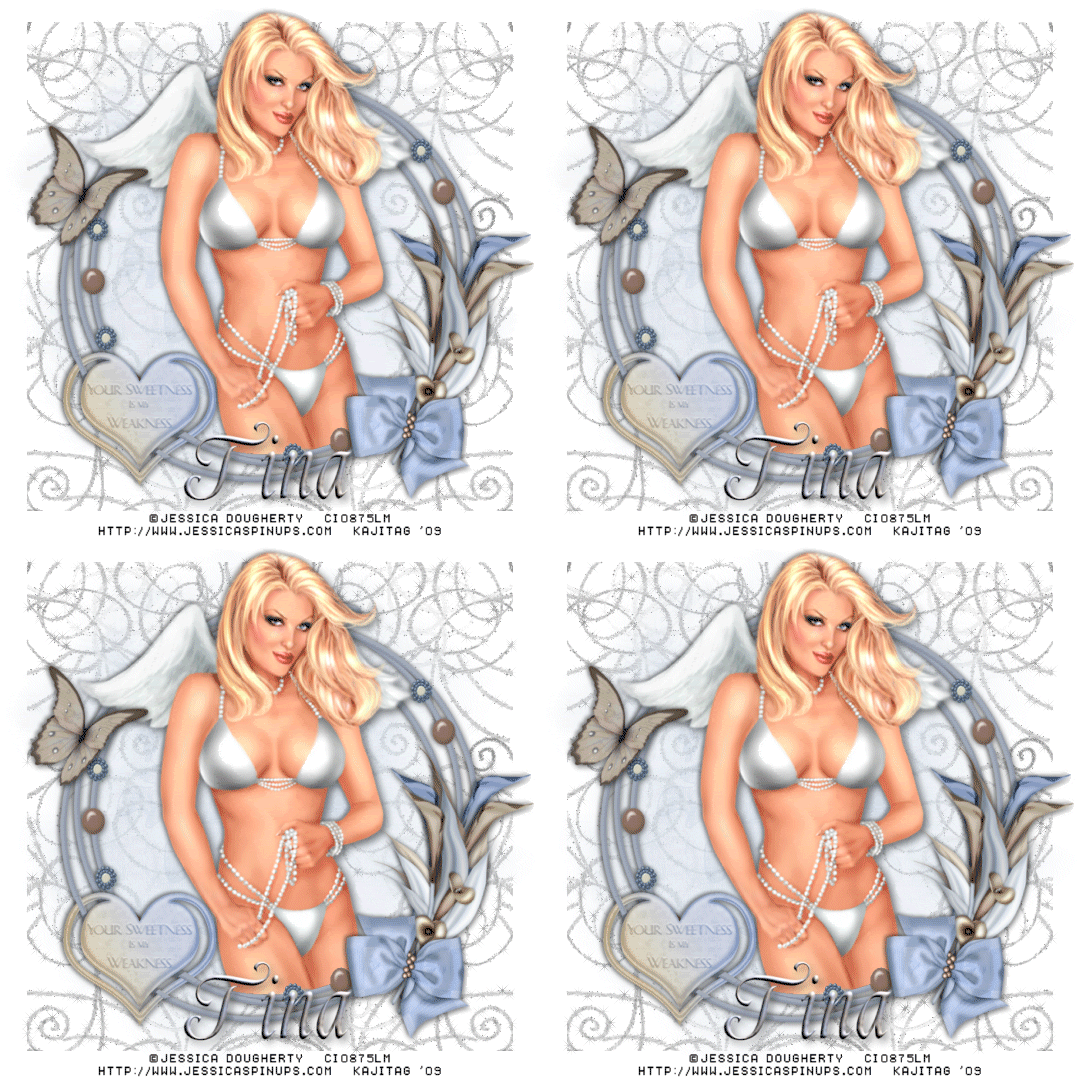
You will also need:
Animation Shop. This is from CNET, so it's a safe download. However, it costs. That changed pretty recently. I don't know why!!
HOWEVER ..... a LOVELY person named solshne (and another named Chris) wrote to let me know that one might find Animation Shop for free at this location. This is an FTP link and I have no idea if it's safe or not. So keep your antivirus handy to scan it after download!
A tube of your choice. I'm using the pinup art of Jessica Dougherty. You must have a license to use her artwork. You can get that license and art at C.I.L.M.
The scrap kit is by Tina of Tina's Magical Scrap World. This is a recently FTU kit (that use to be PTU), and has it worked out, I did a tut with it when it was PTU, as well! You can see that tutorial here! It's called Natural Beauty. You'll find these two tuts are not that different! I'm nothing if not consistent... You can find the kit at Tina's Blog. It's called "Something Beautiful." Second one in the posting. Now, the post says "Limited Edition." I wrote to Tina to ask how limited, and she said she'd keep it up, since I was doing a tut with it! Thank you twice, Tina!!
Filters: Alien Skin > Xenofex 2 > Constellation
Font: I used Alys Script Bold.
Supplies: You can find the supplies here. They include the mask and the doodle background
Let's get this started....
Open your supplies in PSP and minimize. Alternatively, you could file your mask with your PSP masks and your doodle wherever you save those. Just have them handy for the tut!
Open a new canvas, 700 x 700, white.
Open stringframe2. Copy and paste as a new layer.
Add your tube. Resize, position, and drop shadow to your taste.
Highlight your stringframe layer. Grab your magic wand, and click inside the center of the frame. Selections > Modify > Expand by 1. Selections > Invert.
Highlight your tube layer. Grab your eraser brush and erase any of the tube that overhangs the bottom of the frame.
Selections > Select none.
Highlight your white background layer.
Open paper14. Copy and paste as a new layer.
Apply your mask. Delete mask layer, answer "yes" to the pop-up question and merge group.
I find it easier doing the next step on the top layer, then dragging the layer down. You can do whatever you like. Just a suggestion.
Open your doodle from the supplies. Copy and paste as a new layer. Resize 110%. Position to the left side of your canvas. Duplicate this layer. Image > Mirror. Merge these two layers down. Drag this layer to below your mask layer.
Open clip3. Resize 50%. Copy and paste as a new layer. Drop shadow.
If yours is positioned like mine, overlapping an easy area on the stringframe, then let's take advantage of the "clip" aspect of this element.
Grab your lasso tool, set on point-to-point, add/shift mode. Zoom way in on your clip. Draw little rectangles around the clip in the areas that it overlaps the stringframe. Like this:
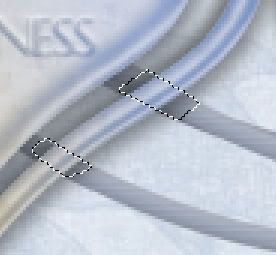
Don't forget the other side of the clip! I did an area there, too.
Hit delete. Zoom out. Selections > Select none.
Open calla1. Resize 60%. Copy and paste as a new layer. Position alongside your frame. You may use my example for placement reference if you like. Drop shadow your Calla.
Open calla2. Resize 57%. Copy and paste as a new layer. Rotate 5° right. Position so it appears as an arrangement of calla lilies on your stringframe. Drop shadow.
Open pearlbow3. Resize 40%. Copy and paste as a new layer. Image > Mirror. Move to over the lower portion of the calla lilies. Drop shadow.
Open butterfly1. Resize 40%. Copy and paste as a new layer. Position to the left side of the string frame. Drop shadow.
Drop shadow your stringframe, too! LOL! I *do* keep forgetting that!
Go back to the top layer and add your name. I used color #a9b6d2 for the fill and #b5b1a7 for the stroke. Now, create a foreground-background Gradient:
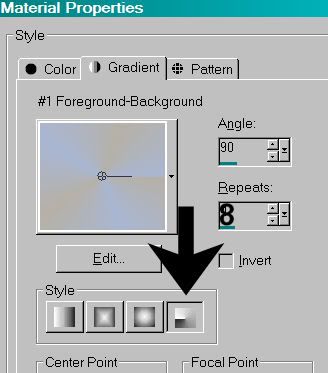
Make your gradient your fill. Add your name.
Add a bevel as shown below:
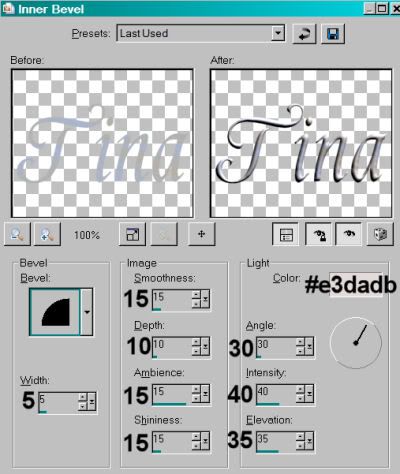
Hit okay.
Drop shadow your name.
Resize your canvas to a size with which you are comfortable.
Add your copyright, license information if applicable, and taggers'/watermark.
If you choose not to animate, you're now done, and you can merge your layers and save!
A N I M A T I O N
Highlight your doodle layer. Duplicate three times, for a total of four doodle layers.
Highlight your bottom doodle layer.
Effects > Alien Skin Xenofex 2 > Constellation with the following setting:
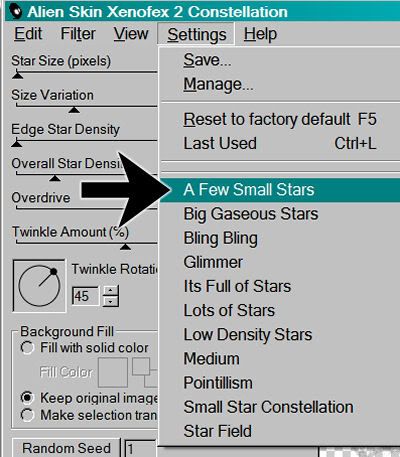
and the following numbers:
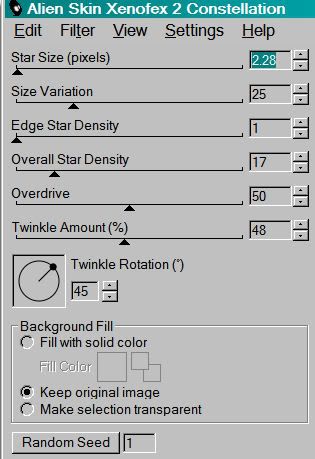
Hit okay.
Highlight the next doodle layer up.
Add Constellation again, this time hitting "Random Seed" once.
Hit okay.
Now, open the third doodle layer. Add Constellation, again hitting "Random Seed."
Hit okay.
And finally, the top doodle layer. Add Constellation, hitting "Random Seed."
Hit okay.
Close out the top three doodle layers, leaving the bottom doodle layer open.
Edit > Copy Merged.
Open Animation Shop. Right-click on the desktop area and paste as a new animation.
Return to PSP. Close out the bottom doodle layer and open the next doodle layer.
Edit > Copy merged.
Back to Animation Shop. Edit > Paste > After Current Frame.
Return again to PSP. Close out the open doodle layer and open the next layer up.
Edit > Copy merged.
Again, back to Animation Shop. Edit > Paste > After Current Frame.
One last time, back to PSP. Close out the open doodle layer and open the top.
Edit > Copy Merged.
Back to Animation Shop. Edit > Paste > After Current Frame.
View > Animation.
Here we are, done with another! I hope you enjoyed this tutorial, and I thank you for stopping by!!
.


No comments:
Post a Comment