skip to main |
skip to sidebar
.
 [Click image above to go to full sized image.]This tutorial was written on December 28, 2009, using Paint Shop Pro, version X.03. It should be okay to do with other versions as well. I just find X.03 more comfortable for me. You may download a free trial of Paint Shop Pro, version X2, from Corel. Any similarities between this tut and any others you may see are purely coincidental.
You will also need:
Animation Shop. This is from CNET, so it's a safe download. However, it costs. That changed pretty recently. I don't know why!!
A tube of your choice. If you're going to try and emulate this tag completely, you'll need a sitting or leaning piece of art for your creation! I'm using the artwork of Guy Powers. You must have a license to use his work. You can get that license and art at Up Your Art.
The scrap kit is by Jo, of A Tagger's Scrap. This is a FTU kit called "Bling in the New Year." This is just one portion of a blog train by the same name. To get more parts, scroll down for the links. Leave a "thank you" for her where it has room for comments!!
Filters: dsb Flux > Bright Noise
Font: I used Black Chancery.
Supplies: The mask, made by the wonderful-yet-missing Becky! Thank you Becky, wherever you are, for the use of your great masks!! Please note, I was having a problem with 4shared this afternoon. I don't know what's wrong with it, but in the interest of time I quickly went to Mediafire. I hope that's okay with y'all. Also, you'll need the 2010 bling, which you can find at Monti's Pixel Playground. (Look at the menu on the left, then scroll down to the bottom of the blings page.) Thanks to you, too, Monti, for sharing your great art!
Okay, here we go!
Open your mask and minimize in PSP. Alternatively, you could save it in with those already in your masks file, for use at a later date! Put Monti's bling where it will be handy when you get into Animation Shop.
Open a new canvas, 800 x 700, white.
Open sofa. Resize 120%. Copy and paste as a new layer. Arrange as you like. Drop shadow.
Add your tube. Resize, position, and drop shadow to your taste.
Open piano. Resize 85%. Copy and paste as a new layer. Image > Mirror. Arrange as you like it. Drop shadow.
Open glass. Resize 45%. Copy and paste as a new layer. I positioned mine so it's sitting on the piano bench. Place yours as you like it. Drop shadow.
Highlight your white background layer.
Open paper5. Copy and paste as a new layer.
Apply your mask. Delete mask layer, answer "yes" to the pop-up question, and merge group.
Open frame3. Resize 120%. Copy and paste as a new layer. In your layer palette, this should be just above your mask layer.
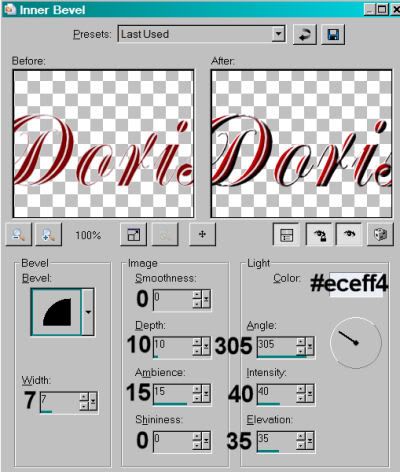
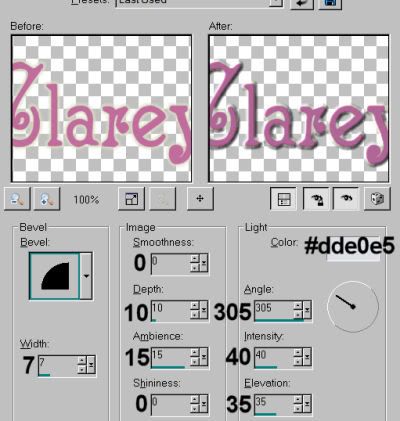
Go back to the top and add your name. I used color #f7daa7 as the fill, black as the stroke, stroke set on 2.
I added the following bevel:
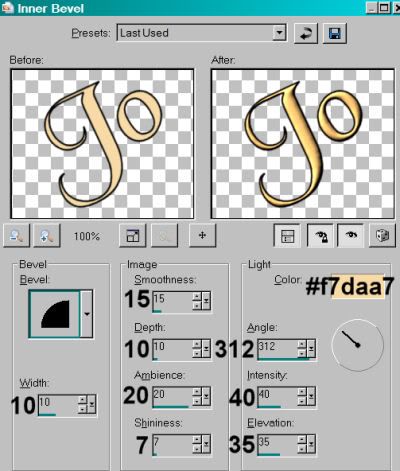
Hit okay.
Drop shadow your name.
Resize your canvas to a size with which you are comfortable.
Add your copyright, license information if applicable, and taggers'/watermark.
If you choose not to animate, you're now done, and you can merge your layers and save!
A N I M A T I O N
Highlight your frame3 layer. Duplicate this three times, for a total of four frame3 layers.
Now highlight the bottom frame3 layer.
Effects > Plug-Ins > dsb Flux > Bright Noise with the following setting:

Hit okay.
Highlight the next frame3 layer up.
Add Bright Noise again, this time hittng "mix" a couple times.
Hit okay.
Highlight the next layer up of the frame3 layers.
Add Bright Noise again, again hitting "mix" a couple times.
Hit okay.
Highlight the top frame3 layer. Add Bright Noise once more, hitting "mix" a couple last times.
Hit okay.
Close out the top three layers of the frame3 layers, leaving the bottom layer open.
Edit > Copy Merged.
Open Animation Shop. Right-click on the desktop area and paste as a new animation.
Return to PSP. Close out the bottom frame3 layer, and open the next layer up.
Edit > Copy merged.
Back to Animation Shop. Edit > Paste > After Current Frame.
Return again to PSP. Close out the layer you just worked with, and open the next frame3 layer up.
Edit > Copy merged.
Again, back to Animation Shop. Edit > Paste > After Current Frame.
Finally, close that frame3 layer, and open the top layer.
Return once more to Animation Shop. Edit > Paste > After Current Frame.
Now, still in Animation Shop, Edit > Select All.
Highlight your the last frame of your animation and
Edit > Paste > After Current Frame.
Go back to frames 1 and 2, highlighting them both.
Edit > Copy
Go to your last frame again, and highlight it.
Edit > Paste > After Current Frame.
You should now have 10 frames.
Bring your slider at the bottom of the animation back to frame 1.
Locate and open the Monti bling.
Edit > Select All.
Animation > Resize Animation > 50%.
Edit > Copy
Go to your tag and Edit > Select All
Edit > Paste > Into Selected Frame
Hover your mouse until you have the 2010 placed where you'd like it. Then release mouse button.
View > Animation.
If you don't like the placement of your bling, you can Edit > Undo and then redo until placed to your liking.
And you're done! I hope you're happy with your results! And thanks for stopping by! I hope you're all having Happy Holidays!
.
.
 [Click image above to go to full sized image.]This tutorial was written on December 22, 2009, using Paint Shop Pro, version X.03. It should be okay to do with other versions as well. I just find X.03 more comfortable for me. You may download a free trial of Paint Shop Pro, version X2, from Corel. Any similarities between this tut and any others you may see are purely coincidental.
You will also need:
Animation Shop. This is from CNET, so it's a safe download. However, it costs. That changed pretty recently. I don't know why!!
I've had two people point out to me that one might find Animation Shop for free at this location. This is an FTP link and I have no idea if it's safe or not. So keep your antivirus handy to scan it after download!
A tube of your choice. I'm using the great artwork of Olivia. You must have a license to use her artwork. You can get that license and art at C.I.L.M. This particular tube can be found here.
The scrap kit is by Clarey, of Clarey's Designz. This is a FTU kit, but with a twist! It's free with purchase of her kit called Christmas Magic. My last tut used that kit. After the order for Christmas Magic goes through, the freebie will be available to you. It's called "Celebrate." Leave a "thank you" for her where it has room for comments!!
Filters: Alien Skin > Eye Candy 5 > Impact > Extrude, Eye Candy 4000 > Gradient Glow
Font: I used FeniceITCbyBT. It's best, if you can't use that font, that you use one like it. A bit bold, but plain.
Supplies: No outside supplies on this tut!
Okay, here we go!
Open a new canvas, 700 x 700, white.
Open squareframe1. Resize 85%. Copy and paste as a new layer.
Highlight your white background layer.
Open paper5. Copy and paste as a new layer.
Highlight your frame layer.
Grab your magic wand and click inside the frame. Selections > Modify > Expand by 15. Selections > Invert.
Highlight your paper layer. Hit delete.
Selections > Select None.
Add your tube. Resize, position and drop shadow to your liking.
Highlight your frame layer.
Grab your magic wand and click inside the frame. Selections > Modify > Expand by 1. Selections > Invert.
Highlight your tube layer.
Grab your eraser brush and erase any of your tube that you don't want showing outside the sides and/or bottom of your frame.
Selections > Select None.
Sorry about the repetition there. I'd left a step out when first writing this... backtracking!!
Open wordart2 and wordart3. Resize 85%. Copy and paste each as a new layer. Arrange to your liking. If you would like them smaller, go right ahead. This is your tag! Once arranged, drop shadow each piece of word art. Merge these two layers down.
Open fireworks2. Resize 85%. Copy and paste as a new layer. In your layer palette, drag this layer below your tube and above your paper. Give it a small drop shadow.
Open clock. Resize 35%. Copy and paste as a new layer. I positioned mine on the top right of the frame. You may position as you like. Drop shadow.
Open champagneflutedouble. Resize 50%. Copy and paste as a new layer. Again, I positioned mine in the area below center of the left side of the frame. (Was that proper grammar? lol) Position yours as you like. Drop shadow.
Open fireworks1. Resize 115%. Copy and paste as a new layer. Duplicate this layer. Image > Rotate 90° left. Merge these two layers down.
Now we're going back to the top to add the name. If you want to go through this, it's a bit fiddly, but I wanted the name to be consistent with the word art. You may choose do do this differently. It's your tag!
I used the color #'s a586c7 and 029091 for the name. Type out the name, one letter at a time, in alternating colors. See my example to see what I mean.
When all typed out, then...
Effects > Alien Skin > Eye Candy 5 > Impact > Extrude with the following settings:
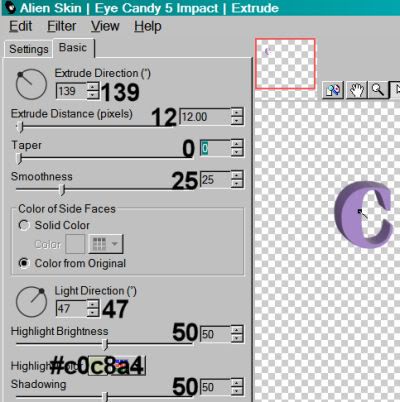
Hit okay. Do this with each individual layer until the name is done.
Arrange your letters however you'd like them arranged. Merge your letter layers down.
Effects > Eye Candy 4000 > Gradient Glow set at 3-0-100 in color #c0c0c0.
Drop shadow your name.
Drop shadow your frame layer.
Resize your canvas to a size with which you are comfortable.
Add your copyright, license information if applicable, and taggers'/watermark.
If you choose not to animate, you're now done, and you can merge your layers and save!
A N I M A T I O N
I animated two parts of this tag (both layers of fireworks). You may choose to do just one if you like.
Highlight your fireworks1 layer. Duplicate three times, for a total of four fireworks1 layers.
Highlight your fireworks2 layer. Duplicate three times, for a total of four fireworks2 layers.
Highlight the bottom layer of the fireworks1 layers.
Adjust > Add/Remove Noise > Add Noise with the following settings:
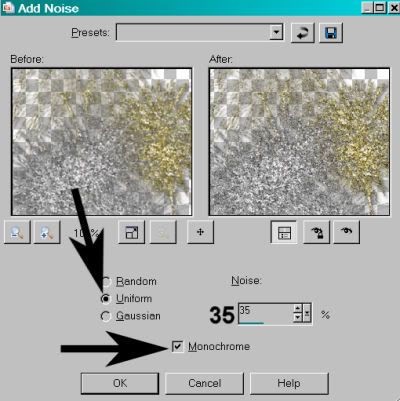
Hit okay.
Go to the bottom layer of your fireworks2 layers, and do the same step as above.
Highlight the next layer up on your fireworks2 layers.
Add Noise again, this time changing the percentage to 40.
Hit okay.
Go to the corresponding layer of the fireworks1 layers. Do the same step as above.
Hit okay.
Highlight the next layer up of the fireworks1 layers.
Add Noise again, this time changing the percentage to 45.
Hit okay.
Go to the corresponding layer of the fireworks2 layers. Add Noise again, same as above.
Hit okay.
Highlight the top layer of your fireworks2 layers. Add Noise once more, this time changing the percentage to 50.
Hit okay.
Highlight the top layer of your fireworks1 layers. Add Noise again, as above.
Hit okay.
Close out the top three layers of both the fireworks1 and fireworks2 layers, leaving the bottom layers open.
Edit > Copy Merged.
Open Animation Shop. Right-click on the desktop area and paste as a new animation.
Return to PSP. Close out the bottom fireworks1 and 2 layers, and open the next layers up.
Edit > Copy merged.
Back to Animation Shop. Edit > Paste > After Current Frame.
Return again to PSP. Close out the layers you just worked with, and open the next fireworks1 and 2 layers up.
Edit > Copy merged.
Again, back to Animation Shop. Edit > Paste > After Current Frame.
Finally, close those fireworks1 and 2 layers that are open, and open the top layers of both sets.
Return once more to Animation Shop. Edit > Paste > After Current Frame.
View > Animation.
And you're done! I know this one was a bit fiddly, but I hope you're happy with your results! I'd love to see them! And thanks for stopping by! Have a Happy Holiday!
.
.
 [Click image above to go to full sized image.]This tutorial was written on December 18, 2009, using Paint Shop Pro, version X.03. It should be okay to do with other versions as well. I just find X.03 more comfortable for me. You may download a free trial of Paint Shop Pro, version X2, from Corel. Any similarities between this tut and any others you may see are purely coincidental.
You will also need:
Animation Shop. This is from CNET, so it's a safe download. However, it costs. That changed pretty recently. I don't know why!!
I had two people point out to me that one might find Animation Shop for free at this location. This is an FTP link and I have no idea if it's safe or not. So keep your antivirus handy to scan it after download!
A tube of your choice. I'm using the cute-n-sexy artwork of Dominic Marco. I just love his work! You must have a license to use his artwork. You can get that license and art at C.I.L.M. This particular tube can be found here.
The scrap kit is by Clarey, of Clarey's Designz. This is a PTU kit, called Christmas Magic. Clarey released a freebie kit for the new year on the same day. My next tut will be using that kit. You can pick that up with your Christmas Magic purchase. After the order for Christmas Magic goes through, the freebie will be available to you. It's called "Celebrate." Leave a "thank you" for her where it has room for comments!!
Filters: Eye Candy 4000 > Gradient Glow, dsb Flux > Bright Noise
Font: I used Christophs Quill ITC.
Supplies: Just the mask, made by the talented but seemingly absent-from-the-web Becky. Thank you, Becky, for all your amazing masks and sharing them with people!
Also, please... if you have problems with any download link for supplies, drop me a line via e-mail. Leaving a comment without a way for me to contact you back doesn't help. If you e-mail me, I'll do my best to send you the supplies.
Okay then, let's go!
Open your mask in PSP and minimize. Alternatively, you can file it away to your mask files for future use!
Open a new canvas, 700 x 700, white.
Open paper12. Resize to 700 x 700 pixels. Copy and paste as a new layer.
Apply your mask. Delete the mask layer, answer "yes" to the pop-up question, and merge group.
We'll be using this paper again, just to let you know...
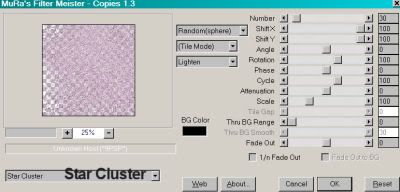
Open glitterdoodle1. Copy and paste as a new layer. Resize 75%.
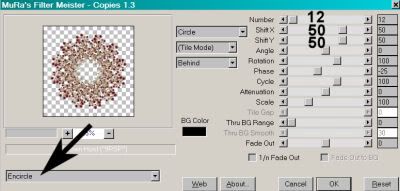
Effects > Mura's Meister > Copies with the following settings:
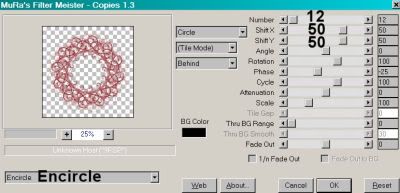
Hit okay.
Open frame2. Copy and paste as a new layer.
Add your tube. Resize, position and drop shadow to your liking.
Open paper12 again. No need to resize this time. Copy and paste as a new layer. In your layer palette, drag this paper below your frame.
Highlight your frame layer.
Grab your magic wand and click inside the frame. Selections > Modify > Expand by 1. Selections > Invert.
Highlight your tube layer.
Grab your eraser brush and erase any portions of your tube that you don't want showing outside the frame.
Selections > Invert. Selections > Modify > Expand by 10. Selections > Invert.
Highlight your recent paper12 layer. Hit delete. Selections > Select None.
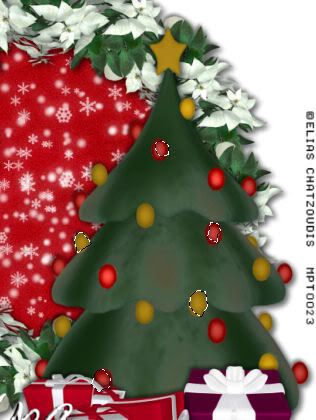
Open christmastree. Copy and paste as a new layer. Arrange as you like. Drop shadow.
Open gift1. Resize 50%. Copy and paste as a new layer. Drop shadow.
Open gift2. Resize 50%. Copy and paste as a new layer. Drop shadow.
Open gift3. Resize 65%. Copy and paste as a new layer. Drop shadow.
Arrange your gifts as you'd like them at the bottom of the tree.
Drop shadow your frame layer.
Go back to the top layer and add your name. I used color #9b2033 for the fill and the stroke, stroke set at 3.
Effects > Eye Candy 4000 > Gradient Glow set at 3-0-100, color #eddf9a.
Drop shadow your name.
I added the following bevel:
Hit okay.
Resize your canvas to a size with which you are comfortable.
Add your copyright, license information if applicable, and taggers'/watermark.
If you choose not to animate, you're now done, and you can merge your layers and save!
A N I M A T I O N
I animated two parts of this tag. The animation of the glitterdoodle layer does NOT show up well, if at all. I'm only giving the steps for the star on the tree. If you want to apply the same steps to the glitterdoodle layer as well, it's up to you.
Highlight your christmastree layer. Duplicate twice, for a total of three christmastree layers.
Highlight your bottom christmastree layer.
Grab your lasso tool, set on point-to-point. Make sure the feather is set to 0. Zoom in as much as you need, and draw a selection around the star at the top of the tree.
Effects > dsb Flux > Bright Noise, intensity set at 40.
Hit okay.
Highlight the middle christmastree layer.
Add Bright Noise again, this time hitting "mix" a time or two.
Hit okay.
Now, highlight the top christmastree layer. Again, add Bright Noise, and again hit "mix."
Hit okay.
Close out the top two christmastree layers, leaving the bottom christmastree layer open.
Edit > Copy Merged.
Open Animation Shop. Right-click on the desktop area and paste as a new animation.
Return to PSP. Close out the bottom christmastree layer and open the middle christmastree layer.
Edit > Copy merged.
Back to Animation Shop. Edit > Paste > After Current Frame.
Return again to PSP. Close out the middle christmastree layer and open the top christmastree layer.
Edit > Copy merged.
Again, back to Animation Shop. Edit > Paste > After Current Frame.
View > Animation.
And you're done! Thanks for stopping by! Happy Holidays!
.
.
 [Click image above to go to full sized image.]This tutorial was written on December 18, 2009, using Paint Shop Pro, version X.03. It should be okay to do with other versions as well. I just find X.03 more comfortable for me. You may download a free trial of Paint Shop Pro, version X2, from Corel. Any similarities between this tut and any others you may see are purely coincidental.
You will also need:
Animation Shop. This is from CNET, so it's a safe download. However, it costs. That changed pretty recently. I don't know why!!
Alternatively, I had two people point out to me that one might find Animation Shop for free at this location. This is an FTP link and I have no idea if it's safe or not. So keep your antivirus handy to scan it after download!
A tube of your choice. I'm using the stunning artwork of Olivia. You must have a license to use her artwork. You can get that license and art at C.I.L.M.
The scrap kit is by Monica, of Simply Sensational Scraps. This is a FTU kit, called New Years Party. Be sure to leave lots of love for your freebie!!
Filters: Mura's Meister > Copies, dsb Flux > Bright Noise
Font: I used NoralTC TT.
Supplies: Just the champagne bottle. I don't know whose this is. If anyone knows who did this, let me know and I'll give proper credit!!
Also, please... if you have problems with any download link for supplies, drop me a line via e-mail. Leaving a comment without a way for me to contact you back doesn't help. If you e-mail me, I'll do my best to send you the supplies.
Okay, so let's do it! lol.
Open your champagne bottle in PSP and minimize. Alternatively, you can file it away with the rest of your PSP files for future use!
Open a new canvas, 700 x 700, white.
Open ornament1. Resize 50%. Copy and paste as a new layer.
Effects > Mura's Meister > Copies with the following settings:
Hit okay. Drop shadow.
Open tagtemplate1. Resize 115%. Copy and paste as a new layer.
Add your tube. Resize, position, and drop shadow to your liking.
Open balloon1. Copy and paste as a new layer. Position to the top right of the canvas, so it can be seen from behind the tagtemplate layer. Drop shadow.
Open balloon3. Copy and paste as a new layer. Image > Mirror. Position to the left, opposite your first balloon. Drop shadow.
In your layer palette, drag both balloon layers below the tagtemplate and "copies" layers.
Open glitterswirl3. Copy and paste as a new layer. Position toward the top of the tagtemplate area. See my example for placement reference. Duplicate this layer and Image > Mirror. Put this toward the bottom of the template area. Merge these two layers down.
Open wordart3. Copy and paste as a new layer. Position at the top of your canvas. Drop shadow.
Open the champagne bottle from the file I supplied. Resize 85%. Copy and paste as a new layer. Rotate 30° right. Position in the bottom right corner of the tag. Drop shadow.
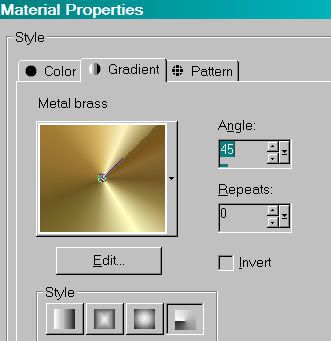
Go to the top layer and add your name. I used the "metal brass" gradient for the fill, and black for the stroke, stroke set at 2.
I added the following bevel:
Hit okay.
Drop shadow your name.
Resize your canvas to a size with which you are comfortable.
Add your copyright, license information if applicable, and taggers'/watermark.
If you choose not to animate, you're now done, and you can merge your layers and save!
A N I M A T I O N
Highlight your glitterswirl layer. Duplicate twice, for a total of three glitterswirl layers.
Highlight your bottom glitterswirl layer.
Effects > dsb Flux > Bright Noise, with intensity set at 40.
Hit okay.
Highlight the middle glitterswirl layer.
Add Bright Noise again, this time hitting "mix" a few times.
Hit okay.
Now, highlight the top glitterswirl layer. Again, add Bright Noise, and again hitting "mix."
Hit okay.
Close out the top two glitterswirl layers, leaving the bottom glitterswirl layer open.
Edit > Copy Merged.
Open Animation Shop. Right-click on the desktop area and paste as a new animation.
Return to PSP. Close out the bottom glitterswirl layer and open the middle glitterswirl layer.
Edit > Copy merged.
Back to Animation Shop. Edit > Paste > After Current Frame.
Return again to PSP. Close out the middle glitterswirl layer and open the top glitterswirl layer.
Edit > Copy merged.
Again, back to Animation Shop. Edit > Paste > After Current Frame.
View > Animation. Whew, we're done! Thanks for stopping by!
.
.
 [Click image above to go to full sized image.]This tutorial was written on December 14, 2009, using Paint Shop Pro, version X.03. It should be okay to do with other versions as well. I just find X.03 more comfortable for me. You may download a free trial of Paint Shop Pro, version X2, from Corel. Any similarities between this tut and any others you may see are purely coincidental.
You will also need:
Animation Shop. This is from CNET, so it's a safe download. However, it costs. That changed pretty recently. I don't know why!!
Alternatively, I had two people point out to me that one might find Animation Shop for free at this location. This is an FTP link and I have no idea if it's safe or not. So keep your antivirus handy to scan it after download!
A tube of your choice. I used the artwork of Ted Hammond. You must have a license to use his art. You may obtain that license and his art from C.I.L.M. Here's the link to this particular tube: GG-3 Hope this helps!!
Once again, this beautiful scrap kit is by Sylvie, from Fantasy Moments. This is a FTU kit, called Happy New Year. As always, leave love for the freebies!!
Supplies: I've had a sudden flurry of e-mails about the animation file not working. The only thing I can think of is that it may be a PSP version problem?? I'm now giving the link to the original file, which I had just resized. I thought it'd be easier to include the resized animation but I guess not! If my memory serves, I resized this animation in Animation Shop to a size somewhat like 350x whatever, maintain aspect ration UNchecked.
FWIW, I just tried to re-open the file in AS to check the measurements, and it wouldn't let me open it either! I'm so sorry ladies!! I'll put a note through the tut groups.... Thanks for bringing this to my attention!!
Also, please, if you have problems with any download link for supplies, drop me a line via e-mail. Leaving a comment without a way for me to contact you back doesn't help. If you e-mail me, I'll send you the supplies.
Filters: Eye Candy 4000 > Gradient Glow
Font: I used ALS Script.
Okay, on to the tutorial!
File the animation to where it will be handy when we get to Animation Shop.
Open a new image, 700 x 700, white.
Open the Element-61. Copy and paste as a new layer. Resize 80%.
Add your tube. Resize, position and drop shadow to your liking.
Highlight your white background layer.
Open Paper-5. Copy and paste as a new layer.
Highlight your frame layer.
Grab your magic wand and click inside the frame.
Selections > Modify > Expand by 15.
Selections > Invert
Highlight your paper layer and hit delete. Selections > Select None.
This paper layer isn't going to show at the end, but it's a good thing to have for reference once we get to Animation Shop.
Open Element-17. Resize 35%. Copy and paste as a new layer.
Position this layer at the top of the frame. Duplicate, and put this one at the bottom. (See my example for placement reference, if you like.) Merge these two layers down.
Effects > Eye Candy 4000 > Gradient Glow of 4-25-100 in color #dab44d.
Open Element-35. Resize 35%. Copy and paste as a new layer. Position at the bottom right corner of the frame. Drop shadow.
Open Element-3. Resize 30%. Copy and paste as a new layer. Position at the top right corner of the frame. Drop shadow.
Drop shadow your frame layer.
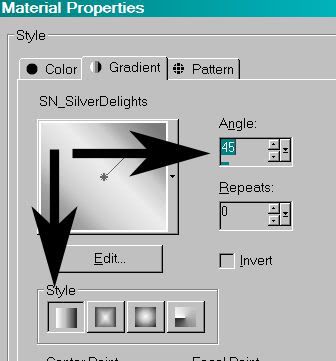
Go back to the top layer and add your name. I used black for the fill and a gradient for the stroke, stroke set at at 2. The gradient I used was called metal-brass, set at a 45° angle and it's a radial gradient.
I added the following bevel:
Hit okay.
Drop shadow your name.
Resize your canvas to a size with which you are comfortable.
Add your copyright, license information if applicable, and taggers'/watermark.
If you choose not to animate, that paper we did in the beginning is very useful for you! And you're done! Merge your layers and save!! Congrats!
A N I M A T I O N
Layers > View > None.
Open your bottom two layers. This should be your white background, and your paper layer.
Edit > Copy merged
Open Animation Shop, right-click on the desktop area and paste as a new animation.
Duplicate this frame until you have a total of 15 frames. Move your slider at the bottom back to the first frame.
Locate and open your fireworks animation. Edit > Select All. Edit > Copy
Return to your animation that you're building and Edit > Select All. Edit > Paste into Selected Frame.
I found placement with the fireworks file quite easy. It is immediately positioned into the middle, which is exactly where you want it!
Go back to PSP. Layers > View > All. Close the bottom two layers.
Edit > Copy Merged.
Back to Animation Shop. Right-click on the desktop area and paste as a new animation.
Duplicate *this* frame until you have 15. Bring the slider back to the first frame.
Edit > Select All. Edit > Copy
Back to the animation upon which you've put the fireworks.
Edit > Select All. Edit > Paste Into Selected Frame
Hover your mouse until you have the frame and fireworks lined up correctly, then release your mouse button.
View > Animation. Save as .gif and, again! We are done!!
.
.
 [Click image above to go to full sized image.]This tutorial was written on December 14, 2009, using Paint Shop Pro, version X.03. It should be okay to do with other versions as well. I just find X.03 more comfortable for me. You may download a free trial of Paint Shop Pro, version X2, from Corel. Any similarities between this tut and any others you may see are purely coincidental.
You will also need:
Animation Shop. This is from CNET, so it's a safe download. However, it costs. That changed pretty recently. I don't know why!!
Alternatively, I had two people point out to me that one might find Animation Shop for free at this location. This is an FTP link and I have no idea if it's safe or not. So keep your antivirus handy to scan it after download!
A tube of your choice. I used the cute artwork of Cristina McAllister. You must have a license to use her art. You may obtain that license and her art from C.I.L.M. The location for this specific tube is here.
The scrap kit is by Sylvie, from Fantasy Moments. This is a FTU kit, called Last Christmas. As always, leave some love for the freebies!!
Supplies: The mask and the sparkle animation, which you may find here. The mask is by the prolific Becky, the whereabouts of whom I do not know. And I don't know who did the sparkly animation. If it is yours, let me know and I will give you proper credit!!
Other than that, please, if you have problems with any download link for supplies, drop me a line via e-mail. Leaving a comment without a way for me to contact you back doesn't help. If you e-mail me, I'll send you the supplies.
Filters: None!
Font: I used Christmas Card.
Okay, let's get this started! This is pretty much a cut-n-paste tut!
Open the mask in PSP and minimize. Alternatively, you can file it with the rest of your PSP masks, for future use! File the sparkly animation to where it will be handy when we get to Animation Shop.
Open a new image, 700 x 700, white.
Add your tube. Resize, position and drop shadow to your liking.
Open Element 6. Copy and paste as a new layer. Resize 85%. Position as you like, behind your tube. I repositioned and changed elements all the way through, 'til I got to these results, so play around! Drop shadow your wreath.
Highlight your white background layer.
Open Paper-25. Copy and paste as a new layer.
Apply your mask. Delete the mask layer, answer "yes" to the pop-up question, and merge group.
Open Element-75. Resize 35%. Copy and paste as a new layer. Position this as you like it, behind your wreath but above the mask layer. Give this a slight drop shadow.
Open Element-24. Resize 65%. Copy and paste as a new layer. Position as you like. Drop shadow.
Open Element-29. Resize 50%. Copy and paste as a new layer. Position, again, as you like. I chose to put it behind the tube and teddy bear, but above the wreath on the right. See my example for placement reference if you like. Drop shadow.
On your top layer, add your name. I used color #92e3bd for the fill, #b8538a for the stroke, stroke set at 3.
I added the following bevel:
Drop shadow your name.
Resize your canvas to a size with which you are most comfortable.
Add your copyright, license information if applicable, and taggers'/watermark.
If you choose not to animate, you're done! Merge your layers and save!! Congrats!
A N I M A T I O N
Edit > Copy merged
Open Animation Shop, right-click on the desktop area and paste as a new animation.
Duplicate this frame until you have a total of 16 frames. Move your slider at the bottom back to the first frame.
Locate and open your "subtle.mng" animation. Edit > Select All. Edit > Copy
Return to your animation that you're building and Edit > Select All. Edit > Paste into Selected Frame.
Hover your mouse over the area you would like your sparkles to be. I chose all the flowery areas of the wreath that can be seen, and the mistletoe. Release the mouse button. Continue to do this until all the areas you like are covered in the sparkles. View > Animation. If you don't like what you see, then Edit > Undo Paste and re-do the paste into selected frame, hovering over a different area. Do this until you like your placement.
View > Animation. Save as .gif and, again! We are done!! Thanks for taking it on! I hope you enjoy your results!
.
.
 [Click image above to go to full sized image.]This tutorial was written on December 13, 2009, using Paint Shop Pro, version X.03. It should be okay to do with other versions as well. I just find X.03 more comfortable for me. You may download a free trial of Paint Shop Pro, version X2, from Corel. Any similarities between this tut and any others you may see are purely coincidental.
You will also need:
Animation Shop. This is from CNET, so it's a safe download. However, it costs. That changed pretty recently. I don't know why!!
Alternatively, I had two people point out to me that one might find Animation Shop for free at this location. This is an FTP link and I have no idea if it's safe or not. So keep your antivirus handy to scan it after download!
A tube of your choice. A laying down, or leaning back tube would work the best. I used the artwork of Gene Gonzales. You must have a license to use his art. You may obtain that license and his art from C.I.L.M. Apparently, they're trying to make things "easier" at CILM by putting all winter and Christmas tubes in a different area. Personally, it seems they've made it more difficult. But here's the link to this particular tube, under Winter and Christmas tubes. Hope this helps!!
The scrap kit is by Doris, from Scraps Dimensions. This is a FTU kit, called Deck the Halls. As always, leave love for the freebies!!
Supplies: You may find here. This includes trees, the snow animation and the mask, which was made by Teresa from Boundless Bliss. I'm surprised to find that her site is no longer there! It was the last time I used this mask. Sad to see you go, Teresa. I hope it's a temporary setback. But thanks for letting us use your mask! The snow animation is one I altered from the normal one I usually use. That original snow animation is again, by someone, but I don't know who. Same situation with the trees. It's someone named Pam, probably with the initials of pjs. If anyone knows, let me know and I'll give the artists the proper credit!
I know I've been using this snow a lot, but I really like it!! Sorry. If you're tired of it, leave me a note in the chat box to let me know.
Also, please, if you have problems with any download link for supplies, drop me a line via e-mail. Leaving a comment without a way for me to contact you back doesn't help. If you e-mail me, I'll send you the supplies.
Filters: Eye Candy 4000 > Gradient Glow
Font: I used Greyton Script LET.
Okay, on to the tutorial!
Open your supplies in PSP and minimize. Alternatively, you can file each one with the rest of your PSP files, for future use! File the snow animation to where it will be handy when we get to Animation Shop.
Open a new image, 800 x 700, white.
Open the Frame. Copy and paste as a new layer. Resize 85%.
Add your tube. Resize, position and drop shadow to your liking.
Highlight your white background layer.
Open Paper 7. Copy and paste as a new layer.
Apply your mask. INVERT TRANSPARENCY CHECKED! Delete mask layer, answer "yes" to the pop-up question, and merge group.
Open the "Trees by Pam" file included with your supplies. Copy and paste as a new layer. In your layer palette, this is above your mask layer while below your frame layer.
Grab your pick tool
...and stretch the trees out in both directions (East/West) until they fill the frame nicely behind your tube.
Open Flowers1. Resize 35%. Copy and paste as a new layer. Rotate 20° right. Position on the bottom right corner of your frame. In your layer palette, this layer should be below your tube and above the frame. Drop shadow.
Duplicate that layer and Image > Flip.
Duplicate *that* layer and Image > Mirror. Position correctly in the top left corner of the frame.
Open the Tag file. Resize 35%. Copy and paste as a new layer. Position in the frame the way you think it looks best. Grab your selection tool, set on rectangle, and draw a selection around the tops of the strings, where they go above your frame. Hit delete. Selections > Select none. Drop shadow your tag.
Open the Gift Boxes file. Resize 35%. Copy and paste as a new layer. Position as you like. For mine, I went Image > Mirror, and positioned the gifts below the gift the elf in the tube art is holding. Drop shadow your gift boxes.
Drop shadow your frame layer.
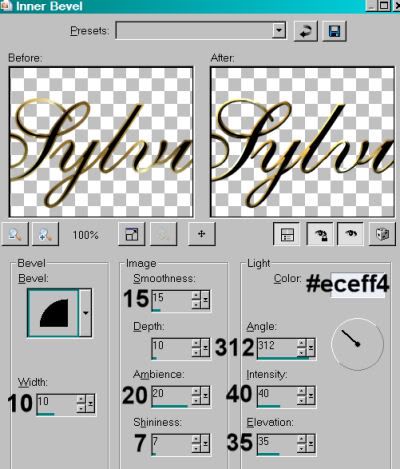
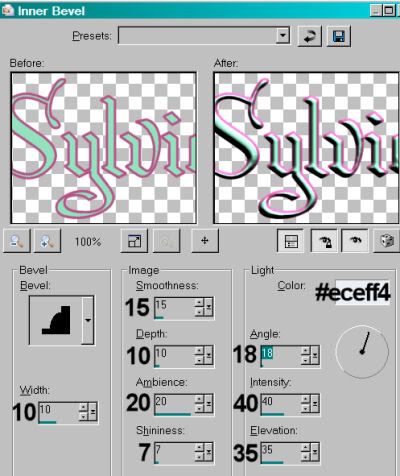
Go back to the top layer and add your name. I used color #7d0000 for the fill and #eceff4 for the stroke, stroke set at at 2.
Add the following bevel:
Hit okay.
Add a Gradient Glow of 4 - 25 - 100 in color #eceff4.
Hit okay.
Drop shadow your name.
Add your copyright, license information if applicable, and taggers'/watermark.
If you choose not to animate, you're done! Merge your layers and save!! Congrats!
A N I M A T I O N
Layers > View > None.
Open your bottom three layers. This should be your white background, your mask layer and your trees layer.
Edit > Copy merged
Open Animation Shop, right-click on the desktop area and paste as a new animation.
Duplicate this frame until you have a total of 10 frames. Move your slider at the bottom back to the first frame.
Locate and open your snow animation. Edit > Select All. Edit > Copy
Return to your animation that you're building and Edit > Select All. Edit > Paste into Selected Frame.
Placement with this snow file is a bit trickier than the others. It needs to be, as best you can, contained in the frame, which is not there. It took me a few tries to get it right for me.
Go back to PSP. Layers > View > All. Close the bottom three layers.
Edit > Copy Merged.
Back to Animation Shop. Right-click on the desktop area and paste as a new animation.
Duplicate *this* frame until you have ten. Bring the slider back to the first frame.
Edit > Select All. Edit > Copy
Back to the animation upon which you've put the snow.
Edit > Select All. Edit > Paste Into Selected Frame
Hover your mouse until you have the frame and snow lined up correctly, then release your mouse button.
View > Animation. Save as .gif and, again! We are done!!
.
.
 [Click image above to go to full sized image.]This tutorial was written on December 13, 2009, using Paint Shop Pro, version X.03. It should be okay to do with other versions as well. I just find X.03 more comfortable for me. You may download a free trial of Paint Shop Pro, version X2, from Corel. Any similarities between this tut and any others you may see are purely coincidental.
You will also need:
Animation Shop. This is from CNET, so it's a safe download. However, it costs. That changed pretty recently. I don't know why!!
Alternatively, I had two people point out to me that one might find Animation Shop for free at this location. This is an FTP link and I have no idea if it's safe or not. So keep your antivirus handy to scan it after download!
A tube of your choice. I'm using the artwork of Elizabeth Austin. You must have a license to use her artwork. You can get that license and art at C.I.L.M.
The scrap kit is by Tina, of Tina's Magical Scrap World. This is a FTU kit, called Christmas Wonderland. Be sure to leave lots of love for your freebie!!
Filters: Eye Candy 4000 > Fire
Font: I used Flapper.
Supplies: I'm including the mask and the window. You can find these here. Again, I don't know from whence these came, so if YOU do, let me know and I'll give the proper credit where it's due!!!
Also, please... if you have problems with any download link for supplies, drop me a line via e-mail. Leaving a comment without a way for me to contact you back doesn't help. If you e-mail me, I'll do my best to send you the supplies.
Okay, so let's get this set in stone! lol.
Open your supplies in PSP and minimize. Alternatively, you can file them away to your mask and etc. files for future use!
Open a new canvas, 800 x 700, white.
Open the window I included in the supplies. Resize 85%. Copy and paste as a new layer. Your positioning of this window may change throughout your building of this tag. I know mine did!
Highlight your white background layer.
Open Paper-13. Resize to 800 x 800 pixels. Copy and paste as a new layer.
Apply your mask. Delete the mask layer, answer "yes" to the pop-up question, and merge group.
Add your tube. Resize, position, and drop shadow to your liking.
To crop the bottom of your tube (if you're using a tube that's ¾ length like I am), grab your lasso tool, set on freehand, and set your feather to 20. Draw a "smile" around the bottom of your tube, kinda like so:
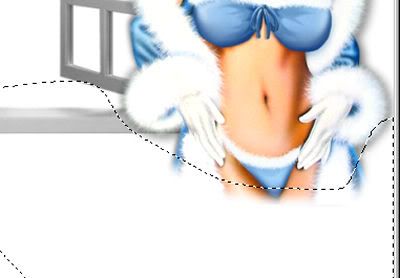
Hit delete a few times, until you have it like you want it. Selections > Select None.
Open Garland1. Copy and paste as a new layer. Drag this layer below your tube layer, but above your window layer.
Grab your pick tool
...and squeeze the sides together until it's the same size as your window.
Position your garland at the top of the window. See my example for placement reference, if you like. Give your garland a drop shadow of choice.
Open SnowFlakeChain1. Copy and paste as a new layer. In your layer palette, this layer should be below the garland, but above the window.
Again, grab your pick tool and squeeze the sides together until the element is the proper size for your window. Position at the top of the window. You might want to see my example for placement reference again, if you like. Drop shadow.
Open Candle With Poisettias1. Resize 50%. Copy and paste as a new layer. Position on the sill of the window, close to the middle. In the layer palette, this should be above the SnowFlakeChain, but below the garland. Drop shadow.
Open Sleigh1. Resize 65%. Copy and paste as a new layer. Position on the side opposite your tube. In your layer palette, this should be just above or below the tube. Drop shadow.
Drop shadow your window layer.
Go back to the top layer and add your name. I used color #f9f9e3 for the fill, #4379b2 for the stroke, stroke set at 2.
Add the following bevel:
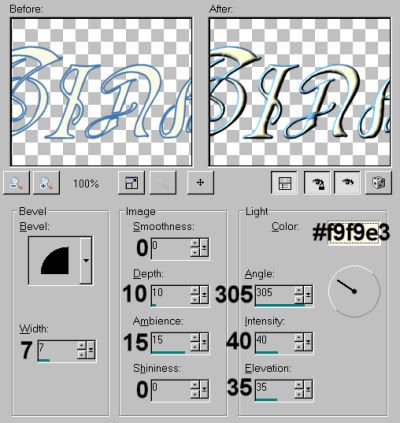
Hit okay.
Drop shadow your name.
Resize your canvas to a size with which you are comfortable.
Add your copyright, license information if applicable, and taggers'/watermark.
If you choose not to animate, you're now done, and you can merge your layers and save!
A N I M A T I O N
Highlight your Candle with Poinsettia1 layer. Duplicate twice, for a total of three candle layers.
Highlight your bottom candle layer.
Grab your lasso tool, set on point-to-point. Make sure the feather is set to 0. Zoom in as much as you need, and draw a selection around each of the three flames.
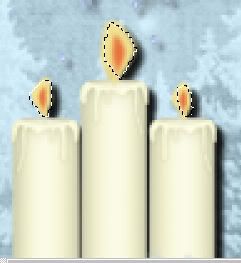
On the bottom layer still,
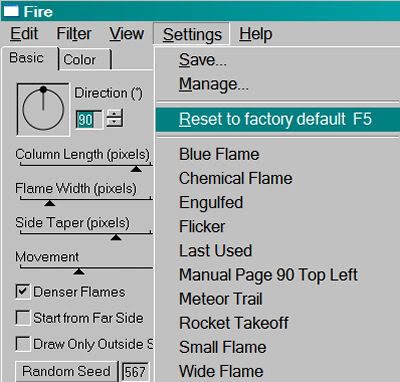
Effects > Eye Candy 4000 > Fire, set with the default settings:
Hit okay.
Highlight the middle candle layer.
Add Fire again, this time hitting "Random Seed" -- watch your window to see what the random seed settings are doing to your flames. You can click that button as many times as you like, until you get an effect you like. Or, just click it once, to make it easy.
Hit okay.
Now, highlight the top candle layer. Again, add Fire, again hitting "Random Seed."
Hit okay.
Close out the top two candle layers, leaving the bottom candle layer open.
Edit > Copy Merged.
Open Animation Shop. Right-click on the desktop area and paste as a new animation.
Return to PSP. Close out the bottom candle layer and open the middle candle layer.
Edit > Copy merged.
Back to Animation Shop. Edit > Paste > After Current Frame.
Return again to PSP. Close out the middle candle layer and open the top candle layer.
Edit > Copy merged.
Again, back to Animation Shop. Edit > Paste > After Current Frame.
Still in Animation Shop, Edit > Select All.
Right-click on the top bar of your animation. Select "Frame Properties" and change that number to 25.
View > Animation.
Whew, we're done! Thanks for being here! I'm going to have to get busy and do lots more tuts!! Happy Holidays!
.
.
 [Click image above to go to full sized image.]This tutorial was written on December 7, 2009, using Paint Shop Pro, version X.03. It should be okay to do with other versions as well. I just find X.03 more comfortable for me. You may download a free trial of Paint Shop Pro, version X2, from Corel. Any similarities between this tut and any others you may see are purely coincidental.
You will also need:
Animation Shop. This is from CNET, so it's a safe download. However, it costs. That changed pretty recently. I don't know why!!
A great person named solshne (and another named Chris) wrote to let me know that one might find Animation Shop for free at this location. This is an FTP link and I have no idea if it's safe or not. So keep your antivirus handy to scan it after download!
A tube of your choice. I used the artwork of Edward Reed. You must have a license to use his art. You may obtain that license and his art from C.I.L.M. Apparently, they're trying to make things "easier" at CILM by putting all winter and Christmas tubes in a different area. Personally, it seems they've made it more difficult. But here's the link to this particular tube, under winter and Christmas tubes. Hope this helps!!
The scrap kit is by Clarey, from Clarey's Designz. This is a PTU kit, available at Clarey's Designz Digital Scrapbook Store, and is called Winter Bliss.
Supplies: You may find them here. This includes many files, the origins of them all unknown. There will be your snow animation, a gradient, a mask, a background and a snow file. If anyone recognizes from whence they (or one of them) came, please let me know so that I can give proper credit! Thank you!
Also, please, if you have problems with any download link for supplies, drop me a line via e-mail. Leaving a comment without a way for me to contact you back doesn't help. If you e-mail me, I'll send you the supplies.
Filters: Eye Candy 4000 > Gradient Glow
Font: I used Acadian.
Okay, let's do this!
Open your supplies in PSP and minimize. Alternatively, you can file each one with the rest of your PSP files, for future use! File the snow animation to where it will be handy when we get to Animation Shop.
Open a new image, 700 x 750, white.
Open roundframe3. Copy and paste as a new layer.
Grab your pick tool
And squish the frame -- maybe even drawing it out a bit wider if you like, until you get something like this:
My intent is/was to make it look like an ice skating pond for one! lol.
Once your frame looks good to you, move it toward the bottom of your canvas and...
Grab your magic wand and click inside the frame. Selections > Modify > Expand by 10.
Go to your materials palette and find your silver gradient file. Settings like so:
Hit okay.
Grab your flood fill tool and fill the selected area with your gradient. Selections > Select None.
Add your tube. Resize, position and drop shadow to your liking.
Highlight your white background layer.
Open Background.psp from your supplies. Copy and paste as a new layer.
Apply your mask. Delete mask layer, answer "yes" to the pop-up question, and merge group.
Open snowflaketree2. Resize 85%. Copy and paste as a new layer. Position to the right of your canvas. This layer should be below everything but the background layer. Duplicate this layer and Image > Mirror. Position to your liking. Add a small drop shadow to both layers.
Open deesnow. This is a kind-of arduous task, but this is how I did it. Copy and paste deesnow as a new layer. This layer should be below all layers of your little ice skating rink, and above the trees. Give this layer a very small drop shadow. Duplicate this layer as many times as you like, moving them down while making sure the snow doesn't look uniform. Some to the right, some to the left. When you've gone almost all the way down (but NOT all the way down!), stop. Merge all these layers down.
Now, add the deesnow again, this time at the bottom of your canvas, and above the ice skating rink layers. Use the same drop shadow as above. Duplicate *this* instance as many times as you like, still making it look kind of random, until the snow *just* covers the bottom of the skating area. See my example for placement reference. When done with these, merge all these layers down.
Now, on BOTH the layers of deesnow that you've made, apply the mask again. Again, answer "yes" to the pop-up question and merge group.
Open snowdust1. Resize 55%. Copy and paste as a new layer. Drag this layer above all your other layers, but below the tube layer. Position this snowdust so that it appears to be coming from the blades on the ice skate. Use a small drop shadow on this layer. Rotate this layer 35° left.
Duplicate this layer and rotate 65° left. Duplicate the first snowdust layer again, this time rotating 48° left. Merge these layers down.
Drop shadow your frame layer.
Go back to the top layer and add your name. I used color #c06d9e for the fill and the stroke, stroke set at 2.
Add a Gradient Glow of 5 - 25 - 100 in color #dde0e5.
Hit okay.
Add the following bevel:
Hit okay.
Drop shadow your name.
Add your copyright, license information if applicable, and taggers'/watermark.
If you choose not to animate, you're done! Merge your layers and save!! Congrats!
A N I M A T I O N
Close the top three layers. This should be your artist info, your name and your tube.
Edit > Copy merged
Open Animation Shop, right-click on the desktop area and paste as a new animation.
Duplicate this frame until you have a total of 10 frames. Move your slider at the bottom back to the first frame.
Locate and open your snow animation. Edit > Select All. Edit > Copy
Return to your animation that you're building and Edit > Select All. Edit > Paste into Selected Frame.
I found placement with this snow very easy. Just don't move until the snow shows up, then release your mouse button.
Go back to PSP. Layers > View > None. Open the top three layers.
Edit > Copy Merged.
Back to Animation Shop. Right-click on the desktop area and paste as a new animation.
Duplicate *this* frame until you have ten. Bring the slider back to the first frame.
Edit > Select All. Edit > Copy
Back to the animation upon which you've put the snow.
Edit > Select All. Edit > Paste Into Selected Frame
Hover your mouse until the rest of your tag is positioned to your liking, then release your mouse button.
View > Animation. Save as .gif and, again! We are done!! Thanks for taking it on! I hope you enjoy your results!
.
.
 [Click image above to go to full sized image.]This tutorial was written on December 3, 2009, using Paint Shop Pro, version X.03. It should be okay to do with other versions as well. I just find X.03 more comfortable for me. You may download a free trial of Paint Shop Pro, version X2, from Corel. Any similarities between this tut and any others you may see are purely coincidental.
You will also need:
Animation Shop. This is from CNET, so it's a safe download. However, it costs. That changed pretty recently. I don't know why!!
A great person named solshne (and another named Chris) wrote to let me know that one might find Animation Shop for free at this location. This is an FTP link and I have no idea if it's safe or not. So keep your antivirus handy to scan it after download!
A tube of your choice. I used the great artwork of Elias Chatzoudis. You must have a license to use his art. You may obtain that license and his art from My PSP Tubes.
The scrap kit is by Doris, from Scrap Dimensions. This is a FTU kit, and is called 'Tis The Season.
Supplies: No outside supplies used in this tutorial!
Filters: No outside filters, either!! Can you believe it??
Font: I used Love.
Okay, let's do this!
Open a new image, 750 x 700, white.
Open Frame Wreath. Resize 75%. Copy and paste as a new layer. I positioned mine to the upper left of the canvas. You can figure this out later, if you want. All depends upon your tube/s.
Highlight your white background layer.
Open Paper 5. Copy and paste as a new layer.
Highlight the wreath layer. Grab your magic wand and click inside the wreath. Selections > Modify > Expand by 15. Selections > Invert.
Highlight your paper layer. Hit delete. Selections > Select none.
Open what I believe will be the last file in your folder for this scrap kit: SO01_Tagger(snowdust).
Copy and paste as a new layer. For this part, I duplicated this layer twice, each time moving the snow until it was covered in such a way that I was satisfied. Merge these layers down. Make sure this is above your paper layer but below your wreath layer.
Add your tube. Resize, position and drop shadow to your liking.
Open Xmas Tree. Resize 50%. Copy and paste as a new layer. Position, again, to your liking. Drop shadow.
Open Gift box 4. Resize 30%. Copy and paste as a new layer. Position under the tree. Drop shadow.
Open Gift box 2. Resize 30%. Copy and paste as a new layer. Position under the tree. Drop shadow. On my canvas, I have Gift box 2 above Gift box 4. Up to you! Arrange them how you like!
Drop shadow your wreath layer.
Go back to the top layer and add your name. I used white for the fill and stroke, stroke set at 2.
I added the following bevel:
Hit okay.
Drop shadow your name.
Resize your canvas to a size with which you are comfortable.
Add your copyright, license information if applicable, and taggers'/watermark.
If you choose not to animate, you're done! Merge your layers and save!! Congrats!
A N I M A T I O N
Highlight your Xmas Tree layer. Duplicate twice, for a total of three tree layers.
Now highlight the bottom tree layer. Grab your lasso tool, set at point-to-point, and draw selections around a variety of your tree lights. See below:
Adjust > Brightness and Contrast > Brightness/Contrast with the settings below:
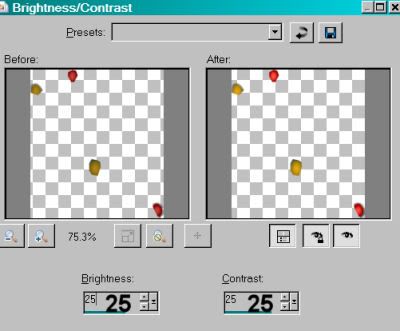
Hit okay.
Now, here's where it gets a bit tricky. Selections > Select None.
Highlight your middle tree layer. Again, grab the lasso tool and select various lights on the tree. To do this so I knew I wasn't doing the same ones over again, I had to hide the other layers, and move them all around a bit to see what I was doing. Good luck!
When done, again add the Brightness/Contrast as you did on the first layer.
Selections > Select none.
Now we're on the top tree layer. Again, the lasso tool, selecting various other tree lights. This time, include the star on top.
Adjust the Brightness/Contrast on this layer. Selections > Select None.
Hide the top two tree layers, leaving the bottom tree layer open. (Your layer with the star selected should be on top. The other two don't matter.)
Edit > Copy merged
Open Animation Shop, right-click on the desktop area and paste as a new animation.
Go back to PSP. Close the bottom tree layer and open the middle tree layer.
Edit > Copy Merged.
Back to Animation Shop. Edit > Paste > After Current Frame.
Return to PSP. Close out the middle tree layer and open the top tree layer.
Edit > Copy Merged.
Back to Animation Shop. Edit > Paste > After Current Frame.
Return again to PSP. Close out the top tree layer and open the middle tree layer.
Edit > Copy Merged.
Back to Animation Shop. Edit > Paste > After Current Frame.
Return to PSP. Close out the middle tree layer and open the bottom tree layer.
Edit > Copy Merged.
Back to Animation Shop. Edit > Paste > After Current Frame.
Still in Animation Shop... Edit > Select All.
Right-click on the top bar of your animation and choose "Frame Properties." Change this number to 17.
Now, find your third frame. Highlight that frame, right-click and choose "Frame Properties." Change this number to 50.
View > Animation. Save as .gif et, voila! We are done!! I hope I explained this well enough to y'all! Have a great rest of your day/evening!! Thanks for choosing my tut!
.
.
 [Click image above to go to full sized image.]This tutorial was written on December 2, 2009, using Paint Shop Pro, version X.03. It should be okay to do with other versions as well. I just find X.03 more comfortable for me. You may download a free trial of Paint Shop Pro, version X2, from, Corel. Any similarities between this tut and any others you may see are purely coincidental.
You will also need:
Animation Shop. This is from CNET, so it's a safe download. However, it costs. That changed pretty recently. I don't know why!!
,
Alternatively, a LOVELY person named solshne (and another named Chris) wrote to let me know that one might find Animation Shop for free at this location. This is an FTP link and I have no idea if it's safe or not. So keep your antivirus handy to scan it after download!
A tube of your choice. I'm using the amazing artwork of Jasmine Becket-Griffith. You must have a license to use her artwork. You can get that license and art at C.I.L.M.
The scrap kit is a collaboration by Heza, of HezaScraps & Tags and Dannie, of One Stop Digi Shop. This is a PTU kit, available at Treasured Scraps and is called Winter Coziness. You may also pick this up at One Stop Digi Stop.
Filters: Eye Candy 4000 > HSB Noise
Font: I used GoodVibrationsROB.
Supplies: Just the mask, about which I know nothing. If this is yours, or your know who made it, please let me know so that I might give proper credit!!
Also, please... if you have problems with any download link for supplies, drop me a line via e-mail. Leaving a comment without a way for me to contact you back doesn't help. If you e-mail me, I'll do my best to send you the supplies.
Okay, so let's begin! I've been playing hooky for over a week, so I have to get my mojo working again!! This one's pretty easy....
Open your mask in PSP and minimize. Alternatively, you can file it away to your mask files for future use!
Open a new canvas, 700 x 700, white.
Open Frame2. Resize 85%. Copy and paste as a new layer.
Add your tube. Resize, position, and drop shadow to your taste.
Highlight your frame layer. Grab your magic wand and click inside the frame.
Selections > Modify > Expand by 1. Selections > Invert.
Highlight your tube layer. Get your eraser brush and erase whatever part of your tube you don't want showing on the bottom or sides of your frame.
Selections > Select None.
Highlight your white background layer.
Open Paper13. Copy and paste as a new layer.
Apply your mask. Delete the mask layer, answer "yes" to the pop-up question, and merge group.
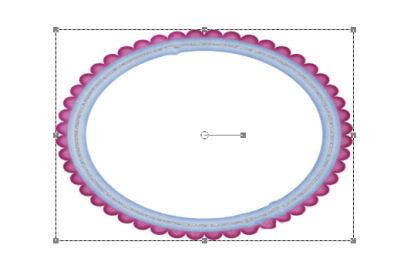
Open Heart Gem 2. Resize 50%. Copy and paste as a new layer. Place on the right bottom corner of the frame. Duplicate this layer and Image > Mirror. Merge these two layers down and drop shadow.
Open Flower3. Resize 40%. Copy and paste as a new layer. Position to the left of the heart gem on the right. Duplicate this layer and Image > Mirror. Merge these two layers down and drop shadow.
Open "Elements 007". Resize 50%. Copy and paste as a new layer. Position at the bottom center of the frame. See my example for placement reference. Drop shadow.
Open Glitter Spill 2. Resize 85%. Copy and paste as a new layer. Move to the bottom of your canvas. Duplicate this layer and Image > Flip. Merge these two layers down.
In your layer palette, drag this layer down below your mask layer.
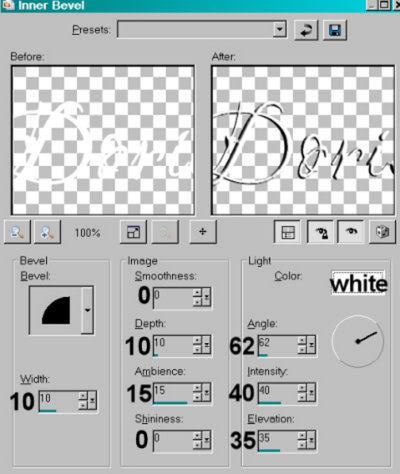
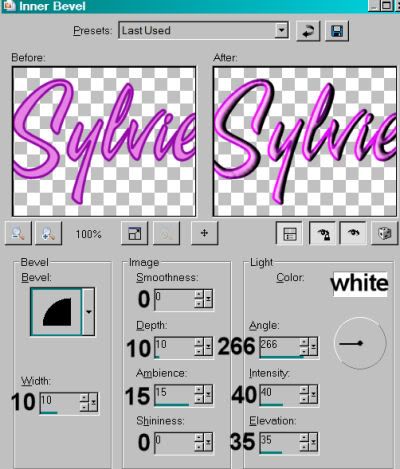
Go back to the top layer and add your name. I used color #e9f2d5 for the fill, and #563440 for the stroke, stroke set at 3.
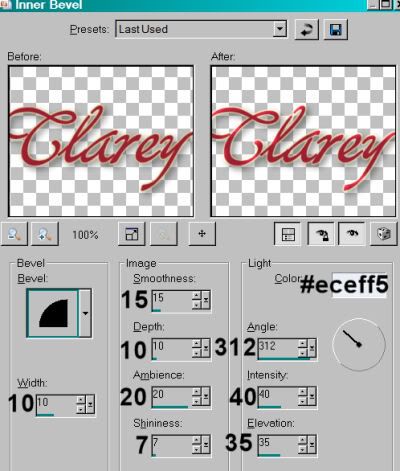
I added a slight inner bevel to the name, again using #e9f2d5 as the color.
Drop shadow your name.
Resize your canvas to a size with which you are comfortable.
Add your copyright, license information if applicable, and taggers'/watermark.
If you choose not to animate, you're now done, and you can merge your layers and save!
A N I M A T I O N
Highlight your Glitter Spill 2 layer. Duplicate three times, for a total of four Glitter Spill 2 layers.
Highlight your bottom Glitter Spill 2 layer.
Effects > Eye Candy 4000 > HSB Noise with just the default settings.
Hit okay.
Highlight the next Glitter Spill 2 layer up.
Add HSB Noise again, this time hitting "Random Seed."
Hit okay.
Now, highlight the third Glitter Spill 2 layer. Again, add HSB Noise, again hitting "Random Seed."
Hit okay.
And finally, the top Glitter Spill 2 layer. Add HSB Noise, again hitting "Random Seed."
Hit okay.
Close out the top three Glitter Spill 2 layers, leaving the bottom Glitter Spill 2 layer open.
Edit > Copy Merged.
Open Animation Shop. Right-click on the desktop area and paste as a new animation.
Return to PSP. Close out the bottom Glitter Spill 2 layer and open the next Glitter Spill 2 layer.
Edit > Copy merged.
Back to Animation Shop. Edit > Paste > After Current Frame.
Return again to PSP. Close out the open Glitter Spill 2 layer and open the next Glitter Spill 2 layer up.
Edit > Copy merged.
Again, back to Animation Shop. Edit > Paste > After Current Frame.
One last time, back to PSP. Close out the open Glitter Spill 2 layer, opening the top Glitter Spill 2 layer.
Edit > Copy Merged.
Back to Animation Shop. Edit > Paste > After Current Frame.
View > Animation.
We've finished! Thanks for being here! I'm happy that you chose my tut!!
.
.
 [Click image above to go to full sized image.]This tutorial was written on November 20, 2009, using Paint Shop Pro, version X.03. It should be okay to do with other versions as well. I just find X.03 more comfortable for me. You may download a free trial of Paint Shop Pro, version X2, from Corel. Any similarities between this tut and any others you may see are purely coincidental.
You will also need:
Animation Shop. This is from CNET, so it's a safe download. However, it costs. That changed pretty recently. I don't know why!!
A great person named solshne (and another named Chris) wrote to let me know that one might find Animation Shop for free at this location. This is an FTP link and I have no idea if it's safe or not. So keep your antivirus handy to scan it after download!
A tube of your choice. I used the very cute artwork of Amber Kelso. You must have a license to use her art. You may obtain that license and her art from C.I.L.M. It has been brought to my attention that if one searches under "Amber Kelso" at C.I.L.M., this particular tube is not there. Apparently, they're trying to make things easier by putting all winter and Christmas tubes in a different area. Personally, it seems they've made it more difficult. But here's the link to their winter and Christmas tubes. Hope this helps!!
The scrap kit is by Tina, from Tina's Magical Scrap World. This is a PTU kit, available at Exquisite Scraps, and is called Purple Snowflakes. It's a gorgeous kit with MUCH to offer. I have a couple other tuts semi-done with this kit... not sure which ones might make it here, but the kit has so much, I couldn't decide!
Supplies: The two masks and the snow, which can be found here. One of the masks is by the illustrious Becky, but I don't know how to find her since I first got her masks a few years ago. If you do where she is, let me know and I'll put up a link to her great stuff! The other mask, I don't know. Same goes for that one, AND the snow. I don't know who made that, either, but it's obviously not an American. If it is yours, or you know whose it is, again, let me know, as I'd love to give the proper credit!
Also, please, if you have problems with any download link for supplies, drop me a line via e-mail. Leaving a comment without a way for me to contact you back doesn't help. If you e-mail me, I'll send you the supplies.
Filters: Mura's Meister > Copies
Font: I used Christmas.
Okay, let's go!
Open the mask in PSP and minimize. Alternatively, you can file it with the rest of your PSP masks, for future use! File the snow animation to where it will be handy when we get to Animation Shop.
Open a new image, 700 x 700, white.
Open frame4. Resize 85%. Copy and paste as a new layer.
Add your tube. Resize, position and drop shadow to your liking.
Highlight the frame layer. Grab your magic wand and click inside the frame. Selections > Modify > Expand by 1. Selections > Invert.
Highlight your tube layer. Grab your eraser brush and erase any of your tube that may be overlapping the sides and/or bottom of your frame. Selections > Select None.
Highlight your white background layer.
Open Paper11. Copy and paste as a new layer.
Apply your Becky_Mask022. Delete mask layer, answer "yes" to the pop-up question, and merge group.
Highlight your white background layer again.
Open glitterspill2. Resize 65%. Copy and paste as a new layer.
Effects > Plug-ins > Mura's Meister > Copies with the settings shown below. Pay no attention to the picture of the canvas in this screen shot. I did it after the actual applying of this setting the first time....
Hit okay.
Apply your Edge Texture mask. Delete mask layer, answer "yes" to the pop-up question, and merge group.
Move this layer around 'til it's sitting how you like it. Make sure it's the layer right above the white background layer.
Open pearls3. Resize 65%. Copy and paste as a new layer. Position behind the frame, as though they are like icicles hanging in the background. Drop shadow. I gave these pearls a really deep drop shadow, to contrast with the darker background color. This, of course, is up to you.
Open "poinsetta2". Resize 50%. Copy and paste as a new layer. Position this on the bottom left corner of the frame. See my example for placement reference, if you like. Drop shadow.
Drop shadow your frame layer.
Go back to the top layer and add your name. I used color #4a4446 for the fill, #fbfbfb for the stroke, stroke set at 2.
I added the following bevel, TWICE:
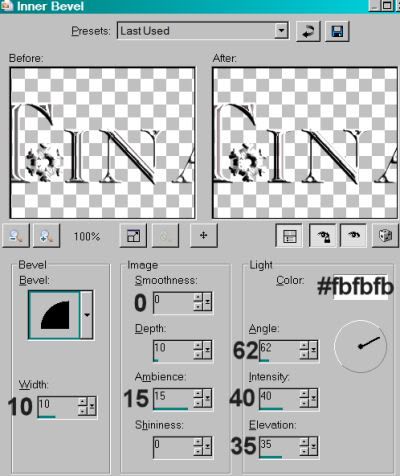
Hit okay.
Drop shadow your name.
Add your copyright, license information if applicable, and taggers'/watermark.
If you choose not to animate, you're done! Merge your layers and save!! Congrats!
A N I M A T I O N
Layers > View > None.
Open the bottom three layers. This should be your white background, your glitterspill2, and your mask layer.
Edit > Copy merged
Open Animation Shop, right-click on the desktop area and paste as a new animation.
Duplicate this frame until you have a total of 10 frames. Move your slider at the bottom back to the first frame.
Locate and open your snow animation. Edit > Select All. Edit > Copy
Return to your animation that you're building and Edit > Select All. Edit > Paste into Selected Frame.
I found placement with this snow very easy. Just don't move until the snow shows up, then release your mouse button.
Go back to PSP. Layers > View > All. Close out the bottom three layers.
Edit > Copy Merged.
Back to Animation Shop. Right-click on the desktop area and paste as a new animation.
Duplicate *this* frame until you have ten. Bring the slider back to the first frame.
Edit > Select All. Edit > Copy
Back to the animation upon which you've put the snow.
Edit > Select All. Edit > Paste Into Selected Frame
Hover your mouse until the rest of your tag is positioned to your liking, then release your mouse button.
View > Animation. Save as .gif and, again! We are done!! Thanks for taking it on! I hope you enjoy your results!
.
.
 [Click image above to go to full sized image.]This tutorial was written on November 18, 2009, using Paint Shop Pro, version X.03. It should be okay to do with other versions as well. I just find X.03 more comfortable for me. You may download a free trial of Paint Shop Pro, version X2, from Corel. Any similarities between this tut and any others you may see are purely coincidental.
You will also need:
Animation Shop. This is from CNET, so it's a safe download. However, it costs. That changed pretty recently. I don't know why!!
A great person named solshne (and another named Chris) wrote to let me know that one might find Animation Shop for free at this location. This is an FTP link and I have no idea if it's safe or not. So keep your antivirus handy to scan it after download!
A tube of your choice. I used the cute-n-sexy artwork of Dominic Marco. You must have a license to use his art. You may obtain that license and his art from C.I.L.M.
The scrap kit is by Sylvie, from Fantasy Moments. This is a FTU kit, called Believe. Leave some love for the freebies!!
Supplies: The mask and the bee animation, which you can find here. The mask is by Monti, of Monti's Pixel Playground. Thank you, Monti, for sharing your talents with us! I'm unaware of the origin of the bee animation. I have a couple of these, with differing file names, so I don't know what to do about that! If this file is yours, or you know whose it is, please let me know so that I may give credit where it's due! Thank you!
Other than that, please, if you have problems with any download link for supplies, drop me a line via e-mail. Leaving a comment without a way for me to contact you back doesn't help. If you e-mail me, I'll send you the supplies.
Filters: Eye Candy 4000 > Gradient Glow
Font: I used A&S Signwriter.
Okay, let's get this started! This is pretty much a cut-n-paste tut! So although it's repetitive, it should be quite easy to accomplish...
Open the mask in PSP and minimize. Alternatively, you can file it with the rest of your PSP masks, for future use! File the bee animation to where it will be handy when we get to Animation Shop.
Open a new image, 700 x 750, white.
Open Element-61 (frame). Copy and paste as a new layer.
Add your tube. Resize, position and drop shadow to your liking.
Highlight the frame layer. Grab your magic wand and click inside the frame. Selections > Modify > Expand by 1. Selections > Invert.
Highlight your tube layer. Grab your eraser brush and erase any of your tube that may be overlapping the bottom of your frame. Selections > Select None.
Highlight your white background layer.
Open Paper-13. Resize to 750x750 pixels. Copy and paste as a new layer.
Highlight your frame layer.
Again, grab your magic wand and click inside the frame. Selections > Modify > Expand by 15. Selections > Invert.
Highlight your Paper-13 layer. Hit delete. Selections > Select None.
Highlight your white background layer again.
Open Paper-2. Resize to 750x750 pixels. Copy and paste as a new layer.
Apply your mask. INVERT TRANSPARENCY CHECKED!! Delete the mask layer, answer "yes" to the pop-up question, and merge group.
Open Element-75. Resize 65%. Image > Mirror. Copy and paste as a new layer. Position this as you like it, behind your tube but above the Paper-13 layer. Give this a slight drop shadow.
Open Element-12. Resize 27%. Copy and paste as a new layer. Rotate 20° right. Position as you like on the flowers from the frame. Drop shadow.
Open Element-47. Resize 59%. Copy and paste as a new layer. Position over the right bottom area of your frame. See my example for placement reference if you like. Drop shadow.
Open Element-23. Resize 50%. Copy and paste as a new layer. Position this over the previous element, on the bottom right area of the frame. Drop shadow.
Open Element-46. Resize 50%. Copy and paste as a new layer. Position this with the others on the right bottom portion of your frame. Drop shadow.
Open Element-21. Resize 50%. Copy and paste as a new layer. Position this with the others, as well. Rotate 25° left. Drop shadow.
Open Element-67. Resize 27%. Copy and paste as a new layer. Position on top of the bunch of flowers you've created, toward the bottom. Drop shadow.
Open Element-33. Resize 25%. Copy and paste as a new layer. Position toward the top right of the frame. See my example for placement reference, if you like.
Drop shadow your frame layer.
On your top layer, add your name. I used color #e682e4 for the fill, #950ba9 for the stroke, stroke set at 2.
I added the following bevel:
Effects > Plug-Ins > Eye Candy 4000 > Gradient Glow set at 3-0-100, color white.
Drop shadow your name.
Add your copyright, license information if applicable, and taggers'/watermark.
If you choose not to animate, you're done! Merge your layers and save!! Congrats!
A N I M A T I O N
Edit > Copy merged
Open Animation Shop, right-click on the desktop area and paste as a new animation.
Duplicate this frame until you have a total of 18 frames. Move your slider at the bottom back to the first frame.
Locate and open your BeeHeart animation. Edit > Select All. Edit > Copy
Return to your animation that you're building and Edit > Select All. Edit > Paste into Selected Frame.
Hover your mouse over the area you would like your bee to be. lol. Release the mouse button. View > Animation. If you don't like what you see, then Edit > Undo Paste and re-do the paste into selected frame, hovering over a different area. Do this until you like your placement.
View > Animation. Save as .gif and, again! We are done!! Thanks for taking it on! I hope you enjoy your results!
.


©kajira hill 2009
http://kajituts.blogspot.com


