
You will also need:
Animation Shop. This is from CNET, so it's a safe download. However, it costs. That changed pretty recently. I don't know why!!
A great person named solshne (and another named Chris) wrote to let me know that one might find Animation Shop for free at this location. This is an FTP link and I have no idea if it's safe or not. So keep your antivirus handy to scan it after download!
A tube of your choice. I used the cute-n-sexy artwork of Dominic Marco. You must have a license to use his art. You may obtain that license and his art from C.I.L.M.
The scrap kit is by Sylvie, from Fantasy Moments. This is a FTU kit, called Believe. Leave some love for the freebies!!
Supplies: The mask and the bee animation, which you can find here. The mask is by Monti, of Monti's Pixel Playground. Thank you, Monti, for sharing your talents with us! I'm unaware of the origin of the bee animation. I have a couple of these, with differing file names, so I don't know what to do about that! If this file is yours, or you know whose it is, please let me know so that I may give credit where it's due! Thank you!
Other than that, please, if you have problems with any download link for supplies, drop me a line via e-mail. Leaving a comment without a way for me to contact you back doesn't help. If you e-mail me, I'll send you the supplies.
Filters: Eye Candy 4000 > Gradient Glow
Font: I used A&S Signwriter.
Okay, let's get this started! This is pretty much a cut-n-paste tut! So although it's repetitive, it should be quite easy to accomplish...
Open the mask in PSP and minimize. Alternatively, you can file it with the rest of your PSP masks, for future use! File the bee animation to where it will be handy when we get to Animation Shop.
Open a new image, 700 x 750, white.
Open Element-61 (frame). Copy and paste as a new layer.
Add your tube. Resize, position and drop shadow to your liking.
Highlight the frame layer. Grab your magic wand and click inside the frame. Selections > Modify > Expand by 1. Selections > Invert.
Highlight your tube layer. Grab your eraser brush and erase any of your tube that may be overlapping the bottom of your frame. Selections > Select None.
Highlight your white background layer.
Open Paper-13. Resize to 750x750 pixels. Copy and paste as a new layer.
Highlight your frame layer.
Again, grab your magic wand and click inside the frame. Selections > Modify > Expand by 15. Selections > Invert.
Highlight your Paper-13 layer. Hit delete. Selections > Select None.
Highlight your white background layer again.
Open Paper-2. Resize to 750x750 pixels. Copy and paste as a new layer.
Apply your mask. INVERT TRANSPARENCY CHECKED!! Delete the mask layer, answer "yes" to the pop-up question, and merge group.
Open Element-75. Resize 65%. Image > Mirror. Copy and paste as a new layer. Position this as you like it, behind your tube but above the Paper-13 layer. Give this a slight drop shadow.
Open Element-12. Resize 27%. Copy and paste as a new layer. Rotate 20° right. Position as you like on the flowers from the frame. Drop shadow.
Open Element-47. Resize 59%. Copy and paste as a new layer. Position over the right bottom area of your frame. See my example for placement reference if you like. Drop shadow.
Open Element-23. Resize 50%. Copy and paste as a new layer. Position this over the previous element, on the bottom right area of the frame. Drop shadow.
Open Element-46. Resize 50%. Copy and paste as a new layer. Position this with the others on the right bottom portion of your frame. Drop shadow.
Open Element-21. Resize 50%. Copy and paste as a new layer. Position this with the others, as well. Rotate 25° left. Drop shadow.
Open Element-67. Resize 27%. Copy and paste as a new layer. Position on top of the bunch of flowers you've created, toward the bottom. Drop shadow.
Open Element-33. Resize 25%. Copy and paste as a new layer. Position toward the top right of the frame. See my example for placement reference, if you like.
Drop shadow your frame layer.
On your top layer, add your name. I used color #e682e4 for the fill, #950ba9 for the stroke, stroke set at 2.
I added the following bevel:
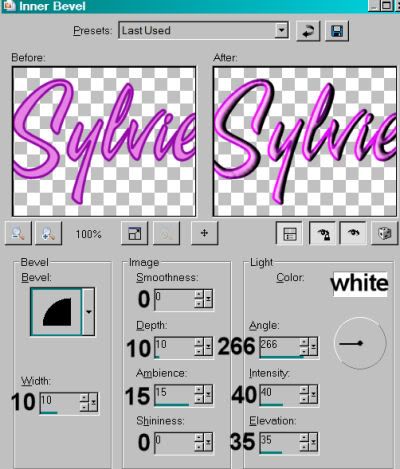
Effects > Plug-Ins > Eye Candy 4000 > Gradient Glow set at 3-0-100, color white.
Drop shadow your name.
Add your copyright, license information if applicable, and taggers'/watermark.
If you choose not to animate, you're done! Merge your layers and save!! Congrats!
A N I M A T I O N
Edit > Copy merged
Open Animation Shop, right-click on the desktop area and paste as a new animation.
Duplicate this frame until you have a total of 18 frames. Move your slider at the bottom back to the first frame.
Locate and open your BeeHeart animation. Edit > Select All. Edit > Copy
Return to your animation that you're building and Edit > Select All. Edit > Paste into Selected Frame.
Hover your mouse over the area you would like your bee to be. lol. Release the mouse button. View > Animation. If you don't like what you see, then Edit > Undo Paste and re-do the paste into selected frame, hovering over a different area. Do this until you like your placement.
View > Animation. Save as .gif and, again! We are done!! Thanks for taking it on! I hope you enjoy your results!
.


No comments:
Post a Comment