
You will also need:
Animation Shop. This is from CNET, so it's a safe download. However, it costs. That changed pretty recently. I don't know why!!
HOWEVER ..... a LOVELY person named solshne (and another named Chris) wrote to let me know that one might find Animation Shop for free at this location. This is an FTP link and I have no idea if it's safe or not. So keep your antivirus handy to scan it after download!
A tube of your choice. I'm using the artwork of Pinuptoons. You must have a license to use his artwork. You can get that license and his art at C.I.L.M.
The scrap kit is by Monica, of Simply Sensational Scraps. This is a FTU kit, and is called Antique Beauty. This is a BEAUTIFUL kit, which surprised me. When I went to start working with it, it came together rather easily, and I didn't use much of it at all! BTW, don't forget to leave love for the freebies!!
Filters: Eye Candy 4000 > Bevel Boss -=- dsb Flux > Bright Noise
Font: I used Agnes.
Supplies: Just the mask, which was made by Monti, of Monti's Pixel Playground. Thank you Monti, for sharing your knowledge and art with the PSP community!
Let's get this started....
Open a new canvas, 750 x 700, white.
Open flowerswirl1. Resize 55%. Copy and paste as a new layer.
Effects > Mura's Meister > Copies with the following settings:
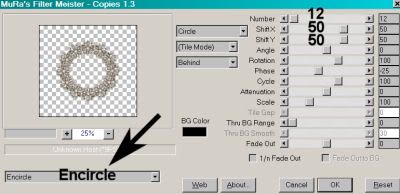
[Please note that this screen shot was taken later on in the making of this tag, but the settings are correct.]
Hit okay. Drop shadow lightly.
Open "broach1." Resize 50%. Copy and paste as a new layer.
Effects > Mura's Meister > Copies with the same settings as above:
Hit okay. Move this layer below the flowerswirl layer.
Highlight your white background layer.
Open paper 3. Resize to 750x750 pixels. Copy and paste as a new layer.
Apply your mask. Delete mask layer, answer "yes" to the pop-up question, and merge group.
Open Sunflower2. Resize 110%. Copy and paste as a new layer. Drag this layer to the top. Drop shadow.
Add your tube. Resize, position, and drop shadow to your taste.
Go back to the top layer and add your name. I used color #dbb7b9 for the fill, and #686459 for the stroke, stroke set at 1.
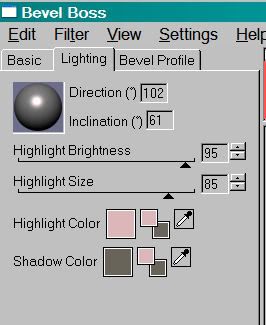
Effects > Eye Candy 4000 > Bevel Boss with the following setting:
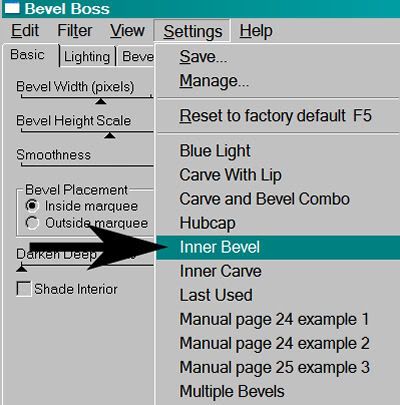
And the following numbers:
Drop shadow your name.
Resize your canvas to a size with which you are comfortable.
Add your copyright, license information if applicable, and taggers'/watermark.
If you choose not to animate, you're now done, and you can merge your layers and save!
A N I M A T I O N
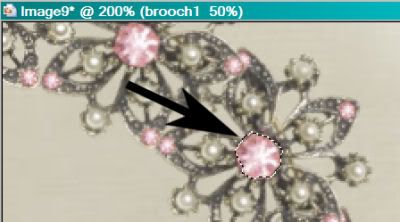
Highlight your "broach1" layer.
Zoom in close! Grab your selection tool, set on point-to-point, and draw a selection around the middle pink areas of all the "broaches." See the screen shot:
Repeat this all the way around.
Now, when I did this, I also drew selections around the pink areas on the outer points of the "broach." In the end, this animation is so very subtle, it almost doesn't show up on the points. So I'm just telling you about it. If you look close, you can see them, but it's totally up to you.
When done with your selections, zoom back out and duplicate the layer twice, for a total of three "broach1" layers.
Highlight your bottom "broach1" layer.
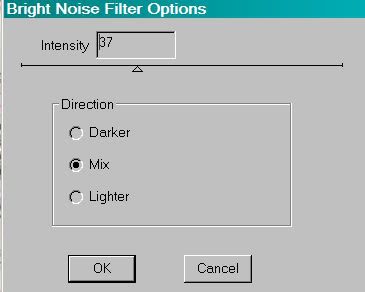
Effects > dsb Flux > Bright Noise with the following settings:
Hit okay.
Highlight the middle "broach1" layer.
Add Bright Noise again, this time changing the intensity to 40, and hitting mix once or twice.
Hit okay.
Now, highlight the top "broach1" layer. Add Bright Noise, changing the intensity to 43 and hitting mix once or twice again.
Hit okay.
Close out the top two "broach1" layers, leaving the bottom "broach1" layer open.
Edit > Copy Merged.
Open Animation Shop. Right-click on the desktop area and paste as a new animation.
Return to PSP. Close out the bottom "broach1" layer and open the middle "broach1" layer.
Edit > Copy merged.
Back to Animation Shop. Edit > Paste > After Current Frame.
Return again to PSP. Close out the middle "broach1" layer and open the top "broach1" layer.
Edit > Copy merged.
Again, back to Animation Shop. Edit > Paste > After Current Frame.
Still in Animation Shop, Edit > Select All
Right-click on the top bar of your animation and choose "Frame Properties." Change this number to 17.
View > Animation.
And we've finished another tut! I hope you like your results! I wouldn't mind seeing any.... Thanks for being here!
.


I just bought some new tubes and this will be a perfect tut to use them. Thank you so much. It is so pretty. Hugs, Dottiemaye
ReplyDelete