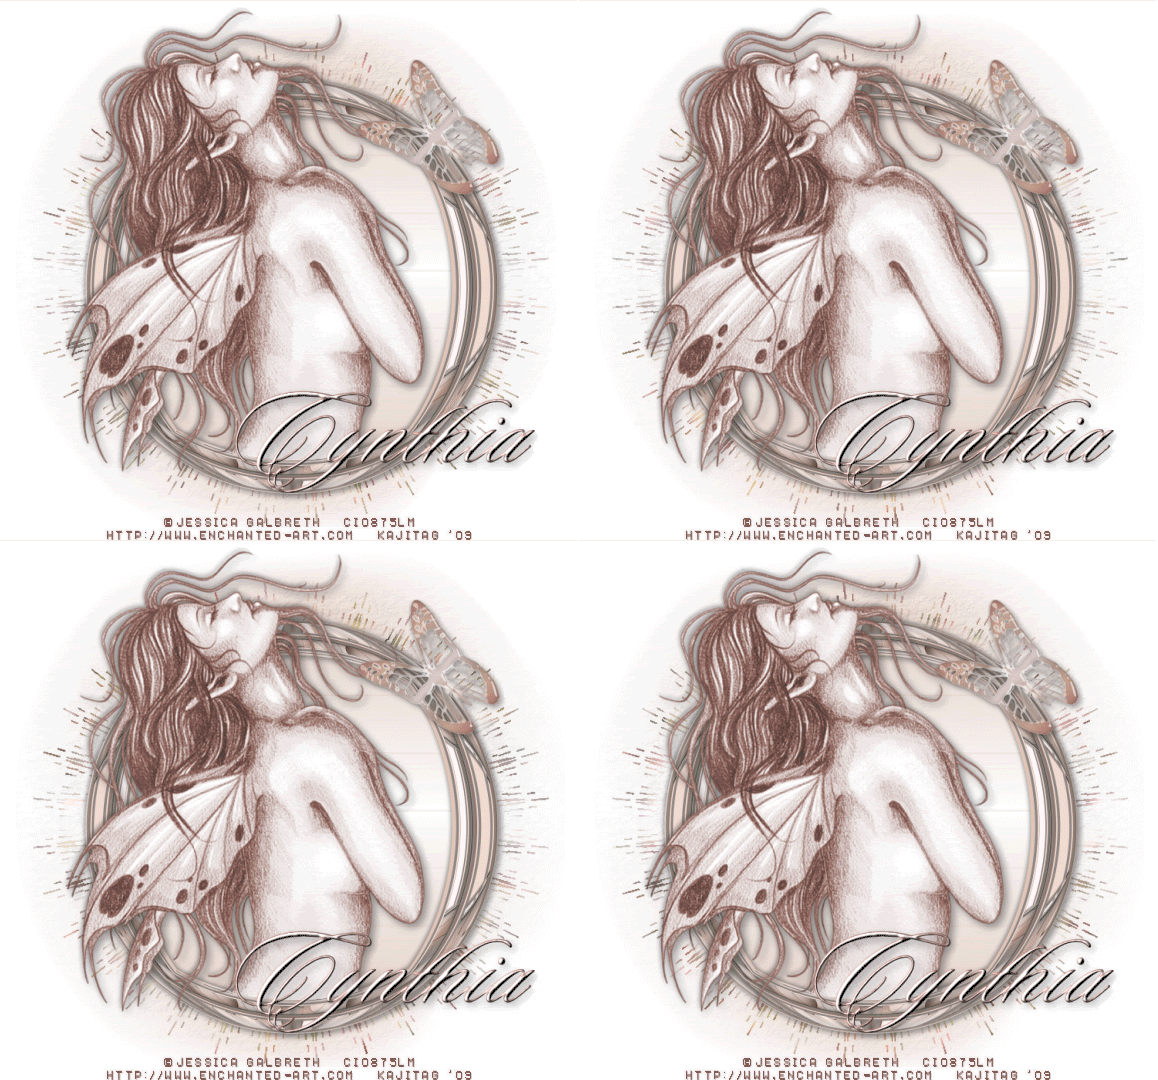
You will also need:
Animation Shop. This is from CNET, so it's a safe download. However, it costs. That changed pretty recently. I don't know why!!
HOWEVER ..... a LOVELY person named solshne (and another named Chris) wrote to let me know that one might find Animation Shop for free at this location. This is an FTP link and I have no idea if it's safe or not. So keep your antivirus handy to scan it after download!
A tube of your choice. I'm using the great sketch work of Jessica Galbreth. You must have a license to use her artwork. You can get that license and art at C.I.L.M.
The scrap kit is by Cynthia, from Sweeet 'n' Sassy DigiScrappers. This is a store, but it's a FTU kit called Coffee. Be sure to leave a thank you for the freebie!!
Filters: Eye Candy 4000 > HSB Noise
Font: I used Sloop Script Two.
Supplies: Two masks, which you may find here. One of the masks is from Wee Scots Lass. If you'd like to collect all her masks, scroll down a bit from the top and you'll see the links on the left side of the blog. Thanks for all the masks over the years, Wee!! The second mask, again, I know not from where. If you can let me know who made it, let me know so that I may give credit where it's due!!
Also, please... if you have problems with any download link for supplies, drop me a line via e-mail. Leaving a comment without a way for me to contact you back doesn't help. If you e-mail me, I'll do my best to send you the supplies.
Let's get started!
Open your masks in PSP and minimize. Alternatively, you can file them away wherever you keep your mask files!
Open a new canvas, 750 x 700, white.
Open coffeeframe. Resize 35%. Copy and paste as a new layer.
Add your tube. Resize, position, and drop shadow to your taste.
Highlight your frame layer.
Grab your magic wand and click inside the frame. Selections > Modify > Expand by one. Selections > Invert
Highlight your tube layer.
Grab your eraser brush and erase that part of your tube that you do not want showing at the bottom or sides of the frame layer.
Selections > Select none.
You're going to be adding the papers now. It would do you well to label the layers as to which papers they are.
Highlight your white background layer.
Open coffeepaper5. Resize to 750x750 pixels. Copy and paste as a new layer.
Again, highlight your frame layer. Grab your magic wand, and click inside the frame. Selections > Modify > Expand by 10. Selections > Invert.
Highlight your coffeepaper5 layer. Hit delete. Selections > Select none.
Highlight your white background layer again.
Open coffeepaper7. Resize to 750x750 pixels. Copy and paste as a new layer.
Apply your WSL_Mask95 mask. Delete the mask layer, answer "yes" to the pop-up question, and merge group.
Last time! Highlight your white background layer.
Open coffeepaper2. Resize to 750x750 pixels. Copy and paste as a new layer.
Apply your Edge Oval mask. Delete the mask layer answer "yes" to the pop-up questions, and merge group.
Resize your Edge Oval mask layer 95%.
You may notice the top of this mask layer stops in an abrupt edge. This bugs the heck out of me, so here's what I did to lose it!
Grab your lasso tool again, this time set on freehand, feather set at 30.
Draw curved selections on the top. Here's an example:
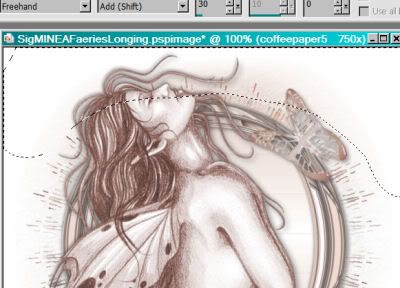
Hit delete. Selections > Select none.
Open coffeebutterfly2. Resize 50%. Copy and paste as a new layer. Mirror if that works for your tag. That's what I did. Position as you like and drop shadow.
Drop shadow your frame.
Go back to the top layer and add your name. I used color #f2ecec for the fill and #805c55 for the stroke, stroke set at 1.
I added a bevel, set as below:
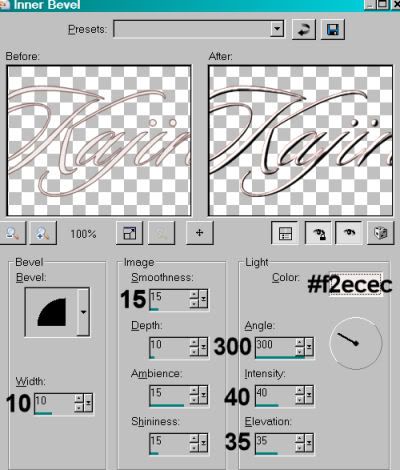
Hit okay.
Drop shadow your name.
Resize your canvas to a size with which you are comfortable.
Add your copyright, license information if applicable, and taggers'/watermark.
If you choose not to animate, you're now done, and you can merge your layers and save!
A N I M A T I O N
Highlight your coffeepaper7 layer. Duplicate three times, for a total of four coffeepaper7 layers.
Highlight your bottom coffeepaper7 layer.
Effects > Eye Candy 4000 > HSB Noise with the following setting:
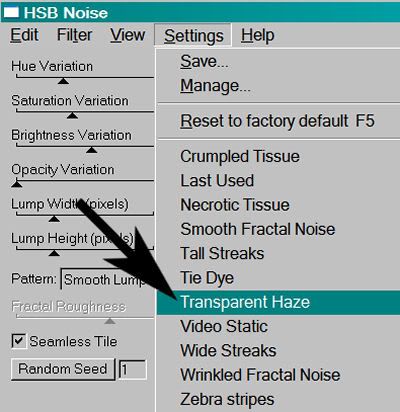
and these numbers
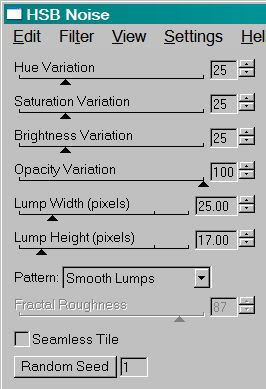
Hit okay.
Highlight the next coffeepaper7 layer up.
Add HSB Noise again, this time hitting "Random Seed."
Hit okay.
Now, highlight the third coffeepaper7 layer. Again, add HSB Noise, hitting "Random Seed."
Hit okay.
And finally, the top coffeepaper7 layer. Add HSB Noise, again hitting "Random Seed."
Hit okay.
Close out the top three coffeepaper7 layers, leaving the bottom coffeepaper7 layer open.
Edit > Copy Merged.
Open Animation Shop. Right-click on the desktop area and paste as a new animation.
Return to PSP. Close out the bottom coffeepaper7 layer and open the next coffeepaper7 layer.
Edit > Copy merged.
Back to Animation Shop. Edit > Paste > After Current Frame.
Return again to PSP. Close out the open coffeepaper7 layer and open the next coffeepaper7 layer up.
Edit > Copy merged.
Again, back to Animation Shop. Edit > Paste > After Current Frame.
One last time, back to PSP. Close out the open coffeepaper7 layer, opening the top coffeepaper7 layer.
Edit > Copy Merged.
Back to Animation Shop. Edit > Paste > After Current Frame.
View > Animation.
There! We've finished! I hope you enjoyed this relatively-easy tutorial!
.


Easy and fun tut, thanks much!
ReplyDelete