

You will also need:
Animation Shop. This is from CNET, so it's a safe download. However, it costs. That changed pretty recently. I don't know why!!
HOWEVER ..... a LOVELY person named solshne (and another named Chris) wrote to let me know that one might find Animation Shop for free at this location. This is an FTP link and I have no idea if it's safe or not. So keep your antivirus handy to scan it after download!
A tube of your choice. You can see this is a pretty specific tube. I'm using the great artwork of Al Rio. You must have a license to use his artwork. You can get that license and his art at C.I.L.M. This particular tube was in CILM's Christmas gift last year, it turns out. I spent an hour going through his packs again and again, to let you know how to get this specific tube, and finally wrote to Michelle at CILM to ask her where I got it. She told me it was in the Christmas collection of 2008. So, if you were lucky enough to be a CILM customer last Christmastime, perhaps you have this one? If not, I realize it's difficult to substitute, and you likely won't be able to do this tutorial. I'm sorry! I didn't realize when I started, what I was doing, using this tube! I am going to be doing another tut with this same scrap kit that will use a more "generic" Christmas tube for y'all.
The scrap kit is by Heza, of HezaScraps & Tags. This is a PTU kit, available at Treasured Scraps and is called Holly Jolly. It's on sale RIGHT NOW at 80% off. This sale is through Monday 11-9, so hurry if you can!
Heza has also done a freebie add-on to this kit, which you can find on her blog. I didn't use anything from this add-on in this tutorial, but just know that it's available!
Filters: Eye Candy 4000 > Gradient Glow
Font: I used 38.
Supplies: You may find here. This contains the "snowy" background and the "Winter Trees." I don't know from where the background came, but the trees are by Rainbow Coffi. Now, she used to be at PSP-playground.com, but that site is experiencing some kind of change, and it referred me to a Yahoo group. I joined that group, and Rainbow Coffi is listed as a permission okay artist. There are some conditions, but the owners of both the group and the site said it was okay to use the tubes as I am doing for now. So thanks to Kim and Peter, and of course, Rainbow Coffi!!
It took me a long time to get the permissions, etc., for this one, so let's start this, those few of you that have the tube!!!
Open your supplies and minimize in PSP. You could file them, also, in with your other PSP files for use in the future. Up to you! (If you us the trees later, be sure you don't use them without referring to PSP Playground and Rainbow Coffi!!)
Open a new canvas, 750 x 700, white.
Open Frame 1. Copy and paste as a new layer. Rotate 90° either way.
Add your tube. Resize and drop shadow to your taste. Position so the tube itself will be centered, not necessarily the top of the swing. See how the swing on mine is a bit to the left of center?
Highlight your white background layer.
Open the "Background" from your supplies. Resize to 750x750 pixels. Copy and paste as a new layer.
Open the V~WinterTrees2.tub from your supplies. Grab your selection tool, set on point-to-point, and draw a selection around the tree on the right.
Edit > Copy
Go to the canvas with which you're working and paste as a new layer. I positioned my first tree just to the right, mostly within the frame, but some hanging out. See my example for placement reference. Drop shadow this layer.
Now, to soften the stark edges made with the drop shadow, grab your selection tool again, this time on freehand. Set feather to 25. Draw a selection around the bottom of the snow at the base of the tree. Hit delete. Selections > Select none.
Now, duplicate this layer. Resize 65%. Position to the right of your first tree.
Now, duplicate both your big tree and your smaller tree and on both layers, Image > Mirror.
Now you have a gap in the middle. Duplicate again one of your little trees and put that in the center. In your layer palette, drag this tree below all the others.
Got them all arranged to suit you? Good!
Open bow 8. Copy and paste as a new layer. Notice, it's EXACTLY the right size!!?? Position where you'd like it in your frame. Drop shadow.
Open Box 1. Resize 35%. Copy and paste as a new layer. Position where you'd like it. Mine is on the far left, below the frame. Drop shadow.
Open Ornament 5. Resize 40%. Copy and paste as a new layer. Position where you'd like it. Drop shadow.
Open Ball 6. Resize 20%. Copy and paste as a new layer. Position where you'd like it. Drop shadow.
Open Box 4. Resize 25%. Copy and paste as a new layer. Position where you'd like it. Drop shadow.
Open Box 3. Resize 20%. Copy and paste as a new layer. Position where you'd like it. Drop shadow.
Open Flake 5. Resize 10%. Copy and paste as a new layer. Position top left of your frame. You will be moving this later. Just have it there, handy. :) Drop shadow very lightly.
Highlight the Background layer that you added from your supplies (not the very bottom, but the one just above that). Grab your selection tool again, and again, set on freehand. Feather set to 30. Draw an "upside down smile" along the top of your darkened sky part of the background.

Hit delete. Selections > Select none.
Go back to the top layer and add your name. I used black for the stroke, set at 2.
I used Paper-11 for the fill.
Open Paper-11.
Go to your materials palette. Click on the fill color and choose the "Pattern" tab at the top. Locate Paper-11, choose it and leave the settings at 0 angle, scale at 100.
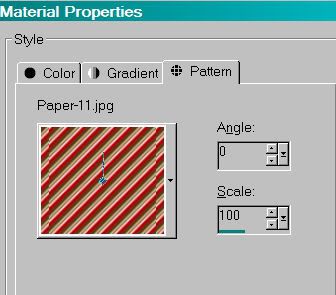
Hit okay.
Write out the name. Objects > Align > Horizontal Center in Canvas. Position where you'd like it, vertically speaking.
Now add a Gradient Glow, set at 5-25-100, color #c0c0c0.
Drop shadow your name.
Resize your canvas to a size with which you are comfortable.
Add your copyright, license information if applicable, and taggers'/watermark.
If you choose not to animate, you're now done, and you can merge your layers and save!
A N I M A T I O N
Highlight your tube layer. Duplicate three times, for a total of four tube layers.
When I do this type of animation, I usually use five layers, but this tube on this canvas size does not allow for five. I usually put the original in the middle of the four others. Since technically there is no middle of the four, I suggest putting your original as the third layer down, putting one of the copies under it. I don't know, it makes it easier for me for some reason. It's probably not necessary, just a quirk of mine. I will, however, be giving instructions for someone doing so. So, put one of your copies below the tube layer. lol..
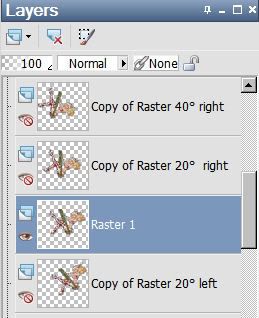
Highlight the layer just above the original layer.
Image > Rotate > 20° right.
Note what you have:

See how the top of the swing doesn't line up? Now, you need to use your mover tool to bring the top of the swing back in "synch" with the first.

Like so. Do you understand? I sure hope so!!
Now, highlight the next layer up. This should be the top layer of the four.
Image > Rotate > 40° right.
And adjust the top of the swing so it lines up.
Now, go to the layer just below the original layer of the four.
Image > Rotate > 20° left.
Do the same thing as above, re-adjusting the swing to line up the best you can.
I did the best I thought I could, and it turned out a little raggedy. But just do your best. We will now be....
... moving your Flake 5 layer so that it covers up the top of all the swing layers!
Close out all the tube layers except the original.
Edit > Copy Merged.
Open Animation Shop. Right-click on the desktop area and paste as a new animation.
Return to PSP. Close out the original tube layer and open the next tube layer up (rotated 20° right).
Edit > Copy merged.
Back to Animation Shop. Edit > Paste > After Current Frame.
Return again to PSP. Close out the open tube layer and open the next layer up (rotated 40° right).
Edit > Copy merged.
Again, back to Animation Shop. Edit > Paste > After Current Frame.
Close out the top tube layer and re-open the layer just beneath it (rotated 20° right).
Edit > Copy merged.
Animation Shop. Edit > Paste > After Current Frame.
Return to PSP. Close out the open tube layer and open the original.
Edit > Copy merged.
Animation Shop. Edit > Paste > After Current Frame.
Return again to PSP. Close out the original tube layer and open the layer just beneath it (rotated 20° left).
Edit > Copy merged.
Animation Shop. Edit > Paste > After Current Frame.
Now, in Animation Shop, Edit > Select All.
Right-click on the top bar of your animation an choose "Frame Properties." Change this number to 25.
View > Animation.
Et, voila! I hope you were able to easily understand this tutorial, and I thank you for stopping by!!
.


No comments:
Post a Comment