
You will also need:
Animation Shop. This is from CNET, so it's a safe download. However, it costs. That changed pretty recently. I don't know why!!
HOWEVER ..... a LOVELY person named solshne (and another named Chris) wrote to let me know that one might find Animation Shop for free at this location. This is an FTP link and I have no idea if it's safe or not. So keep your antivirus handy to scan it after download!
A tube of your choice. I'm using the artwork of Pierluigi Abbondanza. When I got these tubes, it was with a license, through My PSP Tubes. I just checked their list, and he's no longer there... and I see no reference on his web site. Not sure about this one, folks!
The scrap kit is by Jessica, from Scraps by Jessica. Her mojo died some months ago, so this is an old kit of hers, called Envious. Be sure to leave a thank you for the freebie!!
Filters: Eye Candy 4000 > Gradient Glow -=- Mura's Meister > Copies
Font: I used Shalimar Swash.
Supplies: Here. This file consists of a diamond, a sparkle, and the mask. The only one I know anything about is the mask. This was made by Teresa of Boundless Bliss. Thanks so much, Teresa!!
Also, please... if you have problems with any download link for supplies, drop me a line via e-mail. Leaving a comment without a way for me to contact you back doesn't help. If you e-mail me, I'll do my best to send you the supplies.
Let's get started!
Open your supplies in PSP and minimize. Alternatively, you can file them away wherever you keep your various types of files!
Open a new canvas, 750 x 700, white.
Open frame2. Copy and paste as a new layer.
Add your tube. Resize, position, and drop shadow to your taste.
Highlight your frame layer.
Grab your magic wand and click inside the frame. Selections > Modify > Expand by one. Selections > Invert
Highlight your tube layer.
Grab your eraser brush and erase that part of your tube that you do not want showing at the bottom or sides of the frame layer.
Selections > Select none.
Highlight your white background layer.
Add a new raster layer. Flood fill this layer with color #178d2e.
Highlight your frame layer. Grab your magic wand and click inside the frame. There are many nooks and crannies in this frame's space, so be sure you've got them all covered!
Selections > Modify > Expand by 5. Selections > Invert.
Highlight your flood-filled layer. Hit delete. Selections > Select none.
Highlight your white background layer again. Again, add a new raster layer and flood fill with #178d2e.
Apply your mask. INVERT TRANSPARENCY! Delete the mask layer, answer "yes" to the pop-up question and merge group. This layer should be just above the white background layer, below the background of your frame.
Open ivy. Copy and paste as a new layer. Effects > Plug-ins > Mura's Meister > Copies with the following settings:
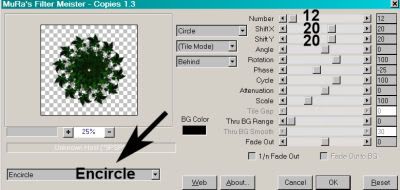
Hit okay. Drop shadow this element/layer.
Drop shadow your frame layer.
Open the greenbutterfly. Resize 65%. Copy and paste as a new layer. I found it competed a lot with the background, so I added a Gradient Glow of 3-0-100, color white. Drop shadow your butterfly.
Open bow3. Resize 65%. Copy and paste as a new layer. Position where you'd like. Drop shadow.
Open the diamond from your supplies. Copy and paste as a new layer, positioning it in the center of the bow.
Now open the sparkle. Make sure you're on the correct layer (not the black one lol), then copy and paste as a new layer. Position over your diamond. Do a better job than I did at centering it. That bothers me that I got it off-center, but I didn't realize it until the tag was done, so....
Go back to the top layer and add your name. I used color #178d2e for the fill and the stroke, stroke set at 3.
Effects > Eye Candy 4000 > Gradient Glow set at 3-0-100, color black.
Drop shadow your name.
Resize your canvas to a size with which you are comfortable.
Add your copyright, license information if applicable, and taggers'/watermark.
If you choose not to animate, you're now done, and you can merge your layers and save!
A N I M A T I O N
Highlight your sparkle layer. Duplicate three times, for a total of four sparkle layers.
Highlight your bottom sparkle layer.
Move the slider on the opacity to 60.
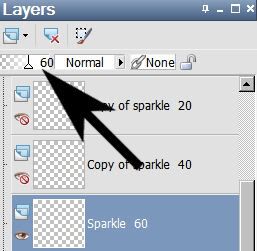
It might help you to label the layers as I have....
Highlight the next sparkle layer up.
Move the slider on the opacity to 40.
Now, highlight the third sparkle layer. Move the opacity slider to 20.
And finally, the top sparkle layer. Move the opacity slider to 0.
Close out the top three sparkle layers, leaving the bottom sparkle layer open. (The layer labeled 60.)
Edit > Copy Merged.
Open Animation Shop. Right-click on the desktop area and paste as a new animation.
Return to PSP. Close out the bottom sparkle layer and open the next sparkle layer. (The layer labeled 40.)
Edit > Copy merged.
Back to Animation Shop. Edit > Paste > After Current Frame.
Return again to PSP. Close out the open sparkle layer and open the next sparkle layer up. (The layer labeled 20.)
Edit > Copy merged.
Again, back to Animation Shop. Edit > Paste > After Current Frame.
One more time, back to PSP. Close out the open sparkle layer, opening the top sparkle layer. (The layer labeled 0.)
Edit > Copy Merged.
Back to Animation Shop. Edit > Paste > After Current Frame.
Now we have to go backward.
Close out the layer labeled 0, and open the layer below it. (The layer labeled 20.)
Edit > Copy Merged
Go to Animation Shop. Edit > Paste > After Current Frame.
Go back to PSP and close out the layer labeled 20, and open the layer labeled 40.
Edit > Copy Merged
Again, to Animation Shop. Edit > Paste > After Current Frame.
Back again to PSP. Close out the layer labeled 40 and open the layer labeled 60.
Edit > Copy Merged
And finally, back to Animation Shop. Edit > Paste > After Current Frame.
Now! lol....
In Animation Shop, move the slider on the bottom of your animation to the first frame.
Right-click on that frame and choose "Frame Properties." Change the number to 25.
Go to the second frame. Right-click on that, choose "Frame Properties," and change the number to 20.
Go to the third frame. Right-click on that, choose "Frame Properties," and change the number to 15.
Frame 4. Right-click, choose "Frame Properties," and change the number to 10.
Frame 5. Right-click, choose "Frame Properties," and change the number to 15.
Frame 6. Right-click, choose "Frame Properties," and change the number to 20.
Frame 7. Right-click, choose "Frame Properties," and change the number to 25.
Now, finally.....
View > Animation.
There! We've finished! Lotta steps. I hope you like your finished product!
.


No comments:
Post a Comment