
You will also need:
Animation Shop. This is from CNET, so it's a safe download. However, it costs. That changed pretty recently. I don't know why!!
A great person named solshne (and another named Chris) wrote to let me know that one might find Animation Shop for free at this location. This is an FTP link and I have no idea if it's safe or not. So keep your antivirus handy to scan it after download!
A tube of your choice. I used the very cute artwork of Amber Kelso. You must have a license to use her art. You may obtain that license and her art from C.I.L.M. It has been brought to my attention that if one searches under "Amber Kelso" at C.I.L.M., this particular tube is not there. Apparently, they're trying to make things easier by putting all winter and Christmas tubes in a different area. Personally, it seems they've made it more difficult. But here's the link to their winter and Christmas tubes. Hope this helps!!
The scrap kit is by Tina, from Tina's Magical Scrap World. This is a PTU kit, available at Exquisite Scraps, and is called Purple Snowflakes. It's a gorgeous kit with MUCH to offer. I have a couple other tuts semi-done with this kit... not sure which ones might make it here, but the kit has so much, I couldn't decide!
Supplies: The two masks and the snow, which can be found here. One of the masks is by the illustrious Becky, but I don't know how to find her since I first got her masks a few years ago. If you do where she is, let me know and I'll put up a link to her great stuff! The other mask, I don't know. Same goes for that one, AND the snow. I don't know who made that, either, but it's obviously not an American. If it is yours, or you know whose it is, again, let me know, as I'd love to give the proper credit!
Also, please, if you have problems with any download link for supplies, drop me a line via e-mail. Leaving a comment without a way for me to contact you back doesn't help. If you e-mail me, I'll send you the supplies.
Filters: Mura's Meister > Copies
Font: I used Christmas.
Okay, let's go!
Open the mask in PSP and minimize. Alternatively, you can file it with the rest of your PSP masks, for future use! File the snow animation to where it will be handy when we get to Animation Shop.
Open a new image, 700 x 700, white.
Open frame4. Resize 85%. Copy and paste as a new layer.
Add your tube. Resize, position and drop shadow to your liking.
Highlight the frame layer. Grab your magic wand and click inside the frame. Selections > Modify > Expand by 1. Selections > Invert.
Highlight your tube layer. Grab your eraser brush and erase any of your tube that may be overlapping the sides and/or bottom of your frame. Selections > Select None.
Highlight your white background layer.
Open Paper11. Copy and paste as a new layer.
Apply your Becky_Mask022. Delete mask layer, answer "yes" to the pop-up question, and merge group.
Highlight your white background layer again.
Open glitterspill2. Resize 65%. Copy and paste as a new layer.
Effects > Plug-ins > Mura's Meister > Copies with the settings shown below. Pay no attention to the picture of the canvas in this screen shot. I did it after the actual applying of this setting the first time....
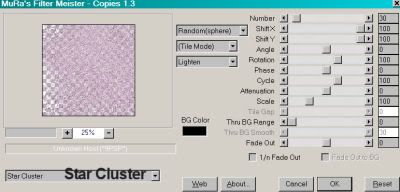
Hit okay.
Apply your Edge Texture mask. Delete mask layer, answer "yes" to the pop-up question, and merge group.
Move this layer around 'til it's sitting how you like it. Make sure it's the layer right above the white background layer.
Open pearls3. Resize 65%. Copy and paste as a new layer. Position behind the frame, as though they are like icicles hanging in the background. Drop shadow. I gave these pearls a really deep drop shadow, to contrast with the darker background color. This, of course, is up to you.
Open "poinsetta2". Resize 50%. Copy and paste as a new layer. Position this on the bottom left corner of the frame. See my example for placement reference, if you like. Drop shadow.
Drop shadow your frame layer.
Go back to the top layer and add your name. I used color #4a4446 for the fill, #fbfbfb for the stroke, stroke set at 2.
I added the following bevel, TWICE:
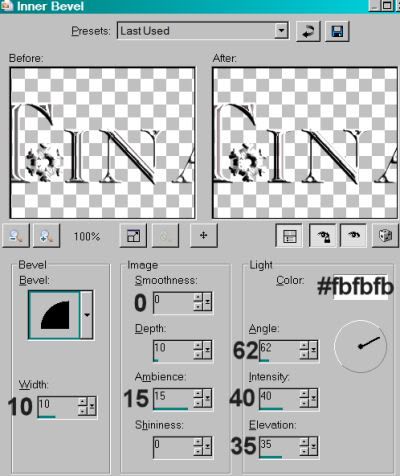
Hit okay.
Drop shadow your name.
Add your copyright, license information if applicable, and taggers'/watermark.
If you choose not to animate, you're done! Merge your layers and save!! Congrats!
A N I M A T I O N
Layers > View > None.
Open the bottom three layers. This should be your white background, your glitterspill2, and your mask layer.
Edit > Copy merged
Open Animation Shop, right-click on the desktop area and paste as a new animation.
Duplicate this frame until you have a total of 10 frames. Move your slider at the bottom back to the first frame.
Locate and open your snow animation. Edit > Select All. Edit > Copy
Return to your animation that you're building and Edit > Select All. Edit > Paste into Selected Frame.
I found placement with this snow very easy. Just don't move until the snow shows up, then release your mouse button.
Go back to PSP. Layers > View > All. Close out the bottom three layers.
Edit > Copy Merged.
Back to Animation Shop. Right-click on the desktop area and paste as a new animation.
Duplicate *this* frame until you have ten. Bring the slider back to the first frame.
Edit > Select All. Edit > Copy
Back to the animation upon which you've put the snow.
Edit > Select All. Edit > Paste Into Selected Frame
Hover your mouse until the rest of your tag is positioned to your liking, then release your mouse button.
View > Animation. Save as .gif and, again! We are done!! Thanks for taking it on! I hope you enjoy your results!
.


No comments:
Post a Comment