
You will also need:
Animation Shop. This is from CNET, so it's a safe download. However, it costs. That changed pretty recently. I don't know why!!
I had two people point out to me that one might find Animation Shop for free at this location. This is an FTP link and I have no idea if it's safe or not. So keep your antivirus handy to scan it after download!
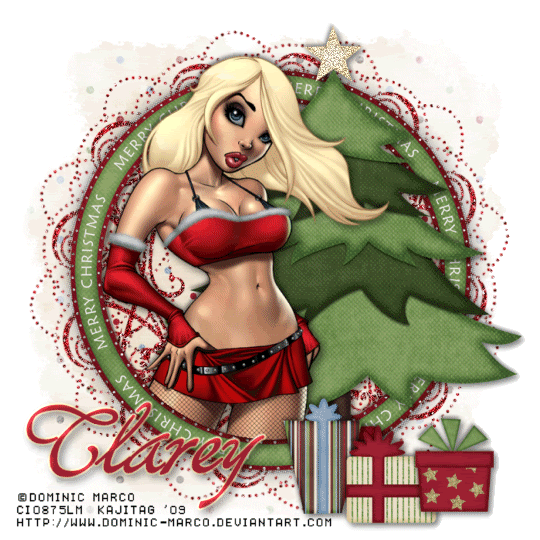
A tube of your choice. I'm using the cute-n-sexy artwork of Dominic Marco. I just love his work! You must have a license to use his artwork. You can get that license and art at C.I.L.M. This particular tube can be found here.
The scrap kit is by Clarey, of Clarey's Designz. This is a PTU kit, called Christmas Magic. Clarey released a freebie kit for the new year on the same day. My next tut will be using that kit. You can pick that up with your Christmas Magic purchase. After the order for Christmas Magic goes through, the freebie will be available to you. It's called "Celebrate." Leave a "thank you" for her where it has room for comments!!
Filters: Eye Candy 4000 > Gradient Glow, dsb Flux > Bright Noise
Font: I used Christophs Quill ITC.
Supplies: Just the mask, made by the talented but seemingly absent-from-the-web Becky. Thank you, Becky, for all your amazing masks and sharing them with people!
Also, please... if you have problems with any download link for supplies, drop me a line via e-mail. Leaving a comment without a way for me to contact you back doesn't help. If you e-mail me, I'll do my best to send you the supplies.
Okay then, let's go!
Open your mask in PSP and minimize. Alternatively, you can file it away to your mask files for future use!
Open a new canvas, 700 x 700, white.
Open paper12. Resize to 700 x 700 pixels. Copy and paste as a new layer.
Apply your mask. Delete the mask layer, answer "yes" to the pop-up question, and merge group.
We'll be using this paper again, just to let you know...
Open glitterdoodle1. Copy and paste as a new layer. Resize 75%.
Effects > Mura's Meister > Copies with the following settings:
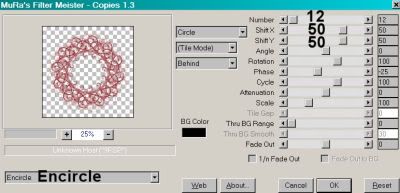
Hit okay.
Open frame2. Copy and paste as a new layer.
Add your tube. Resize, position and drop shadow to your liking.
Open paper12 again. No need to resize this time. Copy and paste as a new layer. In your layer palette, drag this paper below your frame.
Highlight your frame layer.
Grab your magic wand and click inside the frame. Selections > Modify > Expand by 1. Selections > Invert.
Highlight your tube layer.
Grab your eraser brush and erase any portions of your tube that you don't want showing outside the frame.
Selections > Invert. Selections > Modify > Expand by 10. Selections > Invert.
Highlight your recent paper12 layer. Hit delete. Selections > Select None.
Open christmastree. Copy and paste as a new layer. Arrange as you like. Drop shadow.
Open gift1. Resize 50%. Copy and paste as a new layer. Drop shadow.
Open gift2. Resize 50%. Copy and paste as a new layer. Drop shadow.
Open gift3. Resize 65%. Copy and paste as a new layer. Drop shadow.
Arrange your gifts as you'd like them at the bottom of the tree.
Drop shadow your frame layer.
Go back to the top layer and add your name. I used color #9b2033 for the fill and the stroke, stroke set at 3.
Effects > Eye Candy 4000 > Gradient Glow set at 3-0-100, color #eddf9a.
Drop shadow your name.
I added the following bevel:
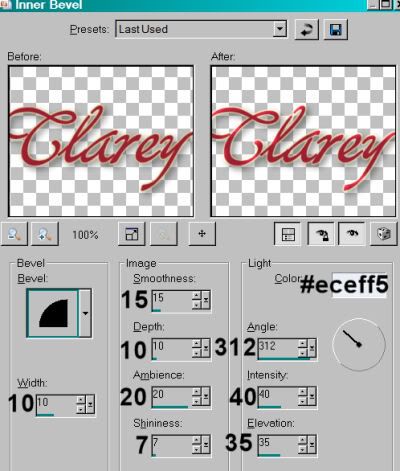
Hit okay.
Resize your canvas to a size with which you are comfortable.
Add your copyright, license information if applicable, and taggers'/watermark.
If you choose not to animate, you're now done, and you can merge your layers and save!
A N I M A T I O N
I animated two parts of this tag. The animation of the glitterdoodle layer does NOT show up well, if at all. I'm only giving the steps for the star on the tree. If you want to apply the same steps to the glitterdoodle layer as well, it's up to you.
Highlight your christmastree layer. Duplicate twice, for a total of three christmastree layers.
Highlight your bottom christmastree layer.
Grab your lasso tool, set on point-to-point. Make sure the feather is set to 0. Zoom in as much as you need, and draw a selection around the star at the top of the tree.
Effects > dsb Flux > Bright Noise, intensity set at 40.
Hit okay.
Highlight the middle christmastree layer.
Add Bright Noise again, this time hitting "mix" a time or two.
Hit okay.
Now, highlight the top christmastree layer. Again, add Bright Noise, and again hit "mix."
Hit okay.
Close out the top two christmastree layers, leaving the bottom christmastree layer open.
Edit > Copy Merged.
Open Animation Shop. Right-click on the desktop area and paste as a new animation.
Return to PSP. Close out the bottom christmastree layer and open the middle christmastree layer.
Edit > Copy merged.
Back to Animation Shop. Edit > Paste > After Current Frame.
Return again to PSP. Close out the middle christmastree layer and open the top christmastree layer.
Edit > Copy merged.
Again, back to Animation Shop. Edit > Paste > After Current Frame.
View > Animation.
And you're done! Thanks for stopping by! Happy Holidays!
.


No comments:
Post a Comment