
You will also need:
Animation Shop. This is from CNET, so it's a safe download. However, it costs. That changed pretty recently. I don't know why!!
Alternatively, I had two people point out to me that one might find Animation Shop for free at this location. This is an FTP link and I have no idea if it's safe or not. So keep your antivirus handy to scan it after download!
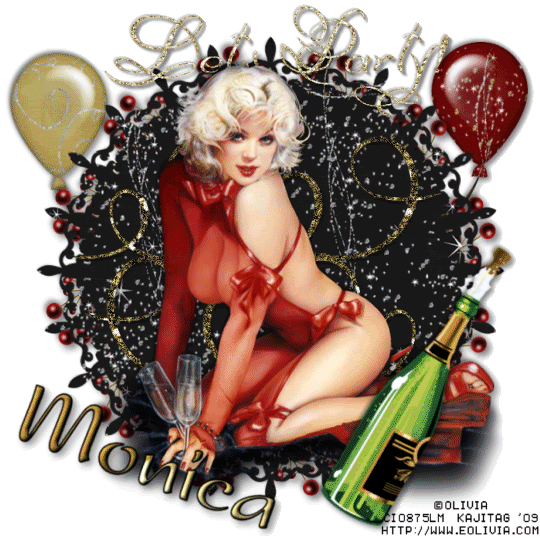
A tube of your choice. I'm using the stunning artwork of Olivia. You must have a license to use her artwork. You can get that license and art at C.I.L.M.
The scrap kit is by Monica, of Simply Sensational Scraps. This is a FTU kit, called New Years Party. Be sure to leave lots of love for your freebie!!
Filters: Mura's Meister > Copies, dsb Flux > Bright Noise
Font: I used NoralTC TT.
Supplies: Just the champagne bottle. I don't know whose this is. If anyone knows who did this, let me know and I'll give proper credit!!
Also, please... if you have problems with any download link for supplies, drop me a line via e-mail. Leaving a comment without a way for me to contact you back doesn't help. If you e-mail me, I'll do my best to send you the supplies.
Okay, so let's do it! lol.
Open your champagne bottle in PSP and minimize. Alternatively, you can file it away with the rest of your PSP files for future use!
Open a new canvas, 700 x 700, white.
Open ornament1. Resize 50%. Copy and paste as a new layer.
Effects > Mura's Meister > Copies with the following settings:
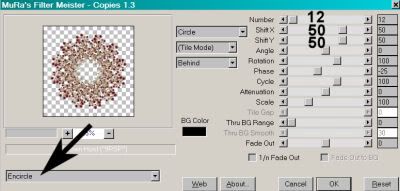
Hit okay. Drop shadow.
Open tagtemplate1. Resize 115%. Copy and paste as a new layer.
Add your tube. Resize, position, and drop shadow to your liking.
Open balloon1. Copy and paste as a new layer. Position to the top right of the canvas, so it can be seen from behind the tagtemplate layer. Drop shadow.
Open balloon3. Copy and paste as a new layer. Image > Mirror. Position to the left, opposite your first balloon. Drop shadow.
In your layer palette, drag both balloon layers below the tagtemplate and "copies" layers.
Open glitterswirl3. Copy and paste as a new layer. Position toward the top of the tagtemplate area. See my example for placement reference. Duplicate this layer and Image > Mirror. Put this toward the bottom of the template area. Merge these two layers down.
Open wordart3. Copy and paste as a new layer. Position at the top of your canvas. Drop shadow.
Open the champagne bottle from the file I supplied. Resize 85%. Copy and paste as a new layer. Rotate 30° right. Position in the bottom right corner of the tag. Drop shadow.
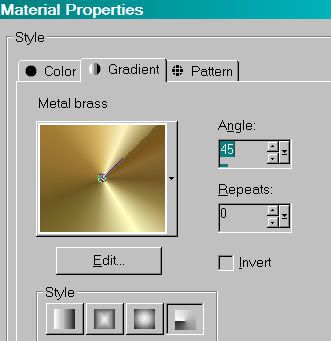
Go to the top layer and add your name. I used the "metal brass" gradient for the fill, and black for the stroke, stroke set at 2.
I added the following bevel:
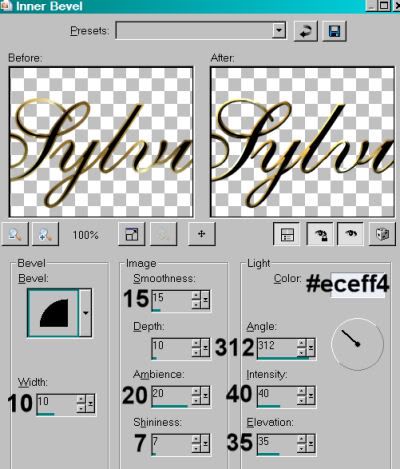
Hit okay.
Drop shadow your name.
Resize your canvas to a size with which you are comfortable.
Add your copyright, license information if applicable, and taggers'/watermark.
If you choose not to animate, you're now done, and you can merge your layers and save!
A N I M A T I O N
Highlight your glitterswirl layer. Duplicate twice, for a total of three glitterswirl layers.
Highlight your bottom glitterswirl layer.
Effects > dsb Flux > Bright Noise, with intensity set at 40.
Hit okay.
Highlight the middle glitterswirl layer.
Add Bright Noise again, this time hitting "mix" a few times.
Hit okay.
Now, highlight the top glitterswirl layer. Again, add Bright Noise, and again hitting "mix."
Hit okay.
Close out the top two glitterswirl layers, leaving the bottom glitterswirl layer open.
Edit > Copy Merged.
Open Animation Shop. Right-click on the desktop area and paste as a new animation.
Return to PSP. Close out the bottom glitterswirl layer and open the middle glitterswirl layer.
Edit > Copy merged.
Back to Animation Shop. Edit > Paste > After Current Frame.
Return again to PSP. Close out the middle glitterswirl layer and open the top glitterswirl layer.
Edit > Copy merged.
Again, back to Animation Shop. Edit > Paste > After Current Frame.
View > Animation. Whew, we're done! Thanks for stopping by!
.


No comments:
Post a Comment