

You will also need:
Animation Shop. This is from CNET, so it's a safe download. However, it costs. That changed pretty recently. I don't know why!!
A great person named solshne (and another named Chris) wrote to let me know that one might find Animation Shop for free at this location. This is an FTP link and I have no idea if it's safe or not. So keep your antivirus handy to scan it after download!
A tube of your choice. I used the great artwork of Elias Chatzoudis. You must have a license to use his art. You may obtain that license and his art from My PSP Tubes.
The scrap kit is by Doris, from Scrap Dimensions. This is a FTU kit, and is called 'Tis The Season.
Supplies: No outside supplies used in this tutorial!
Filters: No outside filters, either!! Can you believe it??
Font: I used Love.
Okay, let's do this!
Open a new image, 750 x 700, white.
Open Frame Wreath. Resize 75%. Copy and paste as a new layer. I positioned mine to the upper left of the canvas. You can figure this out later, if you want. All depends upon your tube/s.
Highlight your white background layer.
Open Paper 5. Copy and paste as a new layer.
Highlight the wreath layer. Grab your magic wand and click inside the wreath. Selections > Modify > Expand by 15. Selections > Invert.
Highlight your paper layer. Hit delete. Selections > Select none.
Open what I believe will be the last file in your folder for this scrap kit: SO01_Tagger(snowdust).
Copy and paste as a new layer. For this part, I duplicated this layer twice, each time moving the snow until it was covered in such a way that I was satisfied. Merge these layers down. Make sure this is above your paper layer but below your wreath layer.
Add your tube. Resize, position and drop shadow to your liking.
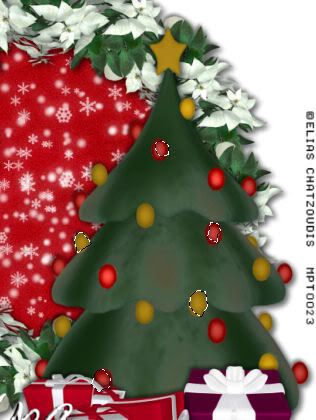
Open Xmas Tree. Resize 50%. Copy and paste as a new layer. Position, again, to your liking. Drop shadow.
Open Gift box 4. Resize 30%. Copy and paste as a new layer. Position under the tree. Drop shadow.
Open Gift box 2. Resize 30%. Copy and paste as a new layer. Position under the tree. Drop shadow. On my canvas, I have Gift box 2 above Gift box 4. Up to you! Arrange them how you like!
Drop shadow your wreath layer.
Go back to the top layer and add your name. I used white for the fill and stroke, stroke set at 2.
I added the following bevel:
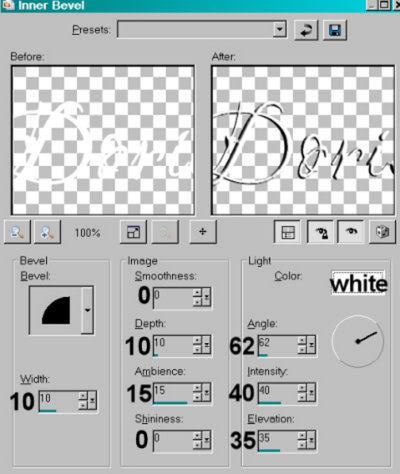
Hit okay.
Drop shadow your name.
Resize your canvas to a size with which you are comfortable.
Add your copyright, license information if applicable, and taggers'/watermark.
If you choose not to animate, you're done! Merge your layers and save!! Congrats!
A N I M A T I O N
Highlight your Xmas Tree layer. Duplicate twice, for a total of three tree layers.
Now highlight the bottom tree layer. Grab your lasso tool, set at point-to-point, and draw selections around a variety of your tree lights. See below:
Adjust > Brightness and Contrast > Brightness/Contrast with the settings below:
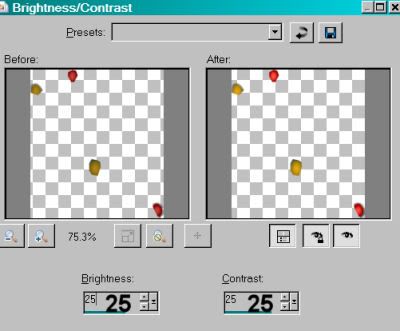
Hit okay.
Now, here's where it gets a bit tricky. Selections > Select None.
Highlight your middle tree layer. Again, grab the lasso tool and select various lights on the tree. To do this so I knew I wasn't doing the same ones over again, I had to hide the other layers, and move them all around a bit to see what I was doing. Good luck!
When done, again add the Brightness/Contrast as you did on the first layer.
Selections > Select none.
Now we're on the top tree layer. Again, the lasso tool, selecting various other tree lights. This time, include the star on top.
Adjust the Brightness/Contrast on this layer. Selections > Select None.
Hide the top two tree layers, leaving the bottom tree layer open. (Your layer with the star selected should be on top. The other two don't matter.)
Edit > Copy merged
Open Animation Shop, right-click on the desktop area and paste as a new animation.
Go back to PSP. Close the bottom tree layer and open the middle tree layer.
Edit > Copy Merged.
Back to Animation Shop. Edit > Paste > After Current Frame.
Return to PSP. Close out the middle tree layer and open the top tree layer.
Edit > Copy Merged.
Back to Animation Shop. Edit > Paste > After Current Frame.
Return again to PSP. Close out the top tree layer and open the middle tree layer.
Edit > Copy Merged.
Back to Animation Shop. Edit > Paste > After Current Frame.
Return to PSP. Close out the middle tree layer and open the bottom tree layer.
Edit > Copy Merged.
Back to Animation Shop. Edit > Paste > After Current Frame.
Still in Animation Shop... Edit > Select All.
Right-click on the top bar of your animation and choose "Frame Properties." Change this number to 17.
Now, find your third frame. Highlight that frame, right-click and choose "Frame Properties." Change this number to 50.
View > Animation. Save as .gif et, voila! We are done!! I hope I explained this well enough to y'all! Have a great rest of your day/evening!! Thanks for choosing my tut!
.


No comments:
Post a Comment