
You will also need:
Animation Shop. This is from CNET, so it's a safe download. However, it costs. That changed pretty recently. I don't know why!!
I've had two people point out to me that one might find Animation Shop for free at this location. This is an FTP link and I have no idea if it's safe or not. So keep your antivirus handy to scan it after download!
A tube of your choice. I'm using the great artwork of Olivia. You must have a license to use her artwork. You can get that license and art at C.I.L.M. This particular tube can be found here.
The scrap kit is by Clarey, of Clarey's Designz. This is a FTU kit, but with a twist! It's free with purchase of her kit called Christmas Magic. My last tut used that kit. After the order for Christmas Magic goes through, the freebie will be available to you. It's called "Celebrate." Leave a "thank you" for her where it has room for comments!!
Filters: Alien Skin > Eye Candy 5 > Impact > Extrude, Eye Candy 4000 > Gradient Glow
Font: I used FeniceITCbyBT. It's best, if you can't use that font, that you use one like it. A bit bold, but plain.
Supplies: No outside supplies on this tut!
Okay, here we go!
Open a new canvas, 700 x 700, white.
Open squareframe1. Resize 85%. Copy and paste as a new layer.
Highlight your white background layer.
Open paper5. Copy and paste as a new layer.
Highlight your frame layer.
Grab your magic wand and click inside the frame. Selections > Modify > Expand by 15. Selections > Invert.
Highlight your paper layer. Hit delete.
Selections > Select None.
Add your tube. Resize, position and drop shadow to your liking.
Highlight your frame layer.
Grab your magic wand and click inside the frame. Selections > Modify > Expand by 1. Selections > Invert.
Highlight your tube layer.
Grab your eraser brush and erase any of your tube that you don't want showing outside the sides and/or bottom of your frame.
Selections > Select None.
Sorry about the repetition there. I'd left a step out when first writing this... backtracking!!
Open wordart2 and wordart3. Resize 85%. Copy and paste each as a new layer. Arrange to your liking. If you would like them smaller, go right ahead. This is your tag! Once arranged, drop shadow each piece of word art. Merge these two layers down.
Open fireworks2. Resize 85%. Copy and paste as a new layer. In your layer palette, drag this layer below your tube and above your paper. Give it a small drop shadow.
Open clock. Resize 35%. Copy and paste as a new layer. I positioned mine on the top right of the frame. You may position as you like. Drop shadow.
Open champagneflutedouble. Resize 50%. Copy and paste as a new layer. Again, I positioned mine in the area below center of the left side of the frame. (Was that proper grammar? lol) Position yours as you like. Drop shadow.
Open fireworks1. Resize 115%. Copy and paste as a new layer. Duplicate this layer. Image > Rotate 90° left. Merge these two layers down.
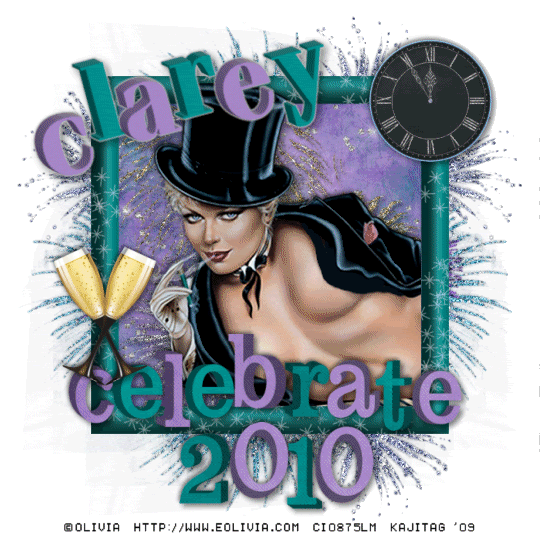
Now we're going back to the top to add the name. If you want to go through this, it's a bit fiddly, but I wanted the name to be consistent with the word art. You may choose do do this differently. It's your tag!
I used the color #'s a586c7 and 029091 for the name. Type out the name, one letter at a time, in alternating colors. See my example to see what I mean.
When all typed out, then...
Effects > Alien Skin > Eye Candy 5 > Impact > Extrude with the following settings:
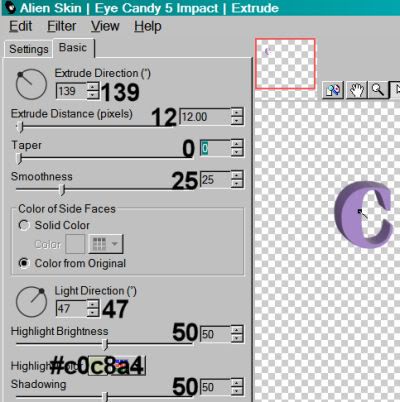
Hit okay. Do this with each individual layer until the name is done.
Arrange your letters however you'd like them arranged. Merge your letter layers down.
Effects > Eye Candy 4000 > Gradient Glow set at 3-0-100 in color #c0c0c0.
Drop shadow your name.
Drop shadow your frame layer.
Resize your canvas to a size with which you are comfortable.
Add your copyright, license information if applicable, and taggers'/watermark.
If you choose not to animate, you're now done, and you can merge your layers and save!
A N I M A T I O N
I animated two parts of this tag (both layers of fireworks). You may choose to do just one if you like.
Highlight your fireworks1 layer. Duplicate three times, for a total of four fireworks1 layers.
Highlight your fireworks2 layer. Duplicate three times, for a total of four fireworks2 layers.
Highlight the bottom layer of the fireworks1 layers.
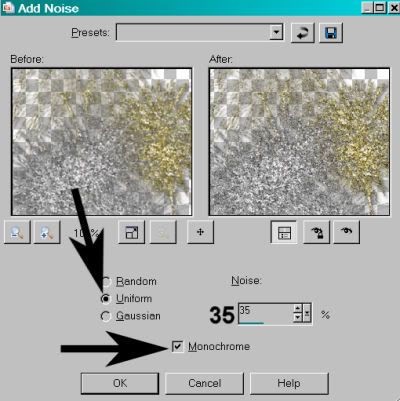
Adjust > Add/Remove Noise > Add Noise with the following settings:
Hit okay.
Go to the bottom layer of your fireworks2 layers, and do the same step as above.
Highlight the next layer up on your fireworks2 layers.
Add Noise again, this time changing the percentage to 40.
Hit okay.
Go to the corresponding layer of the fireworks1 layers. Do the same step as above.
Hit okay.
Highlight the next layer up of the fireworks1 layers.
Add Noise again, this time changing the percentage to 45.
Hit okay.
Go to the corresponding layer of the fireworks2 layers. Add Noise again, same as above.
Hit okay.
Highlight the top layer of your fireworks2 layers. Add Noise once more, this time changing the percentage to 50.
Hit okay.
Highlight the top layer of your fireworks1 layers. Add Noise again, as above.
Hit okay.
Close out the top three layers of both the fireworks1 and fireworks2 layers, leaving the bottom layers open.
Edit > Copy Merged.
Open Animation Shop. Right-click on the desktop area and paste as a new animation.
Return to PSP. Close out the bottom fireworks1 and 2 layers, and open the next layers up.
Edit > Copy merged.
Back to Animation Shop. Edit > Paste > After Current Frame.
Return again to PSP. Close out the layers you just worked with, and open the next fireworks1 and 2 layers up.
Edit > Copy merged.
Again, back to Animation Shop. Edit > Paste > After Current Frame.
Finally, close those fireworks1 and 2 layers that are open, and open the top layers of both sets.
Return once more to Animation Shop. Edit > Paste > After Current Frame.
View > Animation.
And you're done! I know this one was a bit fiddly, but I hope you're happy with your results! I'd love to see them! And thanks for stopping by! Have a Happy Holiday!
.


No comments:
Post a Comment