You will also need:
Animation Shop. This is from CNET, so it's a safe download. However, it costs. That changed pretty recently. I don't know why!!
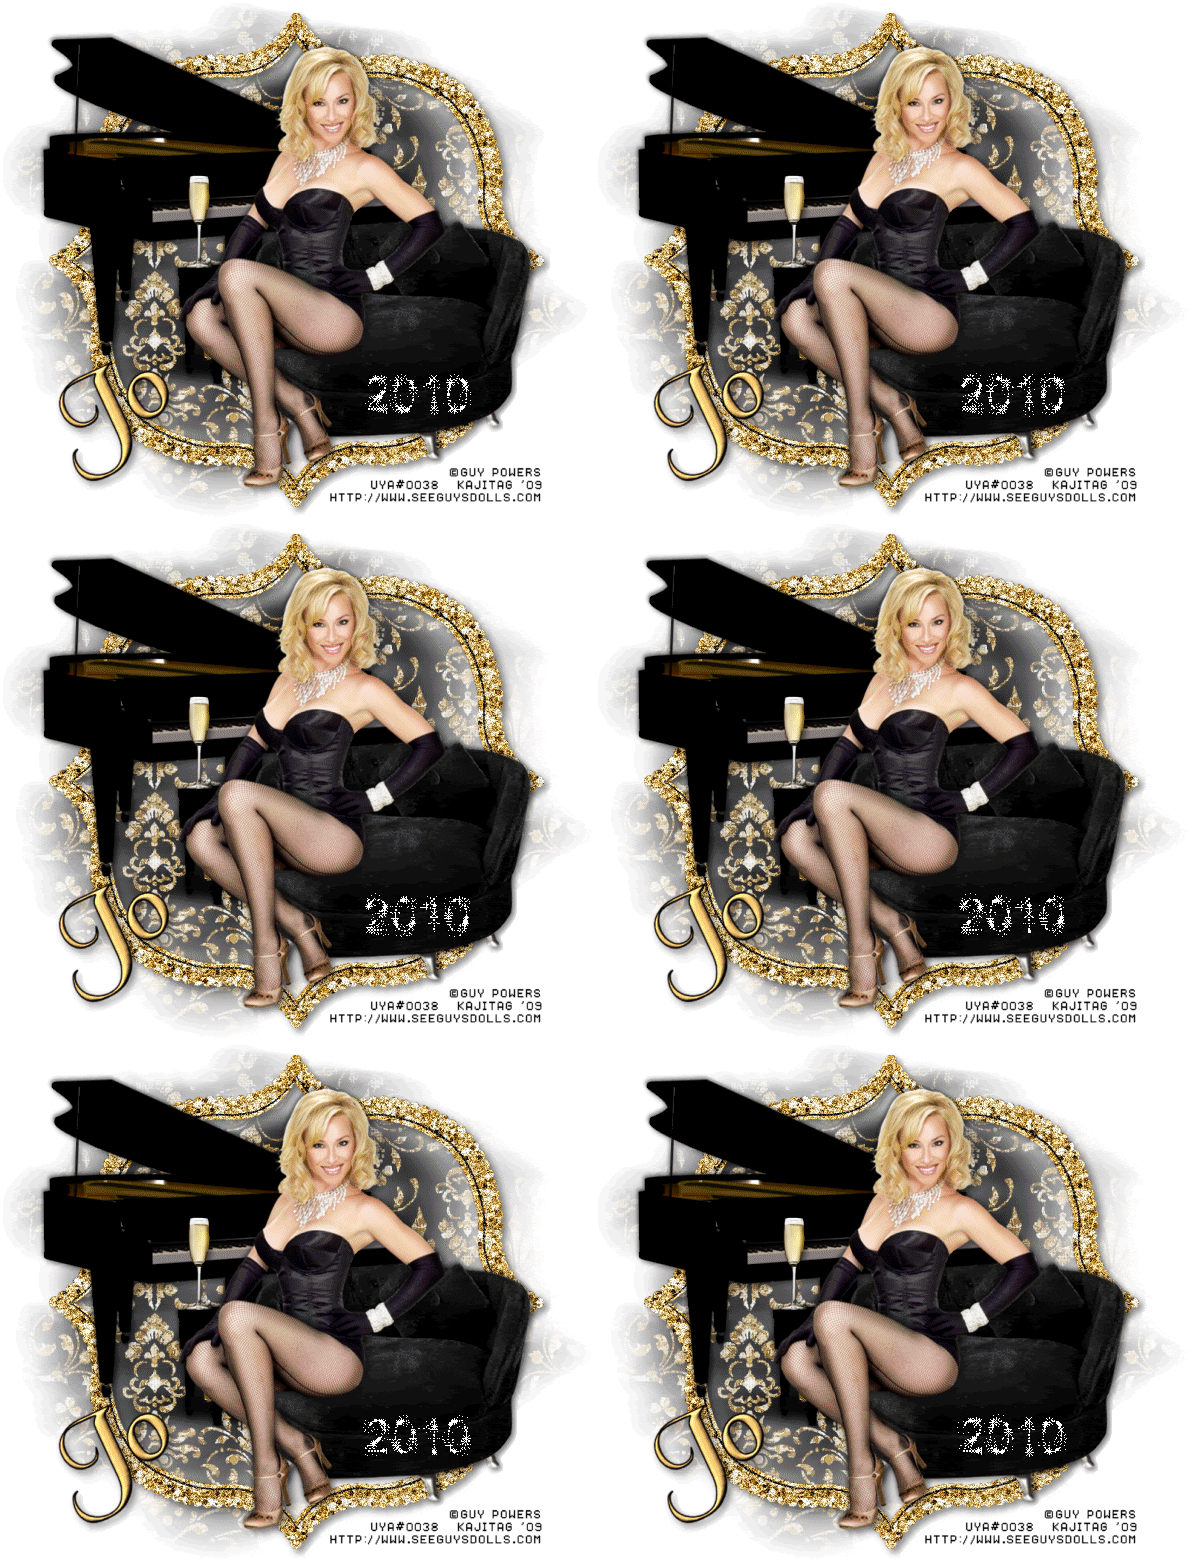
A tube of your choice. If you're going to try and emulate this tag completely, you'll need a sitting or leaning piece of art for your creation! I'm using the artwork of Guy Powers. You must have a license to use his work. You can get that license and art at Up Your Art.
The scrap kit is by Jo, of A Tagger's Scrap. This is a FTU kit called "Bling in the New Year." This is just one portion of a blog train by the same name. To get more parts, scroll down for the links. Leave a "thank you" for her where it has room for comments!!
Filters: dsb Flux > Bright Noise
Font: I used Black Chancery.
Supplies: The mask, made by the wonderful-yet-missing Becky! Thank you Becky, wherever you are, for the use of your great masks!! Please note, I was having a problem with 4shared this afternoon. I don't know what's wrong with it, but in the interest of time I quickly went to Mediafire. I hope that's okay with y'all. Also, you'll need the 2010 bling, which you can find at Monti's Pixel Playground. (Look at the menu on the left, then scroll down to the bottom of the blings page.) Thanks to you, too, Monti, for sharing your great art!
Okay, here we go!
Open your mask and minimize in PSP. Alternatively, you could save it in with those already in your masks file, for use at a later date! Put Monti's bling where it will be handy when you get into Animation Shop.
Open a new canvas, 800 x 700, white.
Open sofa. Resize 120%. Copy and paste as a new layer. Arrange as you like. Drop shadow.
Add your tube. Resize, position, and drop shadow to your taste.
Open piano. Resize 85%. Copy and paste as a new layer. Image > Mirror. Arrange as you like it. Drop shadow.
Open glass. Resize 45%. Copy and paste as a new layer. I positioned mine so it's sitting on the piano bench. Place yours as you like it. Drop shadow.
Highlight your white background layer.
Open paper5. Copy and paste as a new layer.
Apply your mask. Delete mask layer, answer "yes" to the pop-up question, and merge group.
Open frame3. Resize 120%. Copy and paste as a new layer. In your layer palette, this should be just above your mask layer.
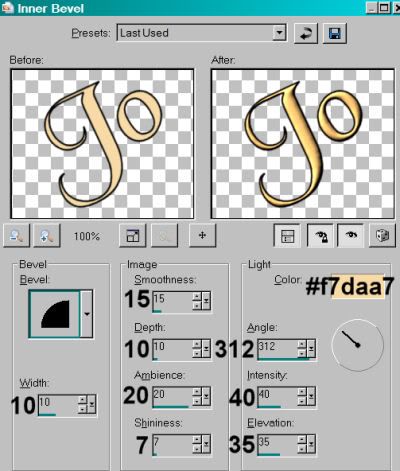
Go back to the top and add your name. I used color #f7daa7 as the fill, black as the stroke, stroke set on 2.
I added the following bevel:

Hit okay.
Drop shadow your name.
Resize your canvas to a size with which you are comfortable.
Add your copyright, license information if applicable, and taggers'/watermark.
If you choose not to animate, you're now done, and you can merge your layers and save!
A N I M A T I O N
Highlight your frame3 layer. Duplicate this three times, for a total of four frame3 layers.
Now highlight the bottom frame3 layer.
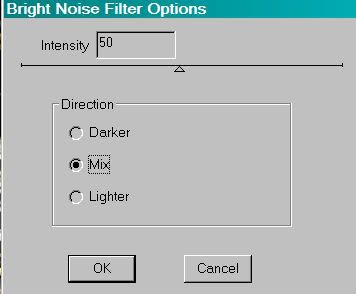
Effects > Plug-Ins > dsb Flux > Bright Noise with the following setting:

Hit okay.
Highlight the next frame3 layer up.
Add Bright Noise again, this time hittng "mix" a couple times.
Hit okay.
Highlight the next layer up of the frame3 layers.
Add Bright Noise again, again hitting "mix" a couple times.
Hit okay.
Highlight the top frame3 layer. Add Bright Noise once more, hitting "mix" a couple last times.
Hit okay.
Close out the top three layers of the frame3 layers, leaving the bottom layer open.
Edit > Copy Merged.
Open Animation Shop. Right-click on the desktop area and paste as a new animation.
Return to PSP. Close out the bottom frame3 layer, and open the next layer up.
Edit > Copy merged.
Back to Animation Shop. Edit > Paste > After Current Frame.
Return again to PSP. Close out the layer you just worked with, and open the next frame3 layer up.
Edit > Copy merged.
Again, back to Animation Shop. Edit > Paste > After Current Frame.
Finally, close that frame3 layer, and open the top layer.
Return once more to Animation Shop. Edit > Paste > After Current Frame.
Now, still in Animation Shop, Edit > Select All.
Highlight your the last frame of your animation and
Edit > Paste > After Current Frame.
Go back to frames 1 and 2, highlighting them both.
Edit > Copy
Go to your last frame again, and highlight it.
Edit > Paste > After Current Frame.
You should now have 10 frames.
Bring your slider at the bottom of the animation back to frame 1.
Locate and open the Monti bling.
Edit > Select All.
Animation > Resize Animation > 50%.
Edit > Copy
Go to your tag and Edit > Select All
Edit > Paste > Into Selected Frame
Hover your mouse until you have the 2010 placed where you'd like it. Then release mouse button.
View > Animation.
If you don't like the placement of your bling, you can Edit > Undo and then redo until placed to your liking.
And you're done! I hope you're happy with your results! And thanks for stopping by! I hope you're all having Happy Holidays!
.


No comments:
Post a Comment