

You will also need:
A tube of your choice. I'm using the beautiful artwork of Karen Middleton. You must have a license to use her art. You may obtain that license and her art from C.I.L.M. (You'll note, if you click on the link to Karen... it brings you to another page at C.I.L.M. The URL we were given no longer works, and we've been told by those at C.I.L.M. to just refer folks to them.)
The scrap kit is by Kairinakat, of Kairinakat Kreations. This is a PTU kit, which can be found at Scrap it Sassy. This kit is titled "Fall Wishes." Now on sale for $1!!!
Supplies: No outside supplies in this tutorial!
Filters: Mura's Meister > Copies, Eye Candy 4000 > Gradient Glow
Font: I used ExPonto.
Let's get to it! This is another easy tut. Cut-n-Paste all the way. The part that's NOT easy is the fact that the kit artist did not label the elements & papers. They're all numbered. So I'll refer to them by a name I chose to label them with, in my layer palette, AND by the number assigned. Clear as mud? Good! LOL...
Open a new canvas, 800 x 700, white.
Open Jewel Heart (16). Resize 50%. Copy and paste as a new layer.
Effects > Plug-Ins > Mura's Meister > Copies with the settings below:
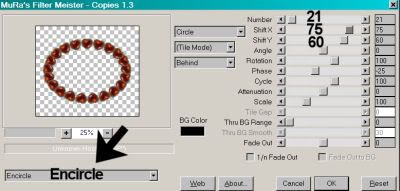
Hit okay.
Add your tube. Resize, position and drop shadow to your taste. Drag below the frame we made with the hearts. If you're using a tube similar to mine, with just the face, then follow along with me!
Highlight your copies layer. Grab your magic wand and click inside the oval of hearts you just made.
Selections > Modify > Expand by 1. Selections > Invert.
Highlight your tube layer. Hit delete.
Highlight your white background layer.
Open paper (81). Copy and paste as a new layer. Hit delete.
Selections > Select none.
Go back to the top layer.
Open the sunflowers (53). Copy and paste as a new layer. Position in the upper right-hand area of your canvas. See my example for placement reference. Drop shadow.
Duplicate this layer and Image > Mirror. Merge these two layers down.
Grab your selection tool, set on rectangle, and draw a box around the stems sticking out on the bottom. Hit delete. Selections > Select none.
Go back to your sunflowers layer and duplicate. Image > Flip. Merge these two layers down. Drag this layer down to just above your white background layer.
Open the golden leaf (51). Resize 75%. Copy and paste as a new layer. Position in the upper right-hand corner of the canvas, between the two sunflowers, where the space is open. Again, see my example for placement reference. Drop shadow.
Duplicate this layer. Image > Mirror. Merge these two layers down. Duplicate THIS layer. Image > Flip. Merge those two layers down. Drag to just above the sunflowers layer.
Open Butterfly (19) Resize 65%. Copy and paste as a new layer. Position in the space at the top center of your arrangement. Drop shadow.
Go to the top layer and add your name. I used color #b23828 as the fill and the stroke. Stroke set at 3.
Add a Gradient Glow, settings at 4-0-100, color #e8c542. Drop shadow your name.
Resize your canvas to a size with which you're comfortable.
Add your copyright, license information if applicable, and taggers'/watermark.
Layers > Merge > and save! We are done!
And there you go! Another finished tag! I hope you liked this tutorial. I thank you SO much for choosing to work with it!!
.


No comments:
Post a Comment