
You will also need:
A tube of your choice. I'm using the artwork of Mark Yanko. You must have a license to use his art. You may obtain that license and his art from C.I.L.M.
The scrap kit is by Tiny, of Tiny D's Scrappin' Designs. This is a PTU kit titled "Happy Hell Hell Helloween." This kit is currently on sale at Scraps With Attitude for only $2.68!! That's 33% off!!
Supplies: The mask and the moon, which you can find here. Not sure where I got either one of those files, so if you made them, or know who did, let me know so I can give correct credit! Thanks!
Filters: No outside filters used in this tut!
Font: I used Gremlin Normal.
Okay, let's try this! This kit is REALLY full of tidbits to use, so there will be a lot of steps, but it's an easy to do tutorial!
Open your supplies in PSP and minimize. Alternatively, you could file them in with the rest of your PSP files for use at a later date. Totally up to you!
Open a new canvas, 800 x 700, white.
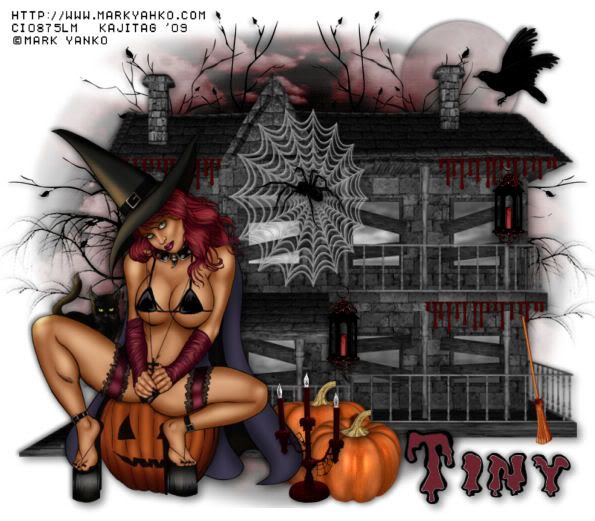
Open House. Resize 75%. Copy and paste as a new layer.
Add your tube. Resize, position and drop shadow to your liking.
Open Tree3. Resize 125%. Copy and paste as a new layer. Position to the left of your canvas, so that it will peek out from behind the house. Duplicate this layer and Image > Mirror. Merge these two layers down, and drop shadow. Drag this layer below your house.
Open Tree2. Copy and paste as a new layer. Position, again, to one side or the other, so that the branches will be visible above the house. See my example for placement reference, if you like. Duplicate this layer. Image > Mirror. Merge these two layers down. Drop shadow. Drag this layer below your house, as well.
Open Web1. Resize 50%. Copy and paste as a new layer. Oh, I forgot to take a screen shot of this. Go Adjust > Brightness and Contrast > Brightness/Contrast and set the brightness number to about 75 or 95. Hit okay.
Now, you can resize your web smaller if you like. I found it wasn't an easy web to work with on this house, but I did the best I could with what I had. Drop shadow your web.
Open Willow Spider. Resize 25%. Copy and paste as a new layer. Image > Mirror. Place in the web as you'd like. Drop shadow.
Open Pumpkins. Resize 65%. Copy and paste as a new layer. Position somewhere in front of the house. Drop shadow.
Open Lantern. Resize 25%. Copy and paste as a new layer. Position where you'd like it on the house. If you like, duplicate the layer and put another elsewhere on the house. Drop shadow your lanterns.
Open Crow. Resize 25%. Copy and paste as a new layer. Position as you'd like it... mine is just readying itself to land on the rooftop, next to one of the chimneys. Drop shadow your crow.
Open Blood Spill1. Resize 35%. Copy and paste as a new layer. I chose to duplicate this twice and position it around the house eaves. Please see my example for placement reference. Drop shadow your blood spills. lol.
Open the Broom. Reisize 35%. Copy and paste as a new layer. Rotate 10° left. Lean on the house. Drop shadow your broom.
Open the Web Candle. Resize 35%. Copy and paste as a new layer. Position along the front of the house, with your pumpkins. Drop shadow your candles.
Highlight your white background.
Open pp1. Copy and paste as a new layer.
Apply your mask. Delete mask layer, answer "yes" to the pop-up question, and merge group. Now, resize 95%.
This is a tricky part. You see how the edges of the mask layer are so crisp? I don't like that. I want them more of a mish-mash kinda thing. So, grab your lasso tool, mode is add/shift, setting is freehand and feathering is 17.
Draw a curve (sorta... please don't try to make a perfect curve... that's what I'm trying to get rid of! Of course, if you're not anal about that, then you can skip this part) around each of the four sides of the mask area. I have an example of my bottom one here:
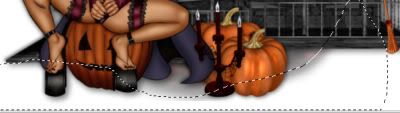
Something like that, okay? When all are drawn, hit delete. Selections > Select None.
Open the moon from the supplies I provided. Copy and paste as a new layer. Adjust the brightness on the moon with the following settings:
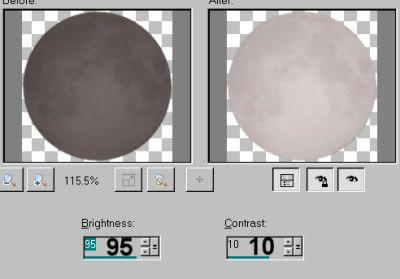
Hit okay.
Position your moon where you'd like it. I put mine behind my crow a bit. Drag this layer down BELOW the mask layer. Drop shadow your moon.
Go to the top layer and add your name. I used black for the fill and stroke, stroke set at 2.
I'm again using an outline font. If you happen to use the same one, grab your magic wand (be sure you set feather back to zero!) and click inside each of the letters.
Selections > Modify > Expand by one.
Grab your flood fill tool and, with color #6d232e, flood fill your letters. I found with this font that there was still white showing, no matter what I did. Frustrating! Drop shadow your name.
Resize your canvas to a size with which you're comfortable.
Add your copyright, license information if applicable, and taggers'/watermark.
Layers > Merge > and save! We are done!
Thanks for deciding upon this tutorial!! I hope it was easy to understand and follow! Have a grrrrrreat day!
.


No comments:
Post a Comment