
[This tag was put together on Friday, April 24, 2009 and then for the weekend I was gone. So figuring it all out to post here will be a challenge, because for me, this is a bit of a "picky" one! I hope it all is understandable here, now that I'm posting it!]
You will also need:
Animation Shop. This is from CNET, so it's a safe download.
[GOOD NEWS!!! The previously-supplied animation of the purple butterfly, which I wrecked somehow and could not fix, and about which I apologized profusely here, HAS BEEN FIXED!! A marvelous, wonderful woman by the name of Joyce worked on it and worked on it, and got it perfected. I found the file in my e-mail this morning (04/28/2009), and it's the first thing I'm doing! The files have been fixed, and everything's beautiful!]
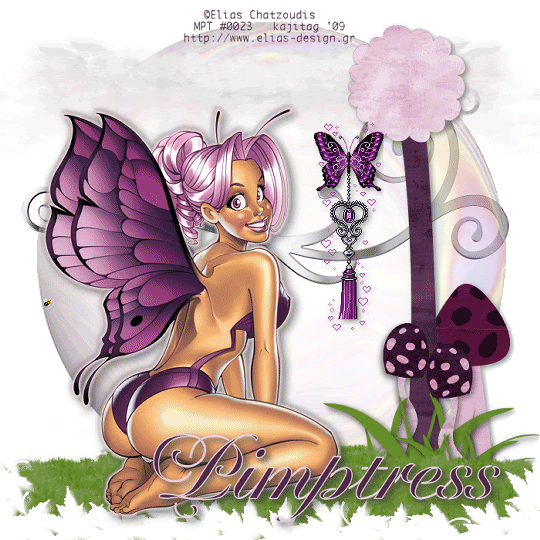
A tube your choice. I'm using the fun & beautiful artwork of Elias Chatzoudis. You must have a license to use his work. You may purchase that license at My PSP Tubes.
Scrap kit is by Pimptress. It's a PTU kit, is available *exclusively* at Scrap Heaven Boutique, and is called Fairy Purple. According to Pimptress, she was inspired to make this kit especially for the tube I've used, by Elias Chatzoudis!
Filters: No outside filters were used in this tut!
Font: I used Chateau
Supplies: I've included the mask, two animations and the grass image. I don't know where I got ANY of them! It's a crime! I didn't know when I started out about giving credit, etc. So if they're yours, let me know and I'll give you proper credit! You can get the file here.
Also, please, if you have problems with the download link for supplies, drop me a line via e-mail. Leaving a comment without a way for me to contact you back doesn't help. If you e-mail me, I'll send you the supplies.
Okay, let's begin...
Open your grass and your mask, and minimize in PSP. Alternatively, you can load your mask into your PSP masks folder for use at a later date. Put your animations where they'll be easily accessible when you're in Animation Shop.
Open a new image, 700 x 700, white.
I started with the tube. So, add your tube. Resize, position and drop shadow to your taste.
Open tree. Resize 75%. Copy and paste as a new layer. Drop shadow.
Open toadstool-02. Resize 50%. Copy and paste as a new layer. Drop shadow.
Open toadstool-01. Resize 30%. Copy and paste as a new layer. Drop shadow. Duplicate and arrange the toadstools as you'd like them to be.
Open grass-02. Copy and paste as a new layer. Resize 90%. Mirror. Arrange this at the base of the tree. Soft drop shadow. Duplicate this layer, resize and mirror as necessary to arrange at the base of the toadstools, as well. See my tag for placement reference, and to just see what I'm trying to say! lol!!
Open grass.pspimage from your supplies. We need to change the color of this grass.
Adjust > Brightness and Contrast > Brightness/Contrast with the following settings:
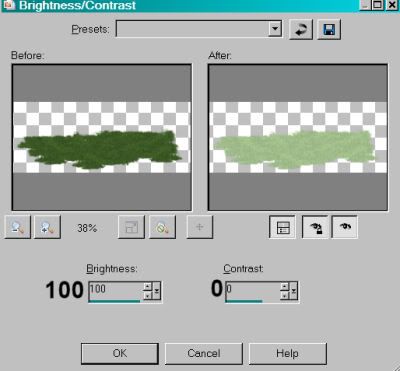
Hit okay.
Now,
Adjust > Hue and Saturation > Colorize with the following settings:
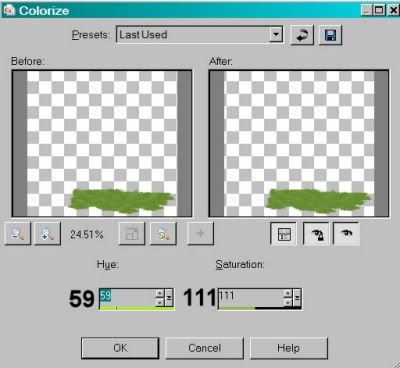
Hit okay.
Go back to Adjust > Brightness and Contrast > Brightness/Contrast, this time with the following settings:
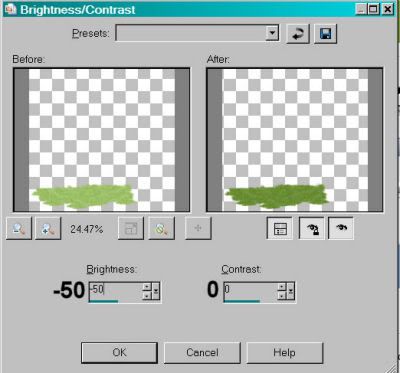
Hit okay.
Now, arrange this grass on the left hand side of your canvas, so that it extends past the side edge of your tag. Duplicate and Image > Mirror. Arrange this on the opposite side. Merge these layers down and duplicate that. Move that down on the tag. You're going to build the bottom of your tag with these layers of grass. When your grass looks good to you, merge all these grass layers down.
In your layer palette, this grass should be above the grass layers from the scrap kit. Move them all around until they are grouped as you'd like them, and so they're below the grass.pspimage base that you've just created. See my tag for placement reference, if you like.
Open bubble-01. Copy and paste as a new layer. In your layer palette, the bubble should be on the bottom, just above your white background.
Open swirl. Copy and paste as a new layer. Use your pick tool if necessary, to stretch it to your choice of size. In your layer palette, this should be below your bubble.
Open cloud. Copy and paste as a new layer. Place this toward the top of your canvas (see my tag for placement reference), to one side or the other. In your layer palette, this should be above the bubble. Duplicate and Image > Mirror. Merge these two layers down.
Highlight your grass.pspimage layer.
Apply your mask. This is tricky! BEFORE YOU DELETE YOUR MASK LAYER:
Duplicate your mask layer three times, for a total of four layers. Now, delete all four mask layers. Answer "yes" to the pop-up question all four times. Merge group.
Add your name. I used color #4f2c48 as the fill, the stroke is color #fe6d1de, stroke set at 1.5.
Drop shadow your name.
Add your copyright, license information if applicable, and taggers'/watermark.
I did not resize my tag before animating on this one. I was concerned with the size of the butterfly animation. So at this point, if you do NOT want to add the animations I included in supplies, you can merge your layers now, resize, save, and be done!!
A N I M A T I O N
Edit > Copy merged.
Open Animation Shop. Right-click on the desktop area and paste as a new animation.
Duplicate this frame until you have 14 frames. Bring the slider on the bottom of your tag to the first frame.
Open PplBflyJeweledTassle.gif. Edit > Select All.
Highlight the last frame of this animation and Edit > Paste > After Current Frame. Now you have 14 frames!
So now, Edit > Select All again.
Go to your original canvas and Edit > Select All. Edit > Paste > Into Selected Frame. Hover your mouse until you have your purple butterfly positioned as you like it, then release the mouse button. Again, SORRY for the white border!
Open abeillecouer2.gif.
Edit > Select All.
Return to the original canvas and Edit > Select All. Edit > Paste > Into Selected Frame. Position, and release your mouse button.
Right-click on the top bar of your animation and choose "Frame Properties." Change this number to 15.
Animation > Resize Animation to a size with which you're most comfortable.
View > Animation. And we're done! I hope you've enjoyed this tutorial! Thanks for stopping by!
.


No comments:
Post a Comment